|
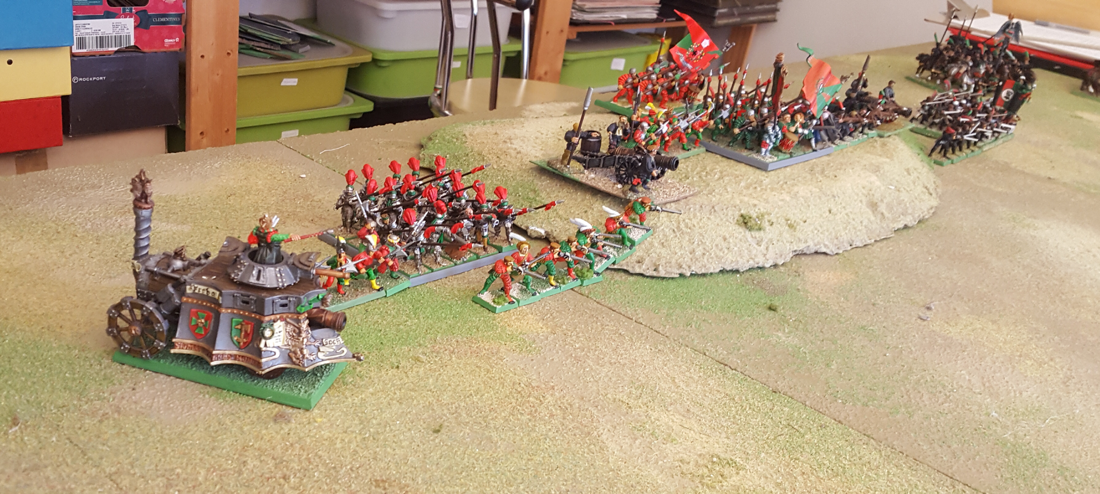
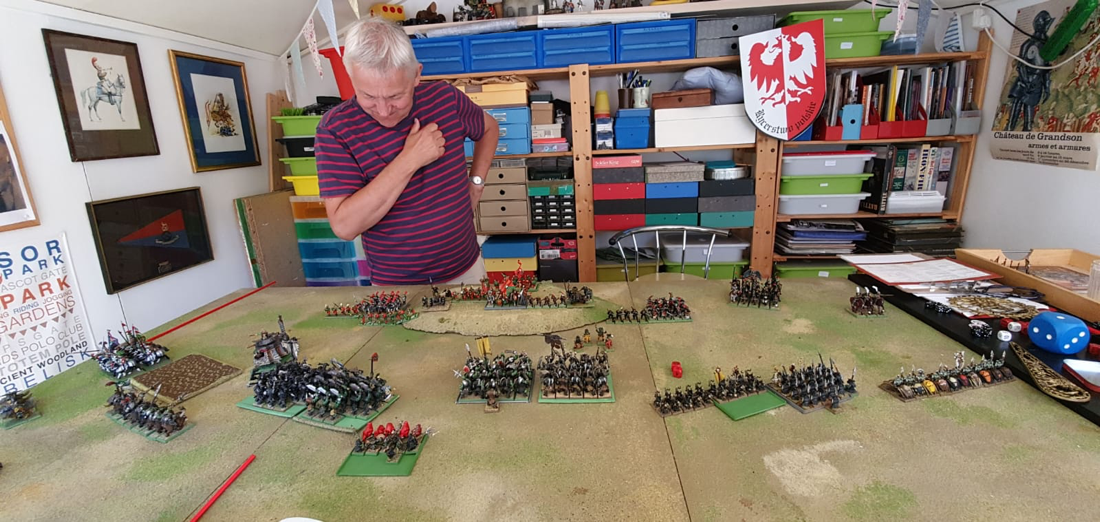
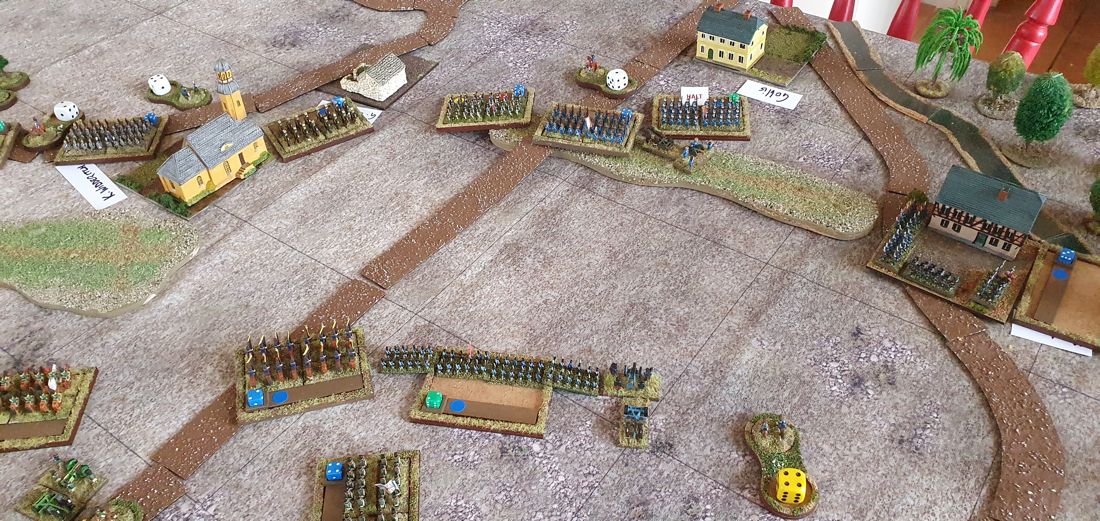
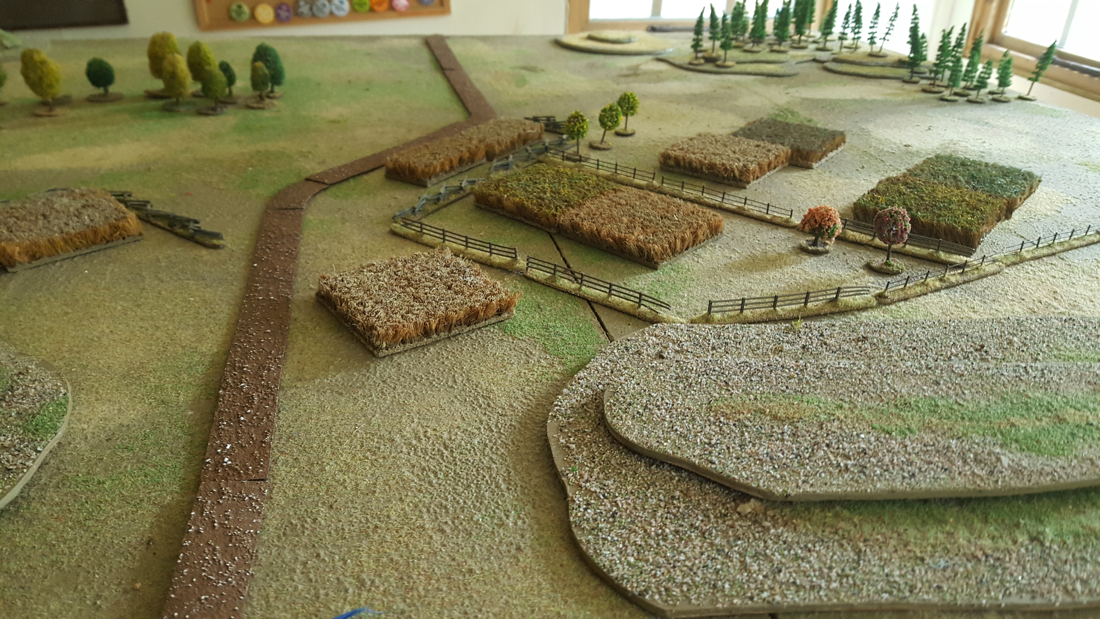
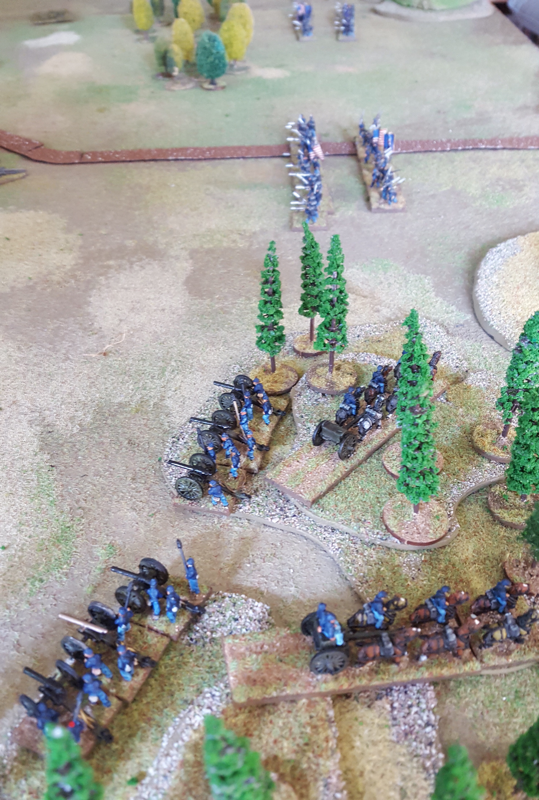
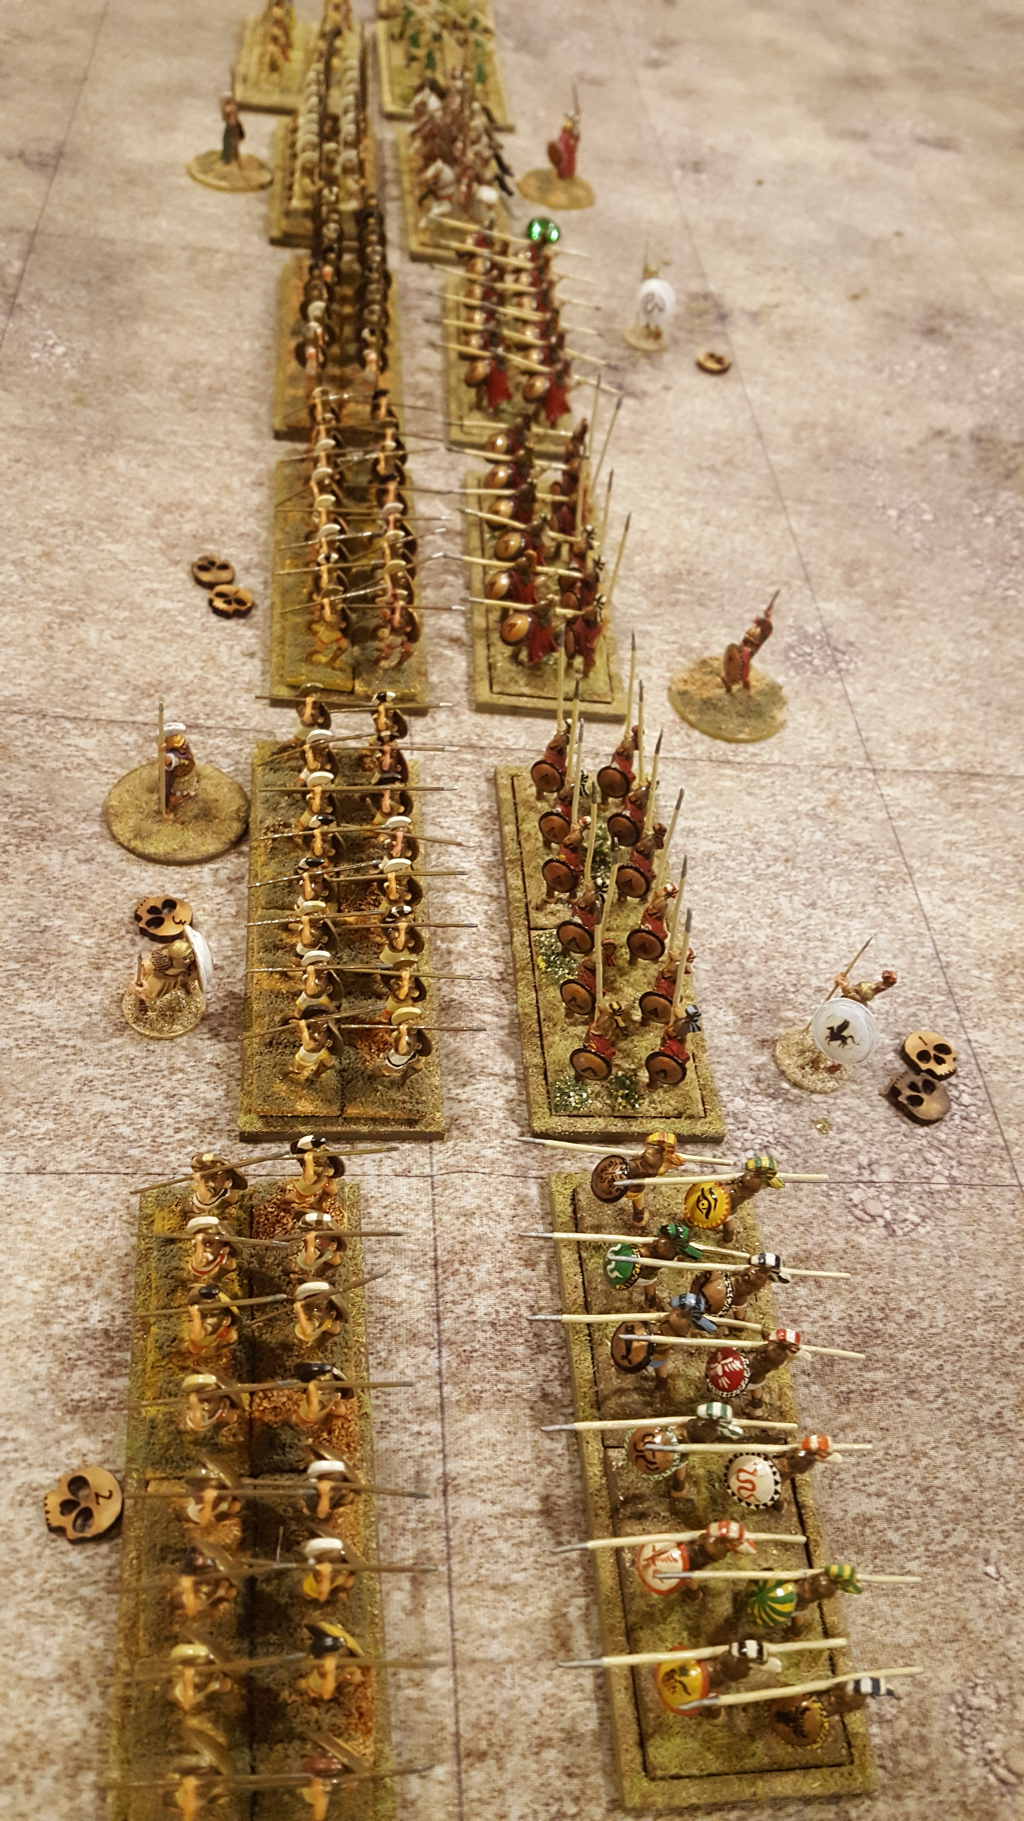
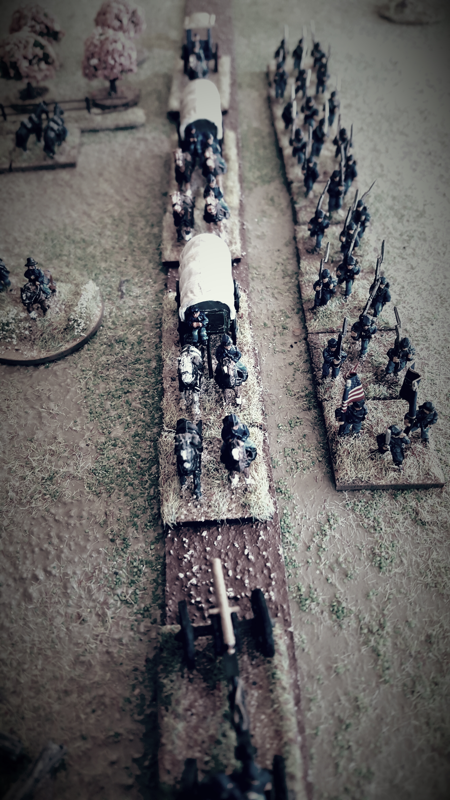
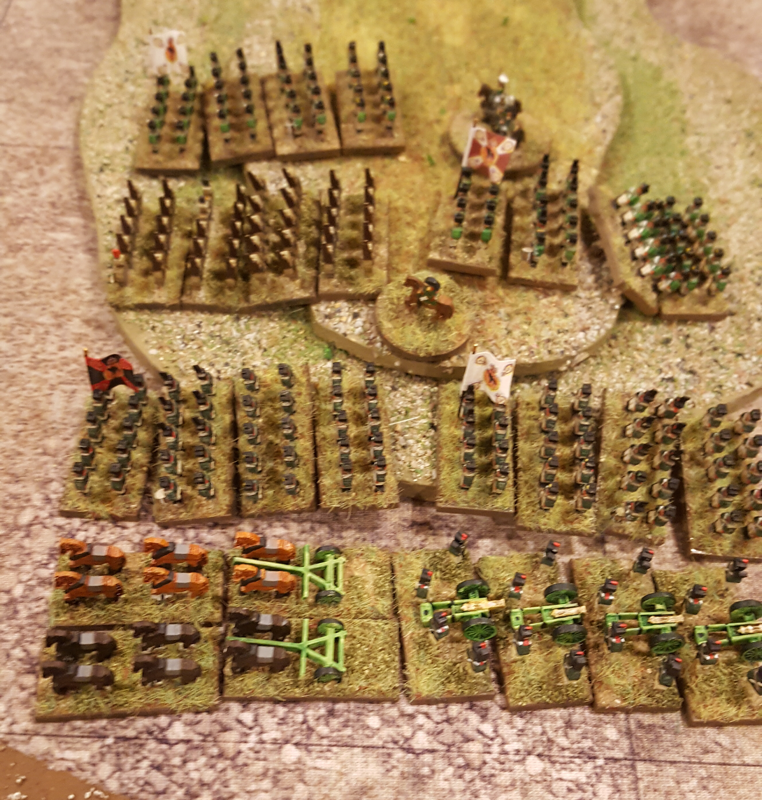
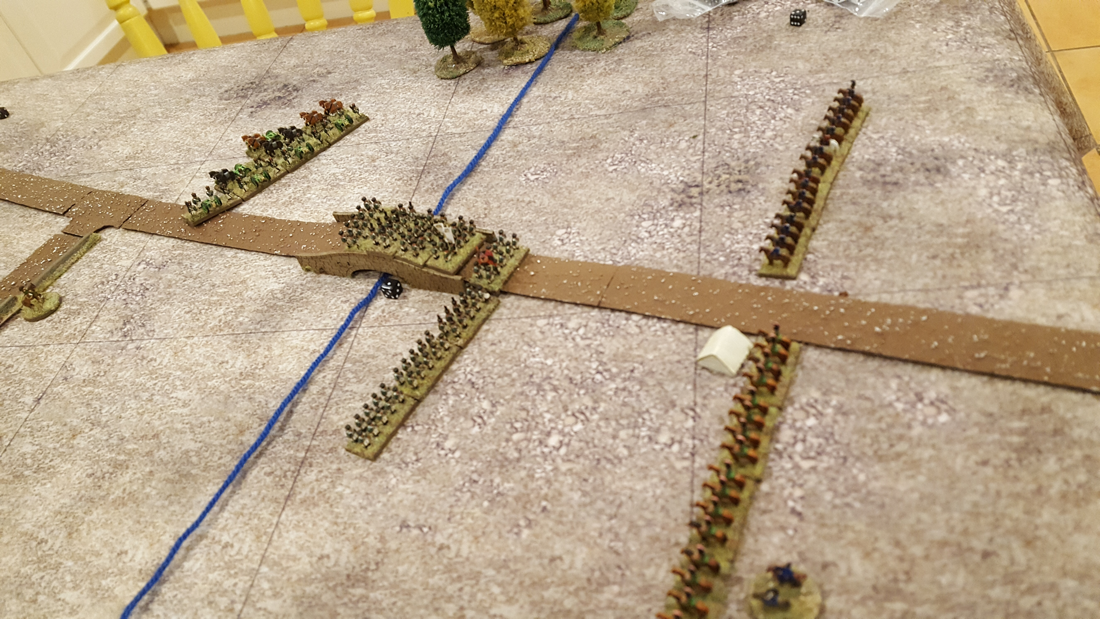
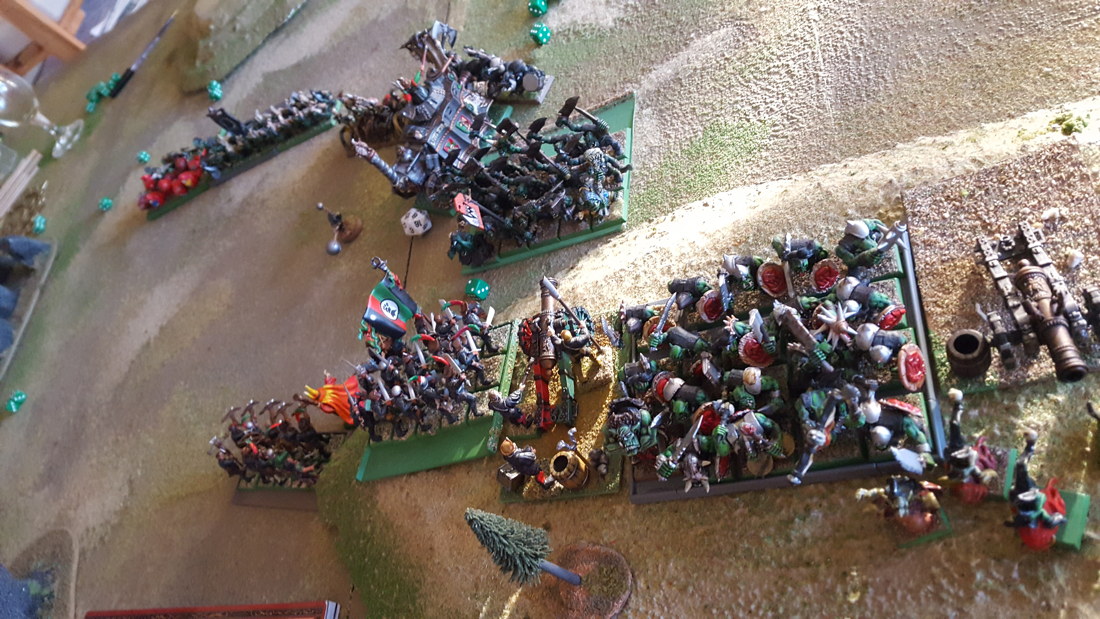
Last week we got out the Warhammer rulebook again. Back in January Nick and I had played our first game of Warhammer 7th edition for a few years. It had been so long that we were both rusty and made mistakes, me more than Nick of course. But the game was great fun and we agreed to play again soon to help us get back on top of the subtleties. Covid 19 put the refight back several months but we finally got together for a socially distanced game last Wednesday. We kept the same races and 2500 point armies, but agreed we could tweak the lists in the light of the first game. Nick dispensed with his giant, added some boarboys and reduced the size of his night goblin horde while I swapped out an engineer for a warrior priest and created more detachments for my spearmen. I brought Luther Huss to lead my army while Nick’s general was a Warboss on foot. As before, the Empire was heavily outnumbered, having sunk points into two great cannon and a steam tank. Nick also invested in a doom diver, partly for the fun of the model. There were some lovely old metal models on the table, including Ricco’s republican Guard, my favourite regiment of renown, though counting this time as spearmen (their ‘pikes’ really aren’t worthy of the name anyway). The metal steam tank weighs a ton. Deployment I set up on a central hill with a unit of ten knights on each flank, plus some pistoliers on the left and the steam tank on the right. Nick put all his night goblins on his right, his orc boys in the centre and his boar boys and wolf riders on his left. What just happened? First, the good news for Empire fans. I wasn’t steamrollered. But I still lost. We both had rather more success on our right flank in the opening moves. My right flank knights chased the wolf riders off the table and the steam tank beat the boar boys, although they rallied later in the game. The steam tank turned in behind the Orc centre, which looked a very promising move. Over on Nick’s right, however, his two night goblin fanatics sent my pistoliers packing, one of whom had an even bigger part to play later on. Meanwhile his centre advanced on mine. Of course, one of my cannon misfired and lost two turns of firing, during which its crew would be flattened by squig hoppers. My firearms and the other cannon did kill orcs but never enough to trouble an Orc unit. As the centres prepared to collide, my left flank, Inner Circle knights led by Luther Huss himself, were stalled immediately in front of one of Nick’s fanatics. I had made a silly decision placing my army commander on the far left as he was out of touch with the centre just as the crunch approached. I reckoned that if I waited for the fanatic to spin himself out of the way it’d be too late, so trusting to luck, I declared a charge on a goblin regiment and moved my knights right through him. And he rolled 5 hits. And he killed 4 knights. And the knights panicked, running off the table with Luther Huss in tow. Which pretty much wrapped up the day for the Empire. In truth the Empire did have some further successes before the end. The most heartening was the defeat and elimination of 20 Black orcs by ‘Ricco’s’ spearmen, led by Warren the warrior priest. Warren’s hate attribute helped the spears to weather the fury of the first assault, while their halberdier detachment stripped the black orcs of their rank bonus. This fight showed what can be achieved when Empire soldiers and their detachments are used properly. Elsewhere my centre mostly came off worse. I still had high hopes for the terror-causing steam tank behind the Orc left centre, but Nick assaulted it with a Squig herd that inflicted 5 wounds in a round. In my next turn, needing enough steam points to grind or boil the pesky squigs, I rolled too high and spent the turn doing nothing. From unstoppable monster to busted tractor in two turns. Them’s the breaks. At game’s end, our lines had rotated around our right wings, with the armies now facing each other perpendicular to the original line. But while I retained a line in being, it was distinctly ropey and Nick’s orcs were still present in dangerous numbers. Having lost general, battle standard and several regiments, I admitted defeat. But I like to think that Warren the warrior priest was able to march off the field, leading Ricco’s and his lads to safety. We both enjoyed the game enormously and agreed we should play again soon. We both played better than last time and our guessing skills for artillery fire are nearly back to scratch. For our next bash, I may take only one cannon, since while effective against giants, the great cannon really isn’t so deadly against a horde of orcs. I also want to work on the Empire detachments as we did see how effective they can be if used properly. And I may, alas, drop one or both units of knights, since the points they take up don’t justify the chasing off of a gang of wolf riders. That, or I deploy them smack bang in the Empire centre next time and let them loose. Having twice won as an Orc, Nick is angling to play the Empire to test some theories about how to neutralise greenskins. So next game, we may change sides. However, having improved on my performance between games one and two, I am sorely tempted to have one more go. After all, as they say, the third time is the charm. 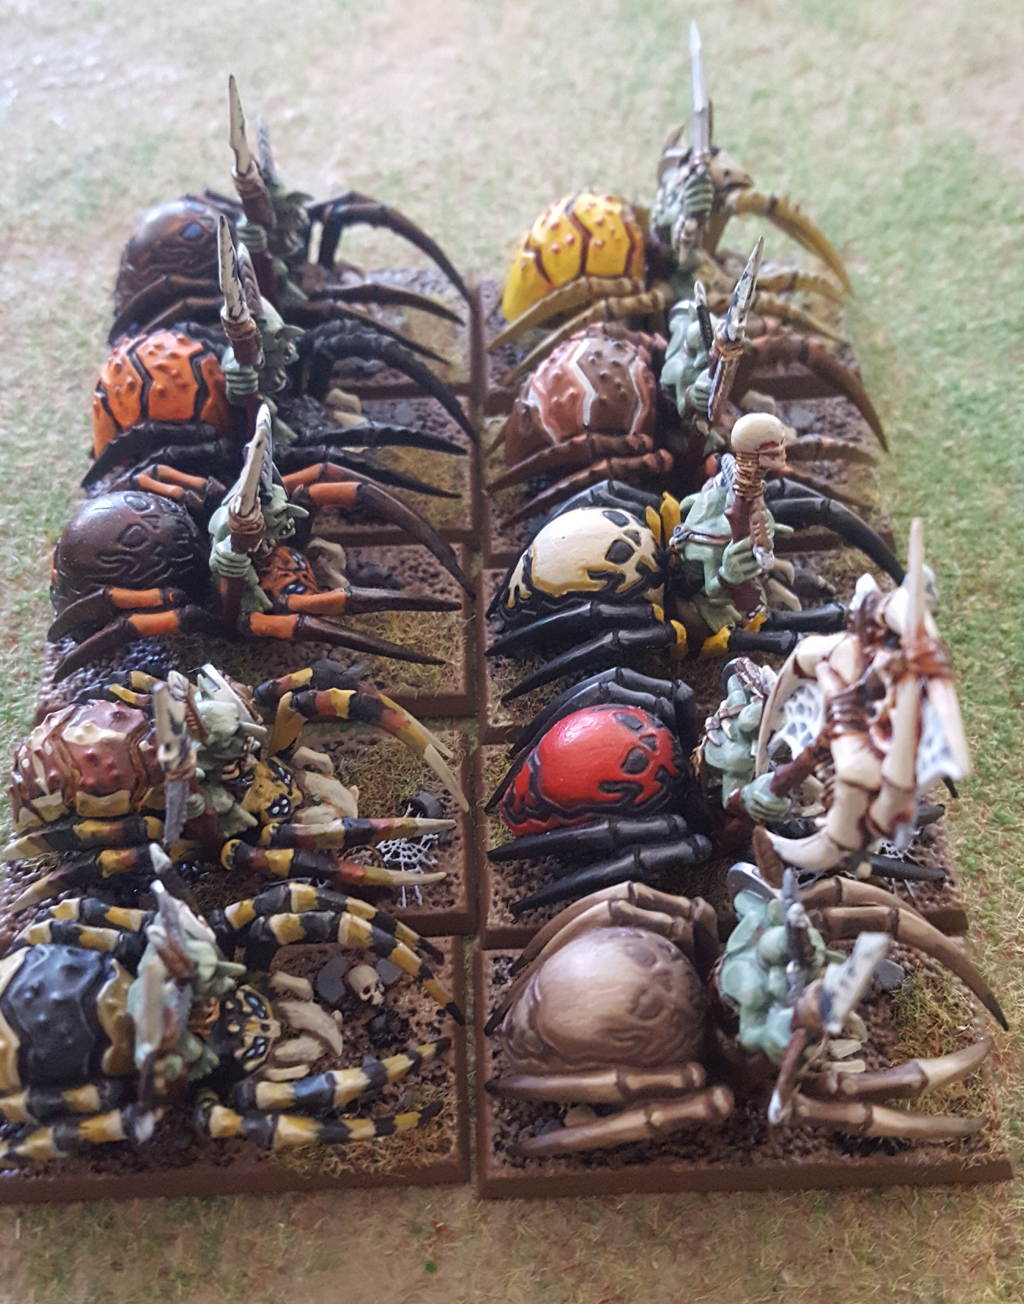
0 Comments
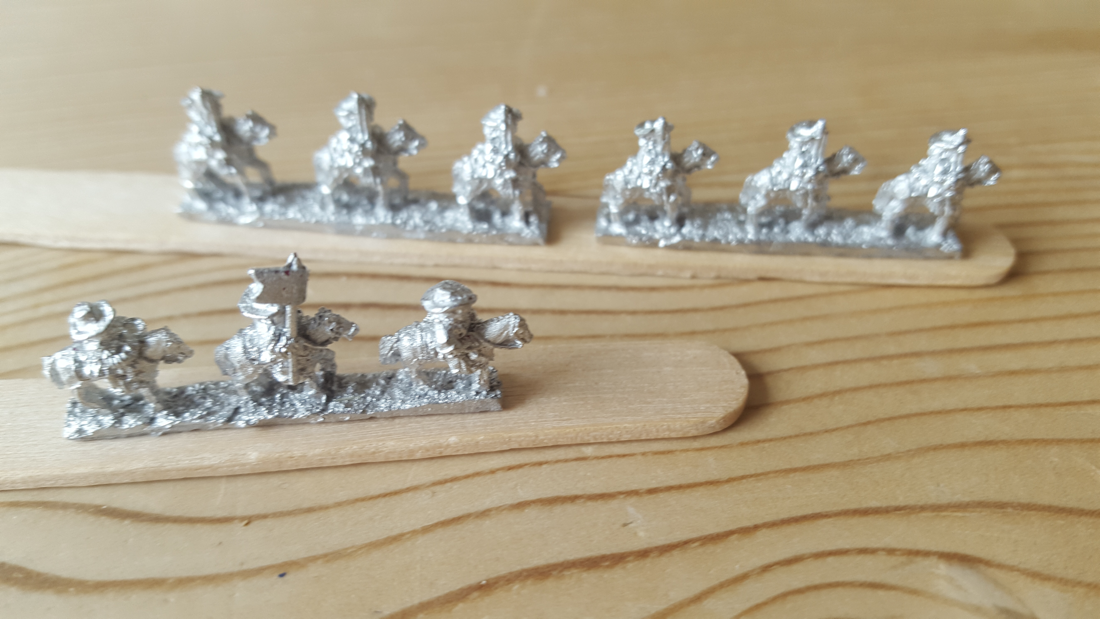
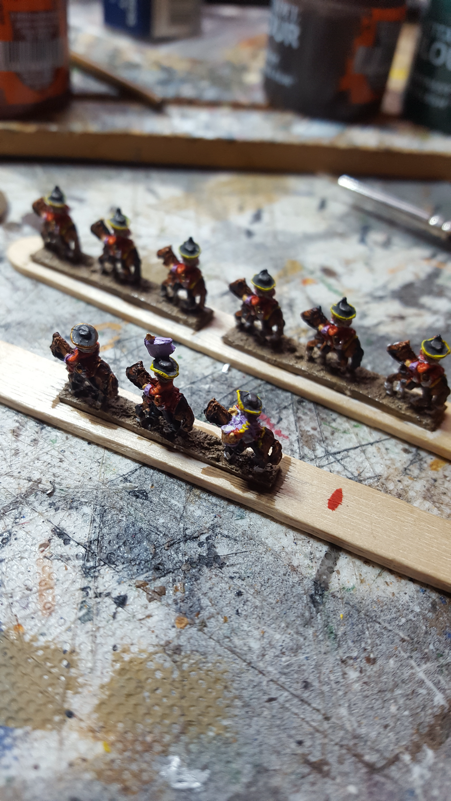
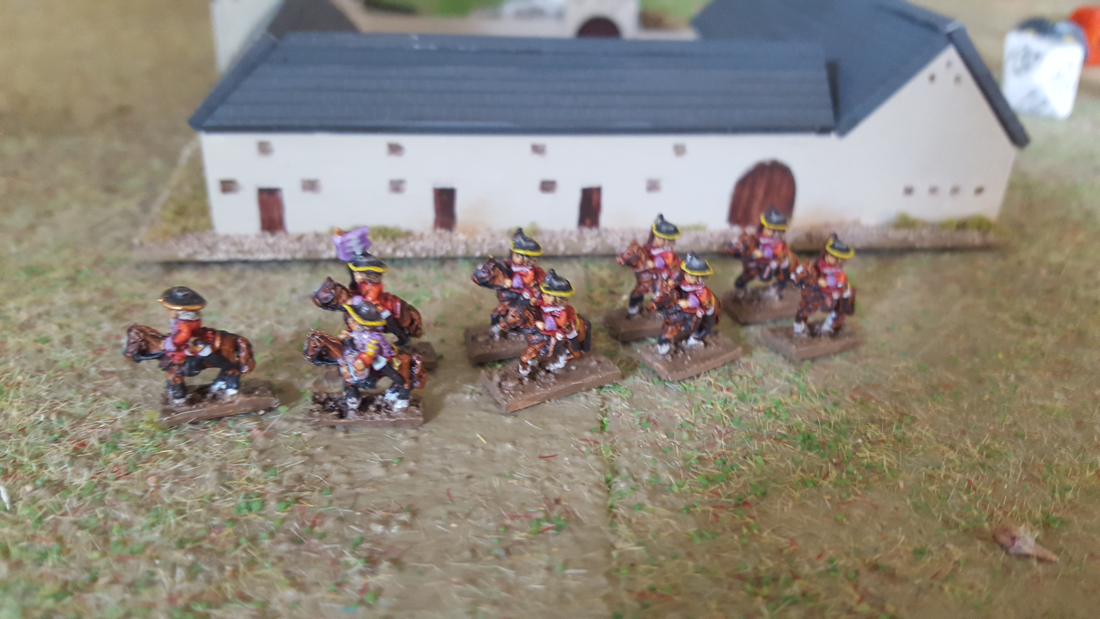
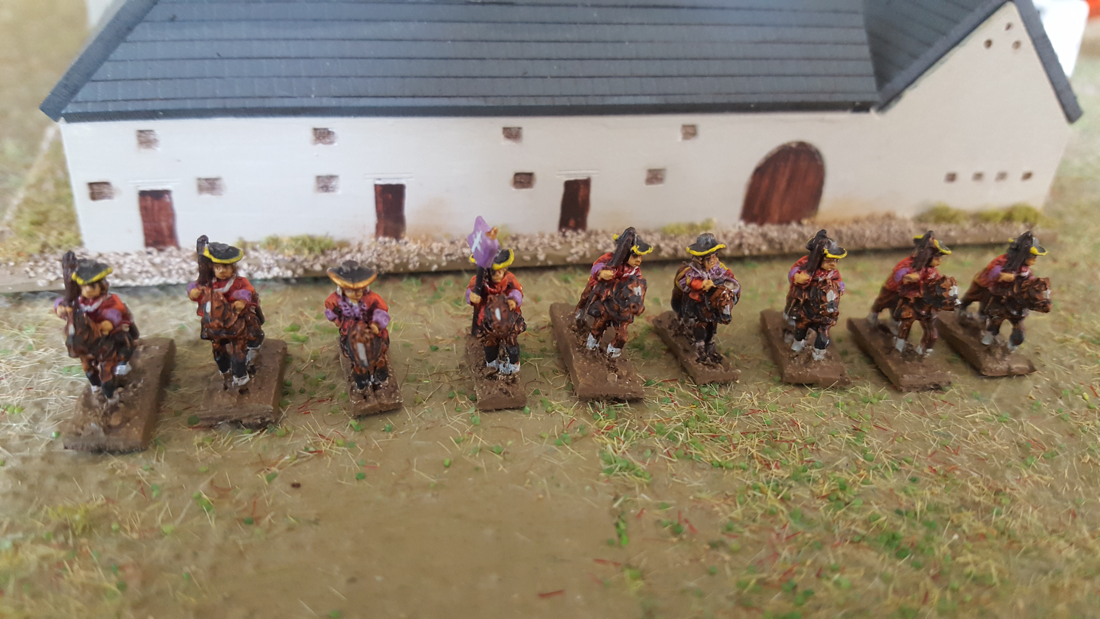
A few weeks ago I responded to an invitation from Per Broden, 6mm gamer and blogger, to join in a project to build two 6mm armies that will be auctioned for charity. Per had agreed with Baccus Miniatures that the company would send each participant a unit of troops to paint up and contribute to one of two ‘Imagi-nations’ for battles using the Twilight of the Sun King rules, set at the close of the seventeenth century. Per introduces the project on his blog, RollaOne, here. Once collected and based, the armies will be auctioned, with proceeds going to the Combat Stress Charity. Baccus is providing the miniatures for free. I was lucky enough to get in before all the units went and was allocated a regiment of dragoons in the Slavic-themed Army of Siarus. My instructions for painting the Simmutov Dragoons was to give them red jackets and Purple facings. The figures arrived last week and slotted in between two units of 15mm Napoleonic Bavarians. My first non-Airfix wargaming figures were 6mm Heroics and Ros Napoleonics, bought in the mid 1970s when the rangę was very small. I also have two old Heroics and Ros armies for the War of Spanish Succession, which I still theoretically play with, although the last game was Blenheim in 2014. I have added to the Napoleonics in recent years with MDF figures by Commission Figurines. I have bought model buildings and 6mm standards from Baccus as well as a couple of their rule sets, but never tried their figures. I was very interested to see what my dragoons would look like. I was impressed. The figures are chunkier than Heroics, with lots of raised detail and bags of character. I especially liked their little faces! They painted up very easily and responded well to washes. Per provided some useful painting tutorials on his website. I decided to give my dragoons yellow hat- and saddlecloth lace and chose a light purple for the facings which I thought went better against the red jackets than dark purple. The finished unit went in the post on Saturday. I look forward to seeing the completed armies, based and ready for battle. This has been a really fun project that deserves to earn a healthy sum for Combat Stress. When wargame shows resume, I will be tracking down Per Broden to shake his hand and if he’ll let me, buy him a coffee or better still, a beer.
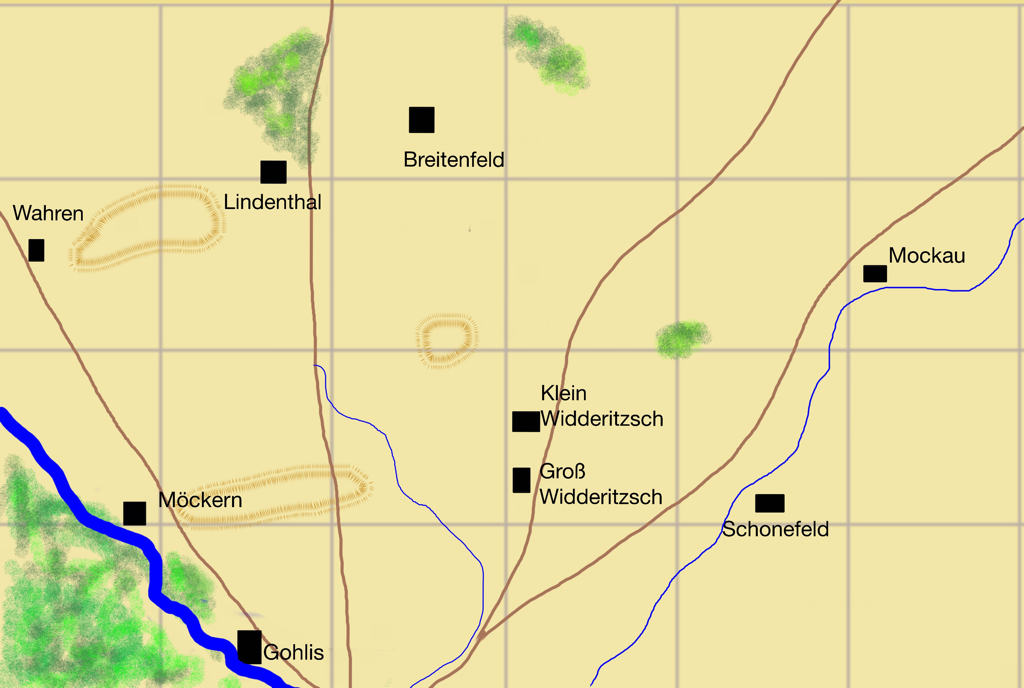
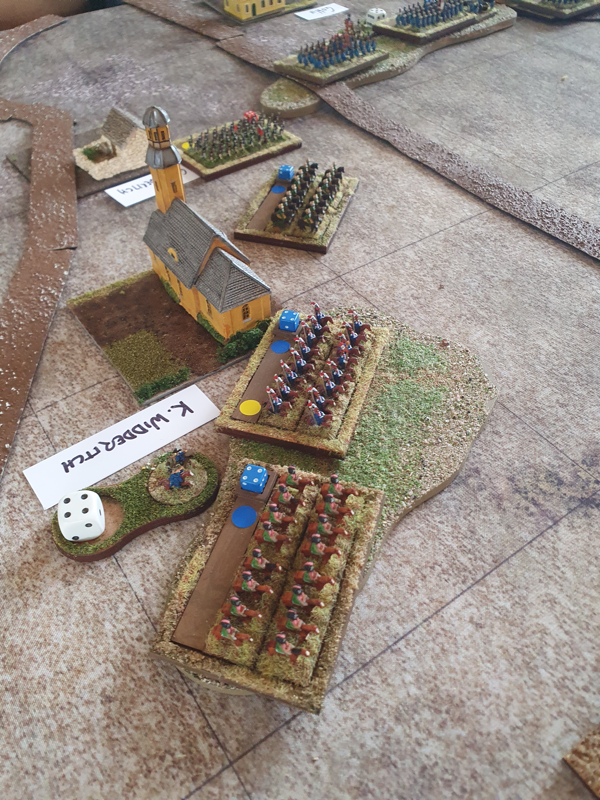
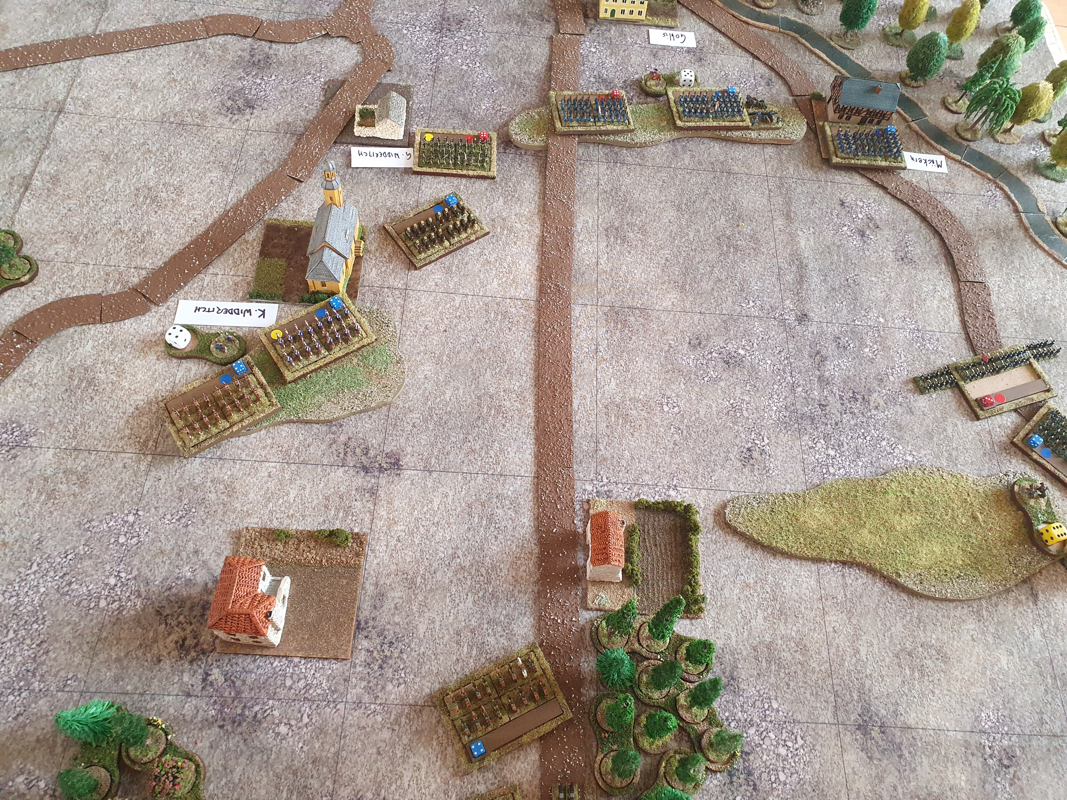
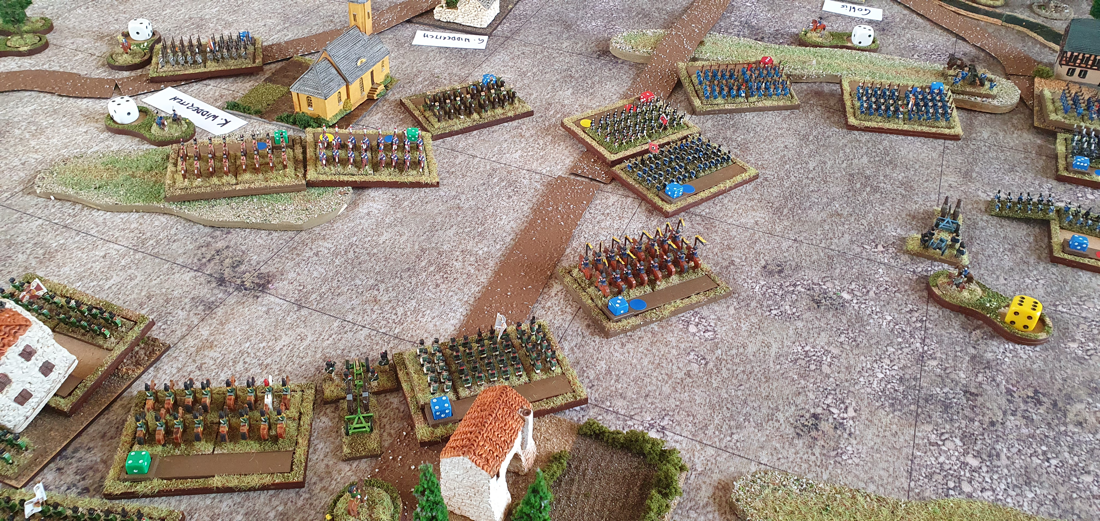
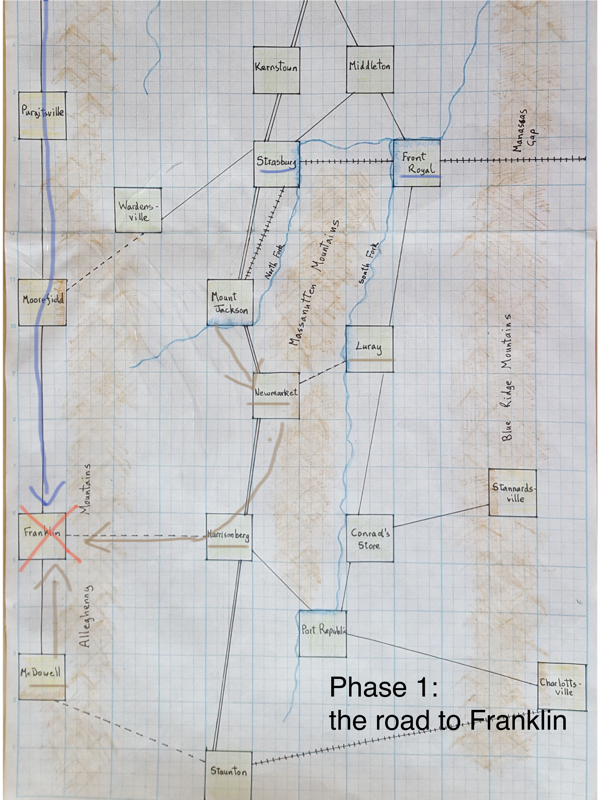
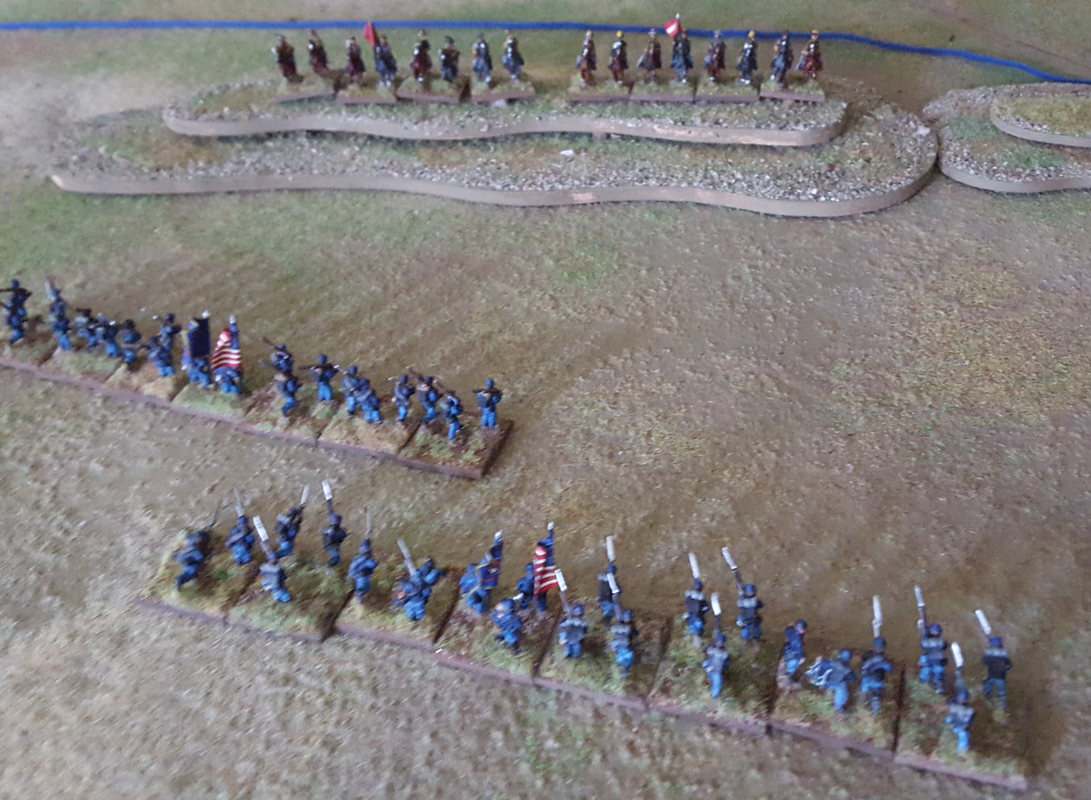
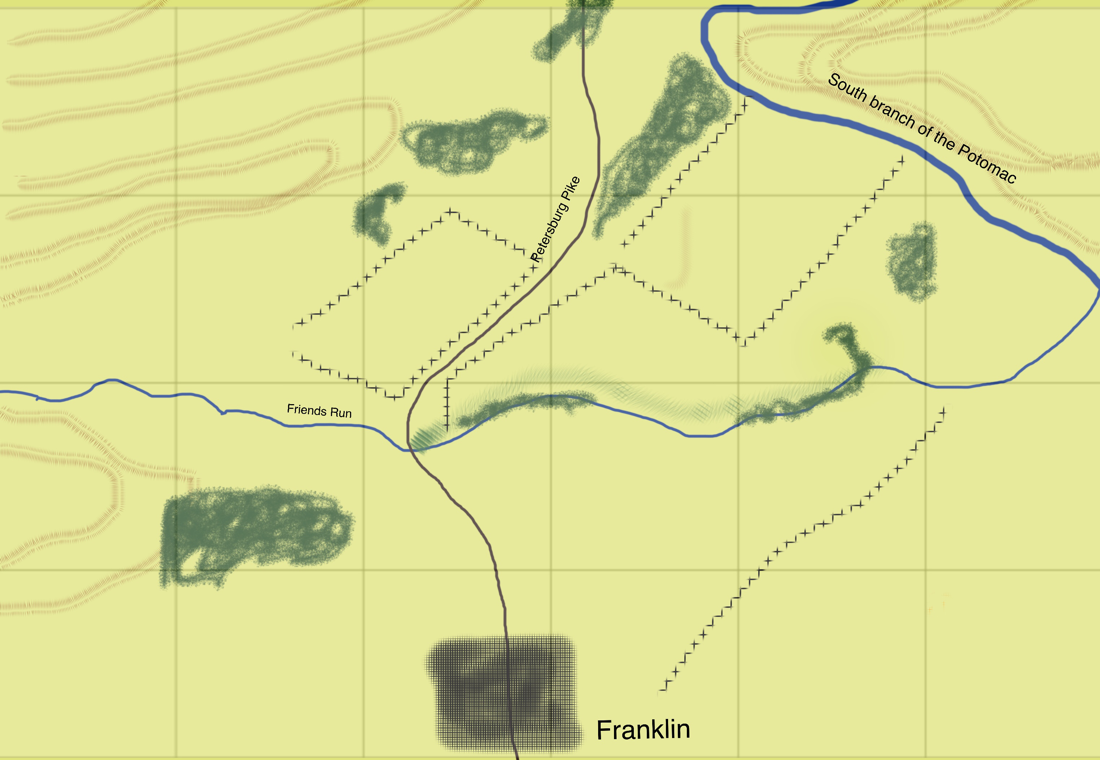
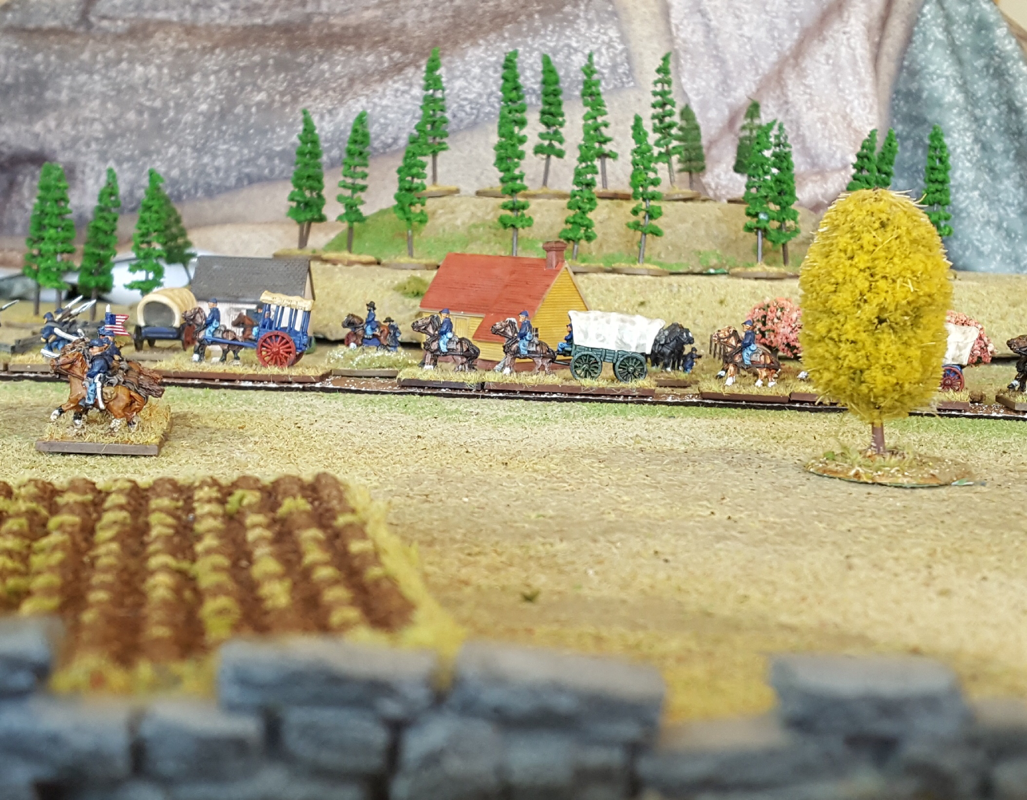
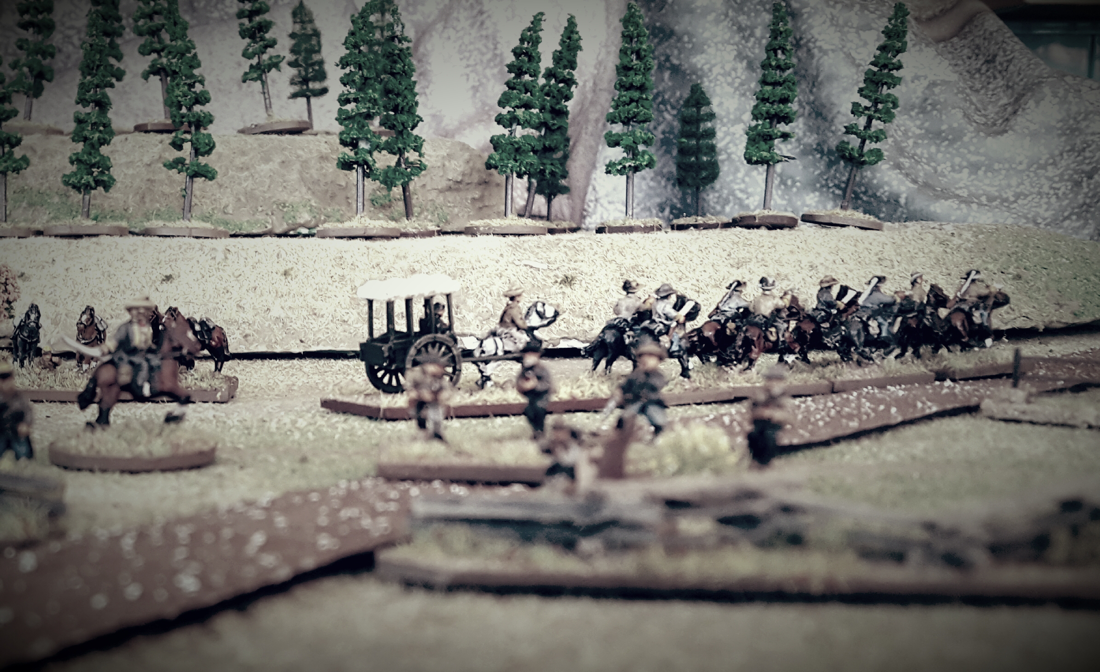
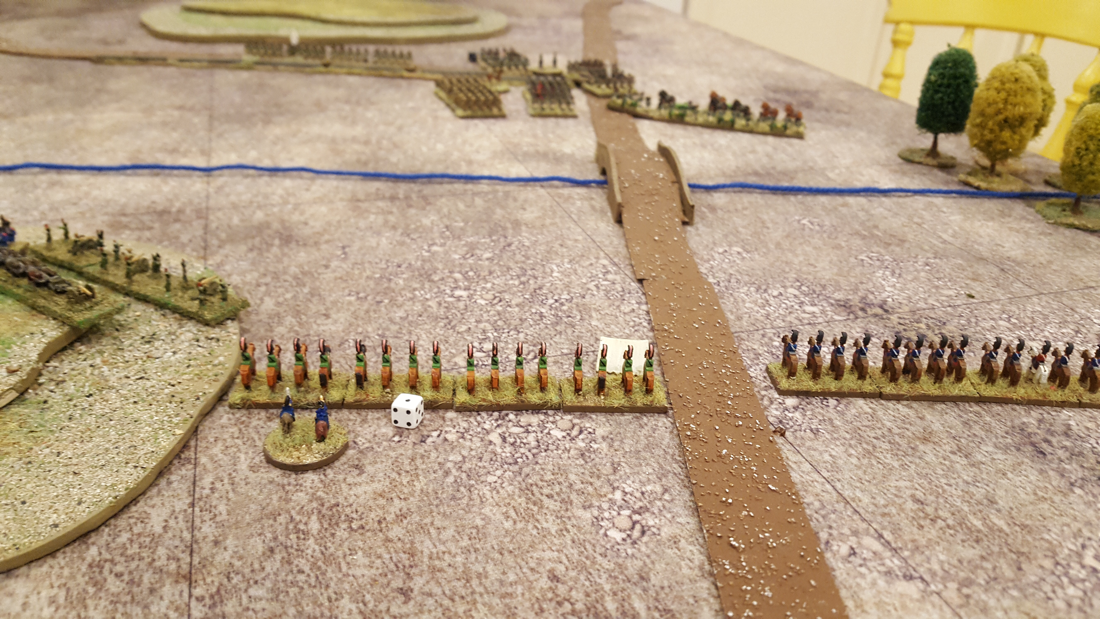
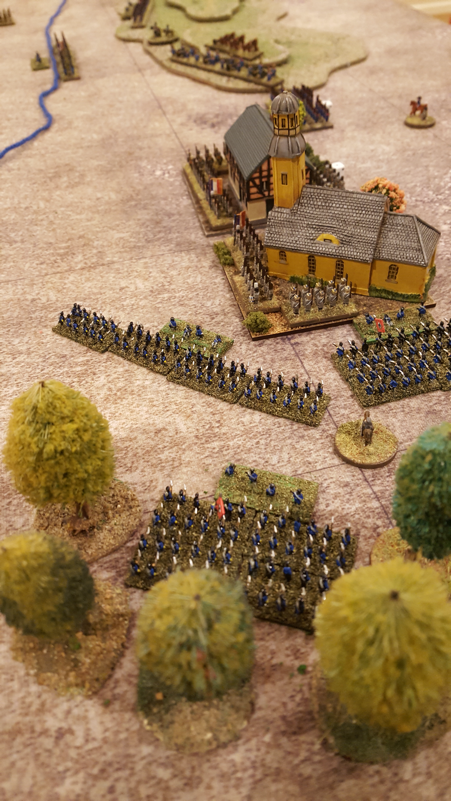
I have been running a second Shenandoah Valley wargame campaign, this time with four new players, two rebels and two Federals. We are using the map and rules from the first campaign (here) but set later in 1862, with more forces and four separate commanders: Frémont and Banks versus Jackson and Ewell. To cater for four players I made one basic change from the historical situation: Ewell is not subordinated to Jackson. Otherwise the troops are based on those present in the historical campaign. The first five turns have seen various skirmishes and one or two bigger actions that I have resolved with weighted dice rolls, using a board game-style combat results table. But this turn we had our first big battle at which both sides were determined to slog it out, so I played this on the table with instructions from the three players whose characters were on the field. The location is Strasburg, on the Valley Pike, where Jackson, played by John, attacks Frémont (Keith) and Banks (Dave) from the West. Jackson had earlier bundled two federal brigades out of Moorefield and then Wardensville. In response the Federals, who had been moving southwards down the Valley, concentrated on Strasburg ready to protect their main supply line. Rules and figures I used the On to Richmond rules published by the Courier in the 1980s. These rules got me into ACW gaming and although I haven’t played them for several years I had fond memories of them. My usual rules, Longstreet or Pickett’s Charge, were too small scale for the numbers involved while OTR uses brigades as units and a scale of 1” to 50 yards. OTR uses a card-activated sequence of play, stand removal and D10 and D100 dice rolls. Figures were 12mm Kallistra figures on 1” frontage bases, two of which counted as one OTR stand. I created a map using Google Maps and historic maps of Cedar Run and Fishers Hill, the two battles that took place historically, one north and one south of Strasburg. I sent briefings to the players that I won’t post yet as the campaign is still happening. The players sent back their dispositions and plans for the battle. I set up the table on Thursday and played the game the next day. 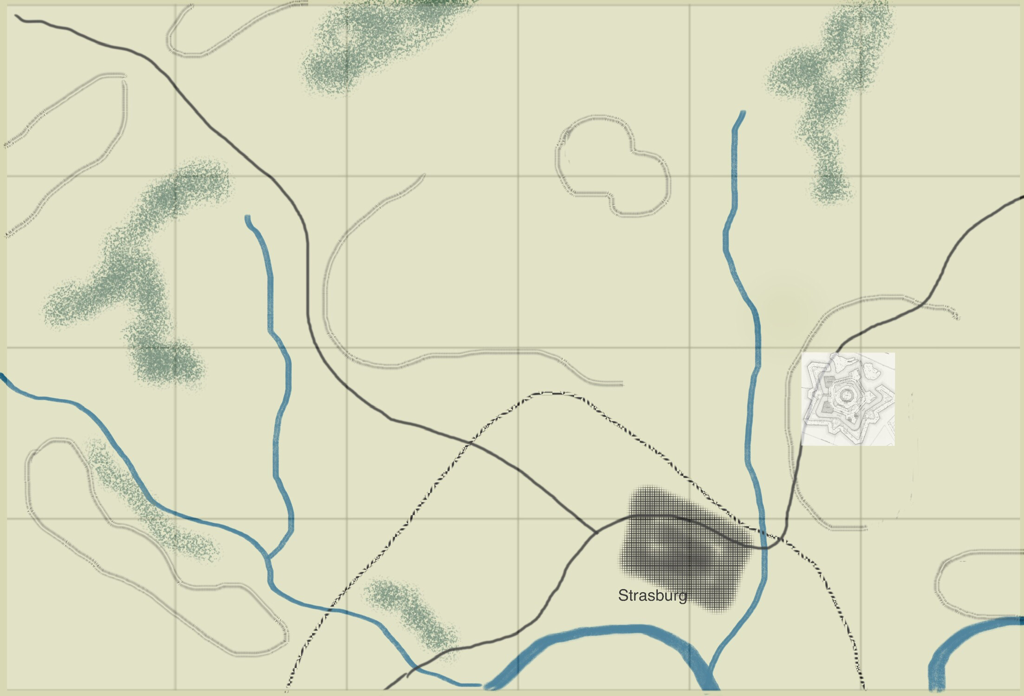 Troops engaged: Federals Frémont Cluseret’s Brigade Schenck’s Brigade Milroy’s Brigade Bohlen’s Brigade 3rd West Virginia Cavalry Two artillery battalions Banks 1/Kimball 2/Kimball 1/Tyler One artillery battalion Confederates Jackson 1/Garnett 2/Garnett 1/Fulkerston 2/Fulkerson Connor’s Brigade Three artillery battalions 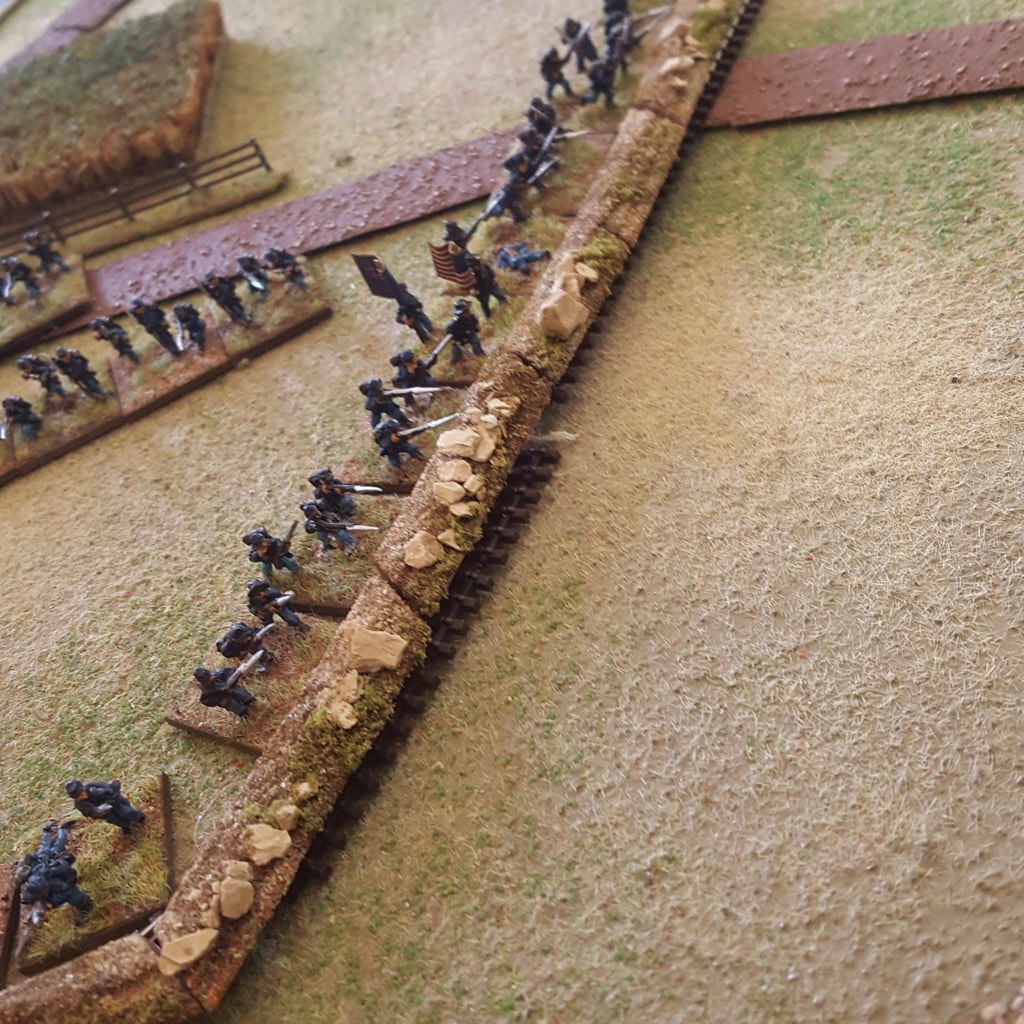 The Federals deployed Cluseret and Schenck in entrenchments along the railway embankment around Strasburg. These were the brigades that Jackson had previously ejected from Moorefield and Wardensville. Artillery was placed in the fort northeast of the town. Other troops were deployed in hiding, some within Strasburg town and some behind woodland in the northeast corner of the table. 3 West Virginia cavalry deployed to the west of the position on Fishers Hill, the high ground south of Tumblers Run. The federal plan was to hide its strength until the rebels had fully committed to an assault. Jackson started with two large brigades on table: Garnett and Fulkerston, each comprising two formations in OTR, plus an artillery battalion. Connor’s brigade arrived from Wardensville soon after with further artillery. Jackson began his attack against the enemy’s left flank, ignoring the federal centre and right. Frémont’s cavalry, defending Fishers Hill, tried to slow Jackson’s advance. The cavalry successfully held up Garnett, the leading Confederate brigade, while Milroy’s brigade, previously out of sight, formed up behind the railway line to complete the federal defensive line facing west northwest. It’s job done and now under great pressure, the cavalry mounted and retired behind the federal earthworks. 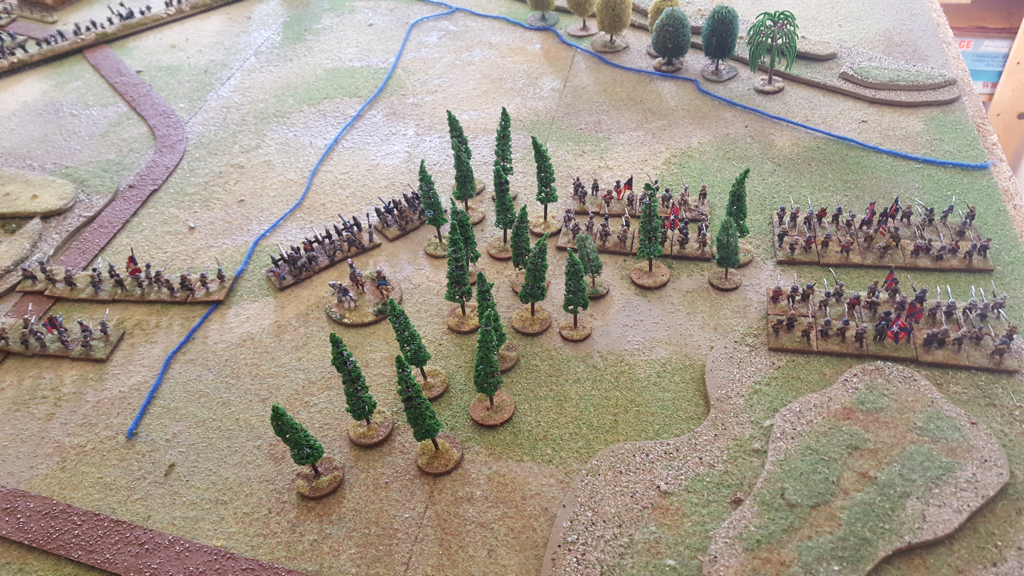 To Garnett’s left, Fulkerston’s Confederate Brigade advanced in line on the Federal earthworks. Its first volley so disrupted Cluseret’s brigade that the latter abandoned their position. Fortunately for Frémont, as Fulkerston advanced his left wing had come under fire for the first time from federal artillery in the fort and was forced to pause to regroup. This gave time for Bohlen’s Federal brigade, waiting in reserve, to reoccupy the abandoned earthworks before the rebels could reach them. The right wing of Fulkerston ‘s brigade however managed to close with the federal artillery that was now alone behind the earthworks and overran it. Before more rebels could join Fulkerston’s left, it was counterattacked by Bohlen and Cluseret, who had regrouped and returned to the combat. Fulkerston’s whole Brigade now settled into a firefight with the Federals and declined to advance again. Jackson’s reinforcements, Connor’s brigade, now arrived on the table and started moving towards the right flank. At that point two fresh federal Brigades broke cover from the woods in the north-east and marched hard towards the rebel left rear. Brought to a halt in front of the earthworks and now clearly outnumbered, Jackson redirected Connor to face the advancing federal reinforcements and he recalled the troops assaulting the federal left. 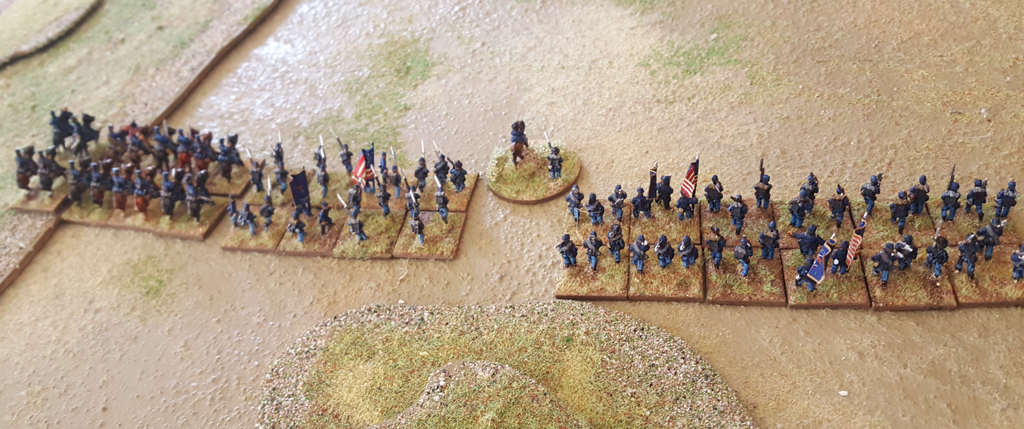 Under the cover of Garnet’s Brigade, which had only just become meaningfully engaged in the attack, Jackson successfully extracted his right wing. Two of Frémont’s brigades followed up initially but having fought hard all day, they rested on the field, while the two brigades previously defeated by Jackson remained in the entrenchments before Strasburg. Banks took over the pursuit with Kimball’s Brigade and the 3rd West Virginia cavalry, which had passed through the town and moved north to support Banks. Jackson instructed Connor and his supporting artillery to cover the retreat of the other brigades and while this Brigade was mauled by Banks, it gained time for the rest of the rebel army to get clear. As the battle ended Tyler’s brigade arrived to reinforce Banks from Kernstown. 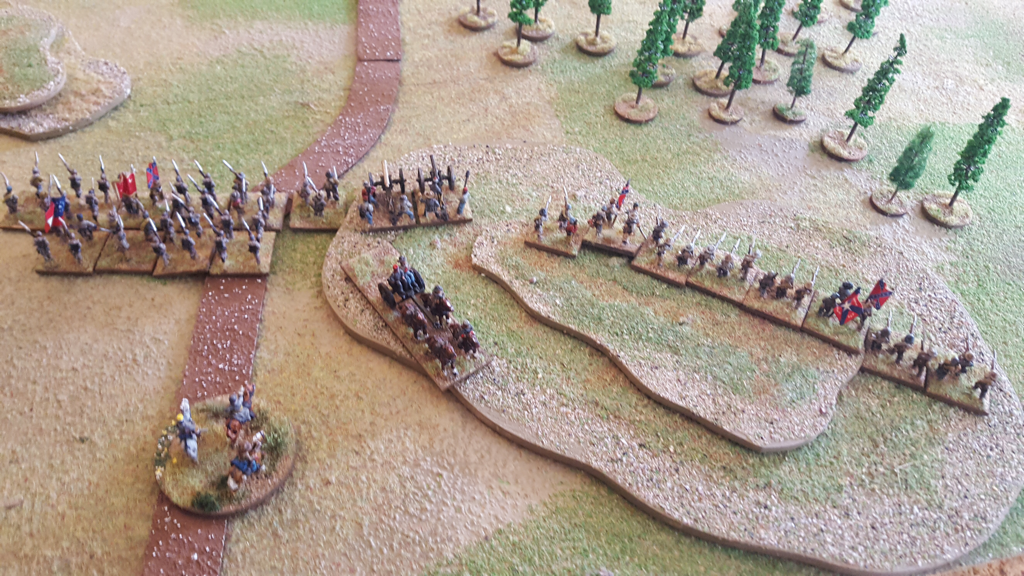 Overall Jacksons army had faced odds of over 2 to1 and was fortunate not to suffer more serious losses. His decision to attack the federal left saved him from a much more serious defeat. Banks, hidden in the north-east woodland, had been ready to take Jackson in the left rear once he had become engaged against Frémont. Once it became clear that Jackson would not come round to the north, Banks left hiding in a dash to cut Jackson’s retreat route.
Banks and Frémont dined in Strasburg that evening, satisfied with their success but a little disappointed that Jackson had not been caught completely in their trap. The Federal battle honours for the engagement went to Milroy’s brigade and to Cluseret who, after first running from the enemy, recovered and then helped repulse them from the union position. In Jackson’s army the most resolute troops were Fulkerston’s brigade which made it into the earthworks despite heavy small arms and artillery fire. Garnett was less impressive, allowing himself to be slowed down by a small but determined Federal cavalry regiment. He nevertheless fought a solid fighting retreat and suffered very few losses from the engagement. Connor fought splendidly against superior numbers but paid for his stubbornness. I now have to roll these results into the outturn report. I very much appreciate the readiness of all four players to devote their minds to this campaign and to allow me to determine their fate on the table. It must be frustrating, especially for the side that comes second! 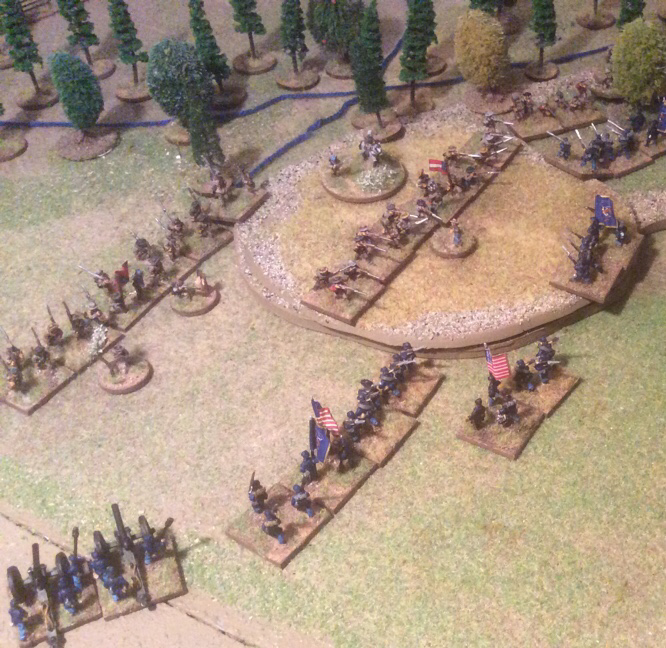 Our ACW campaign has come to a close, with victory for Jackson. The last two turns of our campaign saw Jackson, played by Matt, gaining a significant advantage over Banks’ forces led by Spencer. In the west, Banks’ attempt to outflank the rebels in the valley, which had been so promising after the battle of Franklin, was thwarted when he withdrew a third of the outflanking force just as Jackson was reinforced. The outflanking force was repulsed at the battle of Harrisonburg and then trapped and nearly annihilated between Jackson’s force and General Johnson’s brigades advancing from McDowell. Meanwhile, in the valley, Banks drew in his forces and advanced to Mount Jackson along the Valley Pike, leaving the Luray valley road in the east uncovered. At just this time, Jackson sent two brigades and a strong cavalry reconnaissance through Luray and Front Royal, to find the federal supply line back to Harper’s Ferry exposed. On turn 5 of the campaign, rebel cavalry occupied Strasburg behind the main federal army and captured rear area troops, ammunition and grain supplies. Before he cut the telegraph, Ashby, commander of the 7th Virginia Cavalry, wired the following message to Banks from Strasburg: “From the officer commanding the Confederate garrison of Strasburg to the General commanding, federal forces. Thank you for provisions and ammunition. There is no need to send more as we now have a proficiency of both. Respectfully, Ashby, Lieutenant, 7th Virginia Cavalry.” (I stole this idea from a French bonapartist pamphlet of 1815, in which Napoleon thanks Louis XVIII for the troops he has sent and says he doesn’t need any more). The closing positions of the active game therefore had Banks at Mount Jackson with his supply line cut, and Jackson, reinforced by Ewell, with forces to the south, east and north of the federal army. Banks was still formidable but Spencer decided at this point that he had been outmanoeuvred and conceded to Matt. I played out the following turn myself, presuming Banks would try to escape encirclement while Jackson would attempt to catch him. The only way Banks could get clear was to retreat all the way back to Winchester, while Jackson ended at Kernstown and Middleton. The Federals were back where they had started the campaign, with one very badly mauled division, the other virtually unbloodied and a great many supplies now equipping the rebels. So Banks is still in the valley and will no doubt be ordered to resume hostilities very soon but our small part of the campaign has ended. 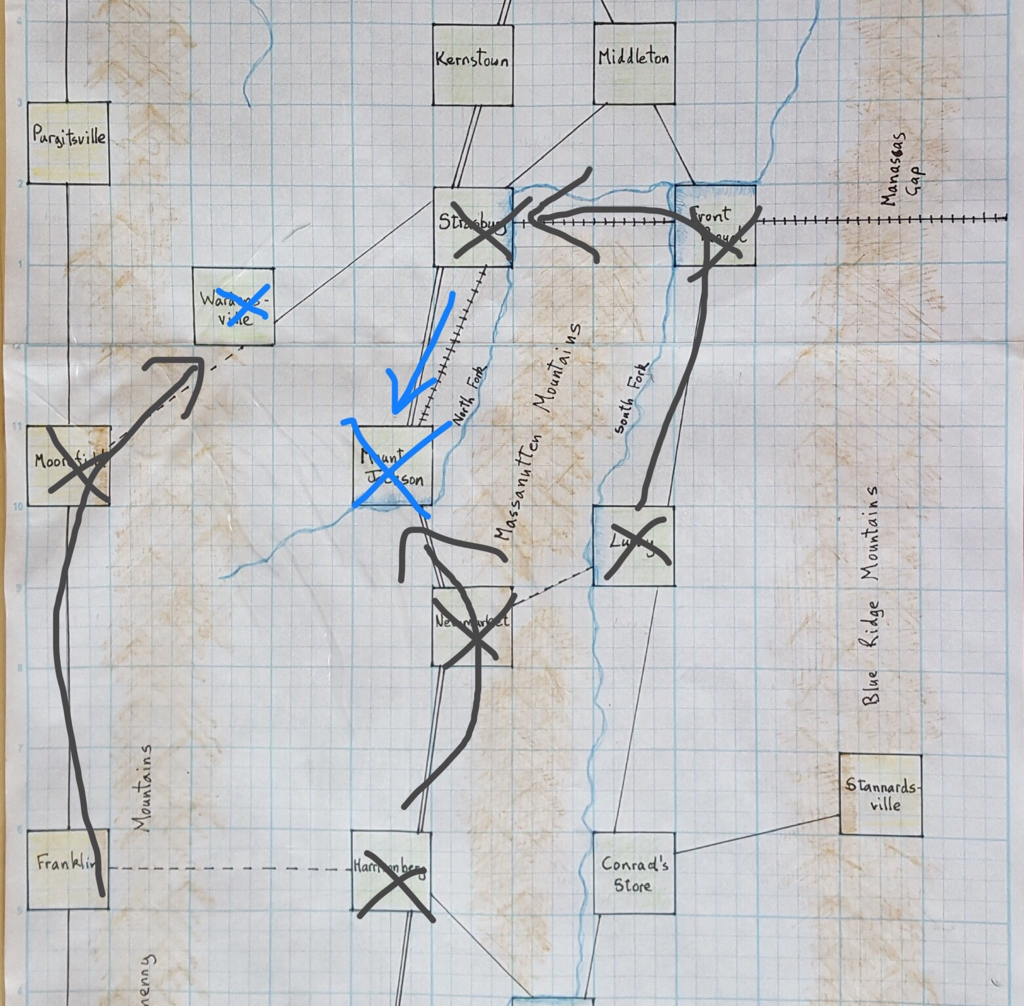 The closing moves saw the Confederates getting around behind the Federal army. The federal troops at Wardensville are no longer combat-worthy after two defeats and a retreat through the mountains. Post campaign analysis: a game of two halves The campaign divided quite starkly into two phases. Spencer started well, with the idea of getting one division around behind the rebel army from the west, while advancing steadily down the Valley Pike with the other division. At this point Matt seemed to lack a plan, for example, sending a brigade westwards only to recall it the next turn. He very nearly lost this brigade between Spencer’s two divisions. The high water mark for Spencer was the Battle of Franklin, ably generalled by Dan as General Shields. Then it seemed the initiative shifted the other way. Spencer recalled one of Shields’ brigades despite ordering him onwards into the rebel left rear. The recalled brigade spent the rest of the campaign marching through the Alleghenies when it could have been critical in helping Shields to deal with Jackson’s reinforced army at Harrisonburg. At the same time, the other federal division stopped its southward march and dug in at Strasburg. This allowed Matt to put greater numbers into the battle at Harrisonburg, while observing Banks with a much smaller force. It is always too easy for an umpire to pronounce on who should have done what. Both players were working with limited knowledge of enemy whereabouts. But I believe that if Spencer had continued to advance his central Division down the valley as the victorious Shields came east from Franklin, Matt would very likely have been doubly defeated. It was the easing of pressure in the centre that allowed Matt to defeat Shields in detail. I also think Matt handled his scouting more effectively, probing for gaps and exploiting the opportunities. Cutting Banks’ supply line was a fine move and, while I made clear that this was not a disastrous development as long as Banks reopened the line, it did mean that Spencer was now having to respond to Matt’s moves. I agree with Spencer that his only real option now would be to retire northwards, staying ahead of the jaws of Matt’s pursuit, and to regroup ready for future operations. I hope the players enjoyed the campaign: I certainly did. While there was no final showdown between two grand armies, we had several encounters between scouts, a running fight through the mountains and two division-sized tabletop games, the first won by the Federals and the second by the Confederates. Given the constraints of lockdown, we couldn’t meet to play these games. I greatly appreciated Dan’s contribution of written orders as proxy commander on both occasions. Dan even responded in real time to an in-game development, allowing me to reflect his instructions for a rearguard action.
All players participated in good spirits and we kept to a pattern of at least one turn a week. Lessons for the future I was happy with the basic game engine. The map is quite simple but it still posed challenges to both players. Submitting orders for three impulses in a turn worked well, as did the limit on how many units may use a road at a time. This slowed the Federals down somewhat while the smaller rebel forces were more agile. In retrospect I should have provided strength points for the fighting units. As the campaign wore on I developed a system of putting minus signs against damaged brigades and the letter F for fatigued units. By the last turn, a couple of brigades were marked ‘- - F F’. I knew what this meant but it could have been clearer for the players. Next time (!) a brigade will begin at, say, strength 4. Permanent losses will reduce that number. Fatigue will continue to be marked by one or more letter F, which will reduce the strength until the unit can rest and recover. So that is that. In case anybody is curious, I have put the campaign rules and map on the ACW scenarios page here. Congratulations to Matt on his win and thanks to him, Spencer and Dan for engaging so readily and cheerfully in this piece of silliness. 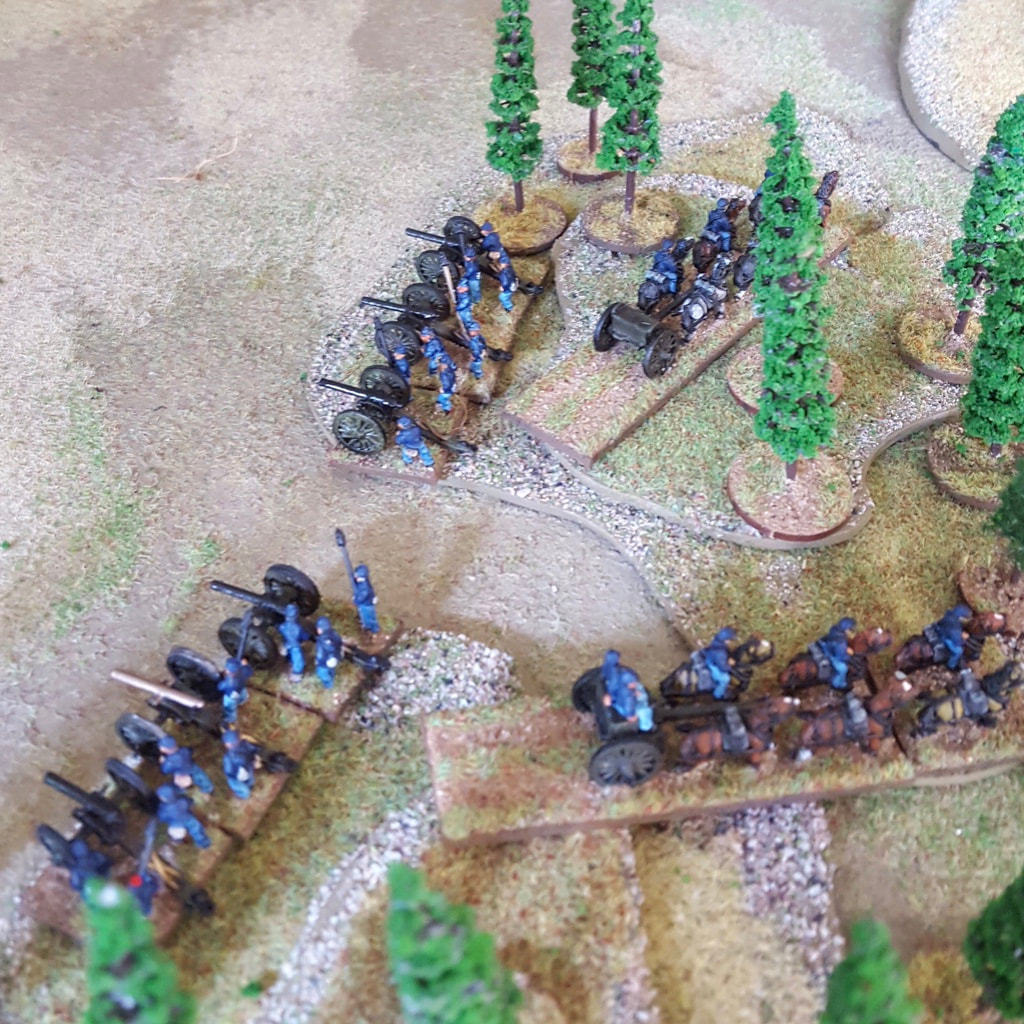 For the past few weeks Matt, Spencer, Dan and I have been playing a campaign based on Jackson’s Valley campaign in 1862. Matt is playing the man himself, Spencer is Federal General Banks, Dan is supplying instructions for devolved commands and I am umpiring and playing battles out where necessary on the tabletop. So far Banks has had the numbers and Jackson the speed. The map and play mechanics are explained in previous blog posts. To keep a bit of pace, each ‘turn’ the players provide orders for three impulses at a time. I then play these out, interrupting the turn to resolve clashes, either with simple dice rolls or, as has now happened twice, to fight a figure wargame. If a player’s character is ‘present’ at the battle I ask them for instructions. If they are absent, Dan steps into the role of the detached commander. The story so far I am having to delay these reports a little to keep the opposing generals in an appropriate state of ignorance. But the bones of the campaign so far are as follows. Banks began the campaign by sending half his army westwards out of the valley into the Allegheny mountains, then southwards to try to get around and behind Jackson’s army. The road net outside the valley is not good and so this movement took some time, during which the other half of the federal army sat tight at Strasburg. Jackson was alerted to the movement and in turn warned General Johnson, commanding the tiny Army of the North West in the Alleghenies, to block the Federal advance. Meanwhile Jackson withdrew his own small army southwards and took a portion with him to support Johnson. There followed the battle of Franklin, at which the Federal force, ably led by Dan, broke the rebel left and pushed them back on Harrisonburg and McDowell. The momentum then swung Jackson’s way. Unknown to Banks, Jackson was reinforced by Ewell’s division arriving from the east. While still outnumbered in the Valley overall, Jackson now had local superiority as well as the benefit of surprise. His odds further improved when Banks recalled part of his detached command to Strasburg, leaving the victors of Franklin only two brigades to continue their advance against Jackson’s left rear. In the next eventful turn, there occurred two significant combats, in both of which the rebels began with a marked advantage. Had the time come for Jackson to show his mettle? The Battle of Harrisonburg Following up on his victory at Franklin, Federal general Shields advanced eastwards into the valley. He caught up with Jackson at Harrisonburg, where he saw the rebels deployed on a line of three low hills west of the town. Shields’ role was once again taken by Dan, who planned to attack first on the right, then to close with his centre and left once his right wing had taken the leftmost rebel hilltop. This plan saved him from total destruction. His right wing advanced on the enemy hill, which was occupied only by dismounted cavalry. The rebel horse mounted and charged down from the hill into Shields’ cavalry, the combat continuing for a couple of turns on the far Southern flank of the table. As Shields’ leading regiment neared the crest of the seemingly empty hill, a line of Louisianans charged into view and bowled the federals back down the slope. It was Trimble’s brigade of Ewell’s division, freshly arrived to reinforce Jackson. At the same time Taylor’s brigade from the same division appeared round the side of the hill and charged towards the federal centre. The federal right was all but destroyed. Fortunately for Dan, his centre and left were still some distance from the rebel positions and so avoided being caught in the flank. They were able to withdraw, but the rebels pursued vigorously, obliging the Federals to detach a regiment of infantry, their last unrouted cavalry regiment and a section of smoothbore as a rearguard. Under the protection of this rearguard, the rest of the command fled westwards back to the Alleghenies. The brave rearguard was eaten up however and four cannon were lost. Post-match analysis I played Harrisonburg using Honour Games’ Longstreet. It was at the limit of the rules’ applicability: a couple more brigades and I’d have used On to Richmond. The mixture of random cards and orders from absent players worked well again. I felt sorry for Dan that he was walking into a trap but on reflection, that is the appeal of a campaign: surprise attacks are harder to set up in a one-off encounter. It was also an advantage that Dan wasn’t there in person. When a player gives up their time to play a face to face game, one wants to give them a fair chance of winning. In this case, the only question was how badly Dan would be beaten up. As it happened, his plan probably gave him the least bad outcome, since his initial attack revealed the rebel reinforcements before the rest of his army had advanced too far. When I sent him the news of the trap in mid-game, he supplied the orders for the rearguard defence, which again helped save men (at the cost of the rearguard and 4 cannon). He also didn’t seem to mind having been set up! Rebels everywhere While Shields was retreating in the south of the valley, a lone federal brigade at Front Royal was manoeuvred out of its position by superior rebel numbers. This brigade withdrew to Middleton in good order, to cover the road to Winchester. But it seemed at turn’s end that Banks’ position in Strasburg was at risk of encirclement. Remove me from this hell! I would say that fully half of the campaigns I’ve played in over the years have ended through a trailing off of interest rather than the achievement of a set objective. I don’t want this campaign to go that way. I have included the following text in the latest situation reports for both sides: “Many wargame campaigns don’t so much finish as fizzle out. They continue without a clear end point, until eventually one or both players lose interest. That will not be our fate! The historical campaign ended when troops in the valley were called away to take part in a major operation in Virginia. In game terms, I am now checking each turn whether that moment has arrived, at which point I will adjudicate the effect of the campaign on your personalities’ reputations. I want to be sensitive also to your ‘real world’ wishes. In submitting your orders you may express your preferences for continuing the fight in the valley or for requesting to join the impending operations in Virginia. These will affect the dice roll for campaign’s end.” I must say this small campaign has been fascinating, watching the player’s shadow box with limited knowledge of each other’s dispositions. I think both have several reasons to be pleased with their performance. I also think the campaign can still go either way, but the next turn or two should produce a decisive result.
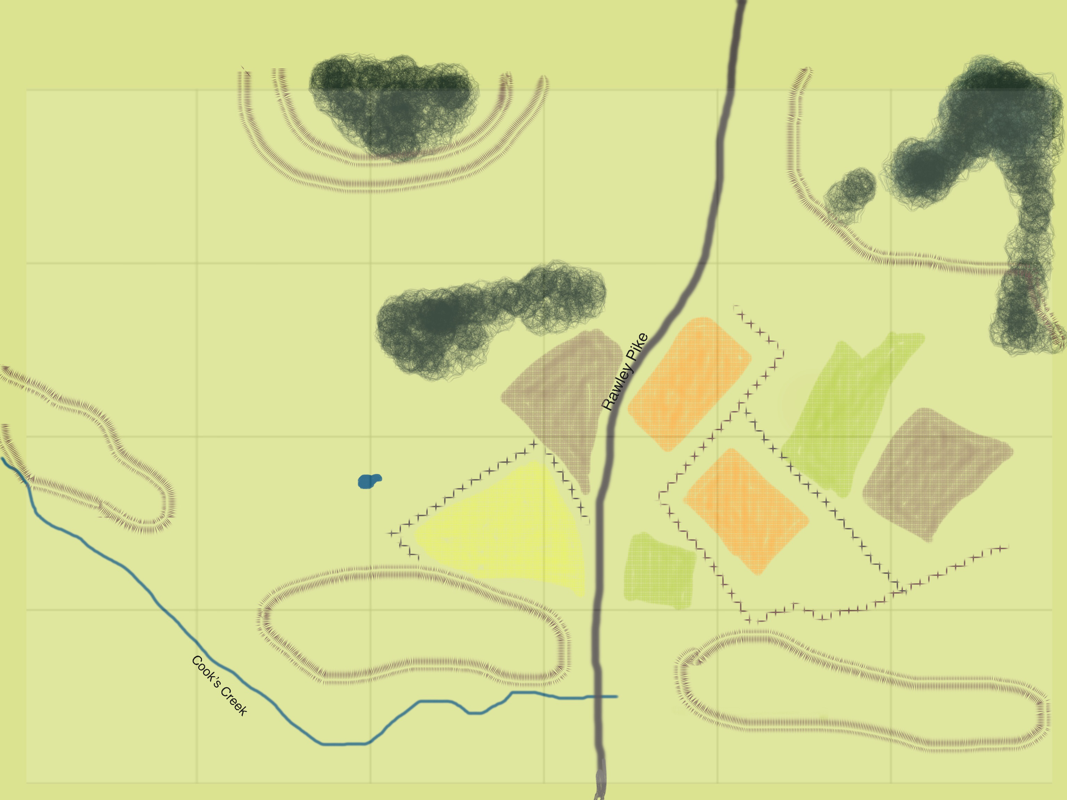
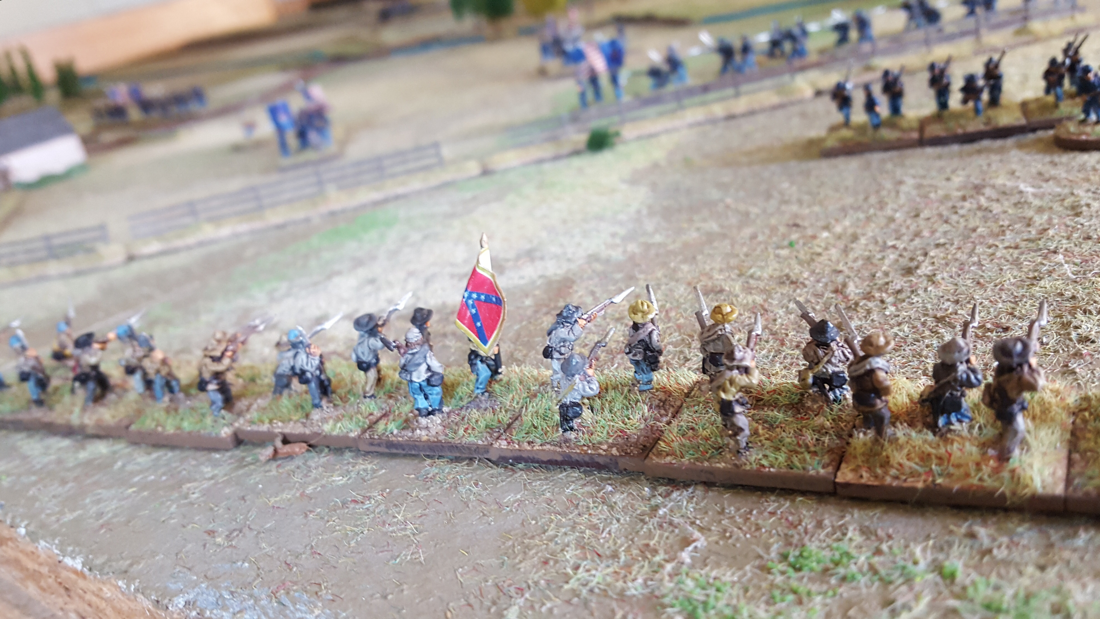
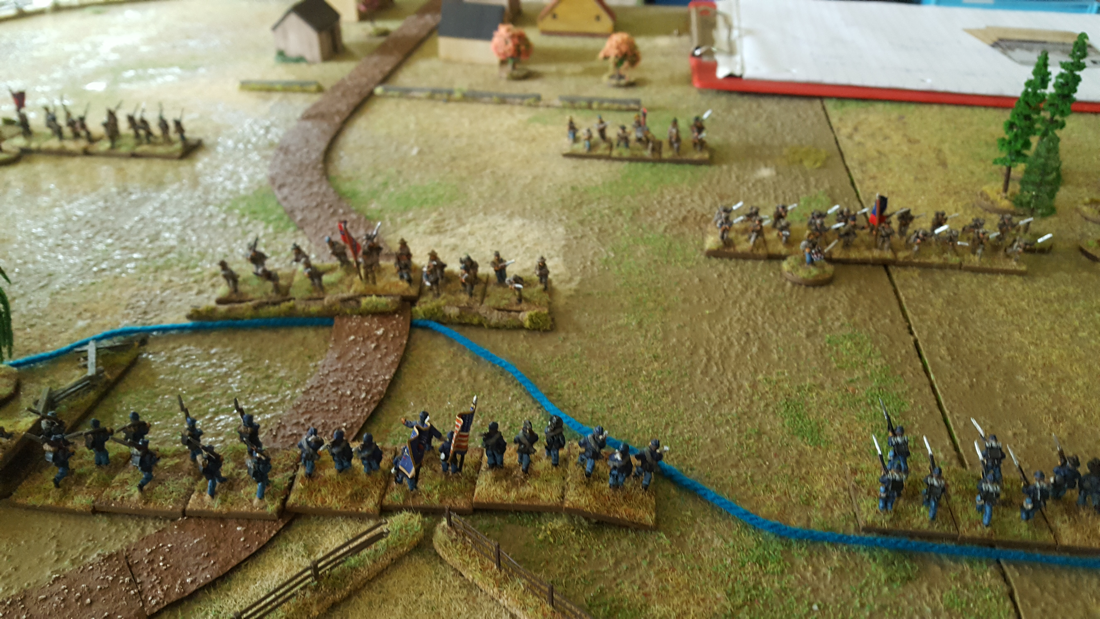
 Last weekend we had the first figure wargame within the framework of our Shenandoah Valley campaign. It took place at Franklin in West Virginia, between Shields’ Federal division of Banks’ army and Johnson’s Army of the Northwest, reinforced by Jackson and a brigade of his foot cavalry. Shields had been sent in an outflanking manoeuvre by Banks, played by Spencer. The mechanics of the game: playing with a split personality I played the game using Sam Mustafa’s Longstreet rules and my 12mm Kallistra figures. The 72 x 48 BW map came from a Google satellite map of Franklin WV. I drew on the historical orders of battle for the troops present. Matt, who is Jackson, was present and so gave me his instructions for the battle direct. As Banks/Spencer was not present on the field in person, I recruited Dan to provide orders for the Federal force. Each had a scenario briefing as if for a face to face game. Matt supplied general instructions for the Confederate side while Dan really went to town, with full instructions and four maps showing his intended dispositions and movements. Between them, the instructions from the players supplied all I needed to play the game in accordance with their wishes. The use of an action deck in Longstreet adds a random quality to solo play. I decided that the federals would hoard/play cards favouring attack and the rebels would use those with a more defensive benefit, - although I made sure to keep Rebel Yell cards for counterattacks. At the start of each turn, I checked what interrupt cards were in the passive player’s hand and rolled a die to see if they would be played this turn. This worked very well, - almost spookily in the case of the so-called “couldn’t hit an elephant” card which represents the enemy general being hit. The union side played this card at a key moment with devastating results, which was a parallel with the wounding of general Johnson at the battle of McDowell in the historical campaign. A brief account of the battle The rebels deployed along the south bank of Friends Run, which flows from west to east above the town of Franklin. Two batteries were entrenched on high ground to the left and certain infantry units were also behind light earthworks along the run. Johnson’s brigades were in the left and centre while Fulkerson was in reserve on the right. Most of Johnson’s Command were recruits while Fulkerson commanded two regiments of veterans. The Federals deployed their artillery on a ridge at the right of their position. Next to them was 2 brigade, in depth to the west of Petersburg Pike. Then came 1 brigade to the east of the pike, with cavalry at the far left, by the south branch of the Potomac. Each federal brigade was much bigger than a rebel equivalent and overall the Federals had significant numerical superiority, although they had no veteran units. The federal attack consisted of an advance in the centre by a line intended to engage the rebels with fire but not to assault. Meanwhile two assaults were made against the rebel wings, each containing two regiments, one behind another. Their cavalry was to try and get around behind the rebel right if the chance arose. In the event it failed in the face of cavalry on the rebel right. Overall, the rebel right and centre held and even counterattacked successfully against the left hand federal assault. On the rebel left however, the union assault rolled right over the front line, helped by the supporting fire from their artillery, which both reduced the Confederate infantry and made some successful counter battery fire. Just at the point when the rebel second line were poised to counter attack, general Johnson was severely wounded. (If you don’t know these rules, the ‘elephant’ card involves removing action cards from the victim’s hand. On this occasion the rebels lost 5 cards out of their hand of 6, which seriously restricted their options at this crucial juncture). This allowed the Federals to press their advantage and push their whole right wing over Friends Run while the rebels were off balance. The rebels could not restore their line and soon found their position unhinged by a federal force deep behind their left and in a position to roll up their position. One of Matt’s instructions was to preserve his troops as a force in being and as the federal position was now so favourable, I decided the rebels should withdraw now or face major losses. Fulkerson was still in good shape, so his brigade formed a screen behind which Johnson’s brigades retreated. The Federals tried to catch as many rebel units as possible and nearly cut off their retreat along the Pike but the rebels left the field in reasonable order. So the first battle has gone the Federals’ way. The players have received their status reports and I am waiting for their orders for the next turn. Dan has won his place as go-to surrogate for future games in the campaign. For my part, I spent two very happy days in the shed, remembering just how much I love these rules. I also realised you can never have too much split rail fencing, so have started work on some new lengths in preparation for the next round in the campaign.
I think the time lag is enough to report on the opening moves in our Lockdown campaign, based on the Shenandoah campaign in 1862. We began with Union General Banks in Winchester and Stonewall Jackson a bit further down the valley at Mount Jackson. The federals began with a big numerical advantage but the rebels had a significant edge in cavalry, which combined with a local population that is mostly friendly means the rebels had good intelligence on the Federal forces. Matt and Spencer know each other’s playing style well and they went in for some interesting second-guessing. With two divisions, each significantly larger than the whole rebel force, Spencer sent the forward-most one (Shields) westwards from Winchester into the Allegheny mountains, intending to outflank Matt and enter the Valley from the South West. Meanwhile his second division (Williams) advanced down the Valley Pike, in order to locate and fix Jackson in place. Matt on the other hand suspected Spencer would try a flanking move and sent one of his brigades westwards along a parallel road into the Alleghenies. Meanwhile he withdrew with another brigade to Newmarket where his troops began to dig in.  A 12mm high Stonewall surveys the field (Kallistra figures) In the first turn both commanders tried to make contact with their sister commands in the Alleghenies, who were Frémont, commanding Federal forces and Johnson leading the rebels. I ran both as non player characters, drawing on a bit of chance combined with their historic performances. The upshot was ready agreement from Johnson to cooperate with Jackson, whereas Frémont declared his readiness to work together with Banks but was very slow mobilising his force. At the end of the turn Jackson received news that General Early was expected in the valley within a couple of turns. Turn 2 saw Matt changing his mind about his move westwards and recalling his flanking brigade. This about face nearly lost him the brigade as Spencer had ordered Williams to march south and take Strasburg. Williams vey nearly caught the returning rebels on the road and would have done so, had it not been for the presence of rebel cavalry to slow down the Federal advance. Fortunately for Mattt, Williams’ force had no cavalry of its own in the vanguard, which added to the efficacy of the rebel rearguard. The returning brigade squeaked through and out of Strasburg while Williams was still held up north of the town.  Meanwhile out west, Shields advanced down the Alleghenies towards Franklin, where Johnson was digging in with his small army. Frémont, bless him, made no move to support Shields. The dice were helping the wargame Frémont to behave much as the real man did: with the energy of a slug. So the second turn/sixth campaign day ended with an apparent stand off in the valley and a battle imminent in the Alleghenies. Umpiring the campaign
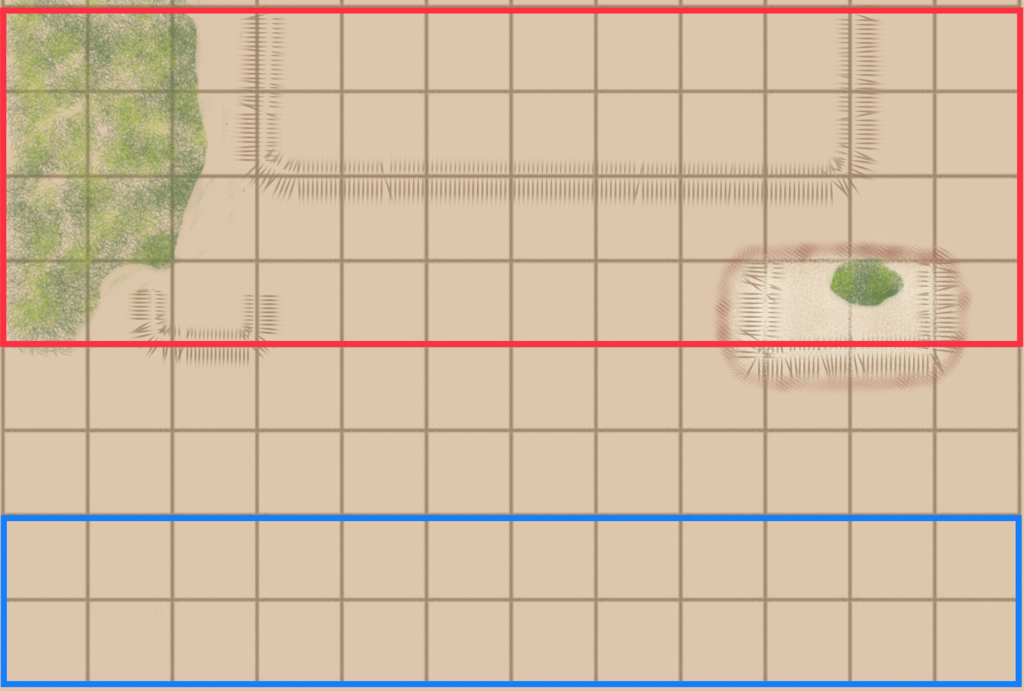
In a few cases so far I have had to establish who got the better of a skirmish or whether a brigade could escape the jaws of a trap. For simplicity, I have rolled competing dice on behalf of the two sides and the result has gone the way of the higher scorer. The bigger the margin, the more emphatic the success. For even chances I have compared the rolls of two D6. If one side has an advantage, such as superior numbers, better training or a proactive leader, that side rolls a D8, D10 or even D12, depending on how many advantages affect the matter. I also use a competing die roll to see if a non player character complies with a player’s request. So far this approach has worked ok. For the impending battle of Franklin, I will fight it this weekend using Sam Mustafa’s Longstreet rules. One player’ character is present on the battlefield so he has given me his orders for the battle. As the other is absent, I have recruited Dan to act as the detached general and he has submitted a full set of instructions complete with maps. We shall see how it all pans out. Three weeks into the Covid 19 lock down, I am making progress on some gaming projects. I have been painting more 6mm Napoleonic figures for a multiplayer Lasalle scenario later in the year (Lord knows when!) and then plan to rebase my oldest collection of figures, two 6mm armies for the War of Spanish Succession. While these are quite satisfying solitary chores, I miss actually playing games. So last week I floated the possibility of a small campaign with Spencer and Matt. They were ready to indulge me and I started looking for a theme. I have run only three campaigns in the past: two set in classical Greece and one in the American Civil War. Matt, Spencer and I play a lot of Ancients and I kicked around a couple of options, one set before the rise of Philip of Macedon and one in Sicily. Neither got me excited enough to turn the idea into a game. Turning to the ACW, I recall playing an enjoyable short campaign in the early 1980s with my friends Keith Blackmore and Andy Finkel. The idea of an ACW campaign grew on me. I have played ACW since the 80s, both figure and board games, and have good source materials with maps and orders of battle. I particularly like the mechanics of A House Divided, Frank Chadwick’s strategic game with a map consisting of a network of boxes connected by different forms of road (the game is still available, now published by Mayfair Games). So ACW it is! As for subject, I decided on the Shenandoah Valley in 1862 as a great candidate for a limited but interesting game. Now, the aim of many wargame campaigns is to lead to face to face games. That isn’t going to be an option for now of course so I want the map turns to be engaging in themselves. As umpire, I hope to encourage a bit of role playing, assisted by some messages from non-player characters. When opposing troops collide, we will play it by ear. I can resolve small encounters with a dice roll. For larger engagements I have Longstreet for brigade level games and On to Richmond for bigger encounters. We shall have to work out how much the players will be involved in table top battles. We can cross that bridge when we get to it... I started with the map, mainly based on the National Geographic Atlas of the ACW and the Osprey Campaign book, Shenandoah Valley 1862 by Clayton and James Donnell. I decided to copy the connected boxes idea used in ‘A House Divided’. I added a wrinkle from another Frank Chadwick game, Attack in the Ardennes, in which the different road types limit the number of units that can travel between two boxes in a turn. This brings out the importance of the major roads and junctions and poses tricky choices to a commander: do they keep their forces moving slowly together, or move fast and get strung out across several boxes? What happens if they meet the enemy in this state? I started the map on a drawing app but found this too fiddly and so resorted to the old standby of pens and gridded paper. I spent a happy day with rulers, eraser and coloured pencils and ended up with an unattractive but, I hope, serviceable game map. The campaign rules shared with both players are below. In addition to the common rules, each player had a personal briefing, with their own campaign objectives and order of battle. I won’t share these yet as both players read this blog (or they pretend to!). As of today, the first turn has completed and the players have submitted orders for turn 2. I don’t know if they are enjoying it yet, but I am already Having a ball! 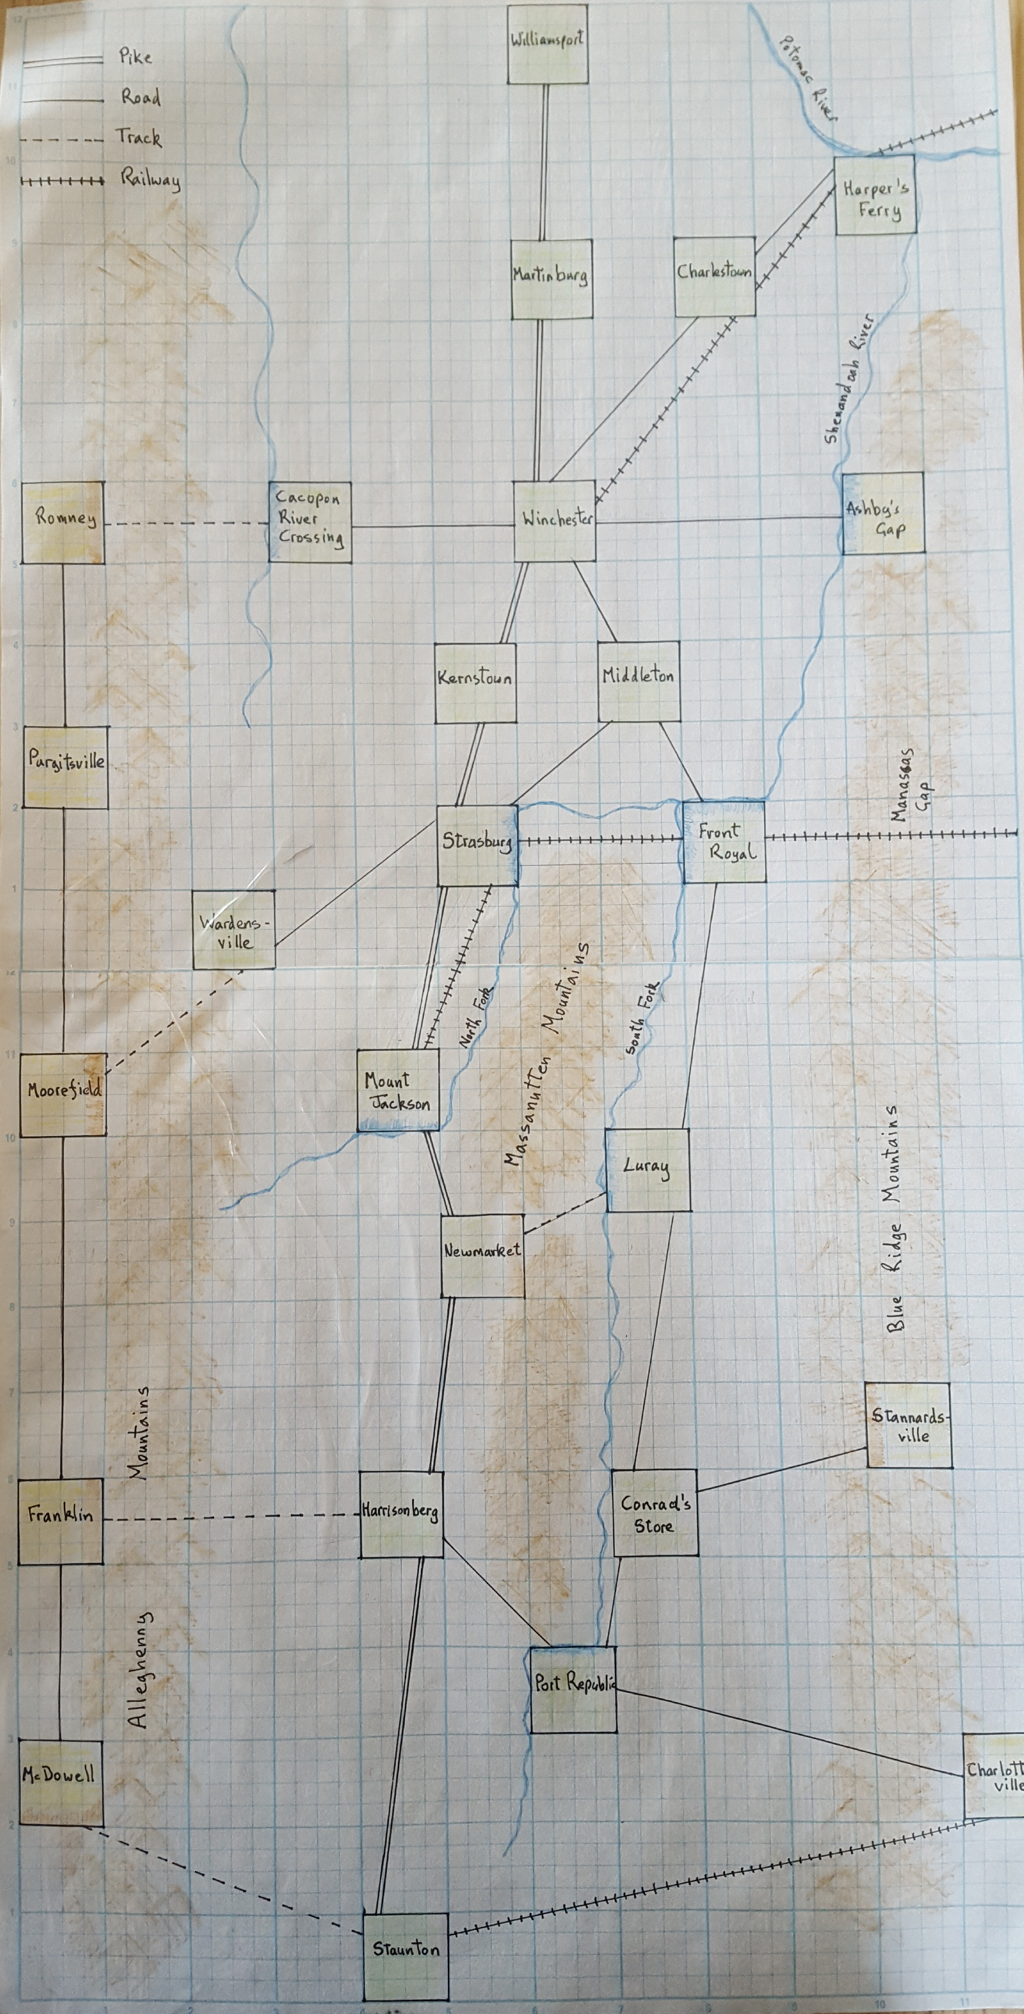 ACW Campaign rules: Fire in the Shenandoah, March 1862 Introduction The Shenandoah Valley is a picturesque and fertile farming region, bounded by the Allegheny Mountains to the west and the Blue Ridge Mountains to the East. Its axis runs from South West to North East, and it is divided down the middle by its own range, the Massanutten mountains. In 1862 possession of the valley offered advantages to both North and South. For the Confederacy the valley was a vital source of supplies, especially of grain. Also Harpers Ferry at its north east tip, only a short distance from Washington DC, was a potential jump off point for invading the North. For the Union, possession of the valley could deny the vital food supplies to the Confederate army, cut the railroad from Richmond to Tennessee and threaten Richmond from the West. The campaign began in late February 1862, with an invasion from Harper’s Ferry by a Union army led by general Nathaniel Banks. Heavily outnumbered, Confederate general Thomas “Stonewall” Jackson withdrew down the valley, while calling in his reserves. It is now mid March. Banks is at Winchester, getting ready to bundle Jackson out of the valley completely. Jackson is somewhere down the valley, waiting for the storm to break. Common rules The Map The map is of the Shenandoah Valley, overlaid with boxes connected by a road net. All units occupy boxes and move between them along the road net. There are four types of road: Pike, Road, Track and Railroad. Most boxes are clear terrain but some have a river along one or more sides (blue shading) and others have difficult ground (brown shading). Boxes surrounded by mountains are considered difficult ground The turn One turn consists of 3 impulses. Turns are resolved simultaneously by the umpire. Orders The players submit orders at the start of each turn. You must provide an order for each of the 3 impulses. A unit without orders will stand in place. Orders can be:
Movement and stacking Space: You may only occupy named boxes on the map. You may have as many units together in one box as you wish. Roads: Every connecting road has a maximum capacity of units that can travel along it in one impulse. The maximum number of infantry units that can move along a connection in one impulse are: Turnpike(double line): 4 units Road(single line): 2 units Track(dotted line): 1 unit Railroad(hashed line): unlimited units as long as railroad is friendly. If it belongs to the enemy, it counts as a road. NB Cavalry does not count towards this limit. Thus, in one impulse, you could send 2 infantry units plus one cavalry unit along a road. A unit may move in every impulse of the turn but this could cause fatigue and attrition. Note that, as there is a limit to the number of units that can use a road in an impulse, it could take two or more impulses for a larger army to move from one box to the next. (Example: a force of 3 infantry units wants to move along a road from one box to another. As only two units can use a road in one impulse, it would take two impulses for the whole force to end the turn together in the destination box. The order might read: 1st unit: move from Staunton to Harrisburg; rest; rest 2nd unit: move from Staunton to Harrisburg; rest; rest 3rd unit: rest; move from Staunton to Harrisburg; rest) To recap: it is possible to move up to three times in a turn but this is likely to result in a unit becoming fatigued. Also, if a large force moves fast using roads or tracks, it is likely to end the turn strung out between more than one box. Encountering the enemy If you enter a box containing enemy troops there will be an encounter. Cavalry on its own will retreat from moving enemy units if outnumbered, unless specifically ordered to stand and fight. Other troops will act in line with any prior instructions from their commander: to stand and fight; conduct a fighting withdrawal or attempt to retreat without fighting. If you, the player character, are present at the encounter, you will be given information about the situation and asked for your orders. If we can manage it and the battle is big enough to warrant the effort, Tim will arrange to fight the encounter at a time when you are available, so you can be involved via Skype or WhatsApp as the battle unfolds. If you, the player character, are not present at the encounter, you will receive a report afterwards of how it went. Terrain Some boxes have either a blue or a brown shading along one or more side, representing either a river or difficult ground. If you occupy one of these boxes and the enemy enters the box across a shaded side, you will receive advantages in the combat. Boxes in the mountains at the left or right side of the map contain difficult ground that is generally favourable to the defender. Boxes in the valley are open terrain, except where a side is shaded brown or blue as noted above. If infantry is present in a box for some time it can prepare the ground, which will be an advantage in battle. To prepare the ground, a unit must spend a full turn (three impulses) doing so. Note these are not like the trenches developed later in the war, but are light fieldworks. Scouting and screening Cavalry’s greatest use is to scout ahead and to screen your army from enemy attention. If Cavalry on its own enters a box containing only enemy infantry, it will retire back one box but can report to you the troops that it sees. If there is enemy cavalry in the box there will be a skirmish. If your cavalry win this skirmish it can report to you all the troops that are in the box. If it loses or the skirmish is inconclusive, it will retire back one box and will only report that it has encountered enemy cavalry. You are permitted to ask the local civilian population what they know about enemy movements. Note that the population are mostly pro-Confederate so their intelligence might be more reliable when dealing with rebels. In addition to the common rules, each player had a personal briefing, with their own campaign objectives and order of battle. I won’t share these yet as both players read this blog (or they pretend to!).
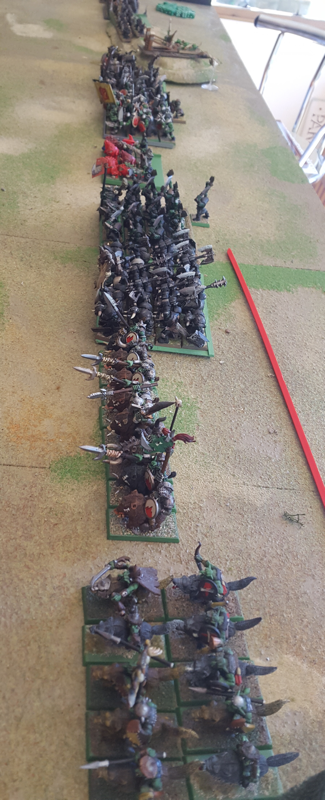
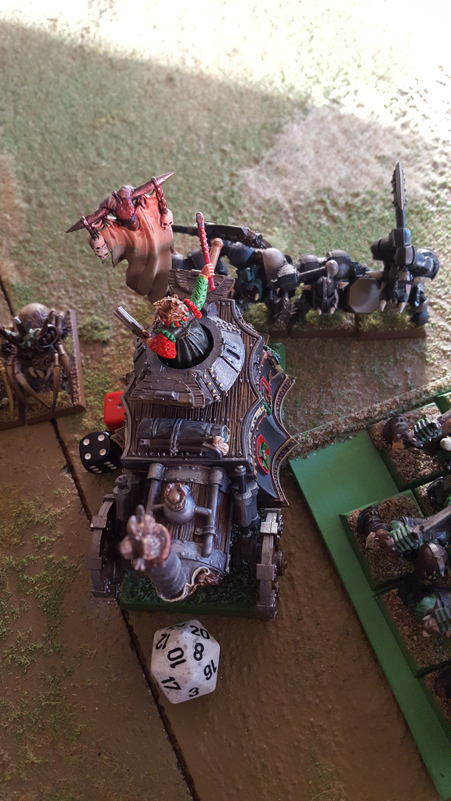
The first turn has completed and the players have had their status reports. I don’t know if they are enjoying it yet, but I am already very excited! 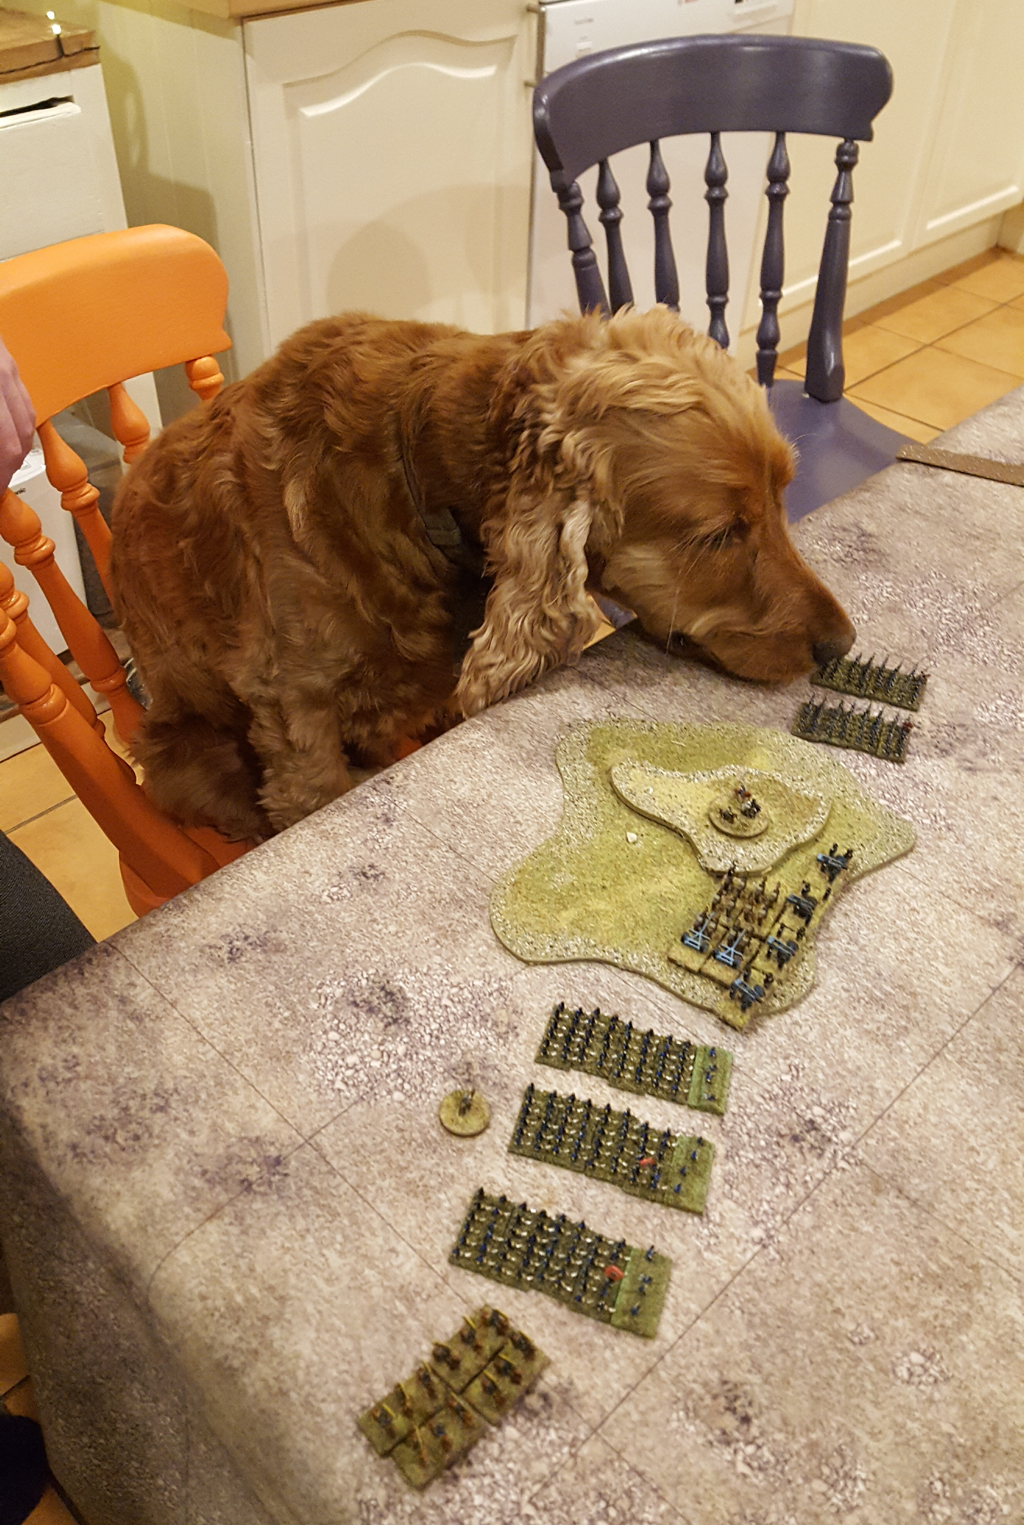 Copper the spaniel gives personal orders to the colonel of the Prussian Landwehr The other evening Dan and Spencer played their first game of Lasalle, leading a Liberation era force of Prussians and Russians in an attack on my French defenders. Little did we know that this is likely to be our last face to face game for some time. Spencer’s Russians consisted of solid infantry and a position battery, while Dan had a mix of good Prussian regulars and unpredictable Landwehr, a foot battery and some Landwehr cavalry. My infantry was half Marine Infantry (Experienced/reliable) and half conscripts (the army list suggests they be Amateur/reliable but I’d made them Amateur/shaky by mistake. That’ll teach me not to check the lists!). I also had a foot and a horse battery and two regiments of mediocre Württemberg chevauxlegers. My position consisted of a central hill with a two-base town to its left. My centre and right were covered by a stream, over which a road ran from the Allied position. Fans of the Battle of Leipzig may notice the broad similarity of troops and terrain with the combat at Mockern on 16 October 1813. I plan to run a multi-player LaSalle refight of Mockern later in the summer and would like the players to be familiar with the rules. I deployed first, putting conscripts in the two town bases with a battalion behind; a battalion of Marines to their right; the two batteries and two more Marine battalions on the hill; and the cavalry on the right covering the bridge. Dan placed his battery on his base line, his regulars and cavalry on his extreme right and his Landwehr on his left. Spencer formed a compact block in march column, above the bridge. I thought from their opening turns that the Allied plan was to mask my centre and assault the town on one flank and the bridge on the other. To stop me from leaving the hill, the two Landwehr battalions were sent to threaten it. Both Dan and Spencer advanced in march column, bringing several battalions within range of my artillery, which received double dice against such juicy targets. The Russians had the benefit of a stone wall to their front which negated this advantage, but the Prussian Landwehr advancing in the centre were seriously disrupted. Meanwhile Dan bombarded my conscripts in the town as his right wing came down the flank to assault them. Spencer crossed the bridge and formed line on my side of the stream with his lead battalion. But he also started siphoning his rear battalions off towards the centre, which now looked like a serious advance on the hill. I’m not sure if this had always been the plan or it was a decision on the hoof. It certainly glued my central battalions to their position. After a couple of checks, the Prussian assault on the town made good progress, taking full possession by the end of the game. Dan’s Landwehr cavalry snuck in past a battalion square and charged my foot battery in front. The guns’ point blank canister emptied too few saddles and in the ensuing combat, the cavalry wiped them out. On the right, we had an interesting test of Russian nerve that paid off handsomely. I declared a cavalry charge against the battalion in line and Spencer elected to give fire as a reaction rather than form square. He inflicted 2 disruptions by fire and then in the ensuing combat, I only achieved an inconclusive victory despite my advantage in dice, which required me to fall back. A bit miffed, I charged with the other cavalry regiment and Spencer again stayed in line. This time the cavalry wiped him out. That’ll teach him! Or will it? He promptly marched another battalion forward to fill the gap. I declared another cavalry charge and, you guessed it, they met me in line. You also guessed it again: I lost the combat and my cavalry broke. It was getting late by this stage and the loss of the cavalry took me to my break point. Although under the rules this does not automatically end a game, we agreed to stop there. The game flowed very well considering two players were new to the rules. It would have gone even faster had we not digressed at various points to discuss everything from NapoleonTotal War to Zulu, my favourite film of all time. But what would be the fun in that? A wargame is at heart a social occasion and Spencer is irrepressible! As for the game narrative, we agreed that mostly, the rules produced plausible outcomes and we did not feel they imposed unreasonable constraints. The successful Russian decision to receive cavalry in line did make me wonder if the rules are too favourable to this gambit succeeding. The issue hasn’t arisen before: in my previous games of Lasalle, players have tried to form square because they knew that this is what the infantry would have done. But Spencer has long experience of assessing rules and is willing to test their limits. He looked at the odds and decided he liked his chances of shooting my cavalry away without forming square.. This worked for him two times out of three. Now, the recorded cases when unsupported Napoleonic infantry in line successfully repelled cavalry are very few. A battalion commander threatened by cavalry would not check his chances in the rule book: he would follow protocol and try to form square. Nor would his division commander be involved in that decision. I don’t like it when rules are too strict but I also don’t like it when a unit can perform outside the character of the period. I need to ask my statistician son to check how flukey the Russians were in this game but if the standard odds of the infantry in line succeeding against cavalry are good, then I fear we have a problem. I would see two possible options: either infantry in line charged by cavalry must always attempt to form square, or its firepower against enemy cavalry in contact should be reduced, for example hitting on 5s to reflect its nervousness about the impending clash. My third option of course is to wait for version 2 of Lasalle, which Sam Mustafa has promised will appear in 2020. I look forward to that release very much. Since we have been deprived of the chance to meet again for the time being, I am going to crack on with painting more figures for the refight of the battle for Möckern. With luck, we can hold this before the end of the summer! Last Sunday, my son Nick and I played a game of Warhammer for the first time in around eight years. His Orc horde faced off against the men of Hochland, in a 2500 point battle using Warhammer 7th edition rules and army lists. For a good twelve years from about 1999, Nick, his brother Will and I were obsessed with the worlds of Warhammer and 40K. Like GW’s new releases, we tended to alternate our games between Old World and Far Future. I had a soft spot for the Empire and Imperial Guard and Nick and Will both liked the Orcs - and Orks. 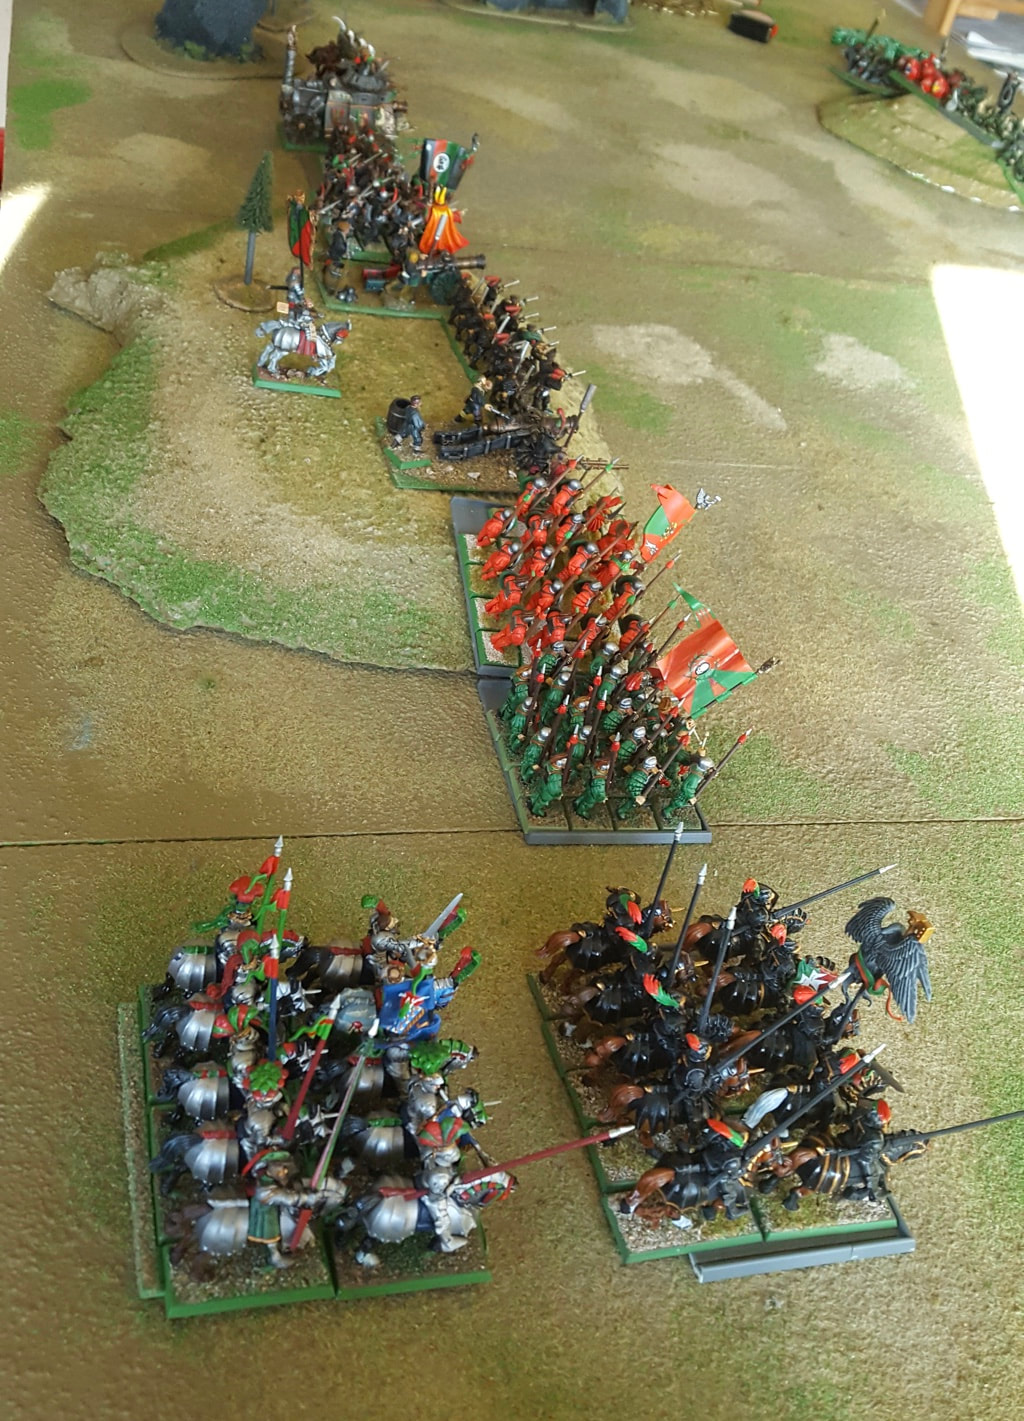 After about 2010 our GW games trailed off as the boys grew up and Nick began to share my interest in historical gaming. When we have occasionally returned to GW, we played 40K or Epic as these seemed easier to pick up after a break. This Christmas, however, we decided it would be fun to revisit the Old World. We agreed to revise the rules and army books and met up for the game last weekend. We had started Warhammer with the 5th edition and played through to the 8th. While we must have played more games of 6th edition than any other, Number 7 was our favourite, especially for magic. 8th edition made changes that favoured immense, unwieldy units and created new terrain rules that just felt silly to us. It also had fewer possible combinations in magic and other items than the earlier editions. I’m not sure how the GW player community would classify 7th edition. From what I read, I don’t think it, or any of the editions we played, are early enough to qualify as ‘Oldhammer’. Whatever the label, 7th was our choice for the reunion bash. 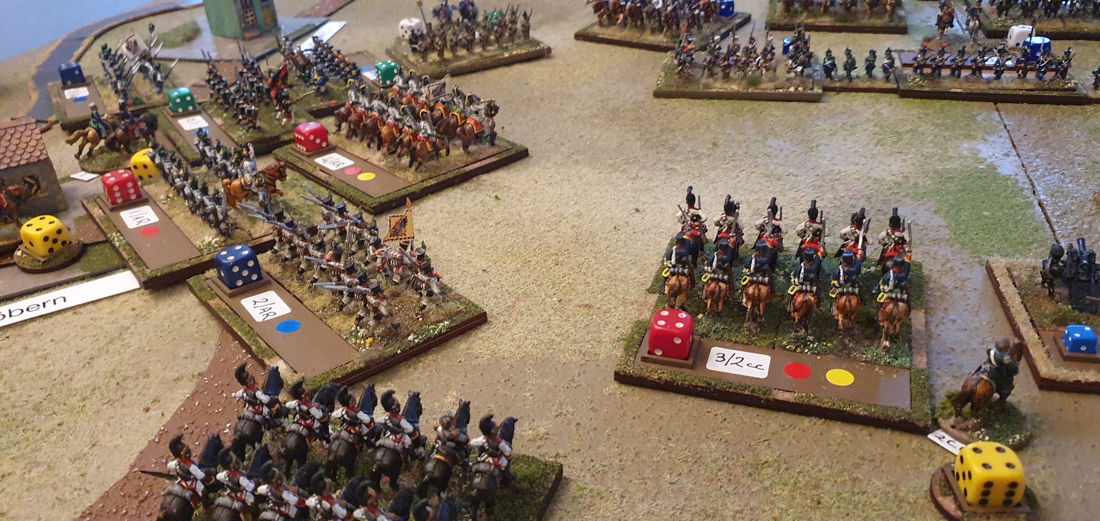 And bash is the word. Nick chose numbers and filled his centre with black orcs and boys, with goblins on both flanks, a giant on his far left and wolf riders, spider riders and a squig herd on his right. I had a smaller force, with 20 knights and two spear blocks on the right, a steam tank, pistoliers and 20 swordsmen on the left and two great cannon in the centre with handgunners between them. My plan was to hold him on the left and centre and swing my right around to roll up his line. Nick’s plan was to break my centre and skirmish on the right, while blocking on the left with 40 night goblins and the giant. He had two shamans, while I had one wizard and Luther Huss, who I took as my army general. The game started well for me. Early on my cannon dealt some serious damage to the black orcs and actually broke them. But they rallied quickly and got back into the action. I then misfired both of my great cannon, with each losing two rounds of fire at a crucial stage of the orc advance. Nick had his share of bad luck too, when his goblin fanatics failed to wound a single human but caused spectacular damage to their own unit and then knocked three wounds off his giant. How we laughed. 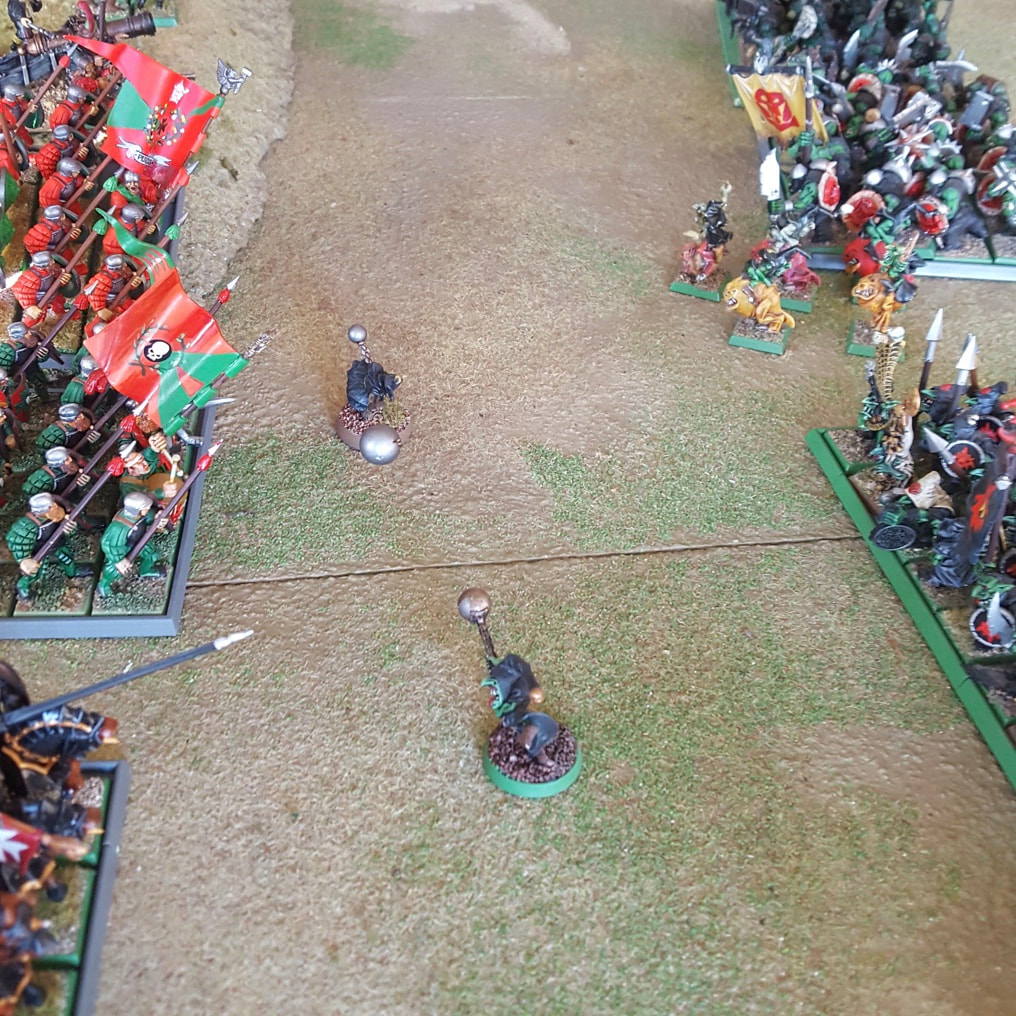 To cut to the chase, Nick’s boys completely crushed my centre. My right had some success against the night goblins but this performance was frankly a poor return on the points invested in my units. Nick’s right didn’t get going until late in the game, partly due to animosity. I conceded after turn five, having no troops at all in my centre, only a couple of units on my right and the steam tank soldiering on alone on the left. There was no coming back from the Orc sledgehammer. That was such fun. We had forgotten the humour in Warhammer: fanatics, squig riders and squabbling orcs add up to some memorable moments. We agreed that we had both forgotten how to make best use of our troops and our army lists (especially mine) could have been more thoughtful. For example, I forgot to buy a dispel scroll for my wizard, which is an item I used never to leave home without. I also invested a lot of points in the two units of knights that I then kept out of the main action. That, frankly, was a waste. I was a bit unlucky with my two cannon misfires but that wasn’t why my centre folded: I had been daft to place so few troops there. We agreed afterwards that we will play a few more games with the same rules and the same two races this year, so we can relearn how to use our armies. It was challenging and even more fun than I had expected to be back in the Old World. |
Archives
November 2023
Categories
All
|


 RSS Feed