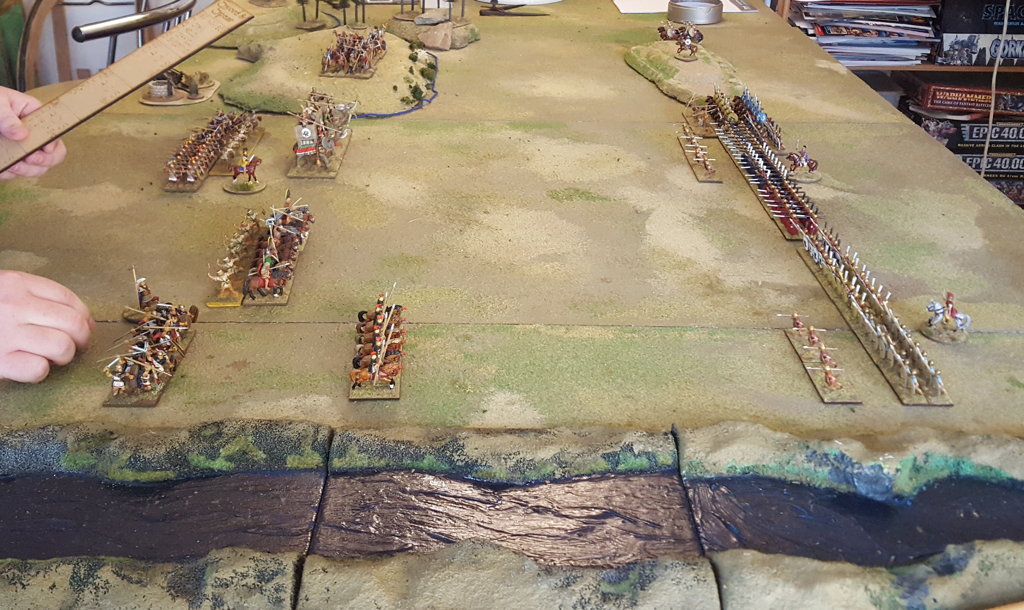
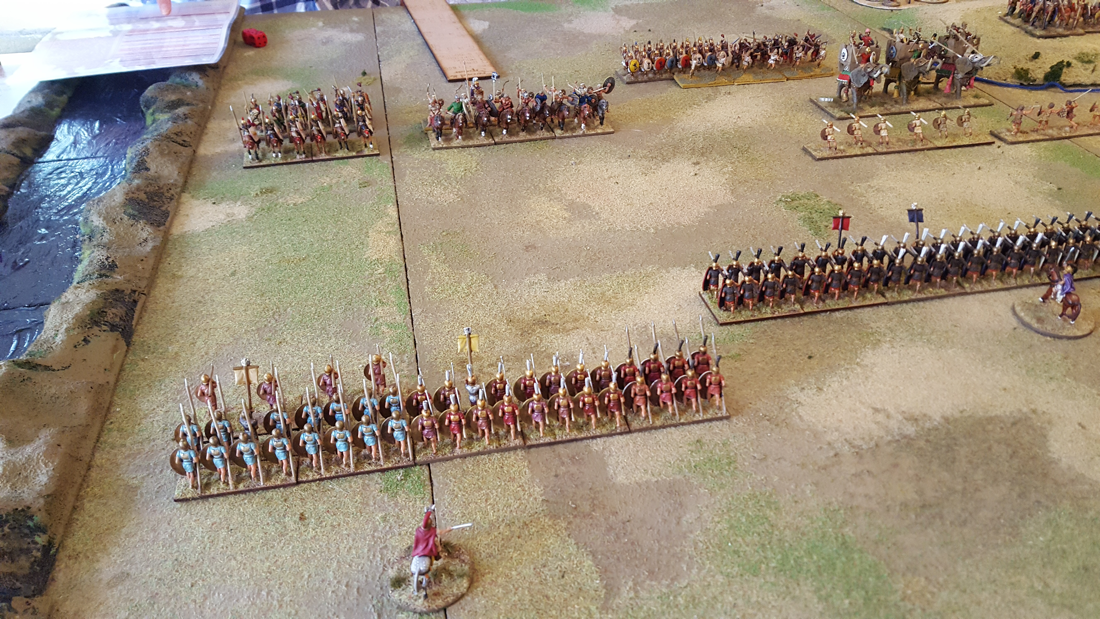
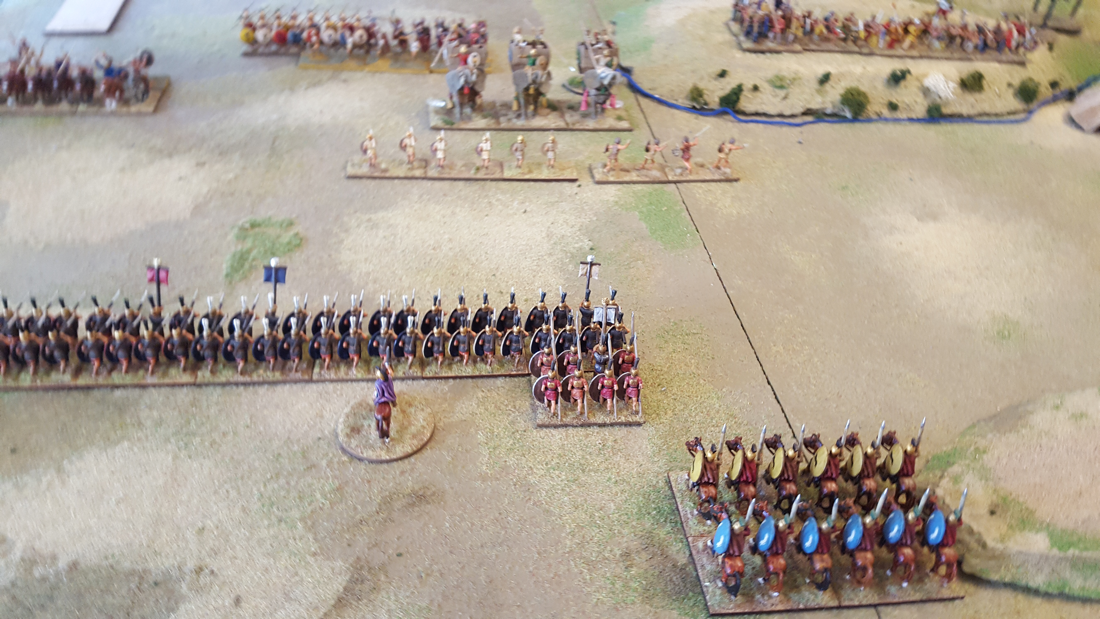
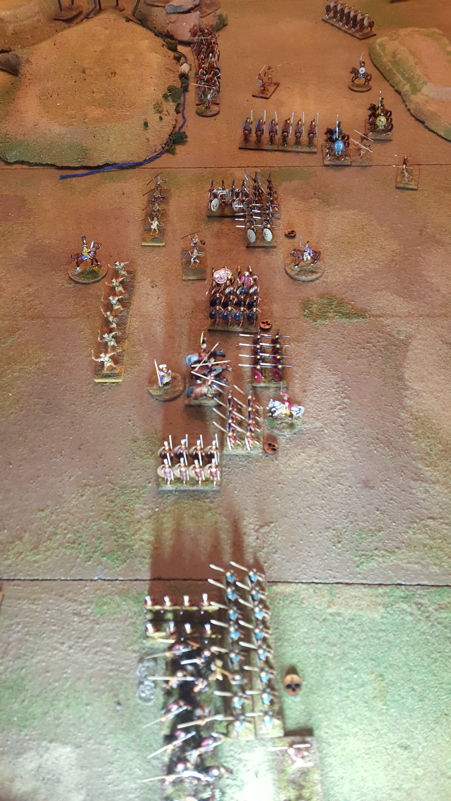
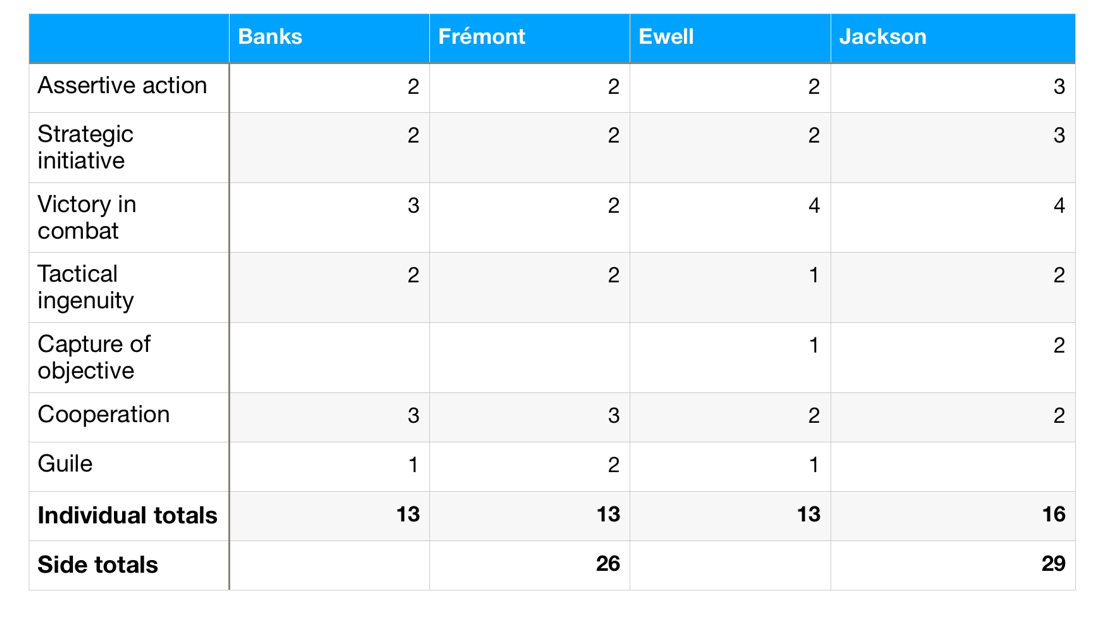
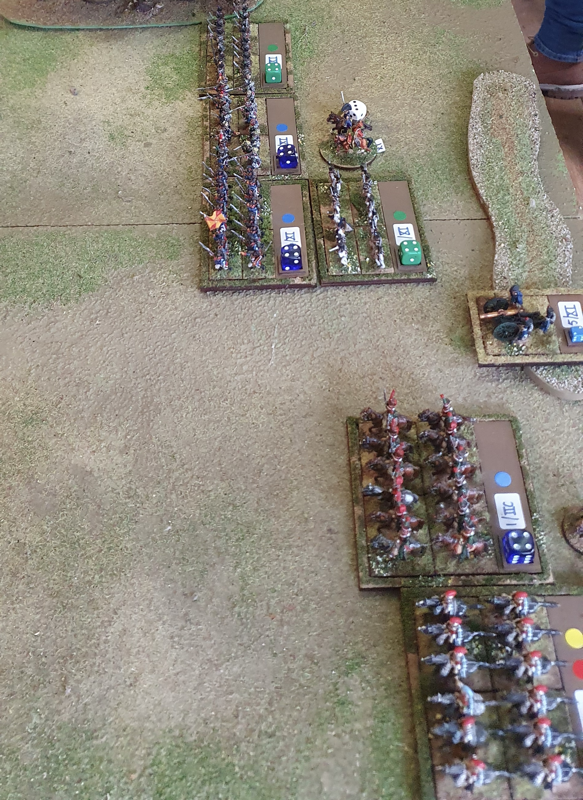
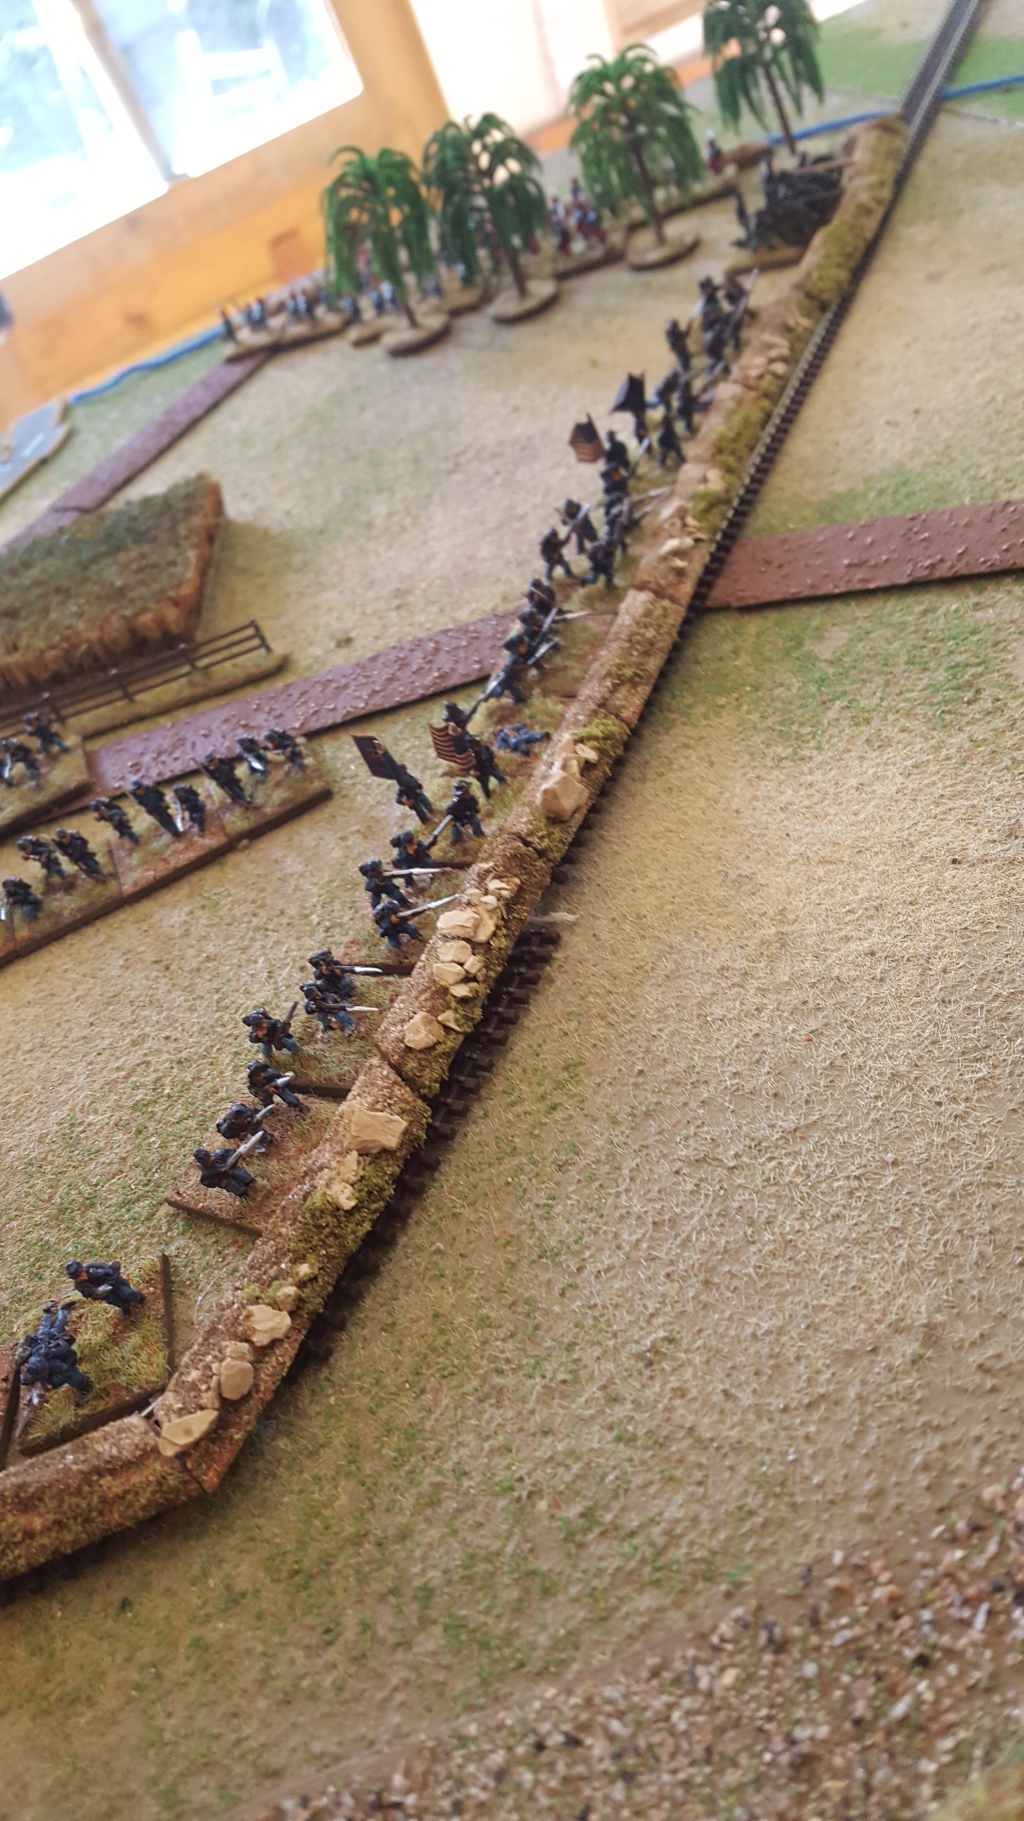
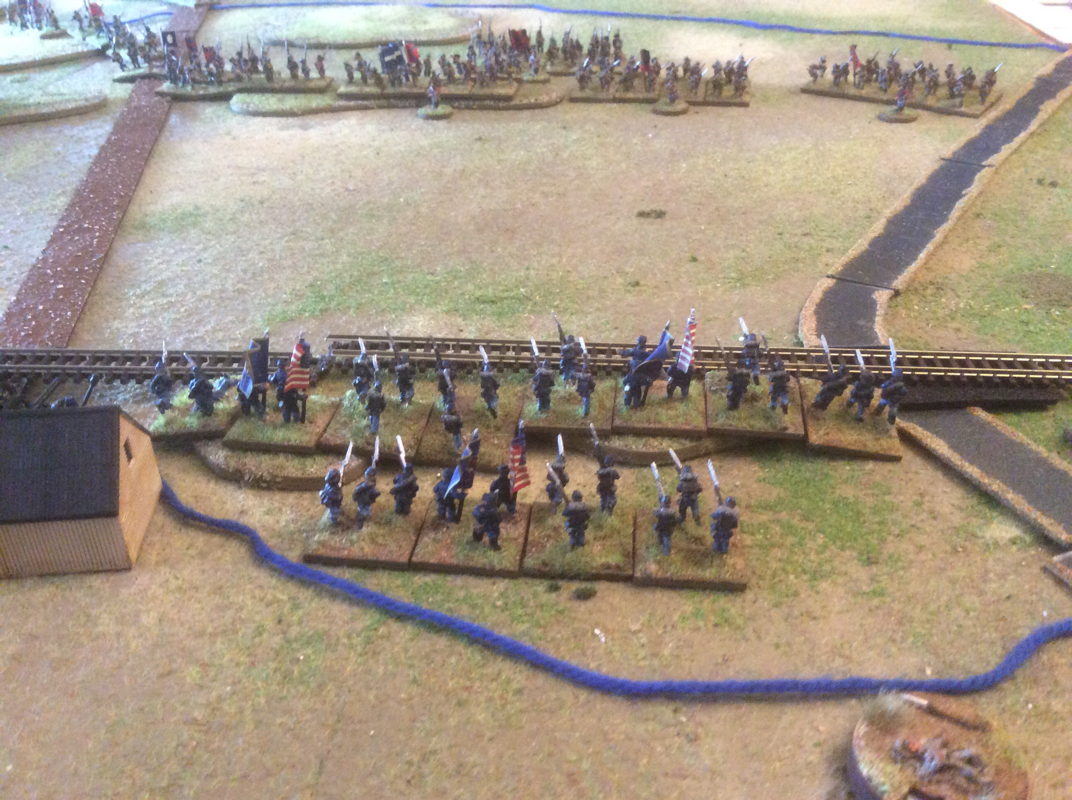
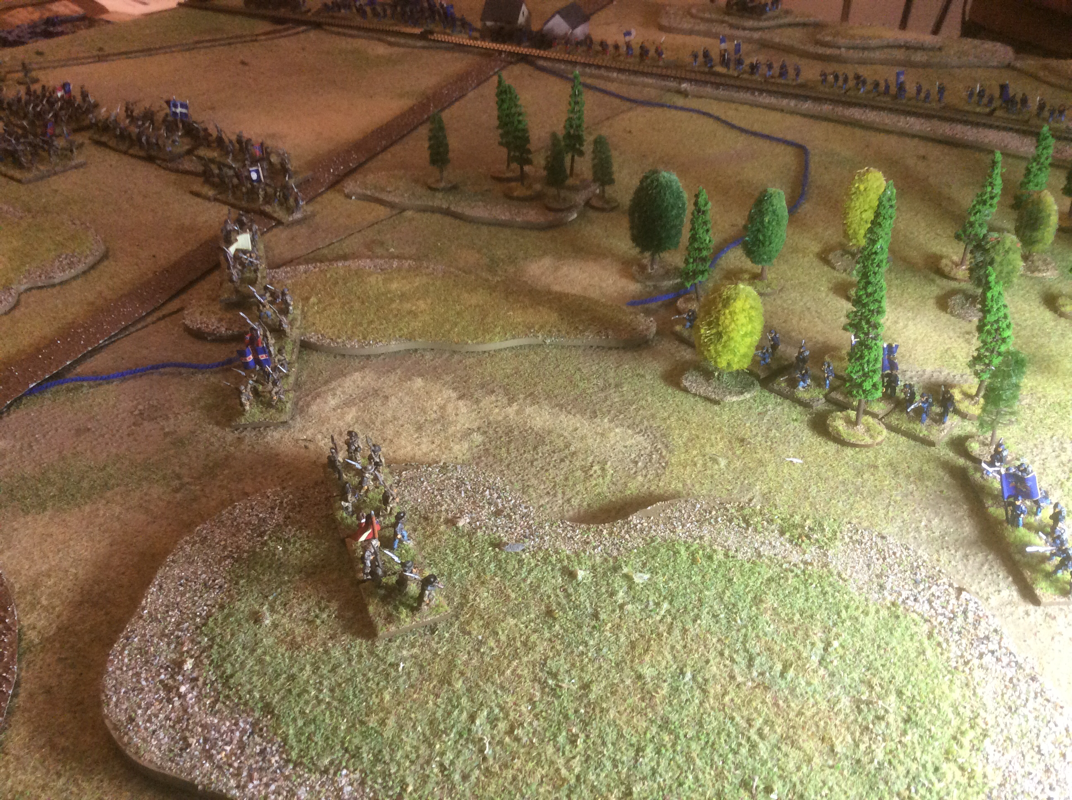
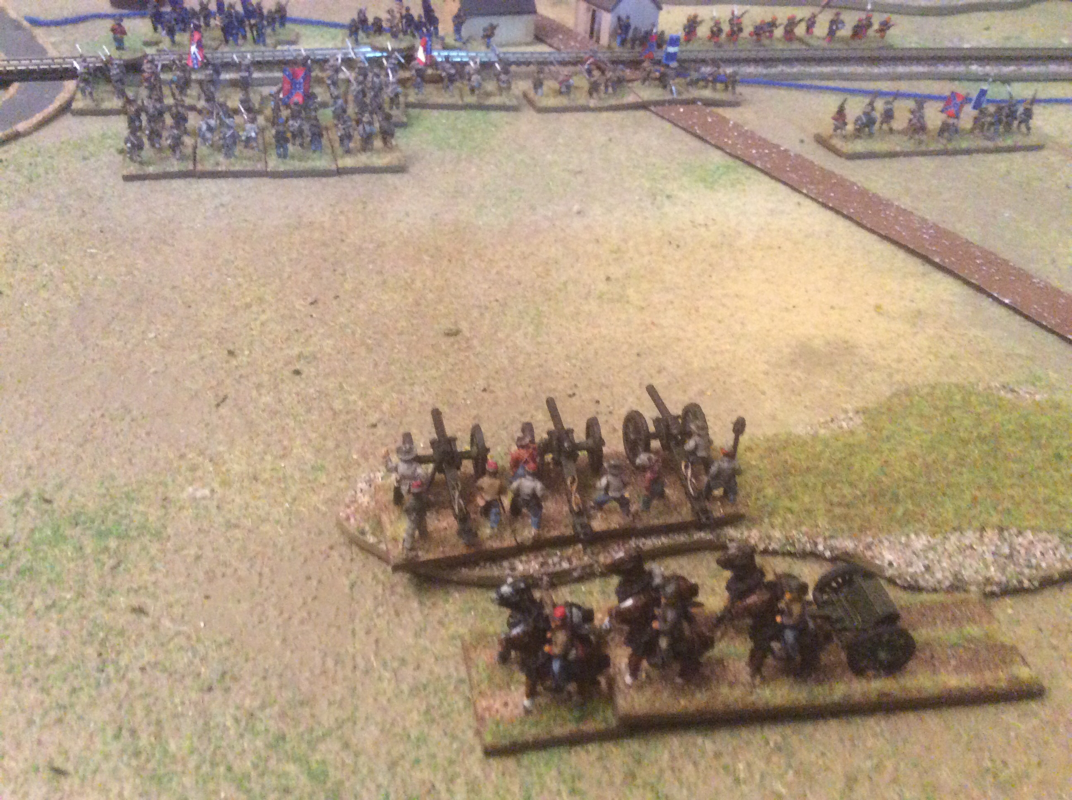
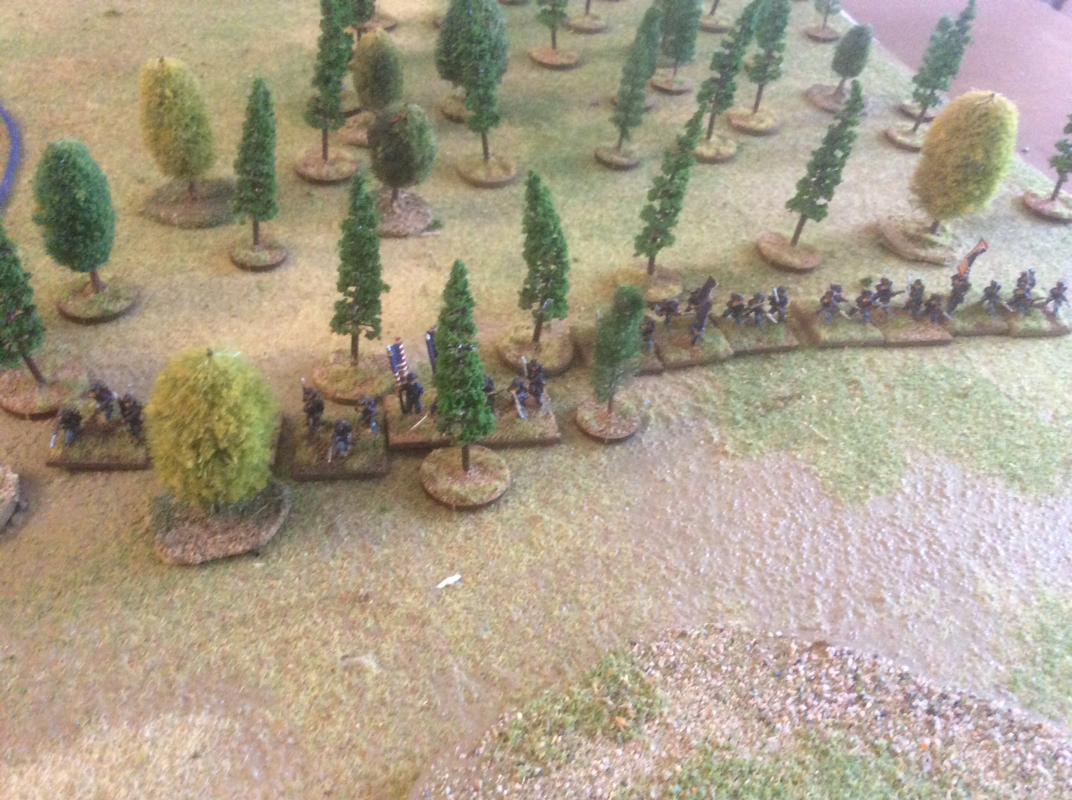
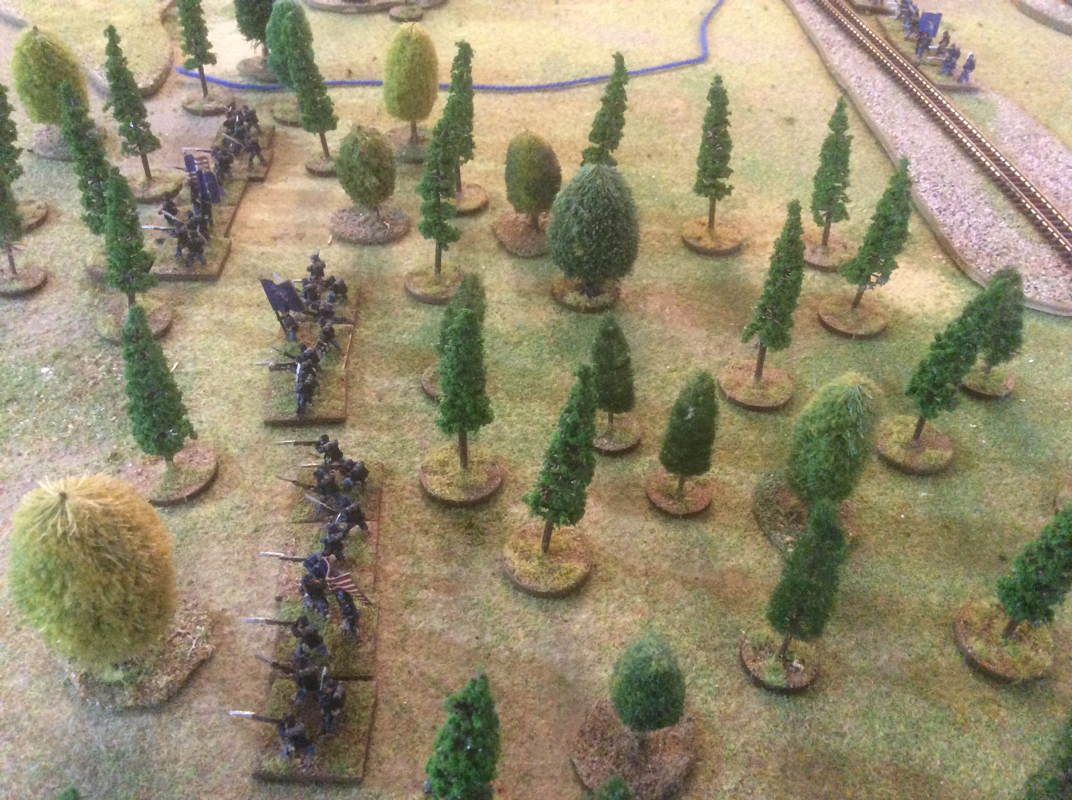
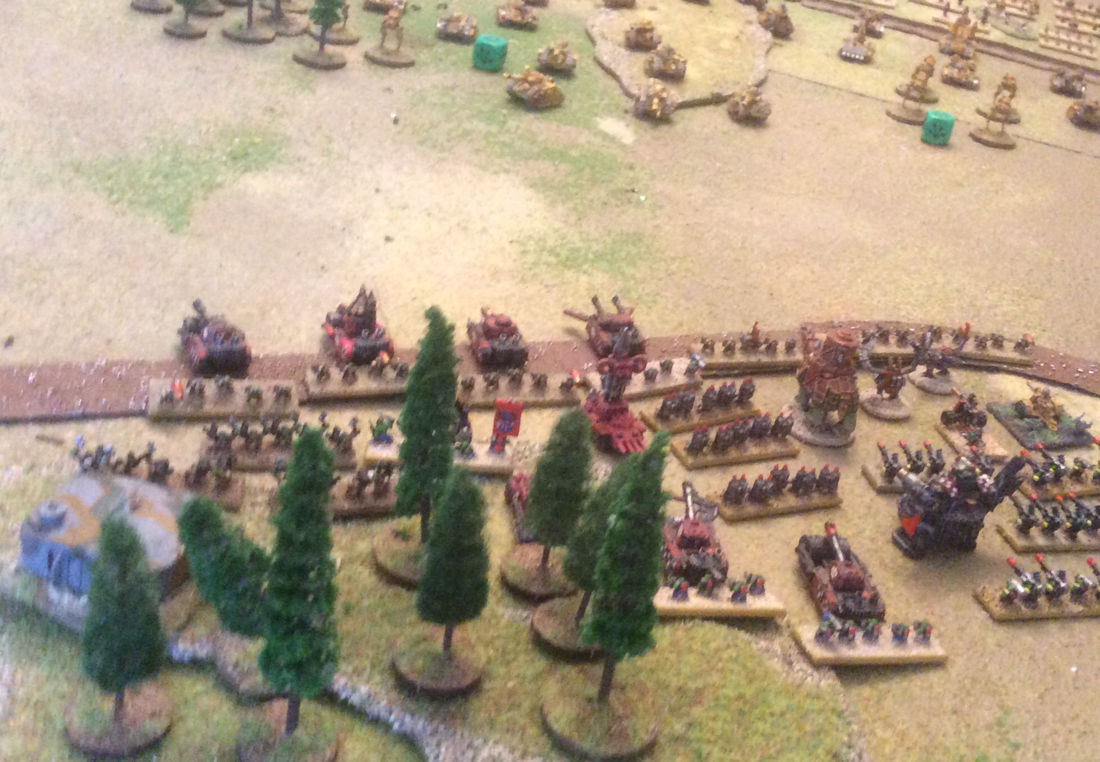
 Hamilcar on the left, Nero and Salinator on the right Gaming the Metaurus My previous blog post explained how we created an ADLG scenario for the battle of the Metaurus. This post tells you how the game went. Ben took the role of Hamilcar and Matt commanded the Romans. Ben followed Hamilcar’s deployment, putting his Gauls on the high ground protected by a strip of difficult terrain. He put his elephants in the centre, with Spanish and African foot behind them, and his cavalry on the right, supported by two more stands of Spanish foot. Matt deployed one infantry command on his left, the other in the centre and his cavalry on his right. Phase one of the game saw Ben’s elephants crash into Matt ‘s centre and pretty much slide off. We had expected them to be destroyed while disrupting the Roman centre but they barely made a dent. Matt’s dice rolling was consistently luckier than Ben’s, setting the pattern for the evening. On the Carthaginian left the Gauls and Roman cavalry looked at each other, while by the river, Ben’s cavalry advanced on Matt’s infantry but wisely chose not to attack. 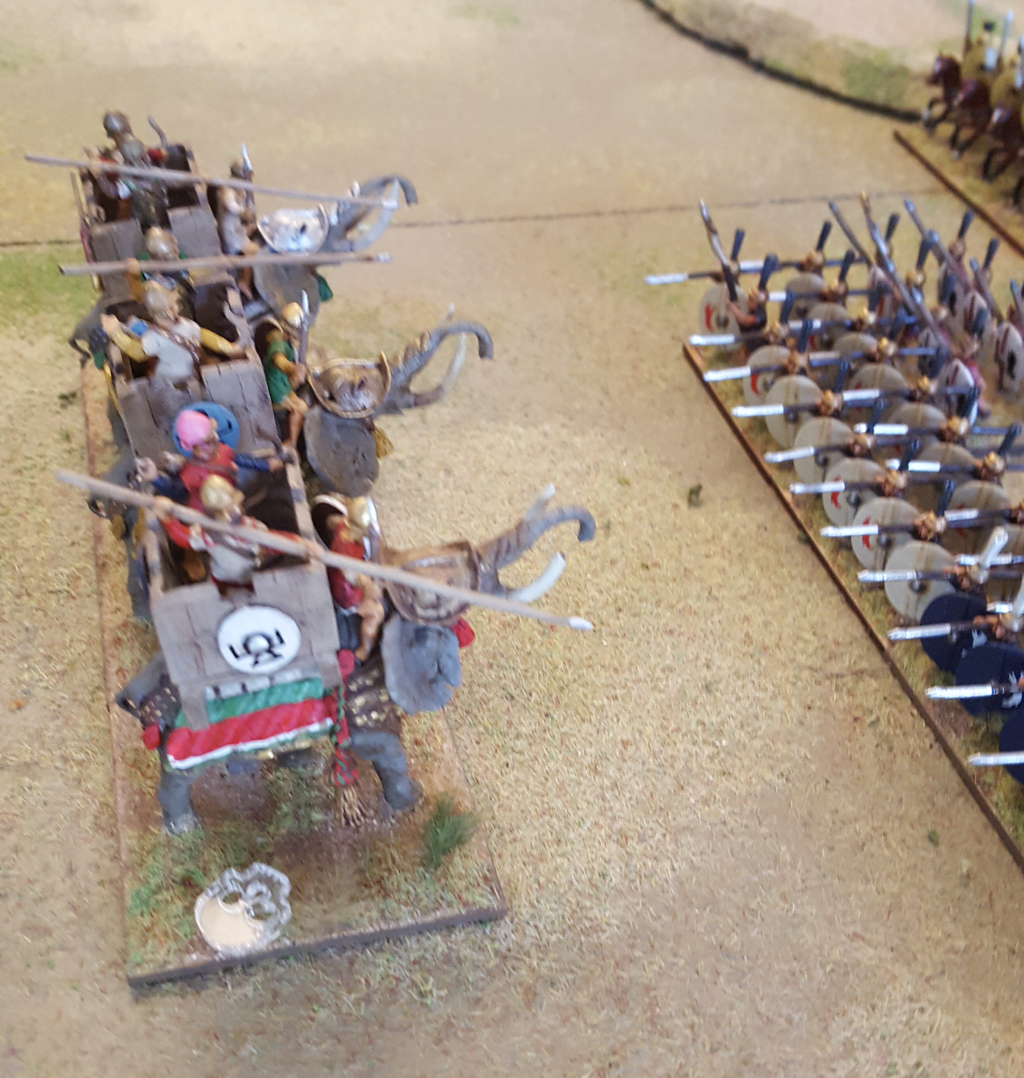 The elephants looked imposing but melted fast In Phase two the two centres came to blows. Ben’s troops fought rather better than their elephants had done and the fight was quite balanced. Meanwhile a couple of stands of Gauls came off the high ground, to be mauled by Matt’s cavalry. Then, Ben decided to launch his cavalry at Matt’s unruffled left wing. Matt again rolled some lucky dice but he also had the edge in modifiers all along this combat. Ben lost several stands in one combat phase, taking him perilously close to break point. In the final phase the rest of Ben’s Gauls came down from the high ground, too late to have an effect on the battle. His cavalry nearly all routed and his centre started to crumble, mainly because his Spanish MI were less resilient. The game then ended as Ben’s morale losses hit 26. At that point Matt’s losses were only 9 points, of which only 4 were due to units routing. Measuring up to the history
According to the generally accepted account of the battle the Carthaginians deployed pretty much as Ben did in our game. The Romans on the other hand placed their cavalry by the river, Salinator in the centre and Nero on the right. Phase one of the battle saw the Carthaginian elephants attacking in the centre, with similar unimpressive results to what happened in the game. On the left the cavalry wings clashed and the Romans began to push the Carthaginians back. The infantry in the centre then closed, with neither side gaining the advantage. On the right Nero soon abandoned any intention to charge the Gauls, who were too well positioned on the high ground. He then marched his wing around the rear of the Roman line to the left and assaulted the Carthaginian centre in its right flank. With this, Hamilcar’s army collapsed and he spurred his horse into the melee. The first Hannibal knew of the defeat was when his brother’s severed head was catapulted into his camp. The big difference in our game was of course Matt ‘s deployment of infantry on his left and cavalry on the right. This made Nero’s manoeuvre impossible. I could, I guess, have imposed historical deployment on both sides but would argue that the more restrictive the setup, the less satisfying the game. To be frank, I was surprised by Matt ‘s deployment and wondered at the outset if he was squandering his cavalry by placing it facing the Gallic Hill. As things turned out, I couldn’t argue with his emphatic victory so what do I know? Nevertheless his cavalry played only a bit part in that victory. I think he was helped by Ben’s decision to charge Roman heavy swordsmen with medium cavalry, rather perhaps than to shift this cavalry to face the Roman horse. In the last turn Ben had to take a survival roll for his C in C when the unit he was with routed. He passed it, so at least our Hamilcar kept his head
0 Comments
We played a 200 Point game of ADLG last night. I always enjoy a game more if it is linked to a real battle (however fuzzily) and I wanted to see if I could fit a historical scenario into a ‘legal’ ADLG format. I chose the Battle of the Metaurus, 207BC, fought between Hamilcar Barca and a consular tag team of Salinator and Nero. This post is about turning a historical battle into a scenario. The next one will report how the game played. Background The Metaurus campaign was perhaps the last chance for Carthage to defeat Rome in Italy. After years of stalemate on the peninsular, Hamilcar had crossed the Alps with an army to reinforce Hannibal. Rome was determined to prevent the Barca brothers from joining forces and a lucky piece of intelligence revealed Hamilcar’s planned route. Nero, commanding the consular army facing Hannibal, took a picked force and rushed to join his colleague Salinator in front of Hamilcar. From being outnumbered, the Romans now had at least parity with Hamilcar and for once, seemed to have an advantage in cavalry. The Romans tried to hide the arrival of Nero and bring on a battle but Hamilcar realised that he was facing two consuls, supposedly because his scouts heard two trumpet calls in the Roman camp. Hamilcar withdrew along the river Metaurus, looking for a crossing point. However he was unable to cross and as the Roman pursuers came closer, he resolved to offer battle. There are different versions of this story in the sources and the debate goes on about the location of the battle, nature of the field and forces involved. I chose what seems to be the current majority view, which results in the following elements: Because he has turned to face his pursuers, Hamilcar deploys his whole army first. The river Metaurus runs down one flank of the table. It is impassable. Hamilcar deploys with his right wing on the river. Next to the river is a strip of open ground. Hamilcar’s left deploys on high ground, with a steep defile in front that will seriously disadvantage an attacker. The Roman side of the field has a low hill towards the rear, opposite the high ground. Otherwise it is featureless. After Hamilcar has deployed, the Romans deploy using the standard deployment rules, except that there is no ‘dead zone’ next to the river so troops may deploy adjacent to it.  The battlefield viewed from the river. Hamilcar will deploy on the left and Nero on the right The Armies
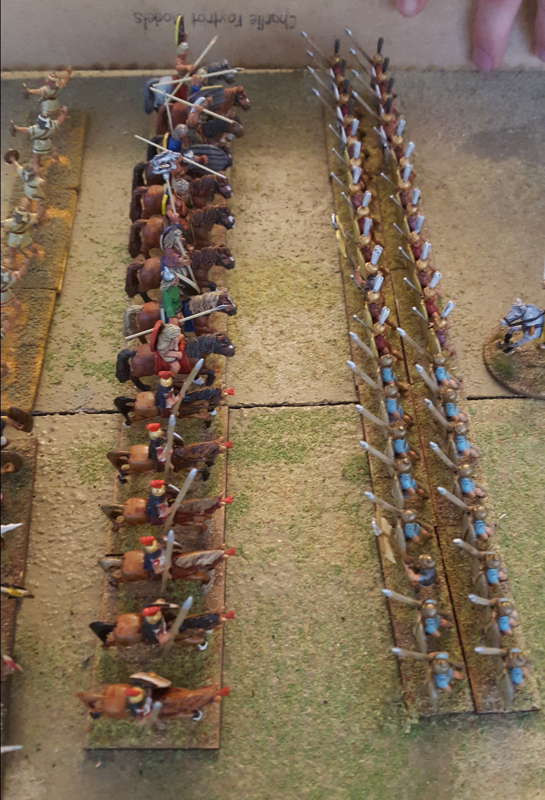
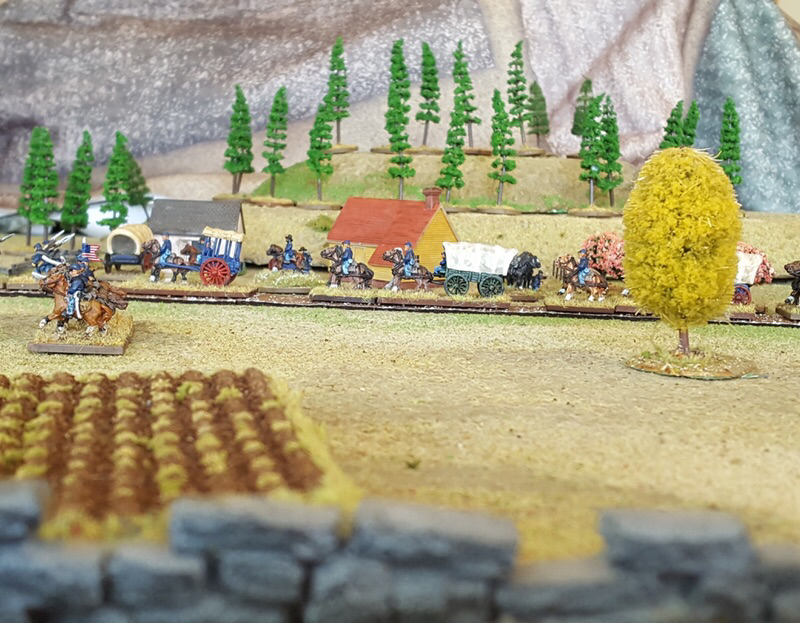
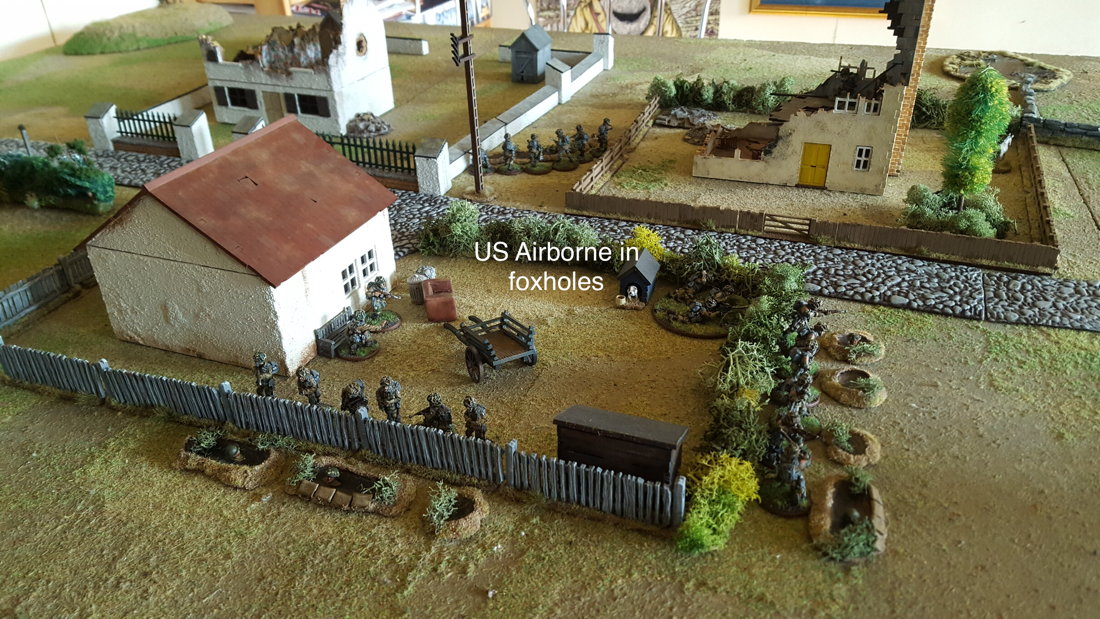
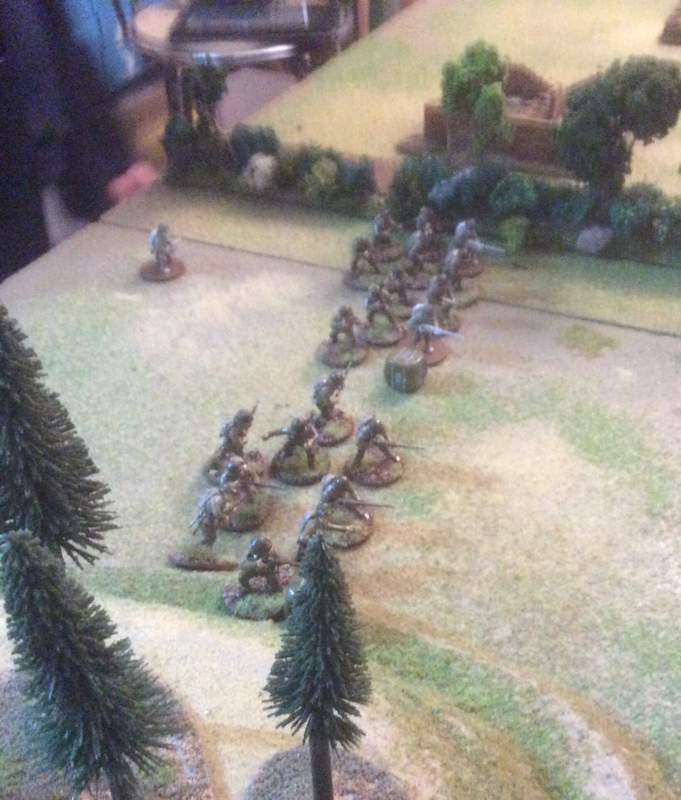
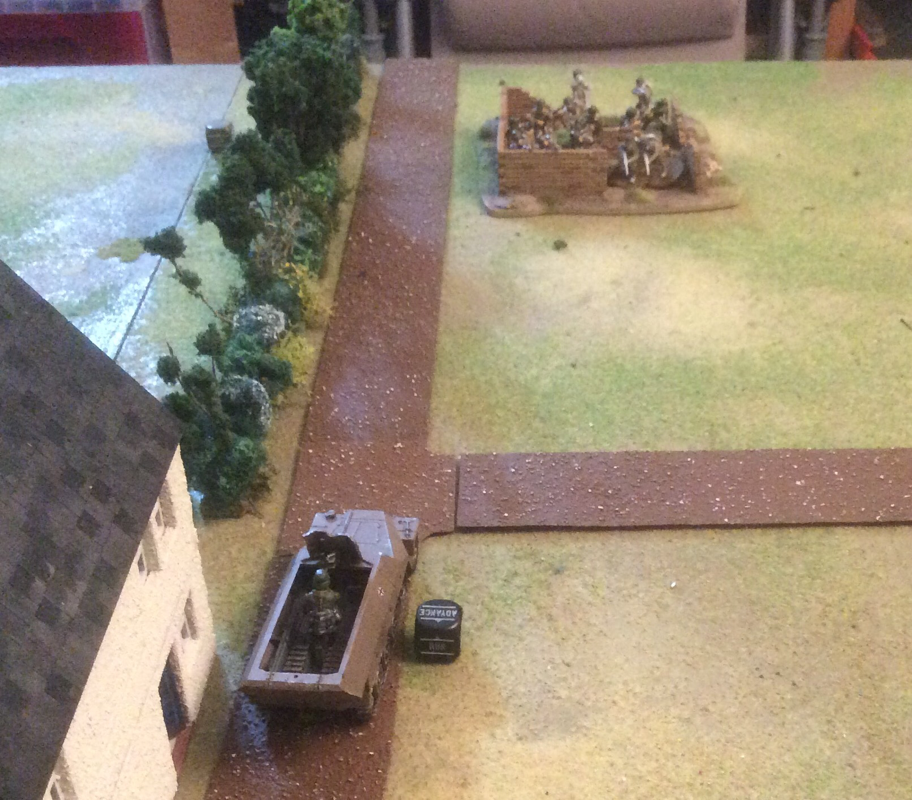
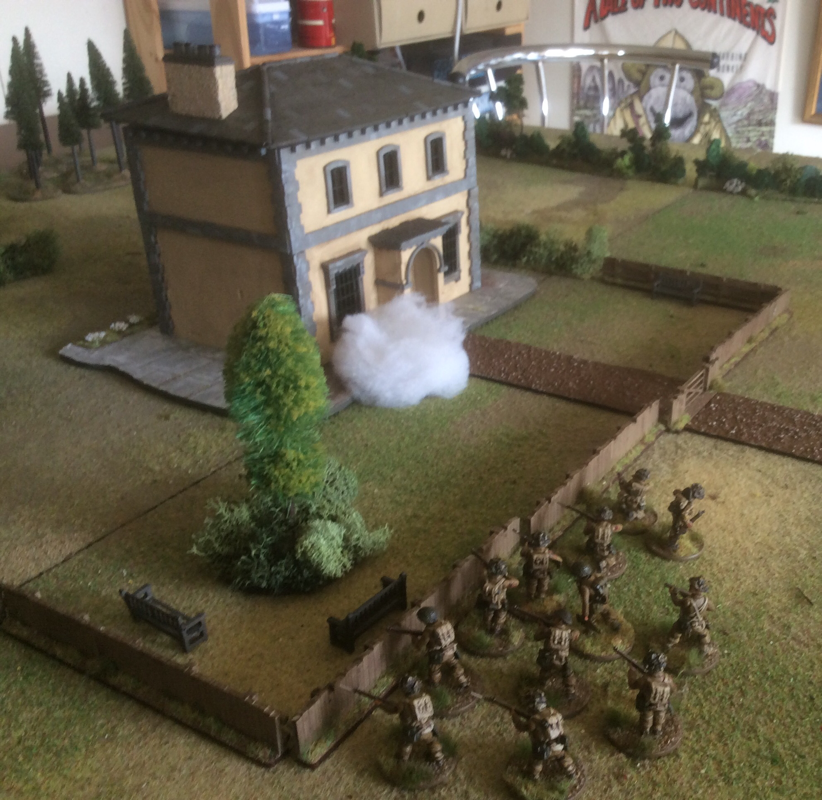
I created two 200 Point ADLG armies, using army lists 53 and 55. All troop types were picked straight from the lists except the Gallic foot. Hamilcar’s Gauls were recently recruited. Some stories say they were drunk at the battle but it is also possible that they were just disaffected and shaky. Either way they fought badly and Hamilcar deployed them on the high ground to make the best of a poor contingent. I decided they would be mediocre heavy swordsmen and not impetuous, reducing their points cost accordingly. Hamilcar’s army contained 6 stands of the mediocre Gallic Heavy swordsmen; 4 of Spanish medium swordsmen; 2 of African spearmen; 2 of Spanish medium cavalry; 3 of Gallic medium cavalry; 3 elephants; 3 Libyan light infantry with javelins; and 3 of slingers. Hamilcar was brilliant and his two subordinates were competent. Break point 26. Nero and Salinator commanded 10 stands of hastati/princeps heavy swordsmen; 5 of light infantry velites; 2 of Allied light infantry; 2 of triarii elite heavy spearmen; 4 of Roman medium cavalry and 2 of Allied heavy cavalry. Nero was brilliant and Salinator and Licinius were competent. Break point 25. Ben and Matt faced off on Wednesday evening. Their exploits are reported in my next post. I played the Markkleeberg scenario twice over last week, first with Matt and then with Keith. This was Matt’s first game with Lasalle and he picked up the rules very quickly. This was more of a training exercise than a full game and we played a reduced scenario, without Russian or French reinforcements. As Kleist, Matt broke into Markkleeberg and duffed up several of my Polish units. For a newcomer to the rules, he did very well and got the hang of the challenges of combined arms combat. Matt successfully evicted my Poles from the village and took out enough units to break my morale. I played the Poles again in the next game against Keith. This time we used a bigger table and all the reinforcements. Keith set up his artillery to bombard the town and advanced his infantry on their right, to leave a clear field of fire for the guns. The Prussians prepared to assault the town from the east with two battalions while with the rest of their infantry they advanced on the Polish left. In two turns I lost 3 battalions: one in the town and two ridden down by Prussian cavalry, working in close partnership with their infantry. The Polish cavalry rode across the field one turn too late to save the infantry but destroyed the Prussian Horse. Keith’s occupation of Markkleeberg triggered the arrival of his reinforcements, followed shortly on my side by Semelé’s French Brigade. The game ended with the Prussians still in Markkleeberg and sending two battalions past the town down the Polish flank. While a draw under Lasalle’s rules, I conceded as I had both taken more losses and my flank was turned. These were two entertaining games and I was pleased with the way the story unfolded. I did tweak the scenario between the first and second games to delay the arrival of Prussian reinforcements. On the day, the bulk of 12th Brigade was held in reserve until Markkleeberg was occupied. Allowing the whole command to be on table from the start did weight the first game in Prussia’s favour. Of course the Poles lost both times but the second game was a lot closer. I am inclined to change the victory conditions for future Lasalle scenarios. The rules as written are complicated and, because the victory test requires a comparison with the turn number, only work within a limited range of game lengths. The main problem for me is that both sides can hit their break point and each continue to take the victory test for a few turns and regardless of further losses, the loser will be the first to fail their dice roll. I think later rules by Sam Mustafa provide cleaner victory conditions. So taking a leaf from Longstreet, I might just set a higher break point and just say that the first to reach their break point has lost.  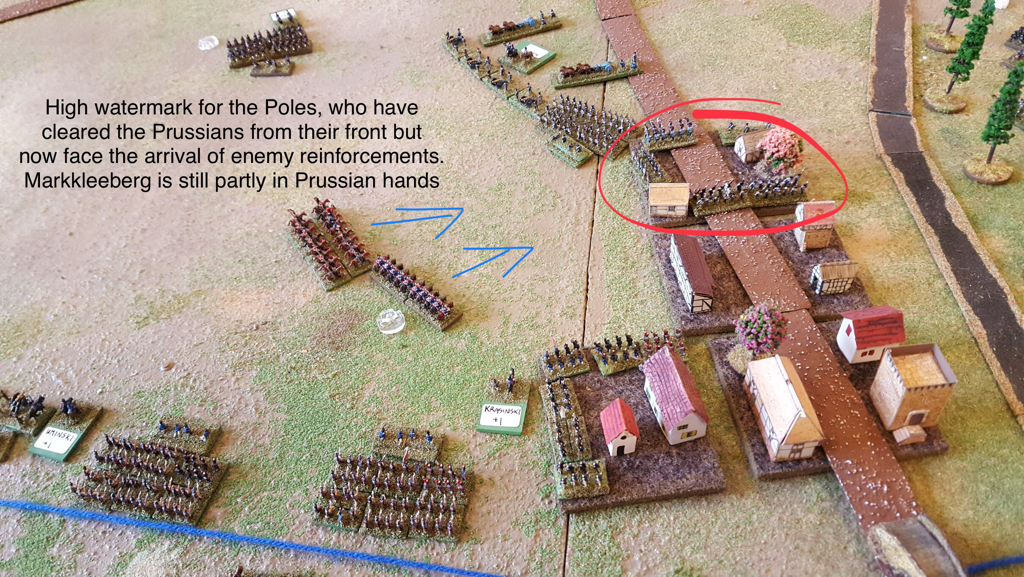 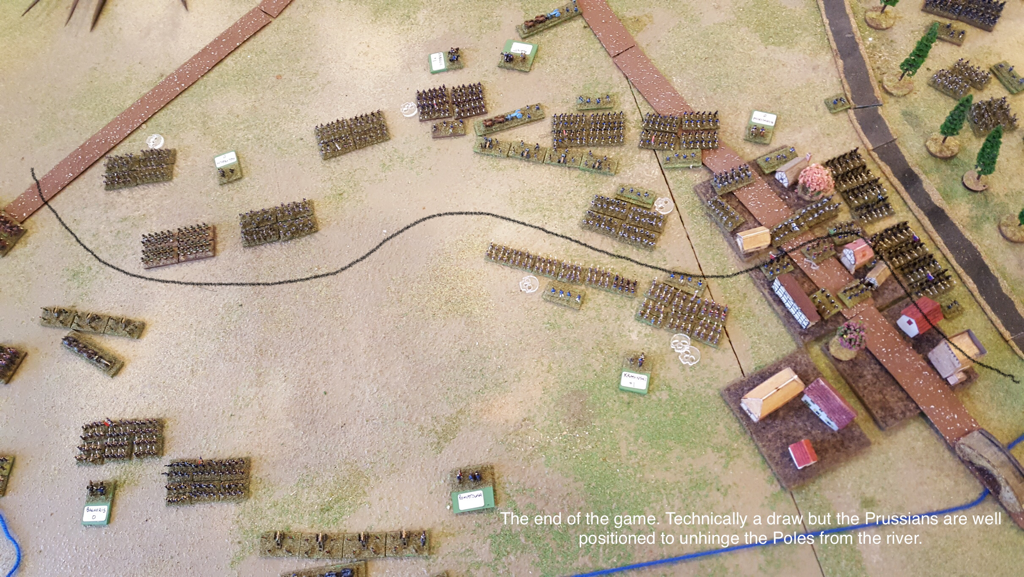 Every so often, we return to gaming the Napoleonic period. Recently, I was reading Digby Smith’s history of Leipzig and got taken right back to an obsession that had lasted for most of the 1990s. Back then our rules of choice were Napoleon’s Battles, then published by Avalon Hill. One of the supplements for these rules included several scenarios for refighting Leipzig. My friend Keith and I agreed to collect the whole Leipzig Orbat in 15mm between us. We managed to paint all the units present on 16 October 1813 (admittedly at a scale of 1 figure to 120 men), but we didn’t get around to the Army of the North or other latecomers, so alas, no Swedes. Over five years or so we played several good games based on the events of the first day of the battle. After rereading Digby Smith, I felt the urge to give Leipzig another go. I decided to start with the attack on Markkleeberg, which was made by a Russo-Prussian column under Kleist, mostly against Poniatowki’s VIII Corps, supported by Semelé’s division of Augereau’s Corps. I pulled together the other sources in my bookcase, which included Scott Bowden’s Grande Armee of 1813, the Osprey Campaign Book of Leipzig by Peter Hofschroer, Lorraine Petrie’s 1813 and two Polish language histories, one of the battle and the other about Poniatowski’s Poles throughout 1813. I had three options for the rules: Napoleon’s Battles of course; Honour Games’ Blucher; or their older, tactical set, Lasalle. Plan A was to adapt the Napoleon’s Battles Orbat for Blucher and I do hope to do this at some stage. But having read about the exciting exploits of individual battalions and cavalry regiments around Markkleeberg, I decided to start with Lasalle, using my small collection of 6mm figures. It proved tricky to work out the detailed order of battle and decide on deployments and reinforcement schedules. The accounts differ widely about exactly who was where and what happened on the day. No two books agreed on the troops involved. On the Allied side, some books just list the formal order of battle, which places Kleist at the head of the whole 2nd Prussian Corps, whereas Smith and Lorraine Petrie explain that at Leipzig, Kleist’s Brigades were shared out among the four Allied attack columns, to bolster their numerically depleted Russian allies. According to these sources, all Kleist had with him was the 12th Brigade, alongside Helfreich’s tiny Russian division. I decided to go with this version as it makes sense of the accounts in all of the books about how the engagement fought out. Had Kleist been in control of his full Prussian Corps, I suspect he would have overrun Poniatowski in no time at all. On the Polish side, again, every book has a different Orbat. Bowden, whose research into French returns is exhaustive, touches only lightly on the Poles and his returns for them don’t match with any other source I could find. I think the trouble here is that several theoretical orders of battle that were decreed for VIII Corps were never implemented because events moved too fast. Mariusz Łukasiewicz, in his book “Armia Księcia Józefa 1813”, carefully examines the true shape of VIII Corps throughout that year. I therefore decided to go with his list. As for the sequence of events, all sources agree that Kleist initially succeeded in taking Markkleeberg, was counterattacked in the course of the day and that by nightfall, he had been pushed back to his start line except he still had a toehold in the village. The resulting scenario is here. We have played it twice and a report and some photos are in my next post.  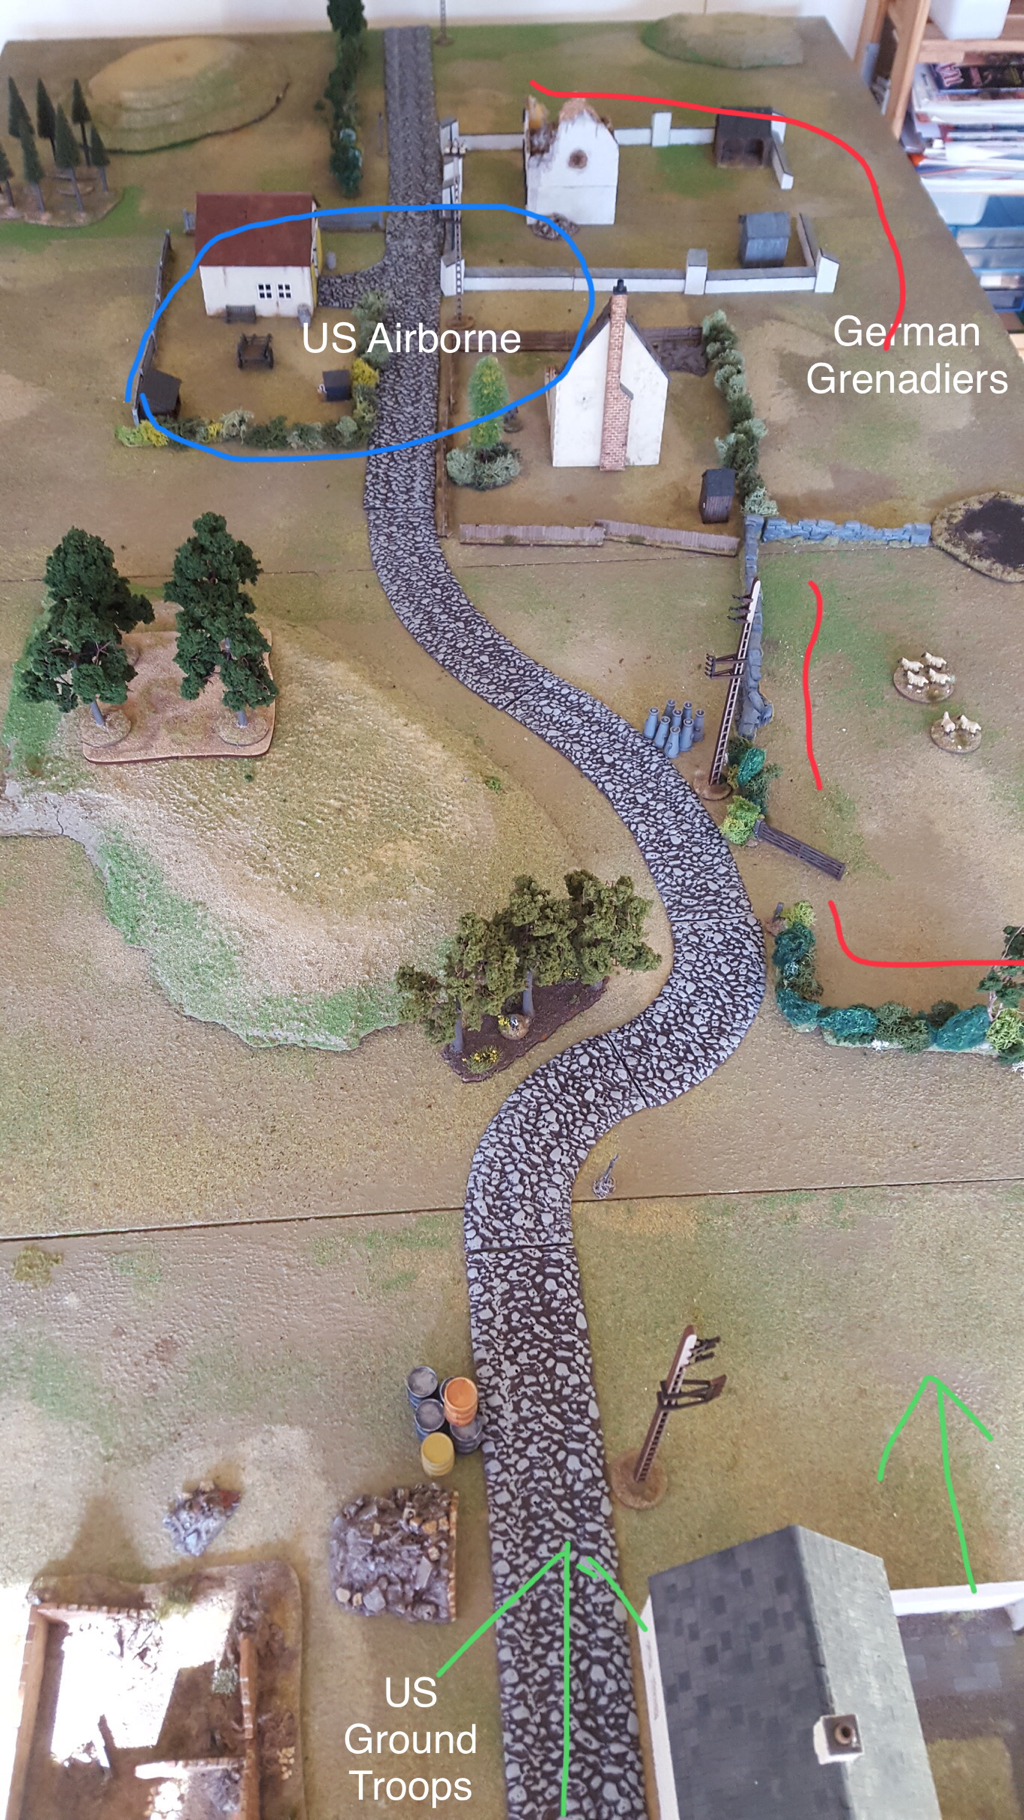 We played a three handed daytime game of Bolt Action on Saturday, to mark the first visit by Ian since he left for Asia in December. It was good to be back in BA after a run of Ancients games. Ian brought down his US paratroopers and Fallschirmjaegers and I wanted to include them in the game so I prepared a 1500 Point scenario very loosely based on Market Garden, as follows: “The 101st Division has been holding the road open to Eindhoven, the first piece of the airborne carpet over which 30th Corps plans to roll in its drive to cross the Rhine. Delayed from the start, the Armoured column is struggling to stick to its timetable. The German forces have reacted faster than the Allies expected and are pulling together an increasingly powerful defence. Place 3 objective markers along the main road, at 18, 36 and 54 inches from the Southern table edge.
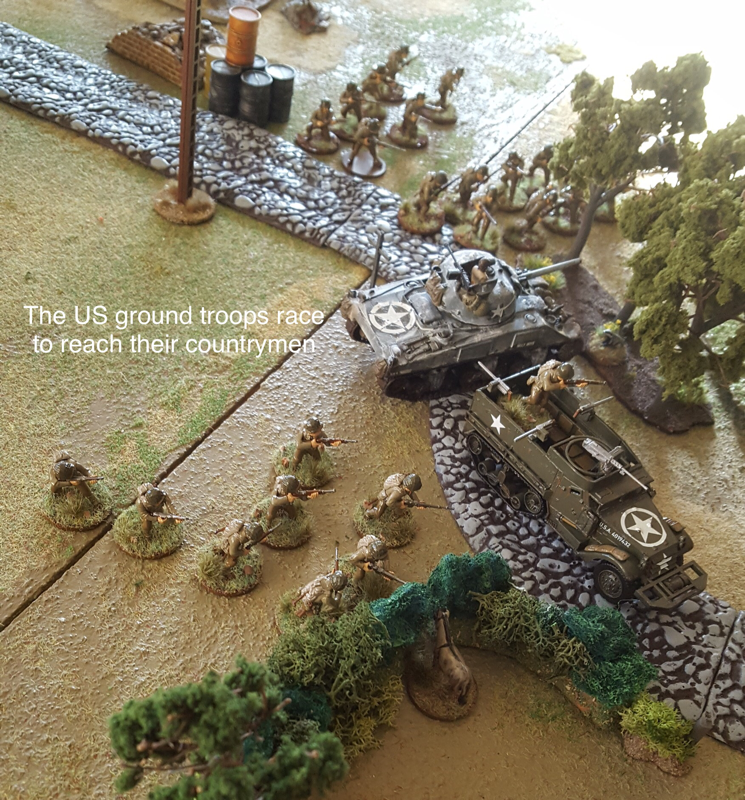
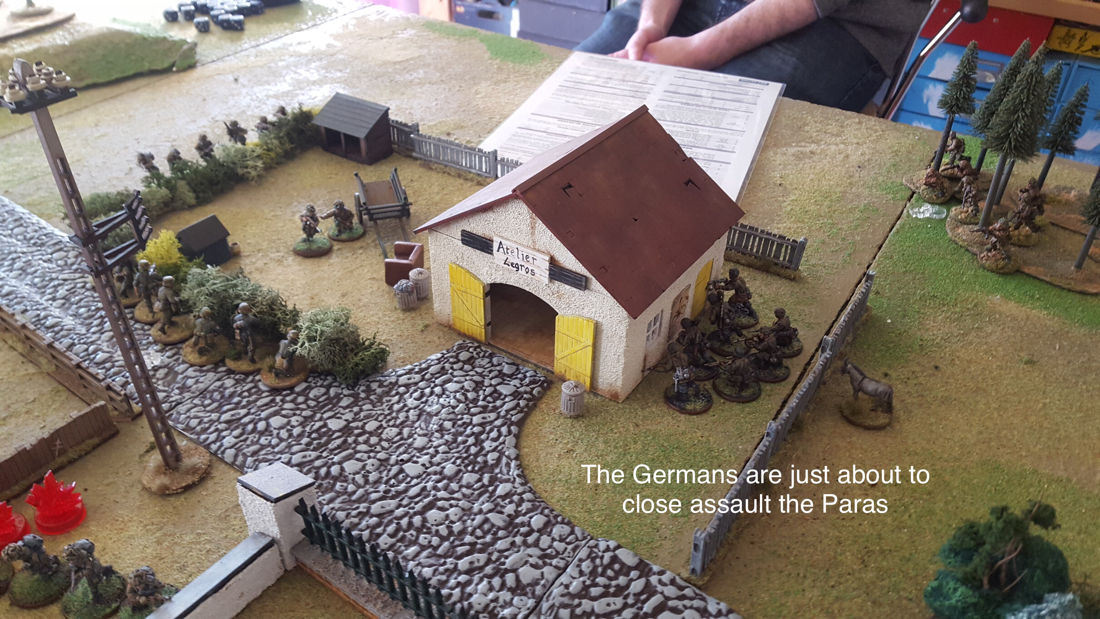
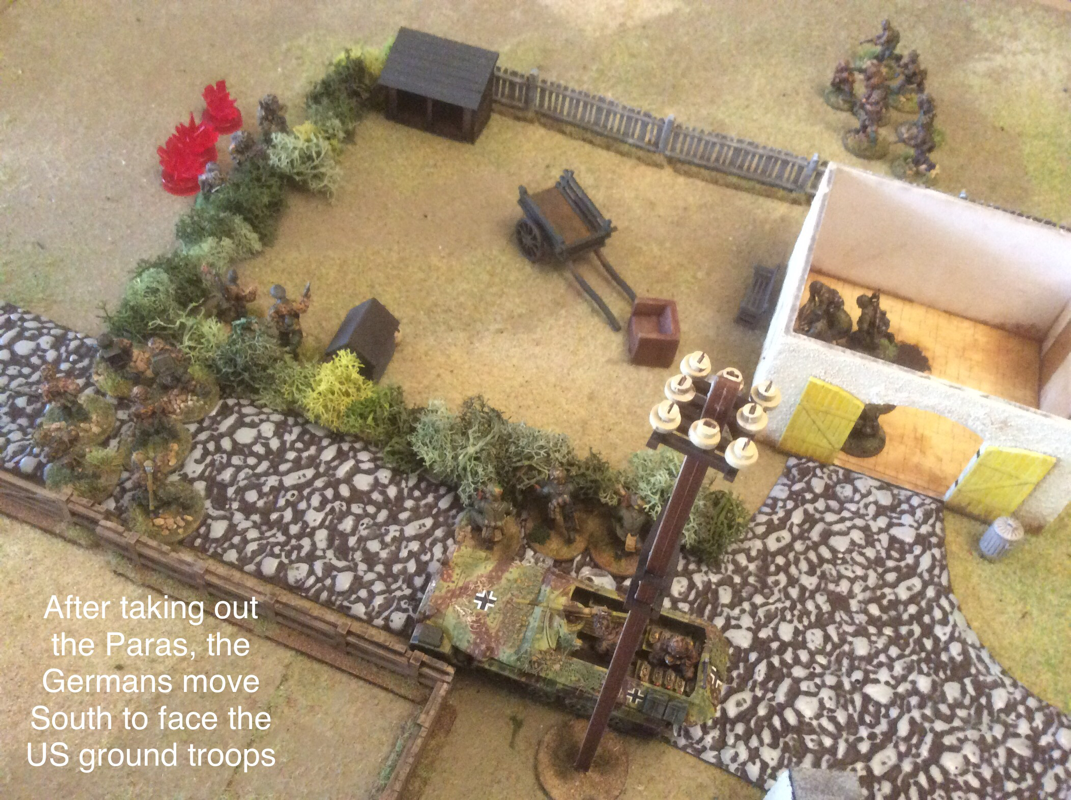
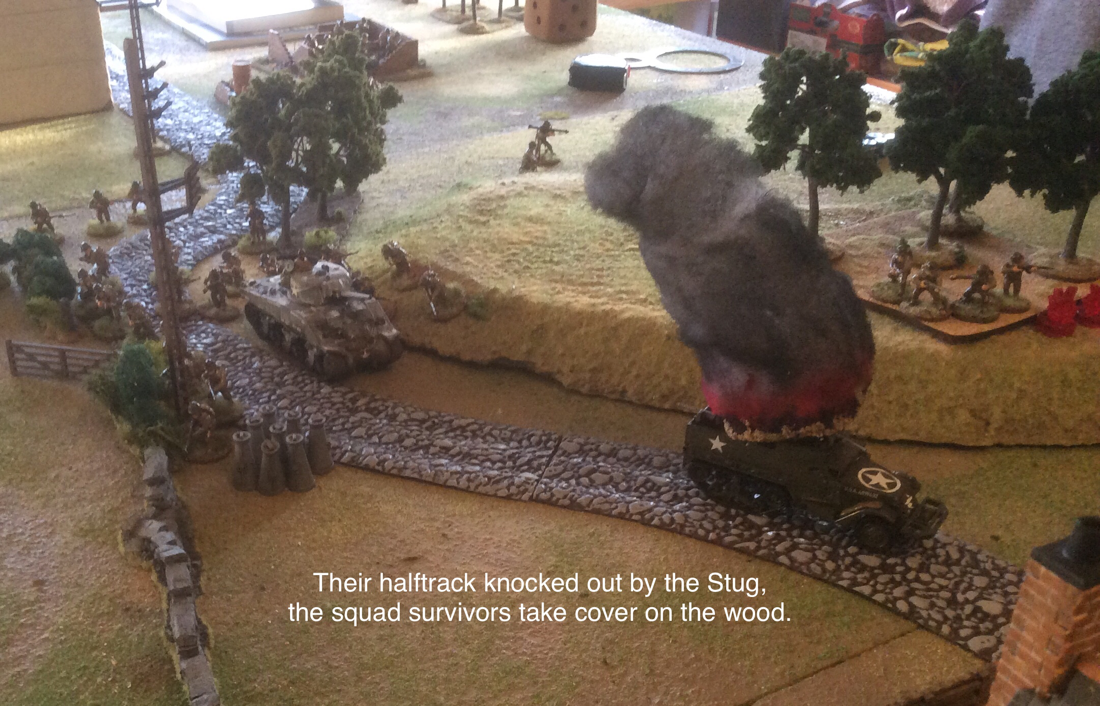
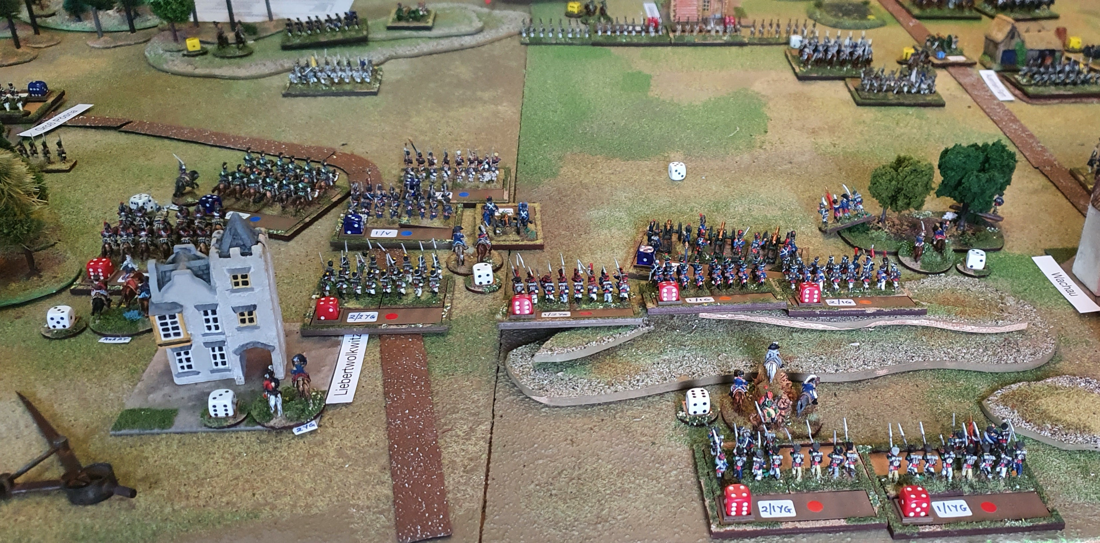
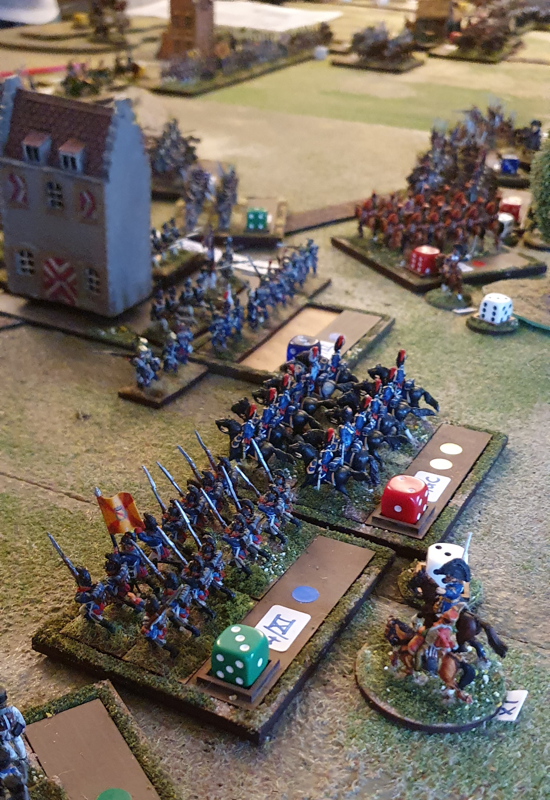
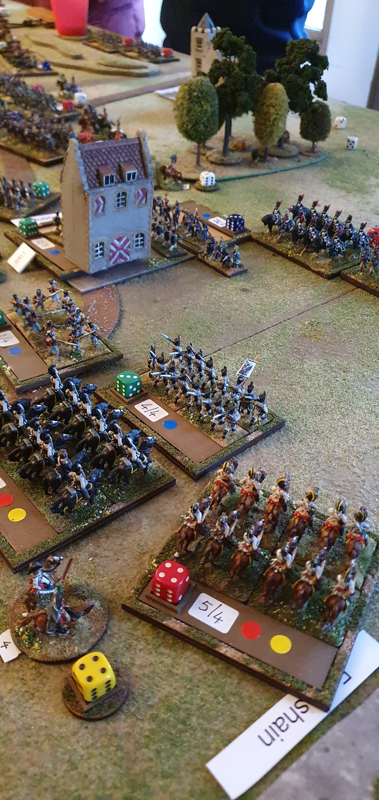
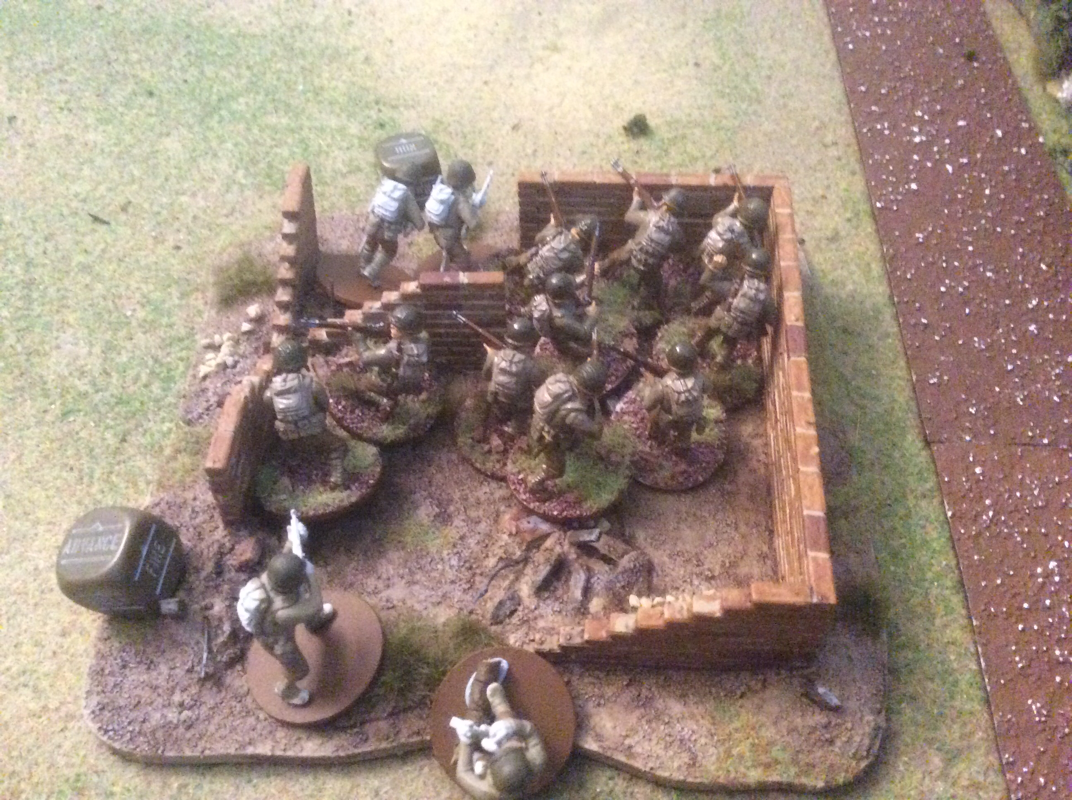
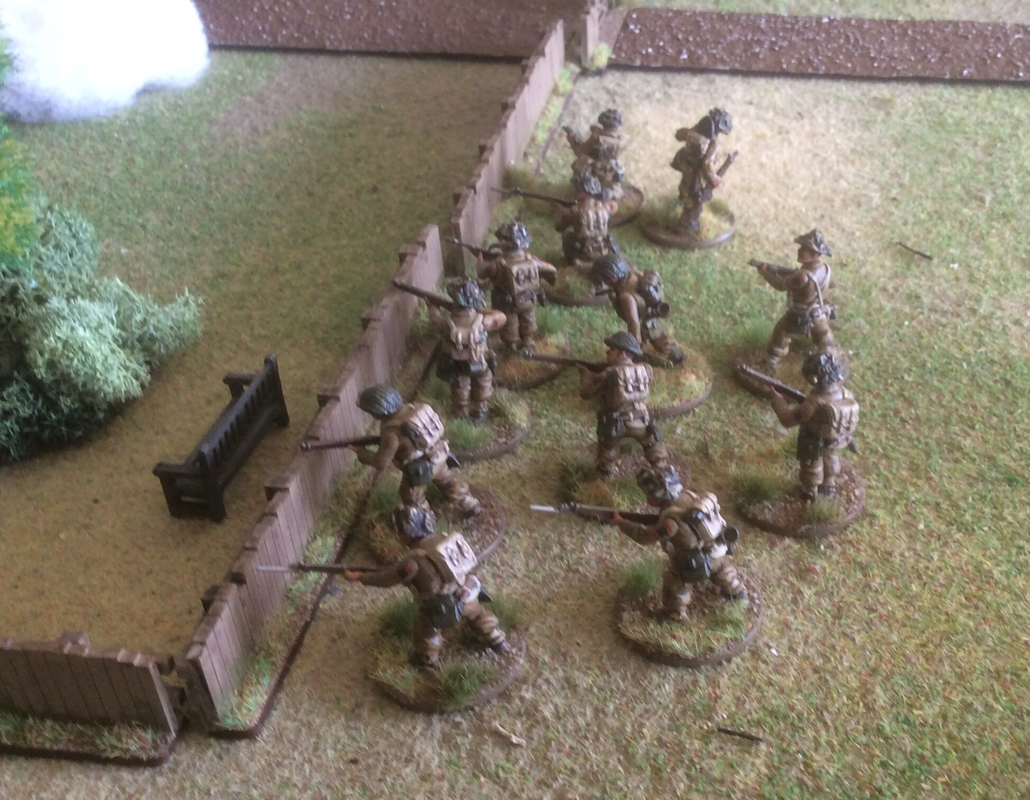
The game lasts 6 turns, with the possibility of a seventh on a roll of 4,5,6. 1 VP for each enemy unit destroyed; 2VP for each objective controlled by troops within 3”. Matt used his US troops as the relief force, with a Sherman, half track-mounted squad and an infantry platoon. I created 750 points of Heer Grenadiers for the on table Germans and a selection of Waffen SS and Fallschirmjaegers squads, a Stug and a panzer grenadier squad for the reinforcements. The objectives were represented by oil drums, milk churns and a dog kennel. The US paras set up in foxholes around the bicycle workshop and the dog kennel objective. The on table Germans all set up to the East of the road, with two squads and an MMG behind a hedge facing South and the rest facing the Paras to the West. In the first stage of the game, Matt’s relief force attacked the German hedge line while the rear area Germans, reinforced by two arriving squads, attacked the US Paras. In the second stage, the relief force destroyed the hedgerow Germans and advanced on the second German line, while the rear area Germans tightened their grip on the Paras. In stage three, the relief force was stalled by the destruction of an M3 halftrack, and held up long enough for the US Paras to be badly mauled and dislodged from the dog kennel objective. The game ran to a seventh turn and ended with the Allies holding 2 objectives for 4VPs, plus 3VPs for German units destroyed. The Germans meanwhile held one 2VP objective and destroyed 6 US units. So a German victory at 10 VPs to 7. The game was closer fought than the final score suggests. The US Assault on the first German line was quick and effective, destroying a 10 man squad and an MMG in short order. The second German line held well however, and was helped by the arrival of the Stug which first destroyed the halftrack then placed itself in ambush round the curve of a hill, threatening to enfilade a further US advance northwards. As it happened, when the Sherman did move into view the Stug only managed a ‘crew stunned’, but this bought enough time for the Germans to wipe out the US Paras. 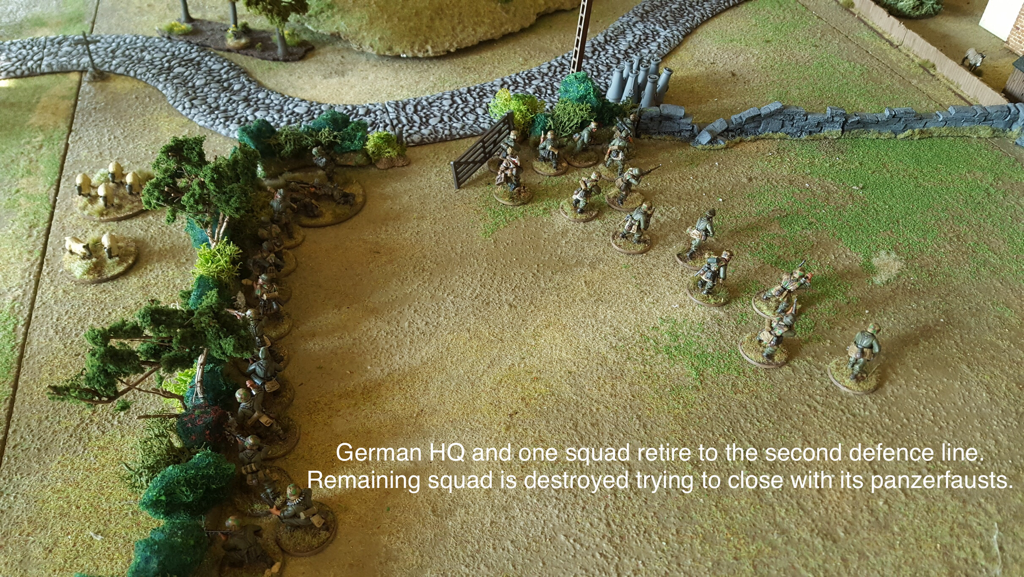 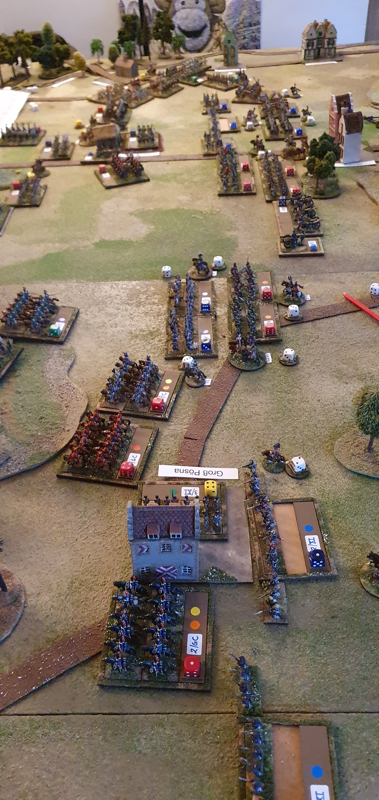 Before it all went wrong: my Romans at the start of the game We played a 200 Point game of Art de la Guerre last night. Matt led the Army of Philip V of Macedon against my Republican Romans. Matt was joined by Warren, in his second ever wargame, as commander of his left wing. This was the first ADLG game we have played with pikemen and it was an Education I’d rather have skipped. Matt won the initiative and chose to attack. I decided to meet him in the mountains, hoping to exploit the vulnerability of pikes in difficult ground. I selected the maximum number of terrain pieces and Matt chose the minimum, one of which was a road. We ended with an impassable river down one flank, a lot of difficult terrain on the other one and a bowling alley down the centre. It started well for me. Then the game began. With great care, I deployed an ambush of triarii in the difficult ground in my left rear, planning to tear into the Macedonian flank as they bore down on my centre. What a plan. I then completely forgot my basic idea and set off across the table to attack the enemy on their baseline. What a pillock. Our centres met in open ground and after the brief benefit of impact in the first round of melee, my Swordsmen began to crumble. Warren kept my right wing busy with his Greek and Illyrian horse and Agrianoi javelinmen. He knocked out my Velites and Roman cavalry, then started hammering my heavy infantry from the flank. At about the same time, Matt punched a hole in the centre that I lacked the reinforcements to plug. Where were my triarii when I needed them? Oh, yeah. Sniggering in the bushes on the far side of the table. 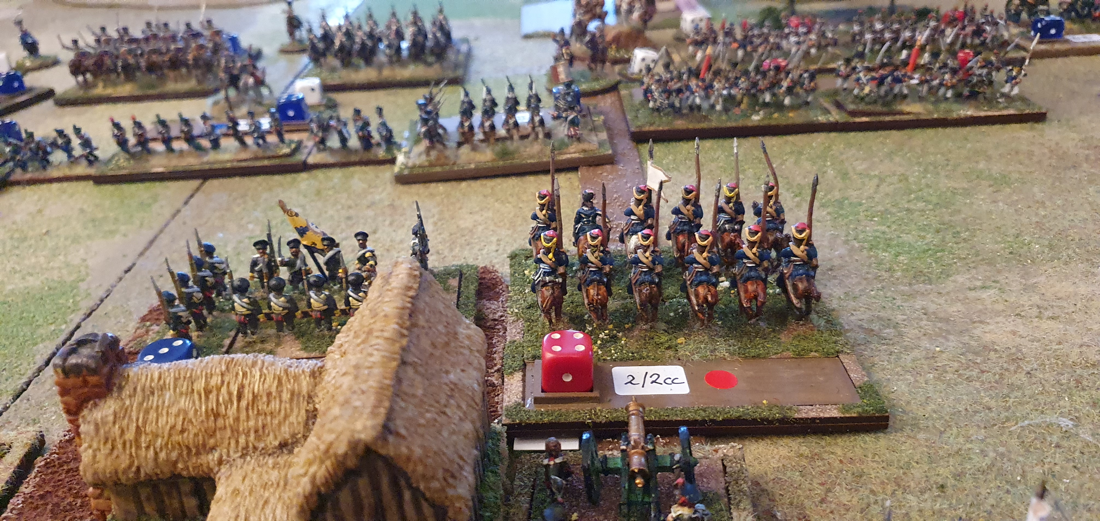 Warren’s Greek horse start eating up my Centre The end came in a rush, with too many of my depleted units breaking together. In all, Warren’s flank attack took out two bases of swordsmen, two Roman cavalry units and two velites. On the opposite flank Matt’s Companions destroyed my allied cavalry, while his rock hard pikes in the centre overturned my heavy swordsmen, admittedly after several rounds but with grinding inevitability. Lessons? Well, if you make a plan, stick to it. Pikemen in the open really are hard to stop and if I’m going to engage them frontally, I should have a pretty good chance of getting troops around their flank before they steamroll my swordsmen. And maybe in future I should spike the enemy’s drinks... Warren seemed to enjoy himself and had the baptism of stabbing his hand on the agema’s pikes not once, but twice. You’re not a true Ancients player until you’ve drawn blood on a spearpoint. It is lovely playing with my old 25s. Some of the Macedonians date back to 1982 when we started playing Ancients. Their pikes are dreadfully brittle and held together with superglue. The definition on the moulds is poor by today’s standards but I still love them. We played our first game of Pickett’s Charge last Saturday evening. I bought the rules soon after their release and made up some casualty markers, but somehow didn’t get around to trying them. I think I was daunted by the four pages of charts and tables and when the chance came to play our next ACW game we went with the tried, tested and much loved Longstreet. However, a visit by Keith coinciding with Warfare 2017 at Reading provided the incentive to try out the new set. Keith and I have broken in a great many rules sets over the years and generally manage to work out what we should be doing. 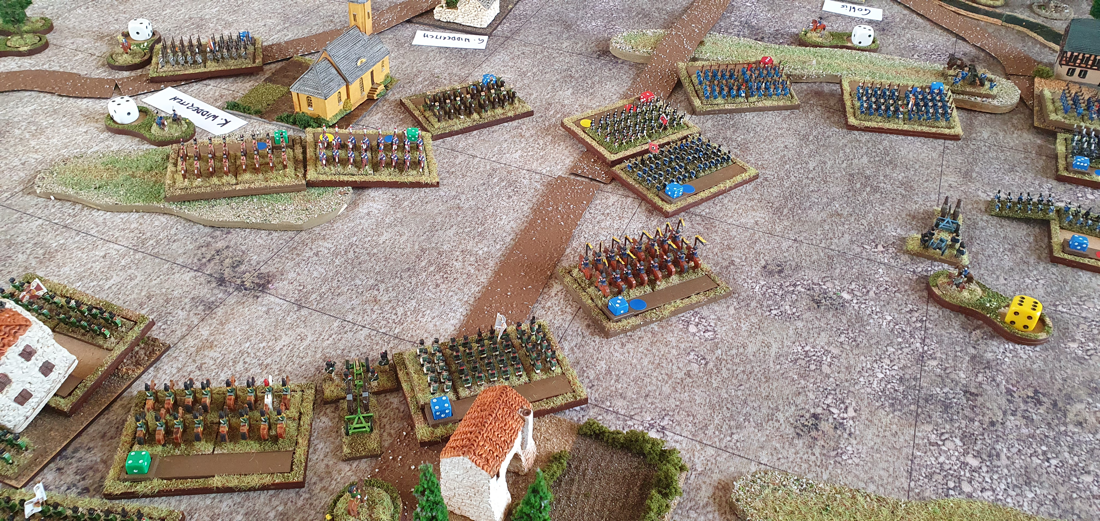 The scenario was Payne’s Farm, November 1863, the most lively encounter during the Mine Run campaign. In this operation, Meade set out to turn Lee’s right flank while Lee hurriedly shifted round to his own right to stop this happening. At Payne’s Farm, Meade’s right hand Corps under French and Lee’s left hand division under ‘Allegheny’ Johnson came to blows as they both converged on the same road junction. French had superior numbers but his advantage was largely cancelled out by the close wooded terrain, his own hesitancy and by Johnson’s aggression. Only later in the battle did Federal numbers start to count and night fell before they could make a decisive difference. I originally wrote a scenario involving Johnson’s whole command and the 2nd and 3rd divisions of French’s Corps. I’d hoped we could have a four player game but in the event, only Keith and I played so I cut the forces to the 2nd Federal division versus Steuart’s brigade of Johnson’s Division, plus a battery of Andrew’s artillery battalion. We started the game at the point where Steuart’s rearguard Brigade, strung out along the Racoon Ford Road, faced left to confront Prince’s division as it approached down Jacob’s Ford Road. Steuart’s task was to hold up the Federals while Johnson brought back his other three brigades from further along the Racoon Ford Road. 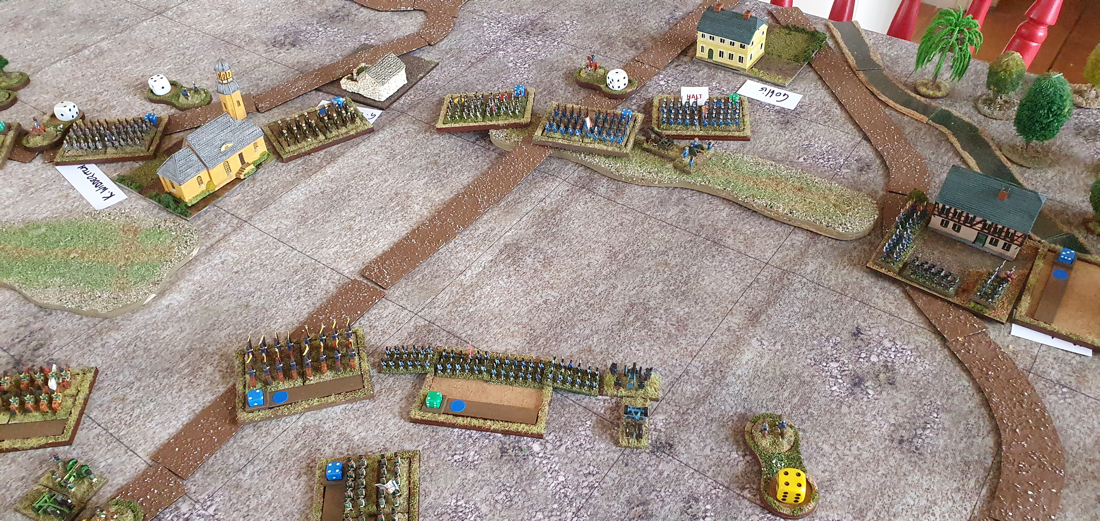 Keith’s Front Brigade advances on my line while the second Brigade moves around to outflank me In our game Keith’s Federals mounted a rapid assault on my Rebels. While his leading Brigade attacked along Jacob’s Ford Road, he moved his second Brigade in column around his left, using staff officers to move it double quick. I advanced my two left regiments to threaten his right. My centre held for a time but Keith’s second Brigade deployed at right angles to my line. I turned my right hand regiment to face it but it was pushed back on the centre, just as the centre itself gave way. End of game. The Confederate reinforcements would arrive on the scene to find French already advancing along Racoon Ford Road. I really like these rules. In spite of the four pages of charts, they played smoothly and we quickly got the hang of the sequence of play. Staff officers are a great device. Frankly our game was a bit small to really benefit from them but I can see them posing some interesting choices in a bigger action. Brigade morale is handled simply and effectively. Shooting has the particularly interesting result of loss of Fire Control, representing the degeneration of firing into an ineffective firefight. Melee (or the lack of it) is especially well handled: a competitive dice roll produces a range of results, most of which involve one side giving way without actually fighting hand to hand.
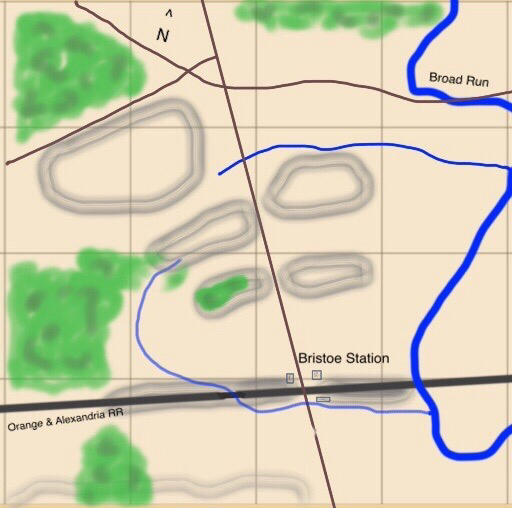
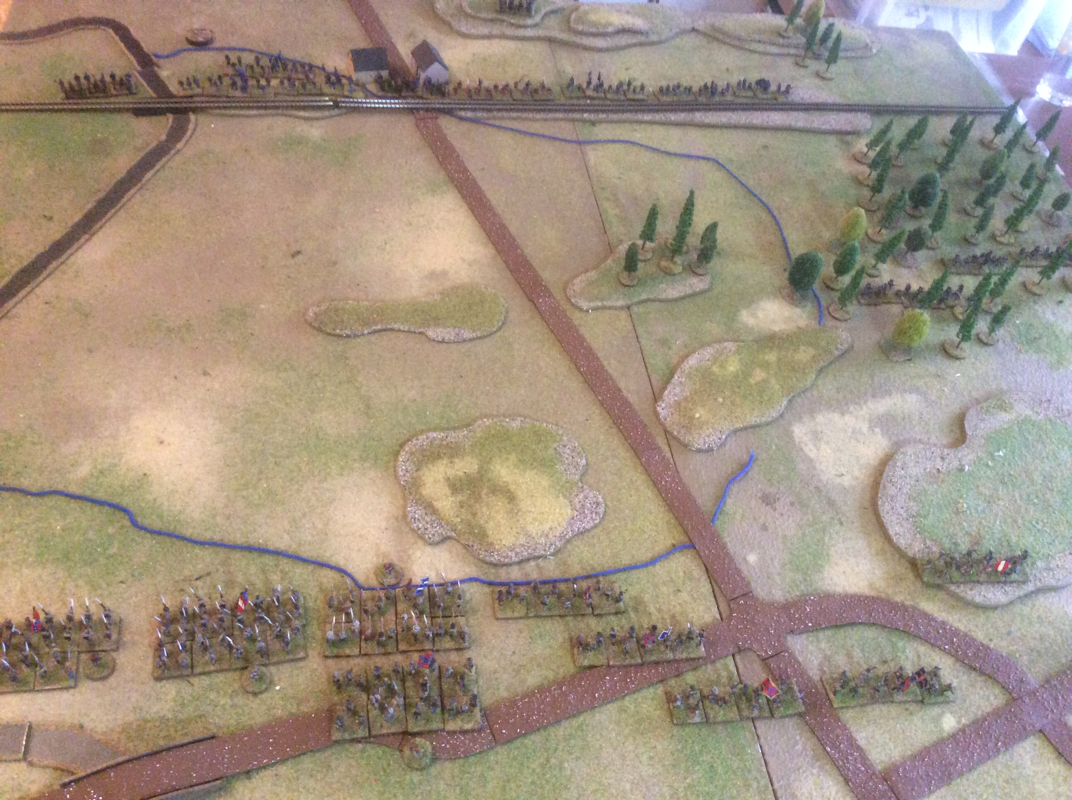
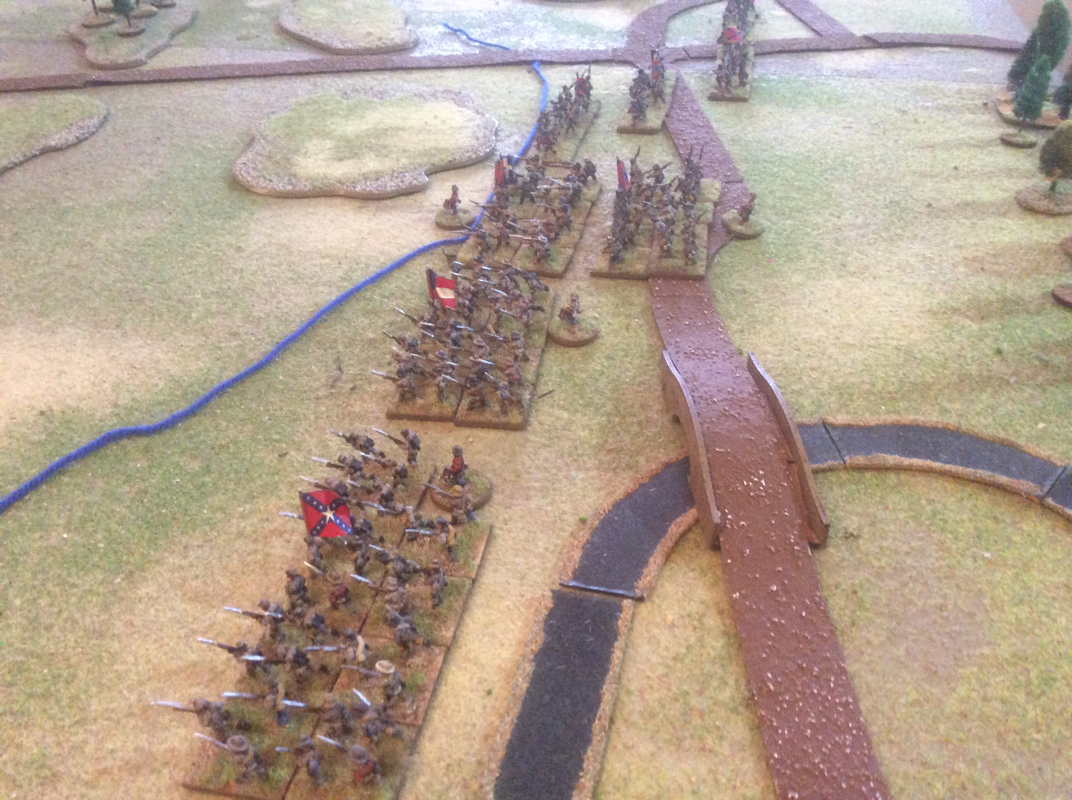
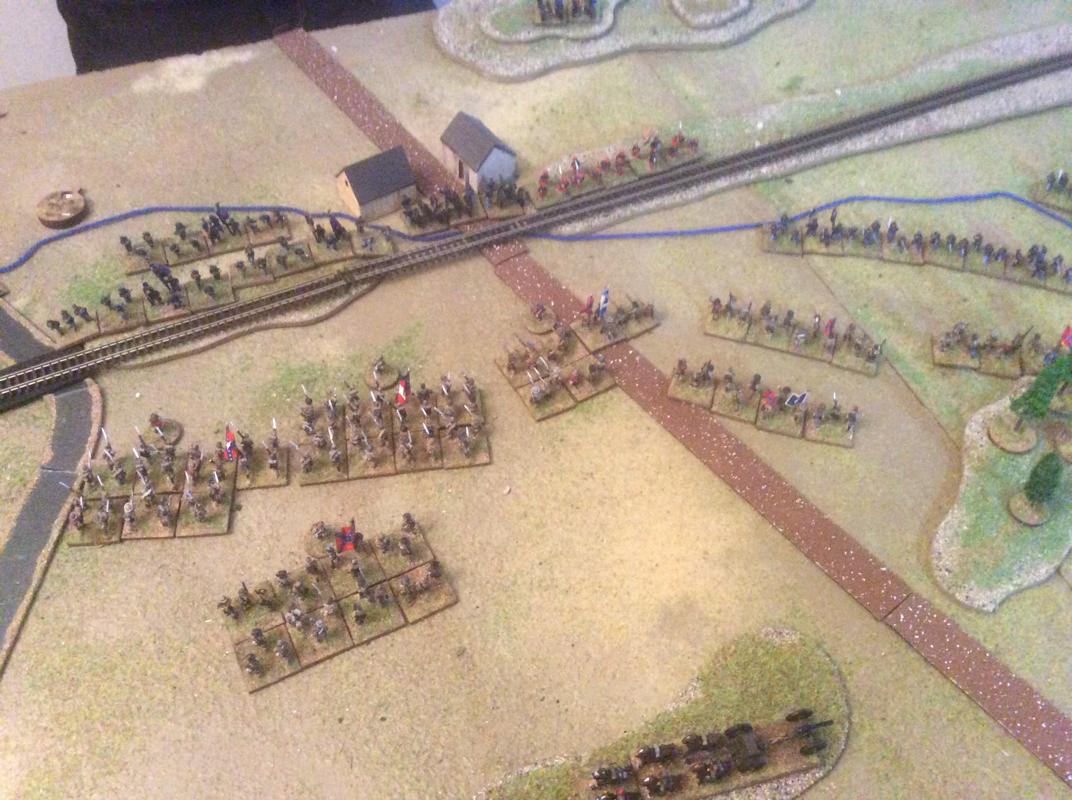
How does Pickett’s Charge compare to Longstreet? Using 1” figure bases, the ground scales, unit sizes and ranges are similar. PC has more period chrome incorporated in the rules, whereas the flavour in Longstreet mostly comes out in the Action cards. A big visual difference is that casualties are not physically removed in PC. A Longstreet battlefield can look a bit empty towards the end of a game! Longstreet doesn’t have explicit morale rules whereas these are important factors at both unit and brigade levels in PC. As I have said before, Longstreet is my favourite rules set for any period. It flows so well and provides period feel and excitement. It also produces occasional situations that historical reports are full of but players almost never permit, when units do something unexpected or unwise in the face of the enemy. I love those moments. But Longstreet has its limitations. With house rules, we were able to use it in a divisional game with four people, but it doesn’t pretend to challenge the player to think beyond the level of brigade commander. Pickett’s Charge on the other hand does this well. So I think the answer for me is that I will continue to use Longstreet for Brigade and small divisional actions and bring in Pickett’s Charge for bigger battles. On Friday Keith and I replayed Bristoe Station, using Honour Games' Longstreet rules. The details are on the Scenarios page of this website, here. The game covers the attempt at the start of the combat by Heth's Division to cut off Warren's line of retreat. The shatter point for both armies was 24. As Warren, Keith deployed his centre and right brigades behind the railway embankment (and so benefitting from cover), and his left hand brigade across the railroad in the woods. He supported his line with three batteries: one at Bristoe Station itself, one on the far side of Broad Run with a good field of fire across his front; and one on high ground behind his front line. As Heth, I put Cooke's stronger brigade on the left and Kirkland's brigade on the right. The front is quite restricted so I deployed Cooke's regiments in double lines. 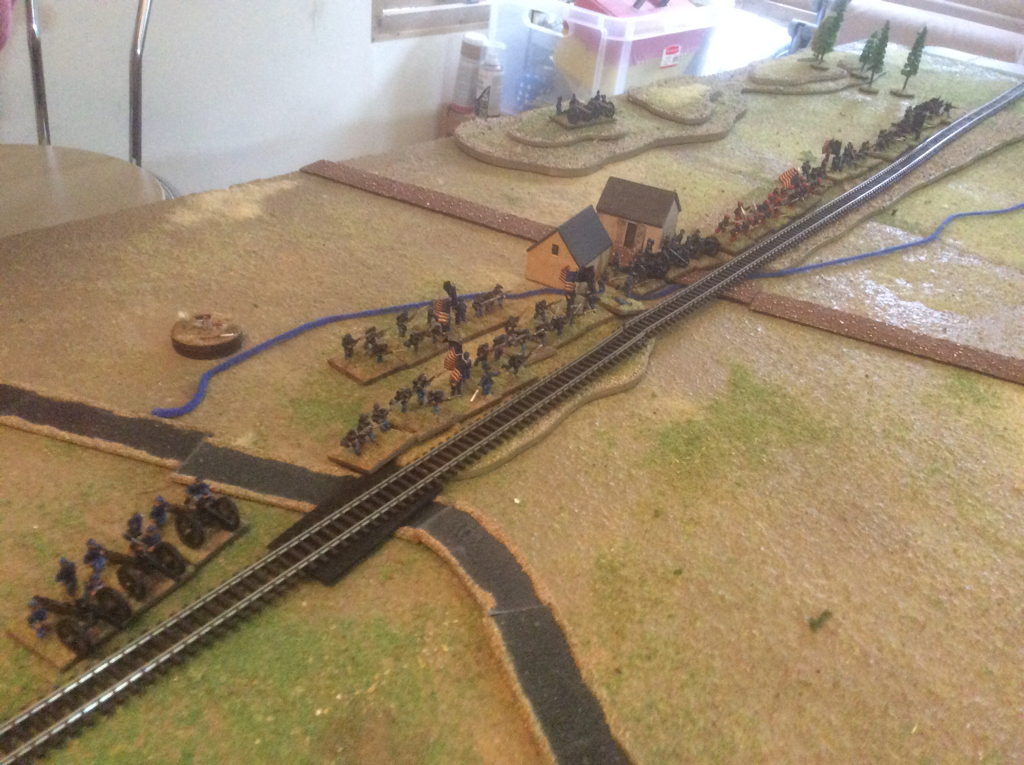 Keith's centre and right, lining the Orange and Alexandria railroad For the first few moves I tried to close the distance quickly, having nothing to counter Keith's powerful artillery. I used up a lot of morale cards and still lost a good few bases. I also lost an entire turn as Keith shot my general (playing the 'couldn't hit an elephant' card) and rolled 6, wiping out my entire hand. On my right, Keith's brigade in the woods came looking for Kirkland, forcing me to refuse my right. I tried not to divert too many units from the main assault but as Keith reinforced his troops on my side of the railroad, more Confederate regiments got stuck into firefights with Federals. However, I was pretty happy with Cooke's progress and approached the embankment with promising local superiority over the Yankee right. But my losses rose quickly as we came into small arms range and I was pushed over my shatter point with Cooke just a couple of inches from the railroad. This was a great game and brought out some of the best aspects of Longstreet. The rules are really easy to remember and strip out unnecessary gloss, but the action cards bring in the flavour of the period- and of the specific stages in the war- perfectly. I came off worse partly due to the Yankee guns card, which made his artillery particularly deadly. Losing 6 Action cards and a whole turn due to my general getting shot increased the time my troops spent in the artillery killing zone. A good test of any rules is how close a refight comes to what actually happened. Well, we couldn't have got closer to the real outcome. On the day, Heth made it to within yards of the railroad before his men were broken by weight of Union fire. At a couple of points in our game, the positions of the troops almost exactly mirrored the map of the actual battle. Very satisfying. Hats off to Keith who had not read about Bristoe Station but saw and exploited the benefits of the terrain pretty much as Warren did in real life. I now want to rerun this scenario using Pickett's Charge, which uses the same ground and units scales. To be honest, they'll have to be pretty amazing rules to shift me from Longstreet. Friday's game reminded why Longstreet is still my favourite rule set for any period. 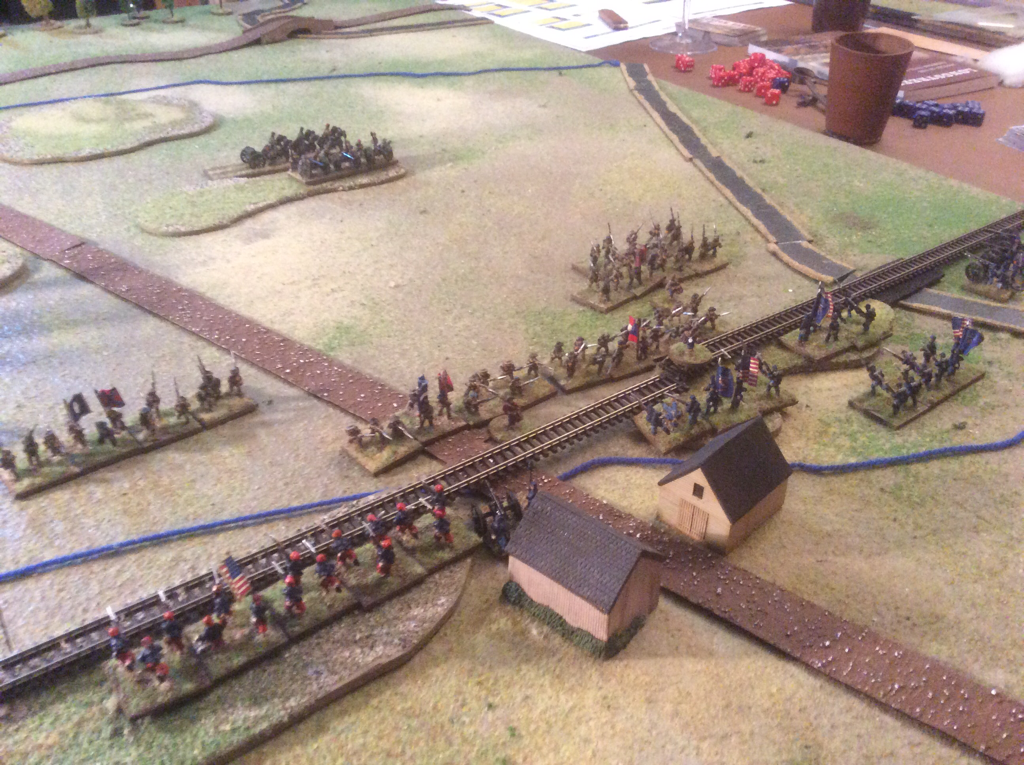 High water mark for Heth. At this point, Confederate losses pushed them over the line and the Union won the Action. On 15 February we started an escalation campaign for Bolt Action, set in 1944 Normandy. We began with 500 point armies, with just platoon assets. Game 1: Ian's Fallschirmjaeger versus Matt's US. Matt fielded two regular and one veteran squads, a 1st Lieutenant and a medic. Ian had two sections of Fallschirmjaegers, one of them in a half track, and a 1st lieutenant. The scenario: meeting engagement. Back story: With the line stabilising, both sides are feeling for the enemy. They meet around the Maison Jaune, a local notary' house. Changes to BA scenarios: Losses from this scenario may be carried forward to the next game, with the chances of recovery better for a unit that was not completely wiped out; hence, either side may withdraw units from the table at any time.  The table for both games. Germans enter from the right both times The Action. Matt arrived first, deploying his three squads together on his right flank. His left was protected from view by bocage (cannot be seen over except by troops lining the bocage). Ian brought his first section with its half-track in on his left, but brought his HQ and second section in on his far right, aiming to outflank Matt. Matt took advantage of the local superiority on his right with concentrated fire against Ian's left, with effective results. With several pin markers, Ian failed a crucial order test and was unable to withdraw before Matt's third squad assaulted his section. This spelt the end of the clash, with Ian's surviving troops linking up with the half track and departing the field. First blood to Matt's US. Game 2 Same scenario, my British against Ian's second force of Fallschirmjaegers. I deployed three regular sections, a 1st lieutenant and a light mortar. Ian had an identical force to game 1. Same terrain. I came on closely grouped on the right flank, with the light mortar in a ruined pig sty a little to the left. Ian came on opposite me but, having seen my deployment, shifted quickly to his right. My platoon swung 90 degrees to face Ian's new position. Firing was limited to lmgs and Ian's half track mmg. The British had slightly more success until Ian's MMG scored a lucky hit that removed a Bren team. Having spent most of the game manoeuvring, we ended with an inconclusive draw. After the games we rolled to see which of our losses would return in time for the next game. Only Ian's fallschirmjaeger section that was destroyed in close combat ceased totally to exist.
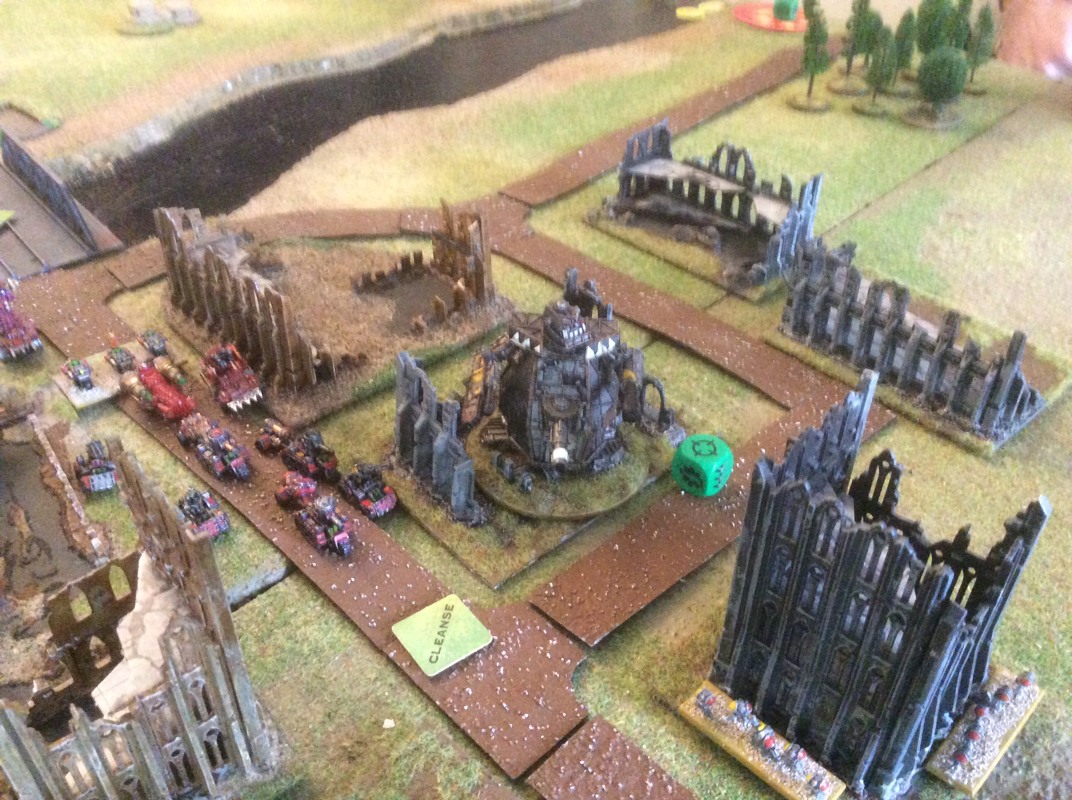
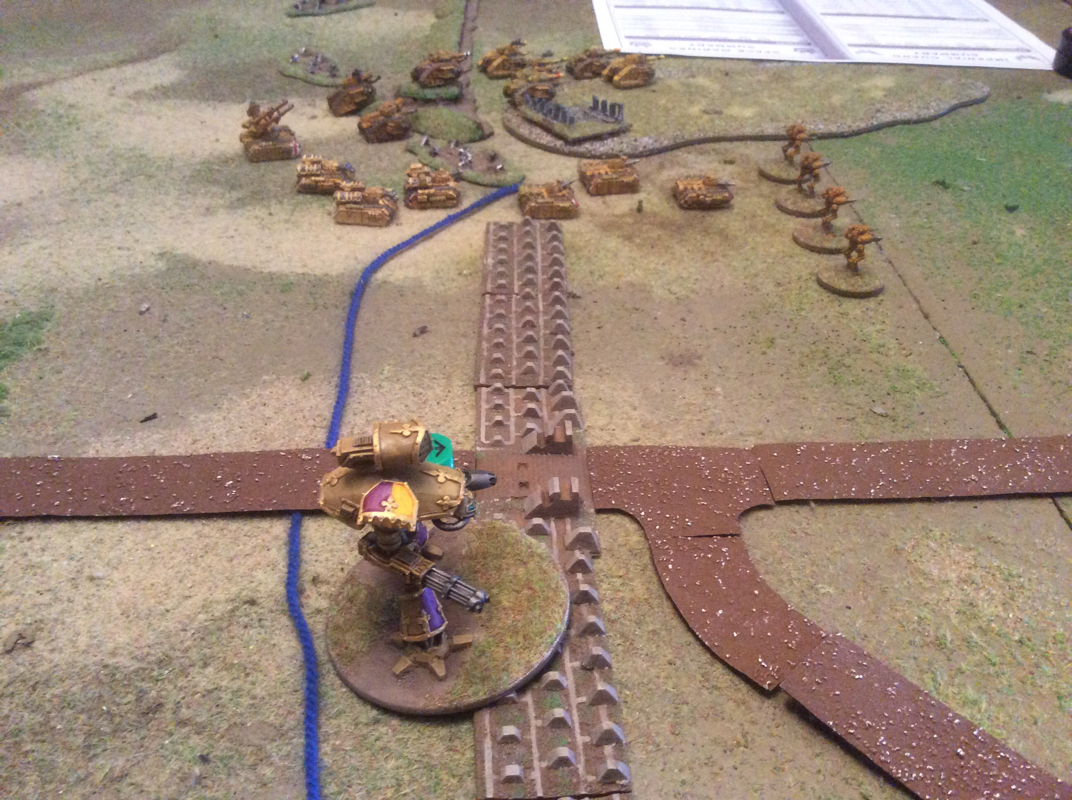
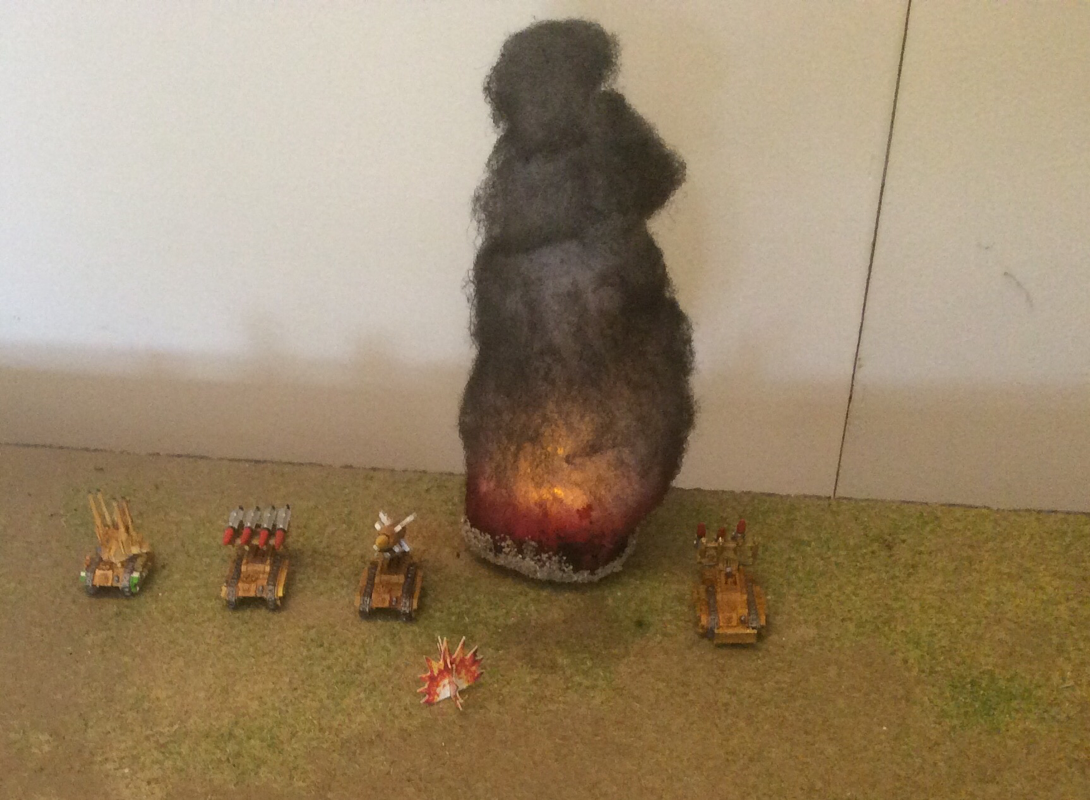
In the next game, players will pay for their surviving reduced sections at normal cost, then buy more assets to the new points limit. Ian will have to replace his lost section with a regular section, so one below the quality of his original troops. Two games in, the points table is: Matt: played 1. Won 1. 2 points Ian: played 2. Lost 1, drew 1. 1 point Tim: played 1. Drew 1. 1 point We play again on 8 March. Yesterday we played an Epic 40k game, very loosely based on Operation Market Garden. Nick and Matt led the Orks; Ian commanded the Imperial Guard ground forces and I combined scenario management with leading the Space Wolves force, air-landed to take and hold the Bridge over the river Grime. We had around 4000 points a side. The player briefing was in my last blog. Turn one The Space Wolf detachment landed on open ground north of the river. An Ork Gargant began in the Imperial ruins north of the river, while a Kult of Speed set up just south of it. On turn one, nearly half the Imperial army arrived on the South table edge. The Orks decided to concentrate on wiping out the Space Wolves, so left the Imperial advance unopposed. Morale levels at end of turn I: 88 O: 103 Turn two The Imperials marched up the field while three Ork detachments arrived from the flanks. Imperial siege artillery and armour took out a great many Orks from Zeke'z Army. Using a Fate card, the Orks brought in an orbital barrage against the Imperial siege guns. The Space Wolves were obliterated north of the river. I: 76 O: 90 Turn three More Ork reinforcements arrived on the field and started to form a defensive line north of the river. An imperial deathstrike missile hit the Gargant, causing massive damage: the Gargant just survived the turn with three damage points left, three onboard fires and only one weapon unbroken. Two Ork detachments were taken below half strength, but with all objectives still in their possession, their morale stayed pretty resilient. I: 76 O: 76 Turn four The Ork line solidified north of the river. The Reaver Titan finished off the damaged Gargant. Ork assaults went in on both flanks: Alarik's Ardboyz, led by Alarik on a Boar, obliterated the Catachan armoured detachment in the East, while Zeke'z Army assaulted but bounced off the Fighting 207th. I: 63 O: 69 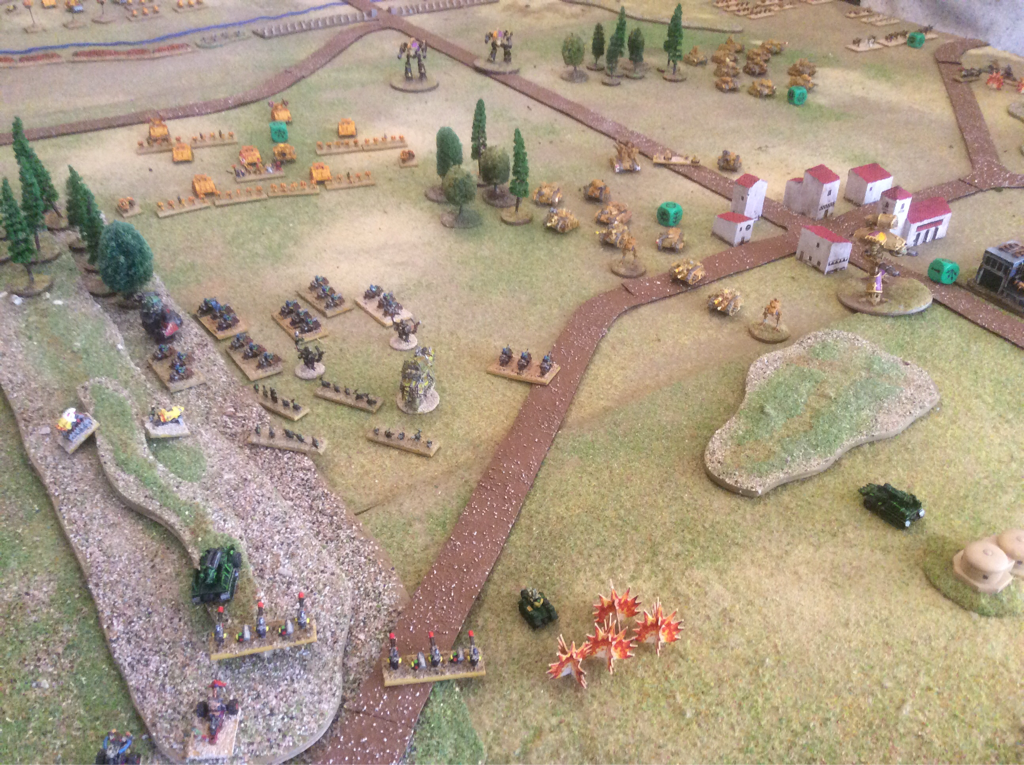 Turn five The Great Gargant and Mega Gargant arrived at the North table edge (to their frustration as it meant a long walk). Meanwhile three flights of fighta Bommaz appeared on the horizon and nearly wiped out a marching Detachment of Imperial armour. Zeke'z Army managed to stay alive for another turn. Alarik's Ardboyz with their boarboyz spearhead assaulted and broke another Imperial armour detachment. I: 41 O: 63 Turn six Alarik and his boars suffered heavy damage from advancing Space Marines but heroically charged a Warhound Titan, who promptly squished them. Thus passed the mighty Alarik. The Orks on the north bank of the Grime started to crossed the bridge to engage the Reaver, surrounding it on three sides. Four detachments broke down its shields then a detachment of battle fortresses destroyed it. One reactor meltdown later and the Reaver was no more. On the Western flank, Zeke and the not-so-fighting 207th both failed to remove a single blast marker, so stalemate fell over that part of the field. The mega Gargant fired a krooz missul into the Imperial siege artillery and took out a manticore and a hydra. Imperial morale took a serious tumble this turn. I: 25 O: 55 Turn seven The Imperial Fists closed up to the river, while the Great Gargant waded into the water intent on making its mark. Three squadrons of fighta bommaz smacked the Imperials in the West; both great and mega Gargant let rip their armaments and both Warhounds ceased to exist. A second Krooz missul took the Imperial siege artillery below half strength and by turn's end, imperial morale went into the negative. The I: -3 O: 48 Post mortem Until turn five, the game seemed well balanced. However, the outcome was already becoming inevitable. The Imperials did have some poor reinforcement rolls that delayed the arrival of two big artillery detachments, the Imperial Fists and the Warhounds. Their advance fell into successive waves, which the Orks were able to contain one after the other. Perhaps the most significant decision of the game was in turn one when the Orks ignored the southern front to concentrate on crushing the Space Wolves north of the bridge. The removal of this threat cleaned up the Ork front and made passage over the bridge easy. Obliged to cover ground fast, the Imperials used a lot of March orders and when Ork air power turned up, this proved lethal to the marching Imperial armour. I hope it was some compensation for the Imperials that the outcome in our game mirrored the outcome of Market Garden. Even with more strength coming up the road, the Imperials would be obliged to halt south of the river. The day flew by and the game was great fun. As the forces on the table multiplied, it looked pretty impressive too. Hats off to Matt and Nick, and commiserations to Ian, who may have felt a little puzzled that despite being on his side, I seemed to take as much pleasure in the outcome as the Ork players. Of course I'd rather we had won, but I was delighted that the scenario had given a tense game and arresting spectacle. What will inspire us next? The Bulge maybe? 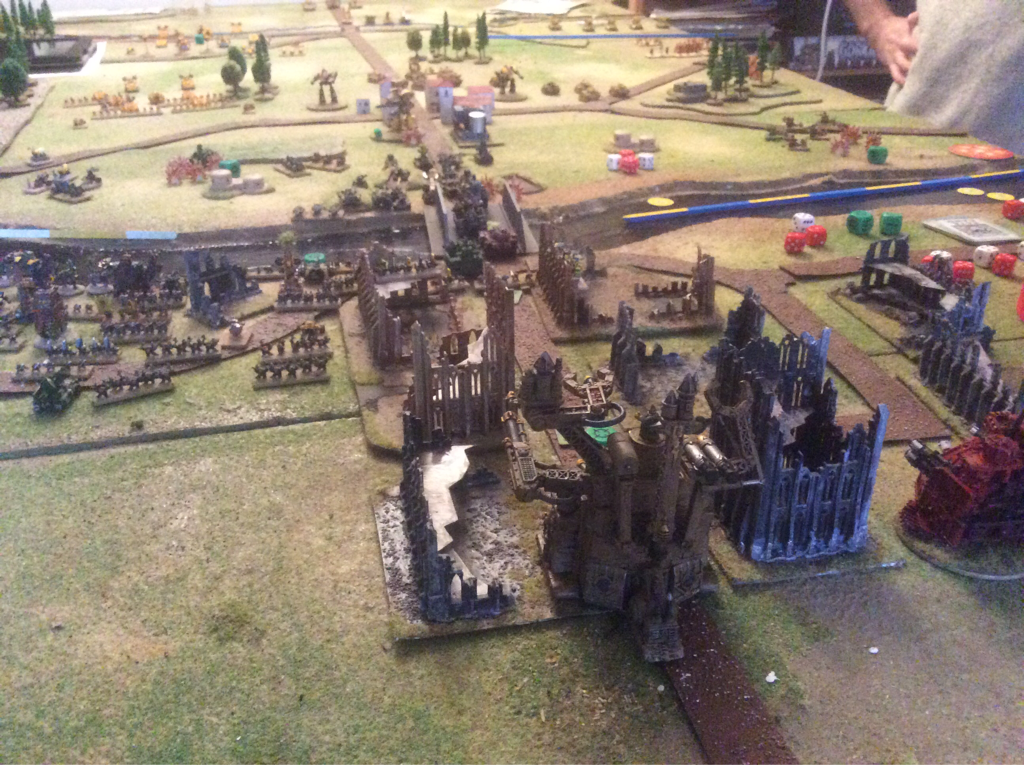 |
Archives
November 2023
Categories
All
|


 RSS Feed