|
Three weeks into the Covid 19 lock down, I am making progress on some gaming projects. I have been painting more 6mm Napoleonic figures for a multiplayer Lasalle scenario later in the year (Lord knows when!) and then plan to rebase my oldest collection of figures, two 6mm armies for the War of Spanish Succession. While these are quite satisfying solitary chores, I miss actually playing games. So last week I floated the possibility of a small campaign with Spencer and Matt. They were ready to indulge me and I started looking for a theme. I have run only three campaigns in the past: two set in classical Greece and one in the American Civil War. Matt, Spencer and I play a lot of Ancients and I kicked around a couple of options, one set before the rise of Philip of Macedon and one in Sicily. Neither got me excited enough to turn the idea into a game. Turning to the ACW, I recall playing an enjoyable short campaign in the early 1980s with my friends Keith Blackmore and Andy Finkel. The idea of an ACW campaign grew on me. I have played ACW since the 80s, both figure and board games, and have good source materials with maps and orders of battle. I particularly like the mechanics of A House Divided, Frank Chadwick’s strategic game with a map consisting of a network of boxes connected by different forms of road (the game is still available, now published by Mayfair Games). So ACW it is! As for subject, I decided on the Shenandoah Valley in 1862 as a great candidate for a limited but interesting game. Now, the aim of many wargame campaigns is to lead to face to face games. That isn’t going to be an option for now of course so I want the map turns to be engaging in themselves. As umpire, I hope to encourage a bit of role playing, assisted by some messages from non-player characters. When opposing troops collide, we will play it by ear. I can resolve small encounters with a dice roll. For larger engagements I have Longstreet for brigade level games and On to Richmond for bigger encounters. We shall have to work out how much the players will be involved in table top battles. We can cross that bridge when we get to it... I started with the map, mainly based on the National Geographic Atlas of the ACW and the Osprey Campaign book, Shenandoah Valley 1862 by Clayton and James Donnell. I decided to copy the connected boxes idea used in ‘A House Divided’. I added a wrinkle from another Frank Chadwick game, Attack in the Ardennes, in which the different road types limit the number of units that can travel between two boxes in a turn. This brings out the importance of the major roads and junctions and poses tricky choices to a commander: do they keep their forces moving slowly together, or move fast and get strung out across several boxes? What happens if they meet the enemy in this state? I started the map on a drawing app but found this too fiddly and so resorted to the old standby of pens and gridded paper. I spent a happy day with rulers, eraser and coloured pencils and ended up with an unattractive but, I hope, serviceable game map. The campaign rules shared with both players are below. In addition to the common rules, each player had a personal briefing, with their own campaign objectives and order of battle. I won’t share these yet as both players read this blog (or they pretend to!). As of today, the first turn has completed and the players have submitted orders for turn 2. I don’t know if they are enjoying it yet, but I am already Having a ball! 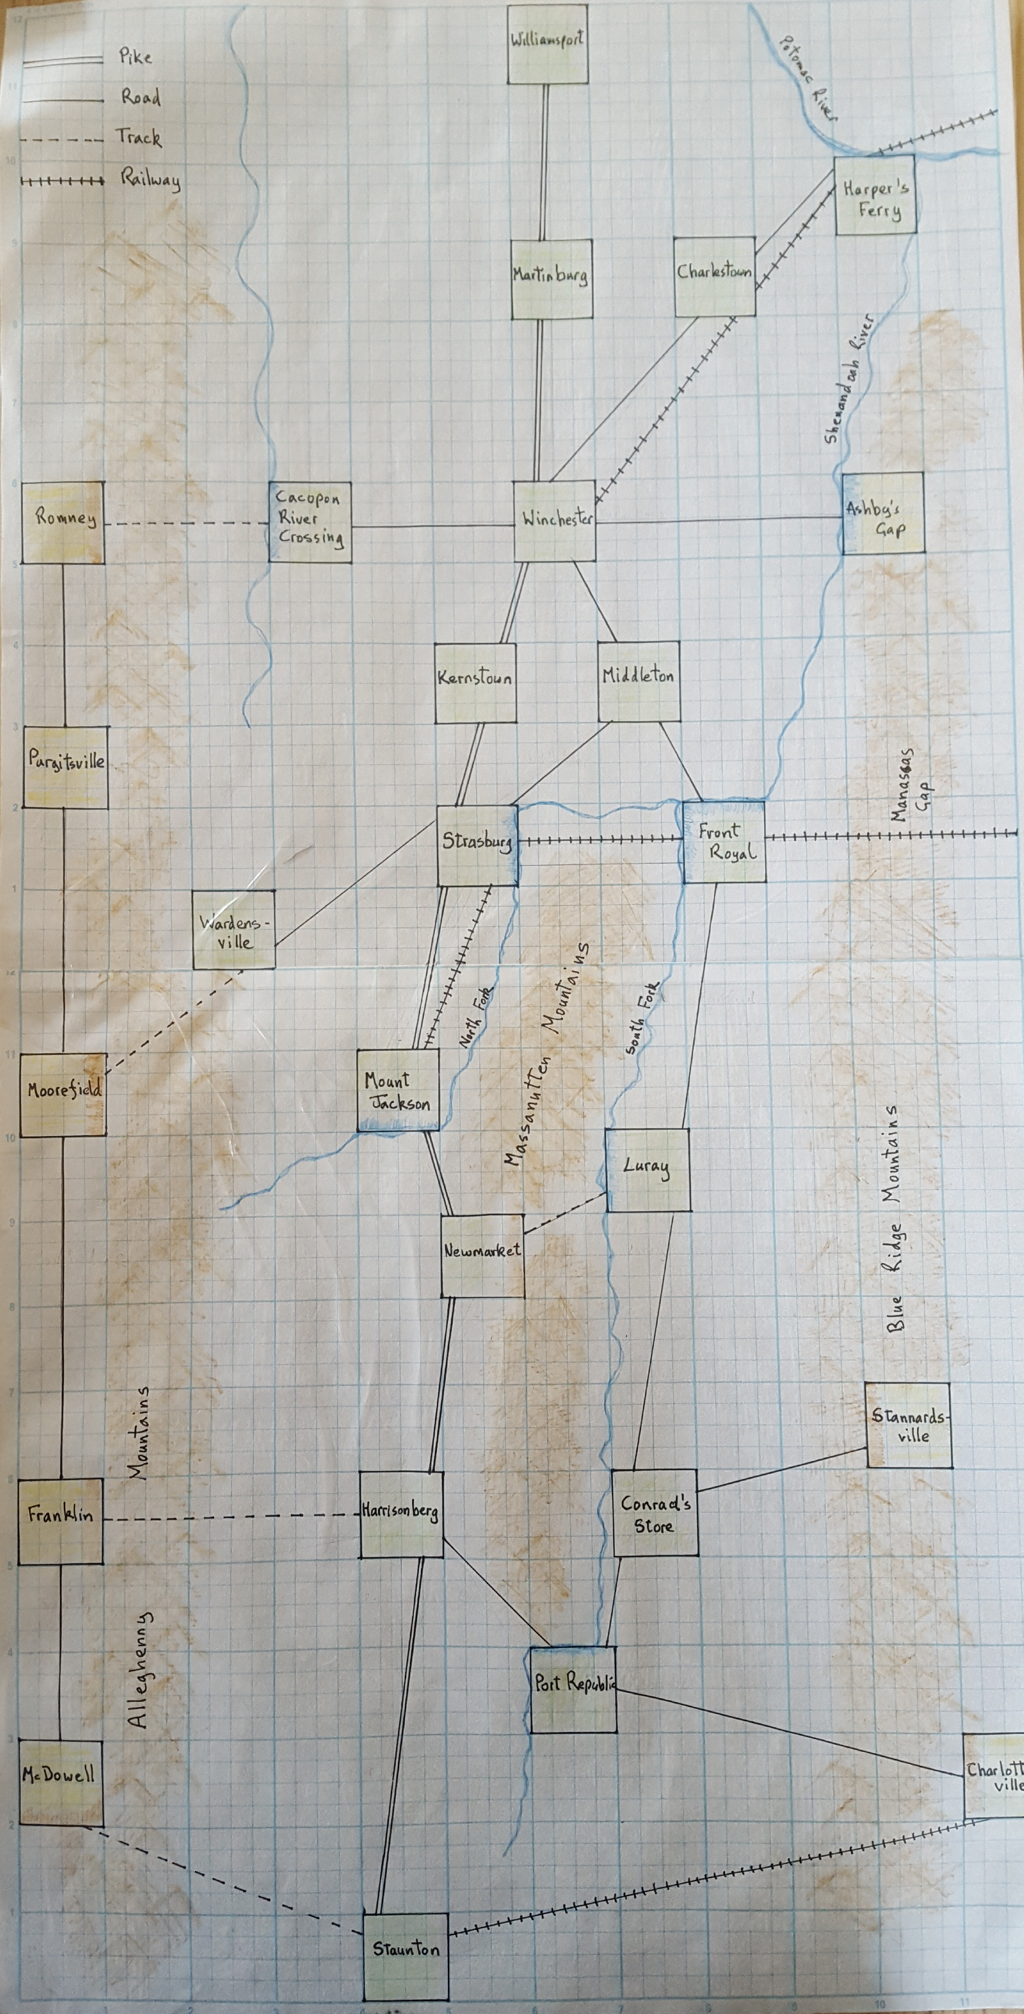 ACW Campaign rules: Fire in the Shenandoah, March 1862 Introduction The Shenandoah Valley is a picturesque and fertile farming region, bounded by the Allegheny Mountains to the west and the Blue Ridge Mountains to the East. Its axis runs from South West to North East, and it is divided down the middle by its own range, the Massanutten mountains. In 1862 possession of the valley offered advantages to both North and South. For the Confederacy the valley was a vital source of supplies, especially of grain. Also Harpers Ferry at its north east tip, only a short distance from Washington DC, was a potential jump off point for invading the North. For the Union, possession of the valley could deny the vital food supplies to the Confederate army, cut the railroad from Richmond to Tennessee and threaten Richmond from the West. The campaign began in late February 1862, with an invasion from Harper’s Ferry by a Union army led by general Nathaniel Banks. Heavily outnumbered, Confederate general Thomas “Stonewall” Jackson withdrew down the valley, while calling in his reserves. It is now mid March. Banks is at Winchester, getting ready to bundle Jackson out of the valley completely. Jackson is somewhere down the valley, waiting for the storm to break. Common rules The Map The map is of the Shenandoah Valley, overlaid with boxes connected by a road net. All units occupy boxes and move between them along the road net. There are four types of road: Pike, Road, Track and Railroad. Most boxes are clear terrain but some have a river along one or more sides (blue shading) and others have difficult ground (brown shading). Boxes surrounded by mountains are considered difficult ground The turn One turn consists of 3 impulses. Turns are resolved simultaneously by the umpire. Orders The players submit orders at the start of each turn. You must provide an order for each of the 3 impulses. A unit without orders will stand in place. Orders can be:
Movement and stacking Space: You may only occupy named boxes on the map. You may have as many units together in one box as you wish. Roads: Every connecting road has a maximum capacity of units that can travel along it in one impulse. The maximum number of infantry units that can move along a connection in one impulse are: Turnpike(double line): 4 units Road(single line): 2 units Track(dotted line): 1 unit Railroad(hashed line): unlimited units as long as railroad is friendly. If it belongs to the enemy, it counts as a road. NB Cavalry does not count towards this limit. Thus, in one impulse, you could send 2 infantry units plus one cavalry unit along a road. A unit may move in every impulse of the turn but this could cause fatigue and attrition. Note that, as there is a limit to the number of units that can use a road in an impulse, it could take two or more impulses for a larger army to move from one box to the next. (Example: a force of 3 infantry units wants to move along a road from one box to another. As only two units can use a road in one impulse, it would take two impulses for the whole force to end the turn together in the destination box. The order might read: 1st unit: move from Staunton to Harrisburg; rest; rest 2nd unit: move from Staunton to Harrisburg; rest; rest 3rd unit: rest; move from Staunton to Harrisburg; rest) To recap: it is possible to move up to three times in a turn but this is likely to result in a unit becoming fatigued. Also, if a large force moves fast using roads or tracks, it is likely to end the turn strung out between more than one box. Encountering the enemy If you enter a box containing enemy troops there will be an encounter. Cavalry on its own will retreat from moving enemy units if outnumbered, unless specifically ordered to stand and fight. Other troops will act in line with any prior instructions from their commander: to stand and fight; conduct a fighting withdrawal or attempt to retreat without fighting. If you, the player character, are present at the encounter, you will be given information about the situation and asked for your orders. If we can manage it and the battle is big enough to warrant the effort, Tim will arrange to fight the encounter at a time when you are available, so you can be involved via Skype or WhatsApp as the battle unfolds. If you, the player character, are not present at the encounter, you will receive a report afterwards of how it went. Terrain Some boxes have either a blue or a brown shading along one or more side, representing either a river or difficult ground. If you occupy one of these boxes and the enemy enters the box across a shaded side, you will receive advantages in the combat. Boxes in the mountains at the left or right side of the map contain difficult ground that is generally favourable to the defender. Boxes in the valley are open terrain, except where a side is shaded brown or blue as noted above. If infantry is present in a box for some time it can prepare the ground, which will be an advantage in battle. To prepare the ground, a unit must spend a full turn (three impulses) doing so. Note these are not like the trenches developed later in the war, but are light fieldworks. Scouting and screening Cavalry’s greatest use is to scout ahead and to screen your army from enemy attention. If Cavalry on its own enters a box containing only enemy infantry, it will retire back one box but can report to you the troops that it sees. If there is enemy cavalry in the box there will be a skirmish. If your cavalry win this skirmish it can report to you all the troops that are in the box. If it loses or the skirmish is inconclusive, it will retire back one box and will only report that it has encountered enemy cavalry. You are permitted to ask the local civilian population what they know about enemy movements. Note that the population are mostly pro-Confederate so their intelligence might be more reliable when dealing with rebels. In addition to the common rules, each player had a personal briefing, with their own campaign objectives and order of battle. I won’t share these yet as both players read this blog (or they pretend to!).
The first turn has completed and the players have had their status reports. I don’t know if they are enjoying it yet, but I am already very excited!
3 Comments
David Pike
3/9/2020 05:48:58 pm
Interesting campaign mechanism. A gaming friend and I may use it for our ACW games, but using Balck Powder and the Glory Hallelujah suppliment.
Tim
3/9/2020 10:40:38 pm
Hi Dave
David Pike
3/9/2020 10:44:54 pm
Thanks Tim. Leave a Reply. |
Archives
November 2023
Categories
All
|

 RSS Feed