|
I have just finished a new unit of Polish 17th century dragoons from the Wargamer's Fire and Sword line. I am quite pleased but the dismounted poses are almost like old flats. I guess they must be older sculpts as they are much less animated than other Wargamer figures I know. Still, it's good to have another régiment in the line. Finishing the dragoons has got me looking at the 1660 campaign again. I am working up a scenario for the battle of Słobodyszcze (Polish spelling), between a Cossack army and a smaller Polish attacker. I plan to play it with the Tercios rules by el Kraken, but as few people seem to have discovered these yet, I will try to make the scenario adaptable to any rules. This battle gives the chance to pit winged hussars and Pancerni against defended wagons and Zaporozhian foot. Despite the spin put on the outcome in the Polish commander's memoirs, it was a tactical repulse for the Poles, albeit leading to a strategic success in the end. As so little is available in English about the battle, I have written a longer background note than usual, relying on a study by Lukasz Ossolinski. I have included it below. I find it fascinating that the battle is the cause of controversy even today, with Russian, Ukrainian and Polish historians all looking at it through the prism of today's murky politics. The Battle of Słobodyszcze
1660 saw one of the most eventful campaigning seasons in the 13 Years war between the Polish-Lithuanian Commonwealth and Muscovy. Muscovite armies were active in both Lithuania and Ukraine, taking maximum advantage of the Commonwealth's weakened condition after the years of Swedish devastation of Polish-Lithuanian lands known as the 'Deluge'. In Ukraine,Voivod Sheremetyev led a combined Muscovite-Cossack army against the army of Grand Hetman Stanisław 'Rewera' Potocki. His objective, in cooperation with the Cossack army of Yuriy Khmelnytsky, was to defeat Potocki, take Lvov and perhaps threaten Kraków. Khmelnytsky's army was slow to muster and risked delaying the start of the campaign. Anxious not to lose time, Sheremetyev set his army in motion, having secured Khmelnytsky's promise to join him in the field. First contact with Potocki took place at Lubar on 14 September. Sheremetyev quickly discovered that his enemy outnumbered him by around 40,000 to 31,000. Potocki had been reinforced by the army of Field Hetman Lubomirski, fresh from campaigning on the Baltic. After a sharp engagement in which Potocki had the upper hand, Sheremetyev decided he could not win an open battle without reinforcement. He withdrew into fortified camp, first at Lubar and subsequently at Chudnov, intending to wait for Khmelnytsky to arrive and catch the enemy between their two armies. Potocki meanwhile laid siege to the Muscovite camp, placing his own fortified camp to the South of the Muscovite position. On 5 October, news reached Potocki that Khmelnytsky's 20,000 strong army was approaching from the South East and had reached Słobodyszcze, 27km from Chudnov. Potocki now faced the prospect of being caught between two enemy armies that would outnumber him by 50,000 to 40,000. Potocki and Lubomirski reacted to this threat by splitting their forces. On 6 October Lubomirski set off for Słobodyszcze with a cavalry-heavy force of around 14,000. Meanwhile, Potocki shifted the main camp to a stronger position to the West of its original location and prepared to confront a Muscovite breakout attempt. Lubomirski reached Słobodyszcze around midday on 7 October, to find the Cossacks encamped on a hill on the far side of the river Hnilopat. The Cossacks had not fortified their camp and scrambled to form a defensive position, forming a hasty barrier of wagons facing the Commonwealth advance. Cossack infantry in a fortified position was famously tough to dislodge, especially by a force lacking a strong infantry contingent of its own. Lubomirski therefore decided to attack almost directly from the line of march. After forcing the river Hnilopat, Lubomirski divided his army into three groups. The centre and left attacked the Cossack position from the south, while the right worked its way round to the east of the enemy camp. The centre and left broke into the camp, reaching as far as Khmelnytsky's own tent but losing cohesion in the process. At this point a Cossack counterattack bundled them out again and back down the hill towards the river. Only now did the attack by the right wing go in and was soundly repulsed. Lubomirski mounted another attack from the South but could not match the initial success. He withdrew across the Hnilopat at nightfall. On 8 October Lubomirski was recalled to Chudnov by Potocki, who was facing a breakout attempt by Sheremetyev. Lubomirski left his Tatar contingent to patrol the river and rejoined the main army. Khmelnytsky did not pursue. Within days, Khmelnytsky and Potocki agreed a truce; the Cossack contingent within Sheremetyev's main army began to drift away and the campaign would end with the most decisive Muscovite defeat of the war. Politics and rumours There are various theories to explain Khmelnytsky's actions in the 1660 campaign. He was a young, militarily inexperienced leader who had difficulty controlling his senior colonels. One view is that although his initial intention was to join Sheremetyev, he lost his nerve after Słobodyszcze and asked for peace. Another is that he, or more likely some of his colonels, were disenchanted with the Muscovite alliance and planned to see how the confrontation between Sheremetyev and Potocki played out before committing to one side or the other. A still harsher theory is that negotiations with Potocki were already far advanced and that Lubomirski's attack was intended to convince the last of the pro-Muscovite faction in the Cossack army to give up. Finally, some historians even claim the battle did not take place at all: they suggest it was a fig leaf invented to hide Khmelnytsky's betrayal of his Muscovite allies. This last version is hard to credit, given that correspondence survived from different participants, including foreign officers who took part in the battle. Also, if Khmelnytsky had been looking for a convincing reason why he changed sides, he and Lubomirski would presumably have spread the story that he had been defeated. On the Commonwealth side, Lubomirski's actions too have been much discussed. After his return to Chudnov, the Tatar contingent successfully kept Khmelnytsky on the far side of the Hnilopat. If he knew that Khmelnytsky was already in negotiations with Potocki, did Lubomirski need to mount his attack at all? One explanation offered to explain his aggression is that he was chafing under Potocki's command and wanted a slice of glory for himself. Whatever the whys and wherefores, Słobodyszcze provides an interesting basis for a wargame, and the chance to practice some appallingly different pronunciation!
0 Comments
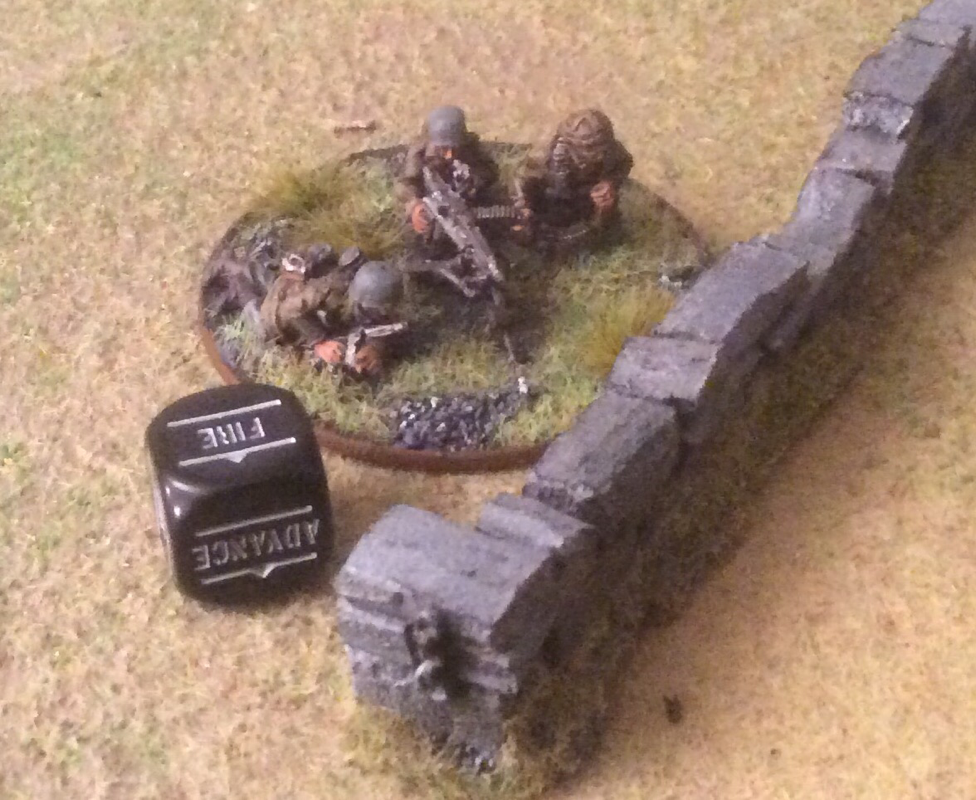
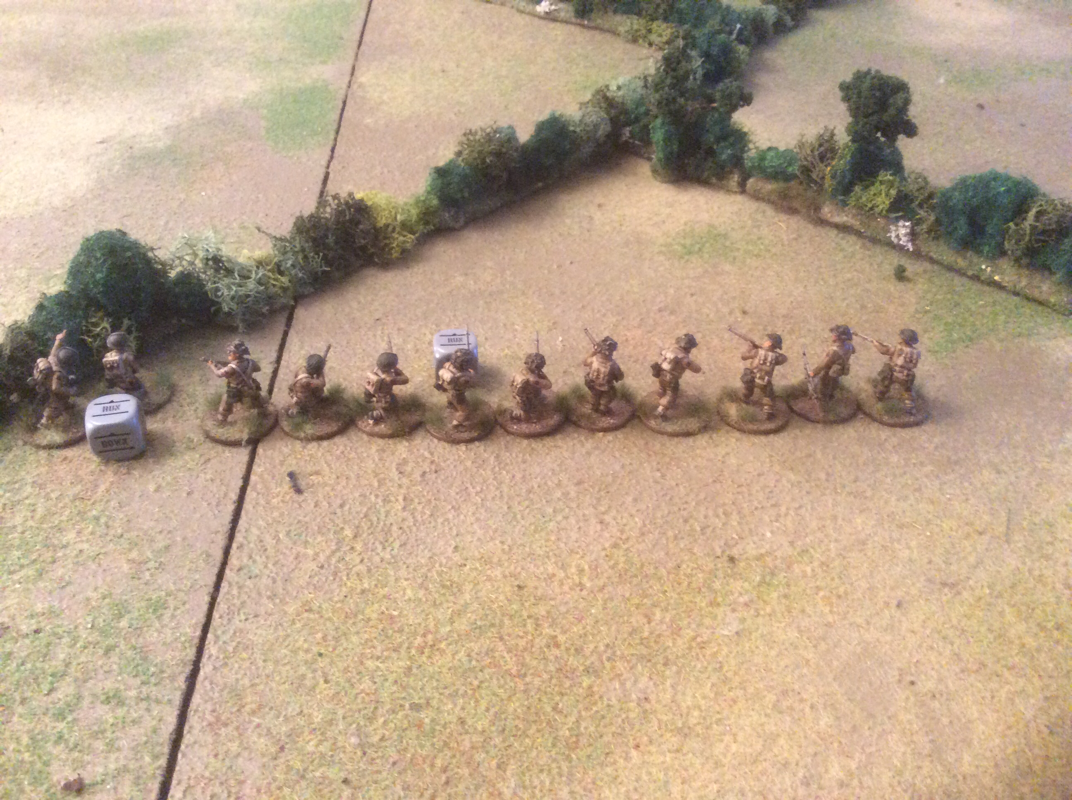
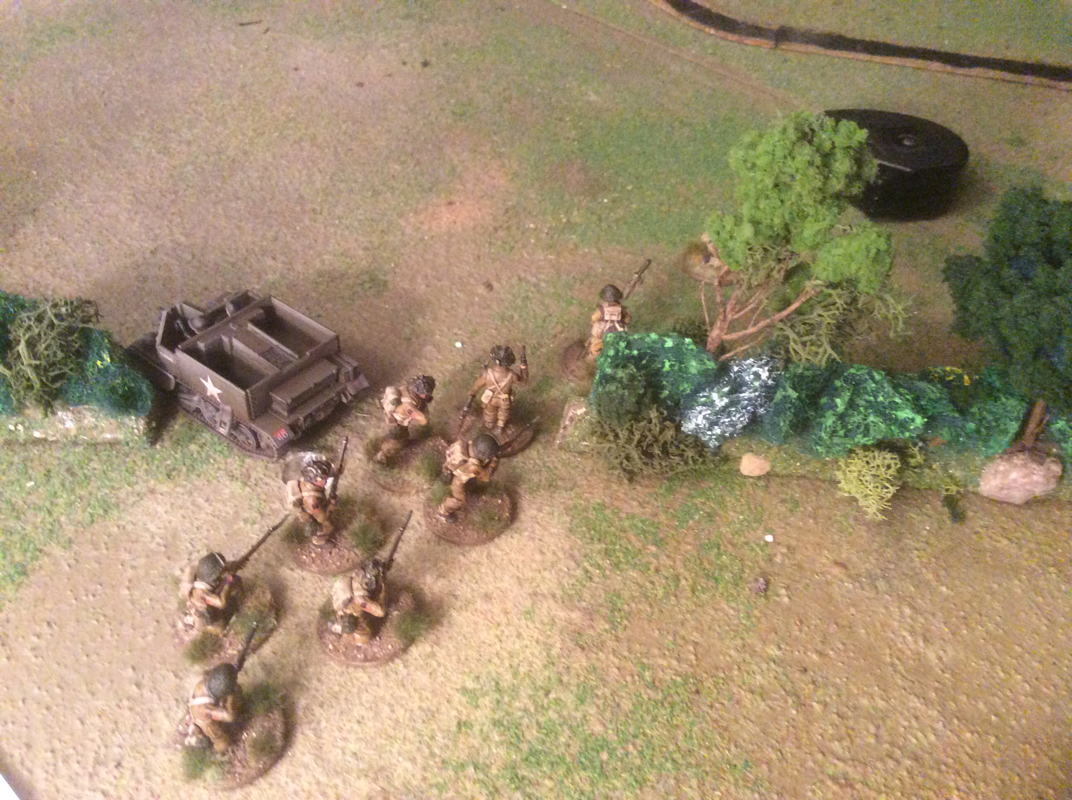
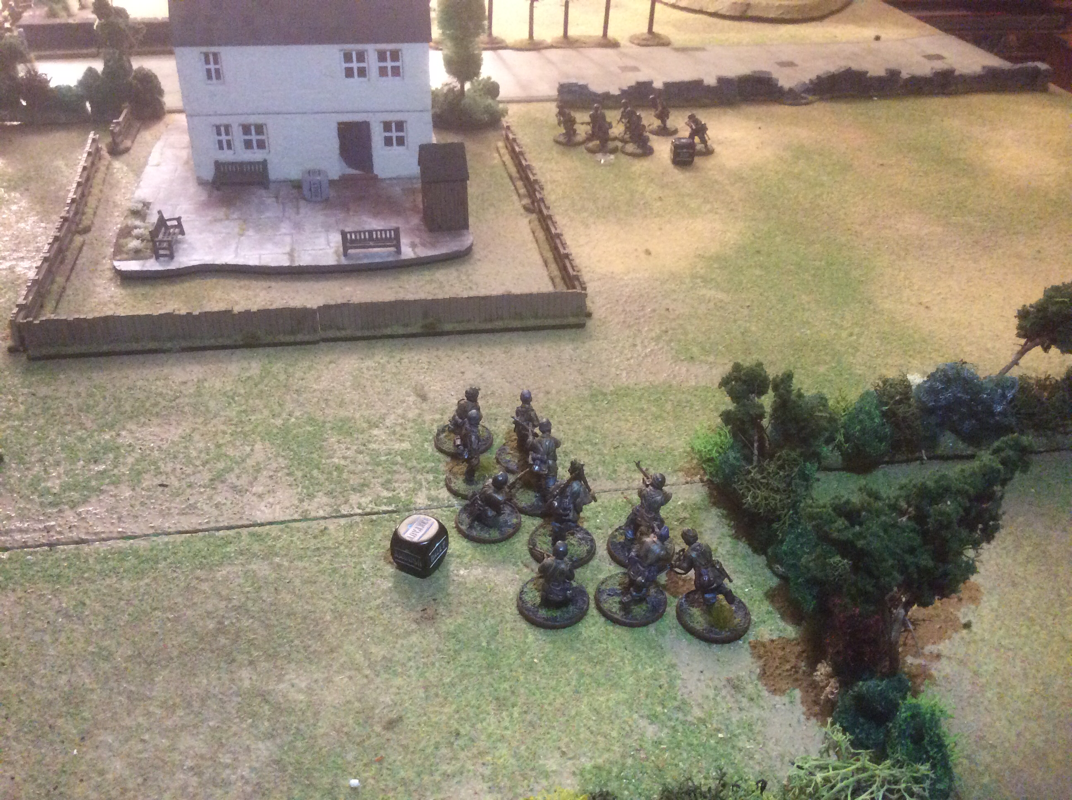
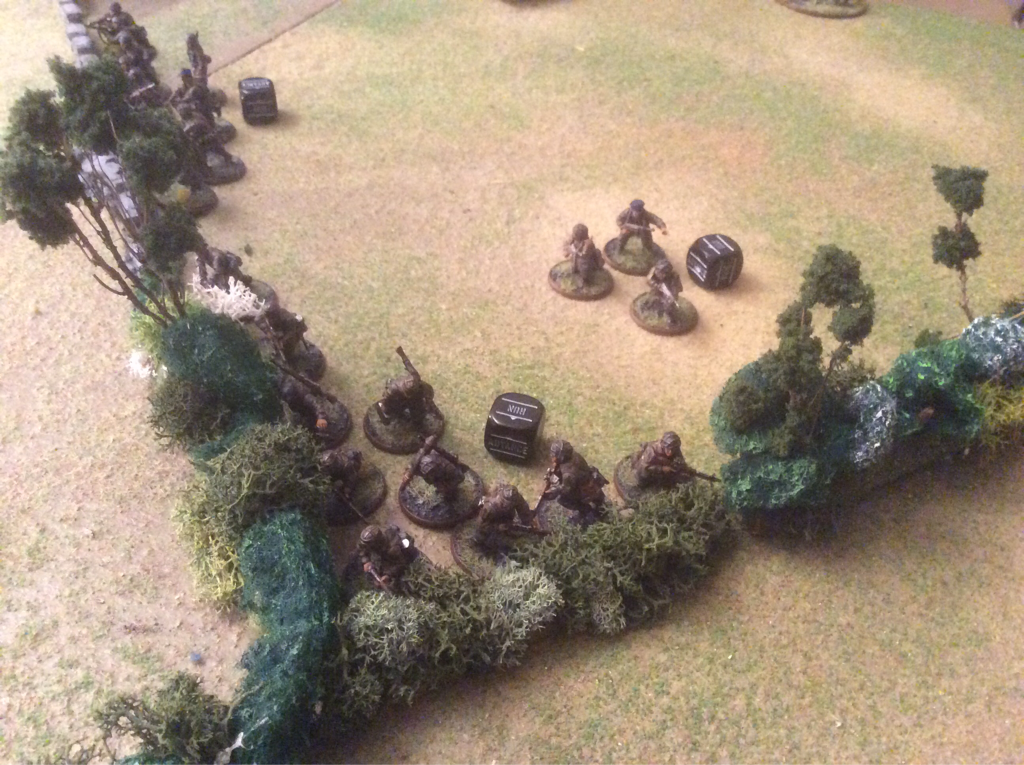 Bocage-lurking was a popular pastime in last night's game. We fought our third game of Bolt Action last night. To a background of thunder and lightning outside the shed, Matt’s and my Allies were given a bloody nose by Ian’s Fallschirmjägers. Armies were 1000 points a side, with the Allies split 500 points apiece between US and British. We played scenario 2, where the winner is the one who destroys the most enemy units. The table was laid out to represent farmland, criss-crossed by bocage with a copse on one flank and a wooded hill and stream on the other. We used the hedgerow rules from Battleground Europe, where the bocage counts as hard cover and cannot be seen over, unless the firer and/or target is adjacent to it. The bocage was in a St Andrew’s Cross shape, with its centre more or less in the middle of the table. For most of the game we had a stalemate in the centre and Allied left, as British and Fallschirmjägers threatened each other from behind diagonally adjacent fields. Whoever broke cover first was likely to lose a lot of men so apart from mortar fire and the accursed German sniper, not a lot happened here. On the Allied right, the action was much faster, bloodier and ultimately decisive in the Germans’ favour. Two squads of Americans, with a Browning HMG and M3 halftrack, challenged one squad of Fallschirmjagers, a light AT gun and a Panzerfaust for control of the wooded hill. The Germans’ superior weapons proved unbeatable, with the extra shot and the Assault ability really adding to their lethality. A British attempt to reinforce the Americans fell foul of German guns in the hedge line. When this attempt was launched, Ian chose to pull back his right wing to launch an attack round the British left. The British responded by sending everybody but an MMG in Ambush to reinforce the Americans but this was too late to change the outcome. By game’s end, two Allied units had been destroyed to the Germans’ one, which was enough to give Ian the day. Moreover, as two US squads were at greatly reduced strength and under several pin counters, the result was more decisive than the small VP difference might suggest. For most of the game, fully half of the German force didn’t do more than dodge mortar rounds and lie behind some hedgerows. A lot of soul searching later, the following thoughts come to mind. With veteran status and a fistful of assault guns, Fallschirmjagers are very hard to beat at close range. It isn’t healthy for a regular Allied squad to race them for possession of a terrain feature: they will always have the edge. Perhaps it's better to stand off, try to knock some Fallschirmjägers down and slow them with pin markers. Mortars have a powerful disruptive effect. Even though the first round has only 1 chance in 6 of hitting, the target is under pressure to move before the improving odds result in a splat. An MMG in ambush with a good fire lane can isolate a portion of the enemy force, allowing it to be overwhelmed. Nice theory, hard to implement. But I'm going to work on it. Smoke! Why haven't I used it yet? It was a key part of tactical doctrine for a reason and I need to work out when and how to use it in the game. There weren't many consolations for the losers of this game, except that we took out the German sniper and the two US squads were still standing at game's end despite serious losses. For all that, it was a good evening and the system keeps drawing us further in.  The hill at game's end. The Brits are on the crest but with no prospect of destroying the Fallschirmjägers in the time available - if at all... After finishing Roger Kershaw's excellent history of Market Garden, I have been working on a scenario inspired by this campaign for Epic 40k. I had forgotten how many unpainted Epic models I still own, abandoned a dozen or so years ago when my flighty attention was drawn elsewhere. So this weekend I painted up 6 Vindicators, 3 Demolishers, 2 Basilisks, a Deathstrike missile launcher, 2 Warhounds and a Reaver Titan. To think I considered putting them on eBay a couple of years ago... The fun of painting these miniatures came flooding back. The metals especially are crisply moulded and work well with a wash. I have also used Tamiya acrylics for the first time. What a lovely smooth paint! I'll look out for more next time I go to Hobbycraft.
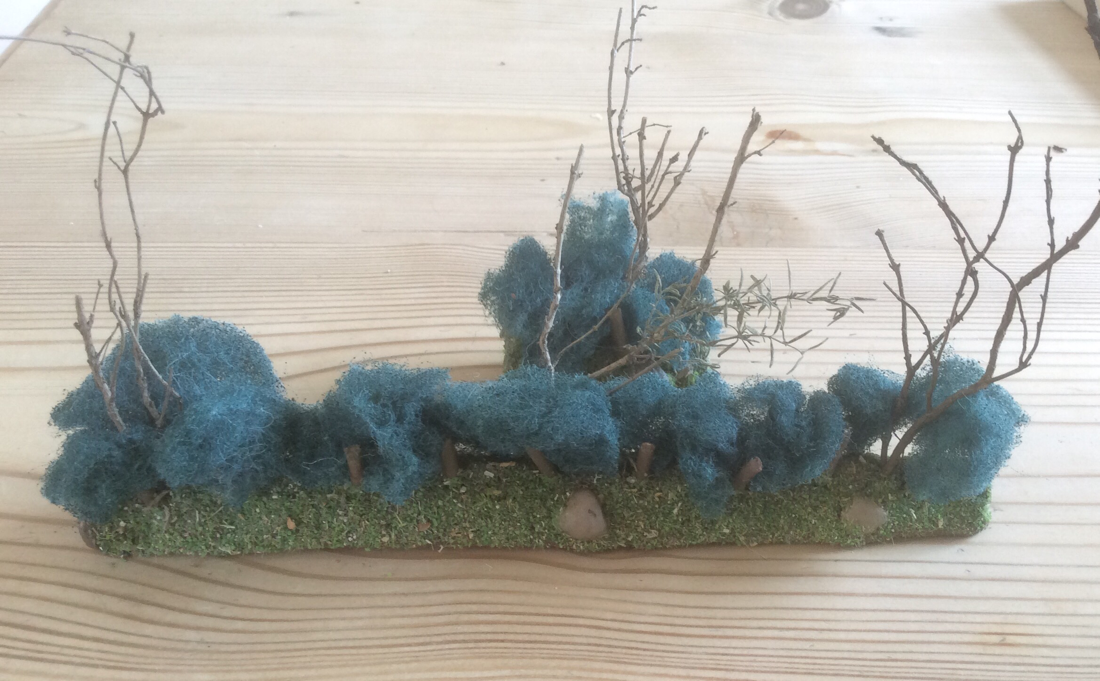
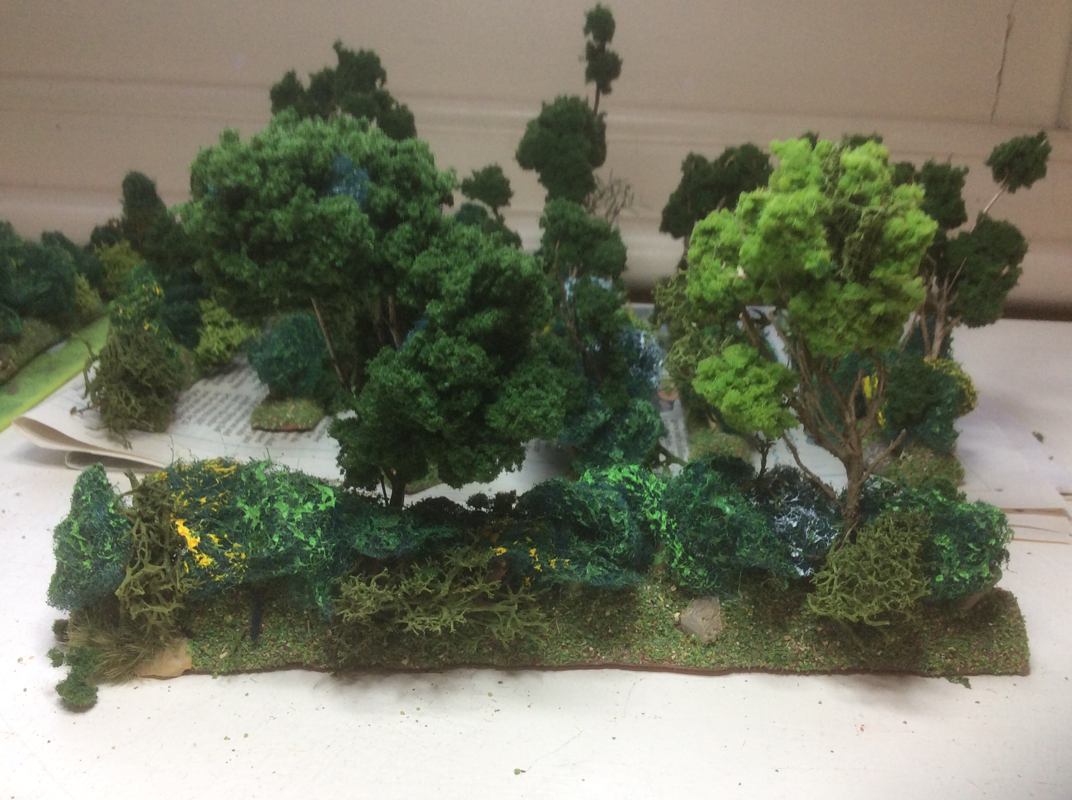
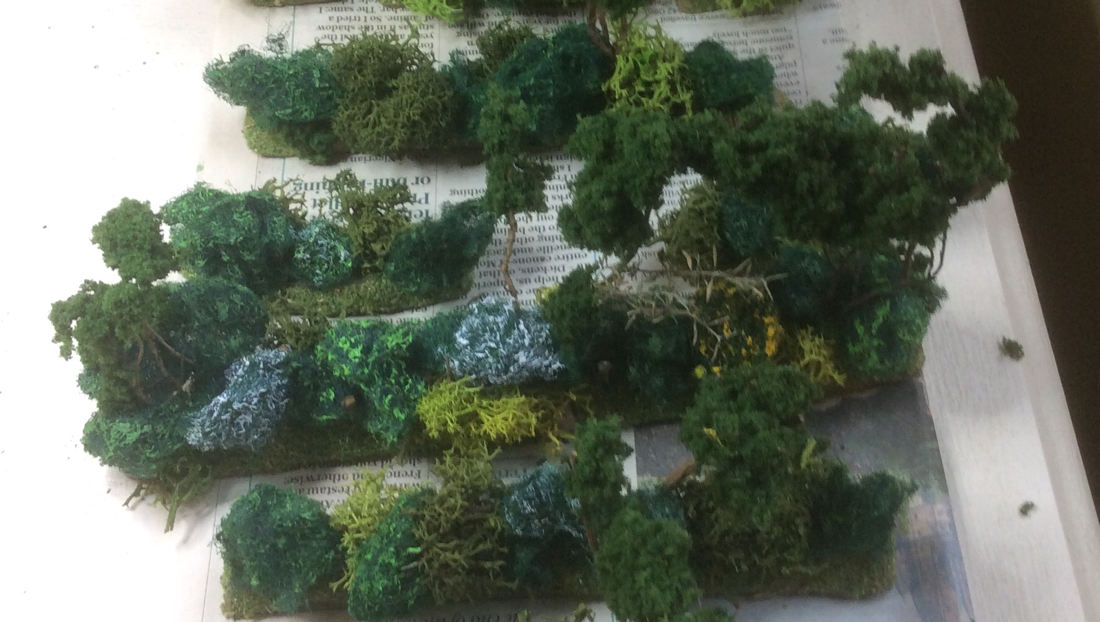
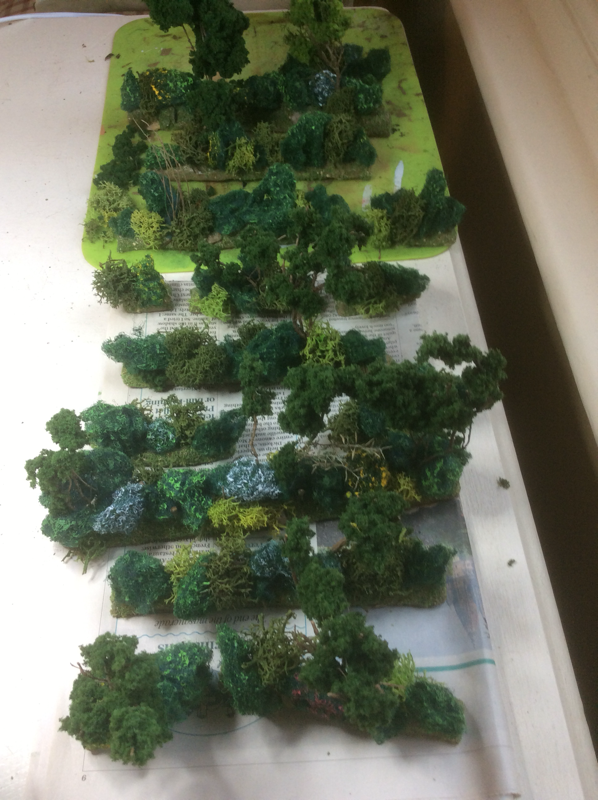
I've been putting together detachments of Space Marines, Imperial Guard and Orks. The premise is that a small Space Marine force is landed by Thunderhawk to seize a river crossing, with orders to hold until relieved by the Imperial Guard. We will play down the length of the table, with Ork reinforcements arriving ad hoc from different table edges. This is pretty close to the Blitzkrieg scenario in the Epic Battles book, except the Ork players will not know the composition of their detachments until these arrive. Their challenge will be to improvise with whatever comes their way. I've yet to work out whether to have the whole game on one table, or to set up the Space Marine bridgehead on a separate table. I have the very fine old Avalon Hill board game, Storm over Arnhem, which provides inspiration and even (who knows?) a playing surface. I think a lot will depend on how many players sign up and how long we set aside to play. Now, to get a date in the calendar and recruit those players! Ian is already committed, I think Matt is persuadable and if I can book it far enough ahead, I hope my son Nick will come back for a weekend game. Four is quite a good number. If I get more, we'll consider hiving off the bridgehead as a separate game. 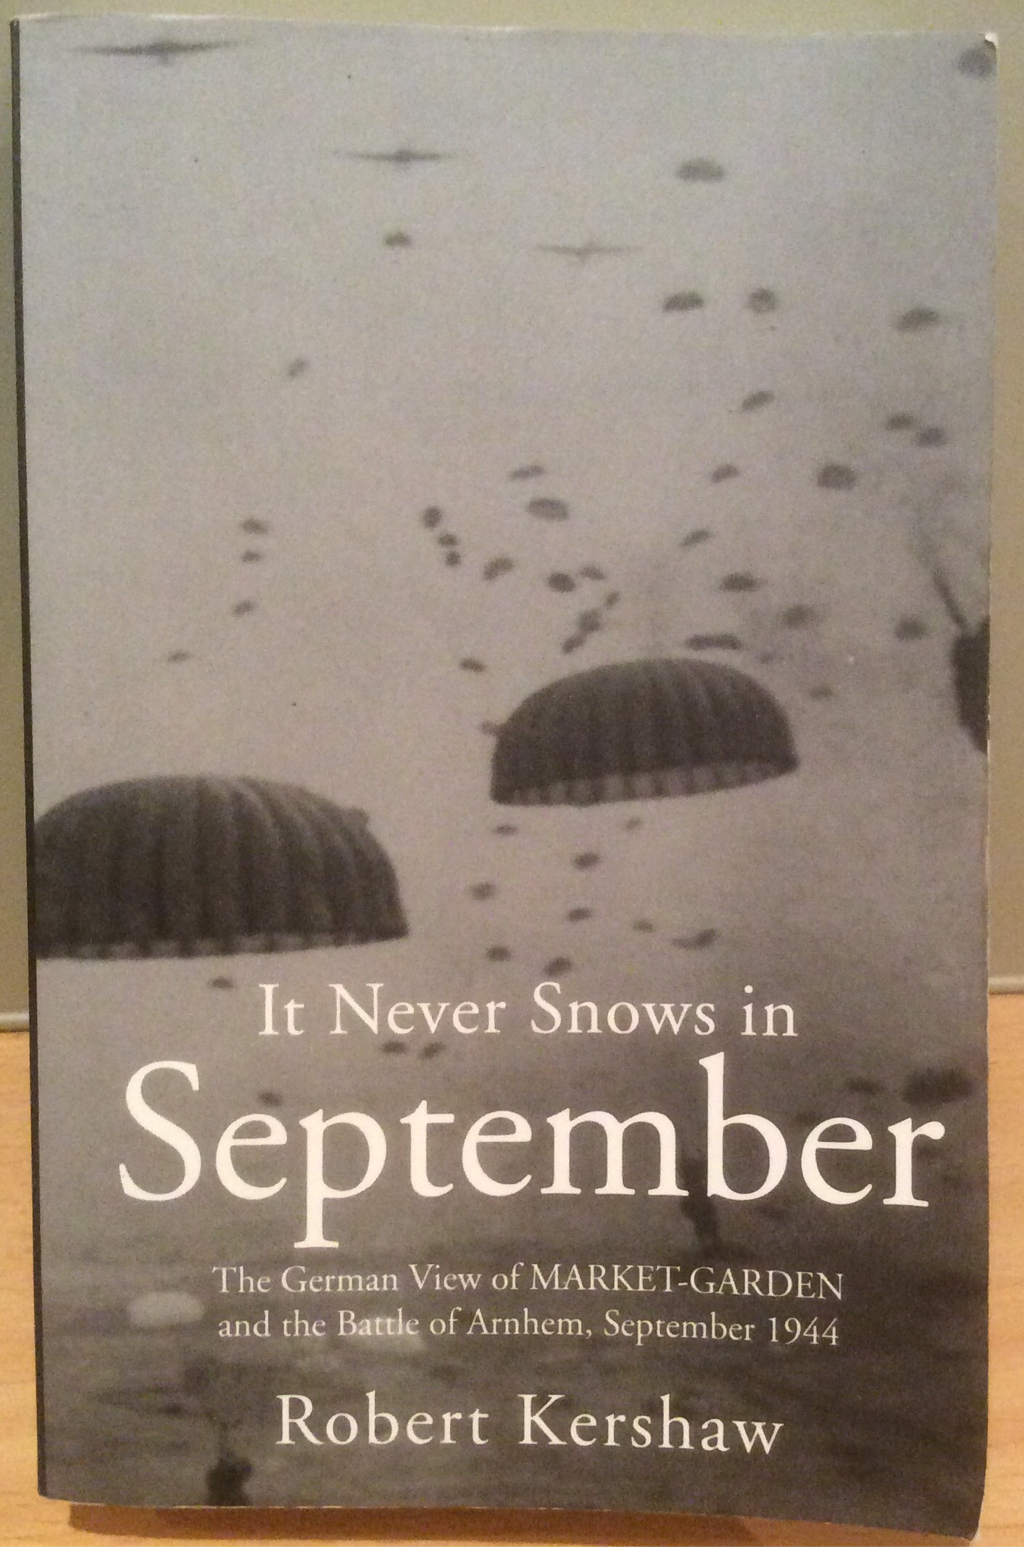 From this excellent history... It's funny how one thing leads to another. I have been greatly enjoying "It never snows in September " by Robert Kershaw, an account of operation Market Garden from the German perspective. I have read a few books about the campaign, but all from the Allied viewpoint. I am used therefore to the broad narrative (with variations) that the Allies overreached themselves; that they had bad luck with unexpected German dispositions and the weather; and that XXX Corps lacked the necessary drive to break through to Arnhem in time. Kershaw's account however brings out just how much the Germans achieved with a motley collection of scratch formations, constantly forming new defensive positions and mounting counter attacks. Perhaps rather than focus sing on how the Allies lost Market Garden, it is more accurate to consider how the Germans won it. The book provides countless ideas for Bolt Action scenarios, especially for those who fancy throwing every possible combination of troops together in the German force. But it has also stirred memories of a mission in one of my favourite game systems, Epic 40,000. I mean the boxed game from the late 1990s, not Epic Armageddon. We have both sets but I think the extra chrome in Armageddon tends to slow the pace down. Jervis Johnson's original rules are elegant, streamlined and for my money, they work better with large armies. And surely, it won't be epic unless there is a shed load of models on the table. The Blitzkrieg scenario in the Epic Battles Book involves one side desperately trying to block an enemy attack, with units coming on at random and trying to stabilise the situation. Shades of Hell's Highway there. Several years ago my son Nick and I had some great games of Epic, but we haven't played it for over a decade. Time, I have decided, to dust off the figures and get Waugh! Tamrine back into gear. I just need to twist some arms to get a multiplayer game going. 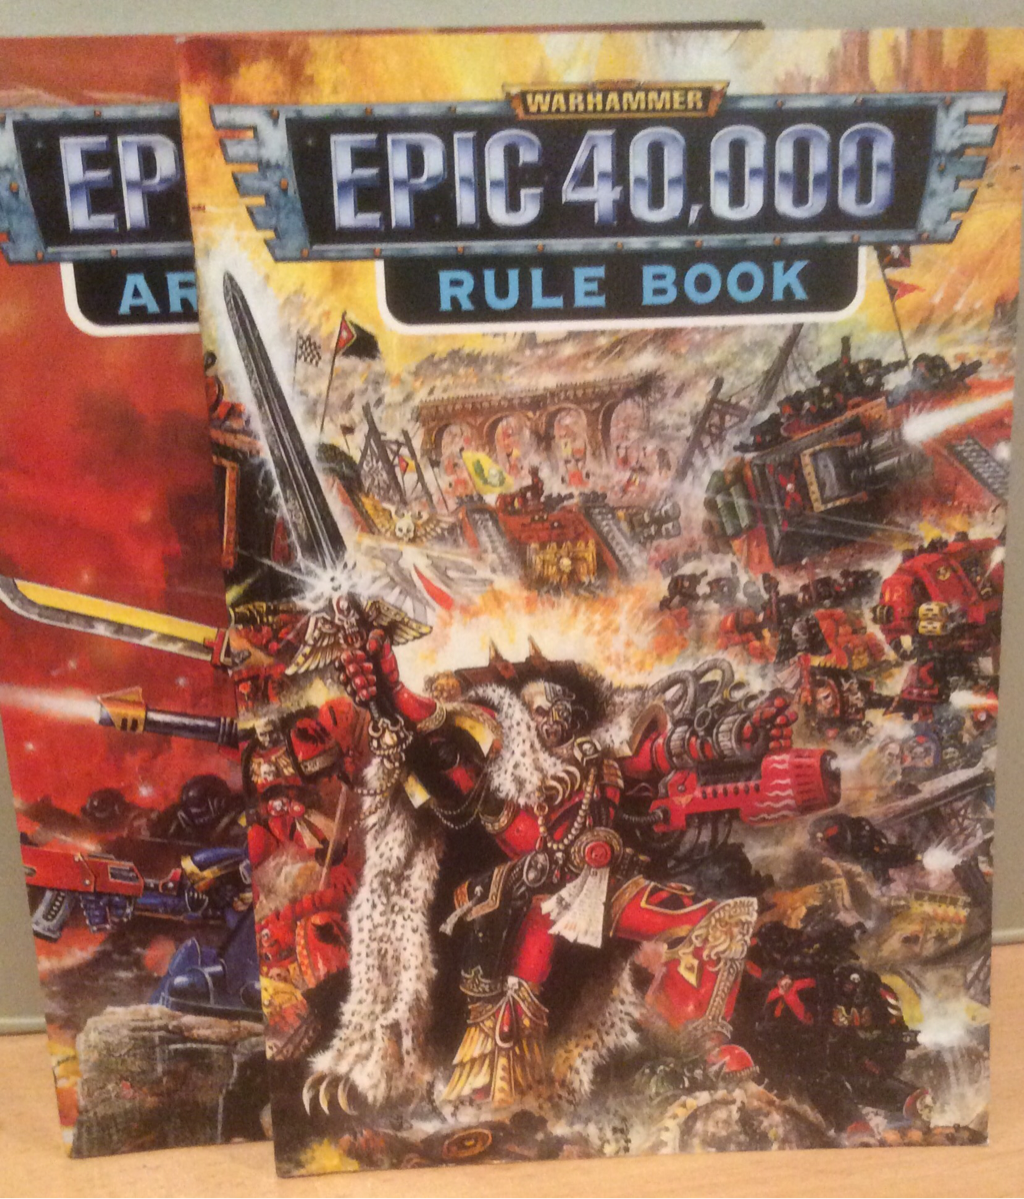 To this fun-packed piece of Sci Fi fantasy 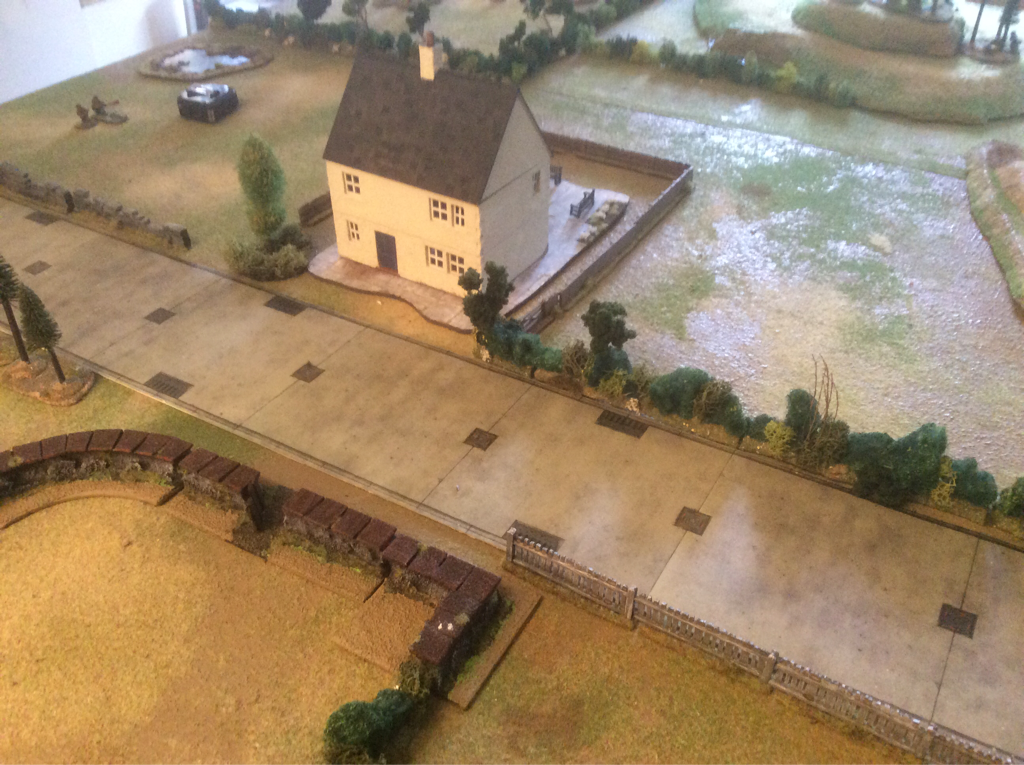 The objective, with Screaming Eagles inside the house. Last night Ian and I played a 1000 point game between his Fallschirmjägers and my British, topped up by a US Airborne squad and MMG. We played scenario 4, Hold Until Relieved, agreeing that the US squads would hold the objective while the British would arrive to bail them out. Or not, as it transpired.... The objective was the privy behind the house in the centre of the table. I placed the Airborne squad in the house and the MMG in the garden behind a fence. We gave the Airborne their own order dice. Ian deployed in an arc around three sides, with three full squads of infantry and a fire base on a hill overlooking the house. I conceded in turn 5, having been outgunned and completely outmanoeuvred. Ian got up close to the house early on, destroyed the MMG and wore down the Airborne in the house with mortar fire, small arms and finally a close assault. I was too slow to place my relief force between the objective and danger, and I made two major mistakes: first, I moved an infantry section up between two fires, hugging the hedgerow for cover from one side while exposing its open flank to a German MMG; and second, my own MMG, arriving from reserve, ended its first move in line of sight of a sniper who immediately wiped out the gunner. How we laughed. Oh, and Ian's flamethrower team toasted my First lieutenant before itself being blatted. Not a good trade-off for me. 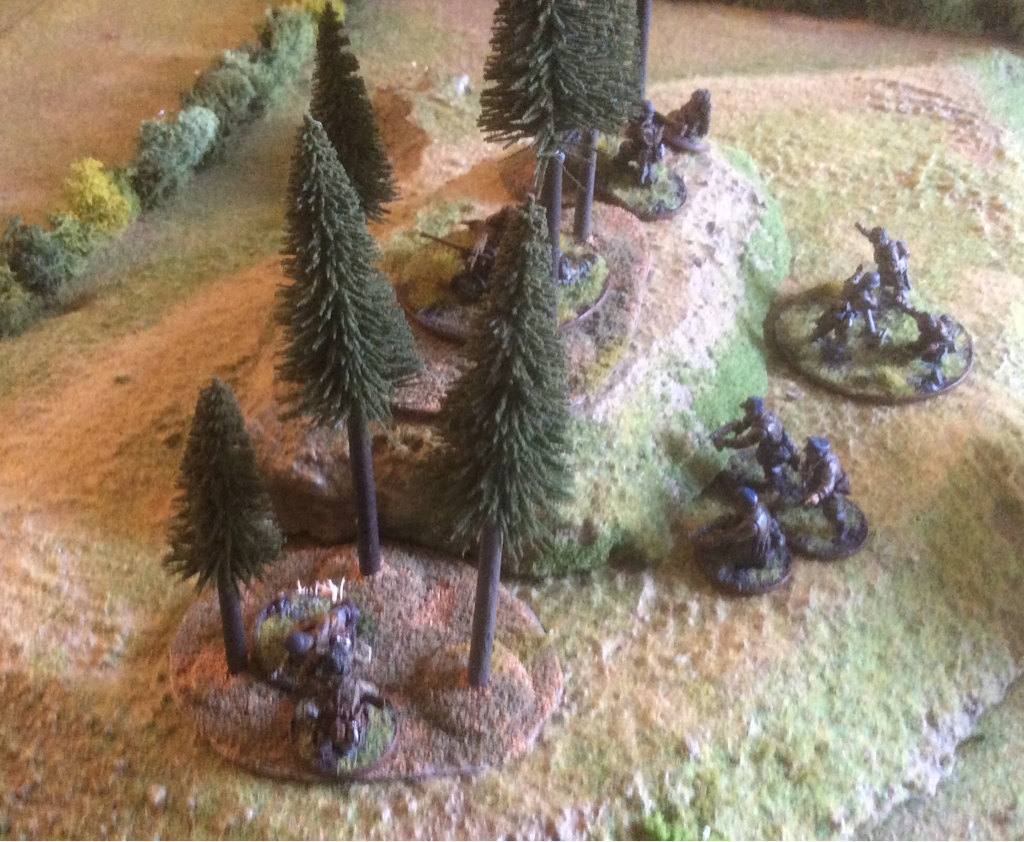 Ian's Fire base. The mortar was especially effective. Ian’s single misfortune was to close assault my surviving British section with a Fallschirmjager squad and lose. The odds were in his favour so it wasn’t a mad move, but the price for poor dice rolls in close assault is high. It’s funny how often the dice give the losing side some crumb to console themselves for a duffing up. My main lessons from the evening: Mortars are an excellent weapon against fixed positions. Close assault is unpredictable, decisive and best avoided until the odds are overwhelming and/or firepower won’t be enough to do the job. Taking cover, however reassuring the protection, can be a distraction from achieving the scenario objective. I liked the look of my section tucked up snugly behind its hedgerow, but I should have been moving it up to relieve the poor Airborne. The German assault rifle is a beast. 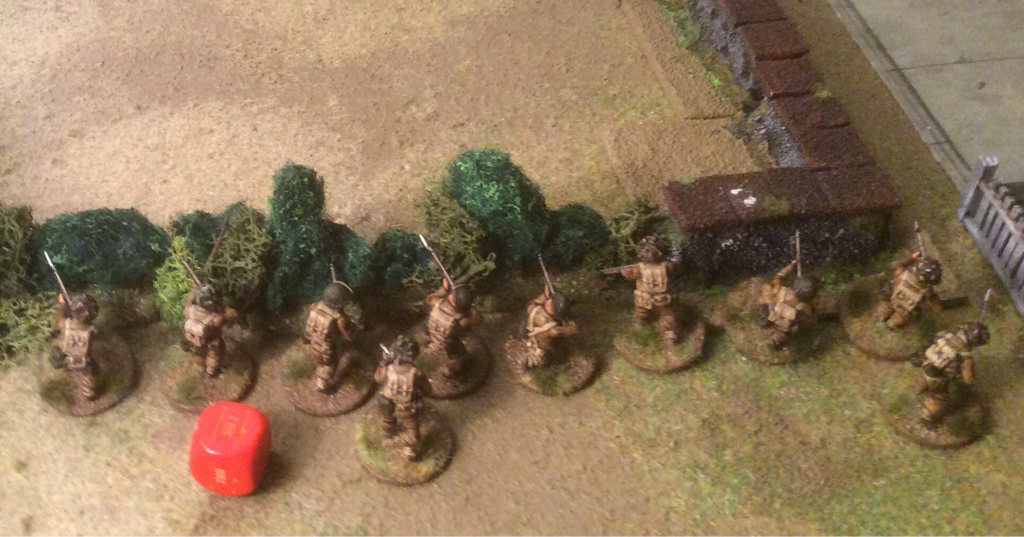 Neatly sheltering behind the hedge, but not actually contesting the objective As for force selection, I need more British infantry. Since the release of Version Two was announced, I have been thinking of delaying more purchases: the British plastics are bigger and harder to pose than recent Warlord plastic releases (Ian’s Fallschirmjagers are much smaller and more lifelike than my Brits) so I am hoping they get a reboot soon. But we now know that the new starter set will have new US Airborne plastics, so I guess it will still be some time before the Brits are replaced. I can’t wait that long, so I don’t really have a choice. (It reminds me of the time when GW introduced the new, tiny and beautifully sculpted Night Goblins, thereby rendering obsolete my freshly painted army using the previous, now gigantic and crude-looking multi-pose set. But I think it just has to be!) 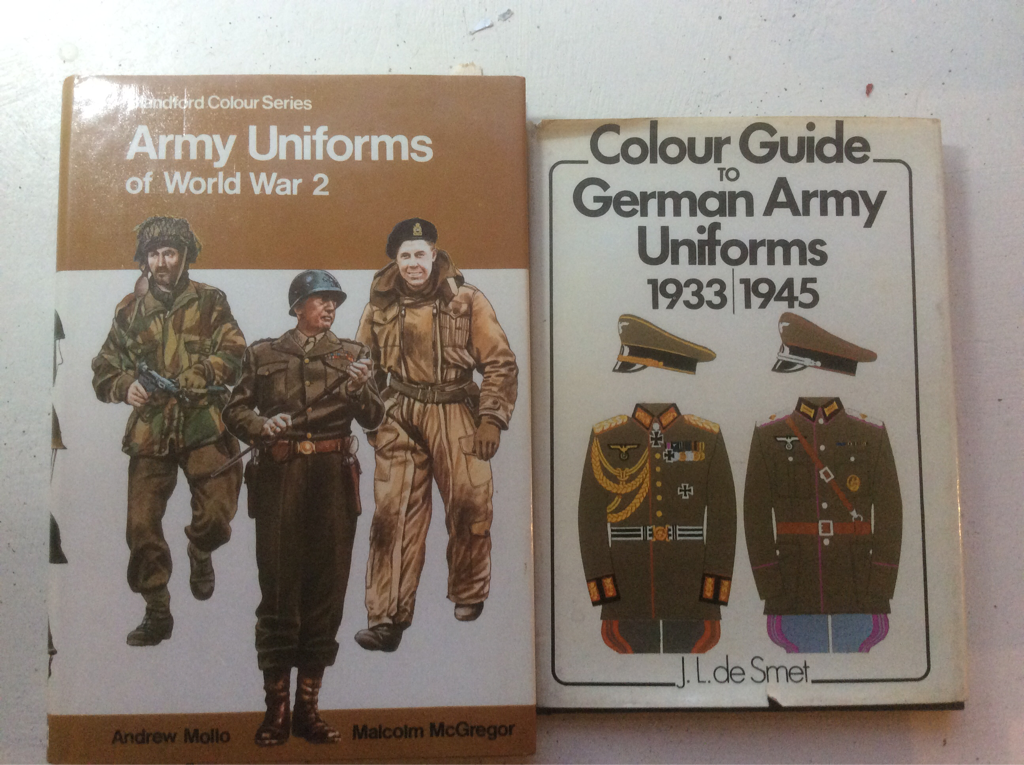 Today I picked up these two titles in our excellent local second hand book store. The German uniform guide, which dates from 1973, is packed full of interesting details. In truth a lot of it will be wasted on my painting skills but I predict that some cuff bands will appear on my Germans pretty soon. I'm also tempted to pick up the Warlord general staff set for the bling. 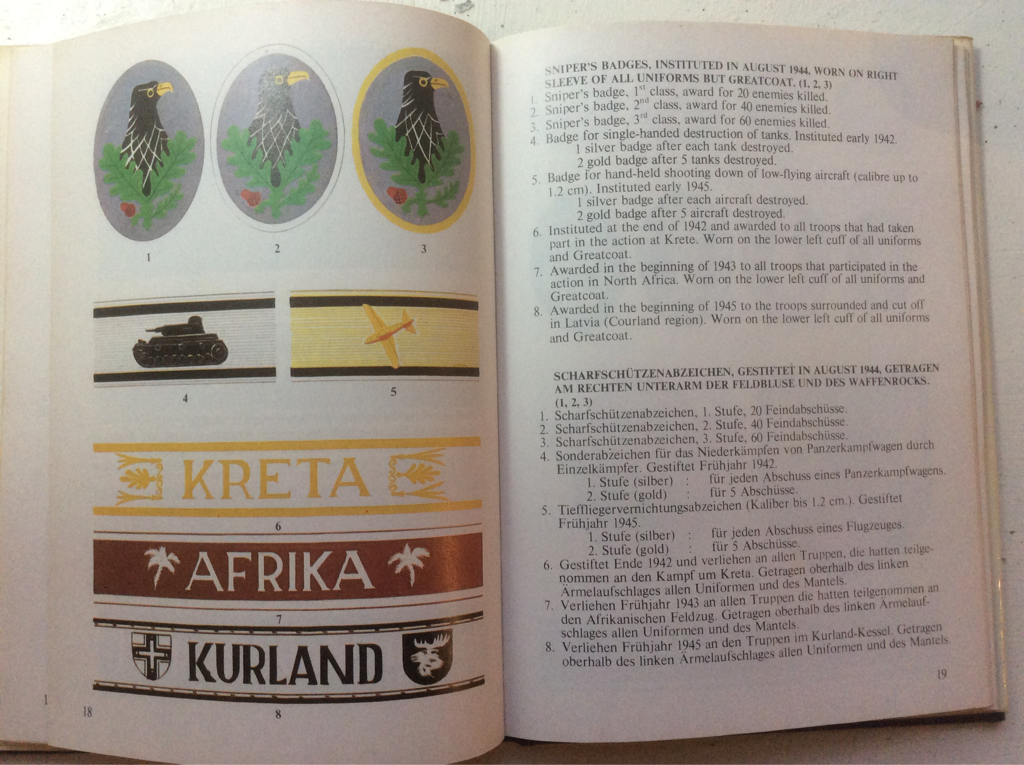 The Blandford title goes back to 1974. The illustrations, all based on contemporary photos, are very pleasing to study. They include some uniforms I have never seen before, such as an Italian Liberation Corps officer, in British uniform with Bersaglieri feathers on his helmet. There is a French mounted officer of Moroccan rifles in Italy, wearing a fabulous striped djellabah (sleeved over-garment). The fact that every figure is based on a real person brings home how much dress differed from the regulations. I doubt I'll ever collect a French colonial force (although never say never, I didn't expect to own a Cossack 17th century army but there they now are in the cupboard!). But the figures for late war Western Europe provide loads of inspiration. In fact, I think figure 166 alone is enough to inspire me to start a German Grenadier platoon. I spend hours trawling through the Internet for uniform information and scenario ideas and it is a wonderful resource. But turning the pages of a book, especially when it's a charity shop find, is strangely satisfying. 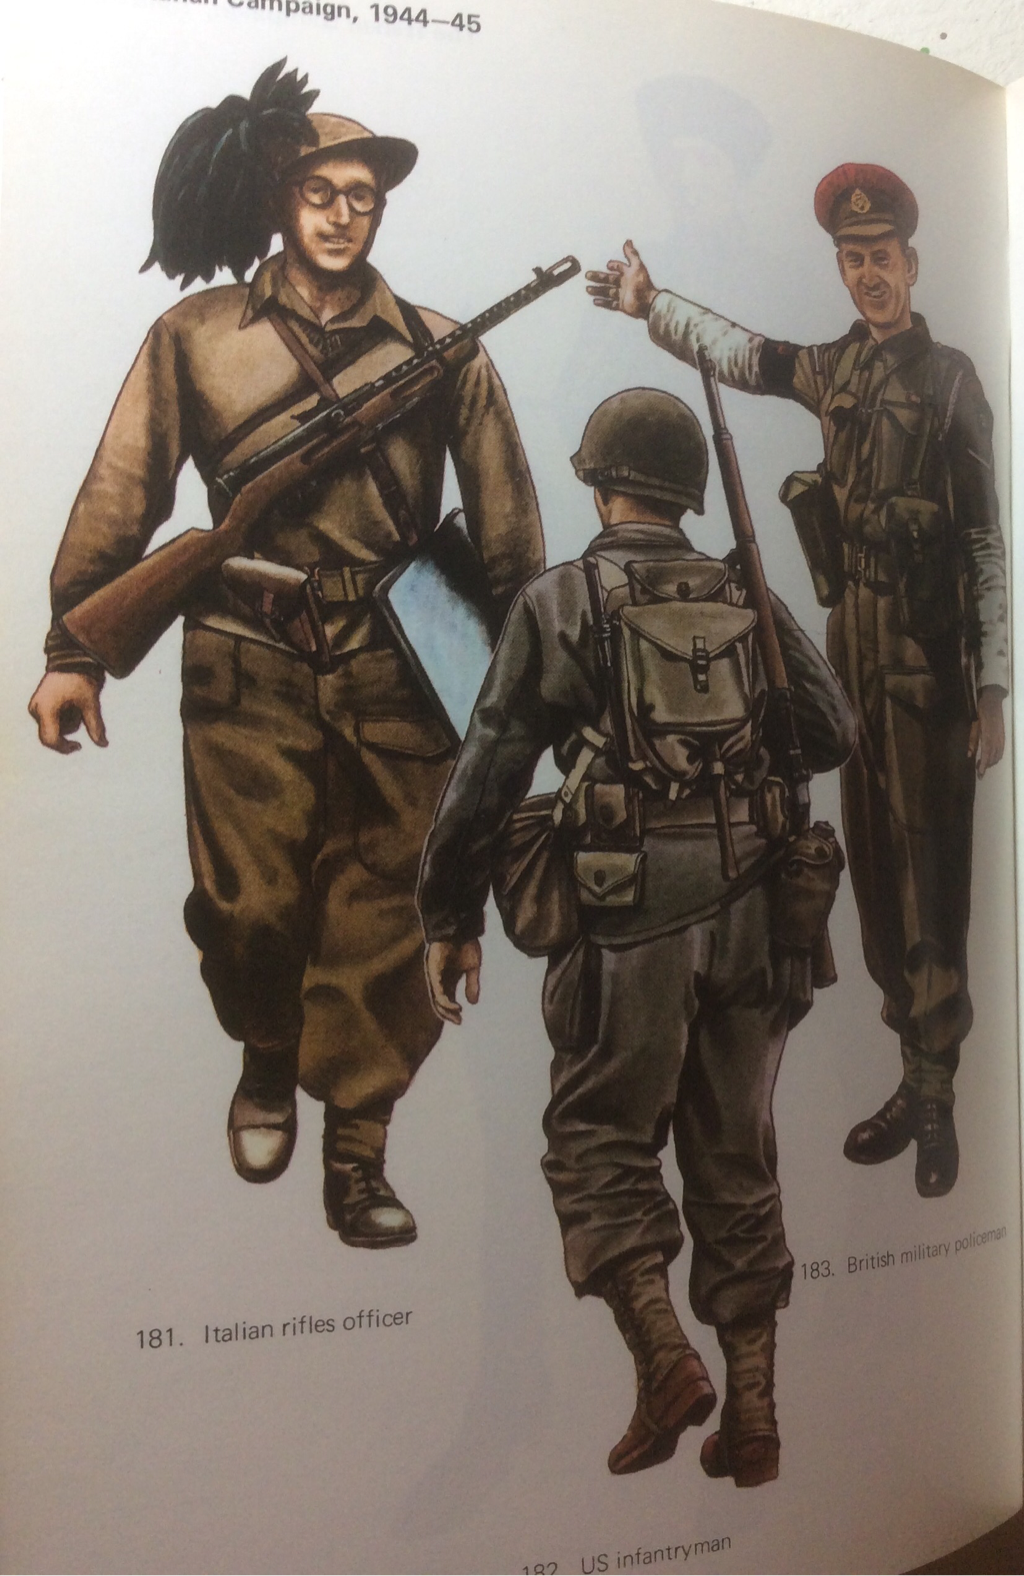 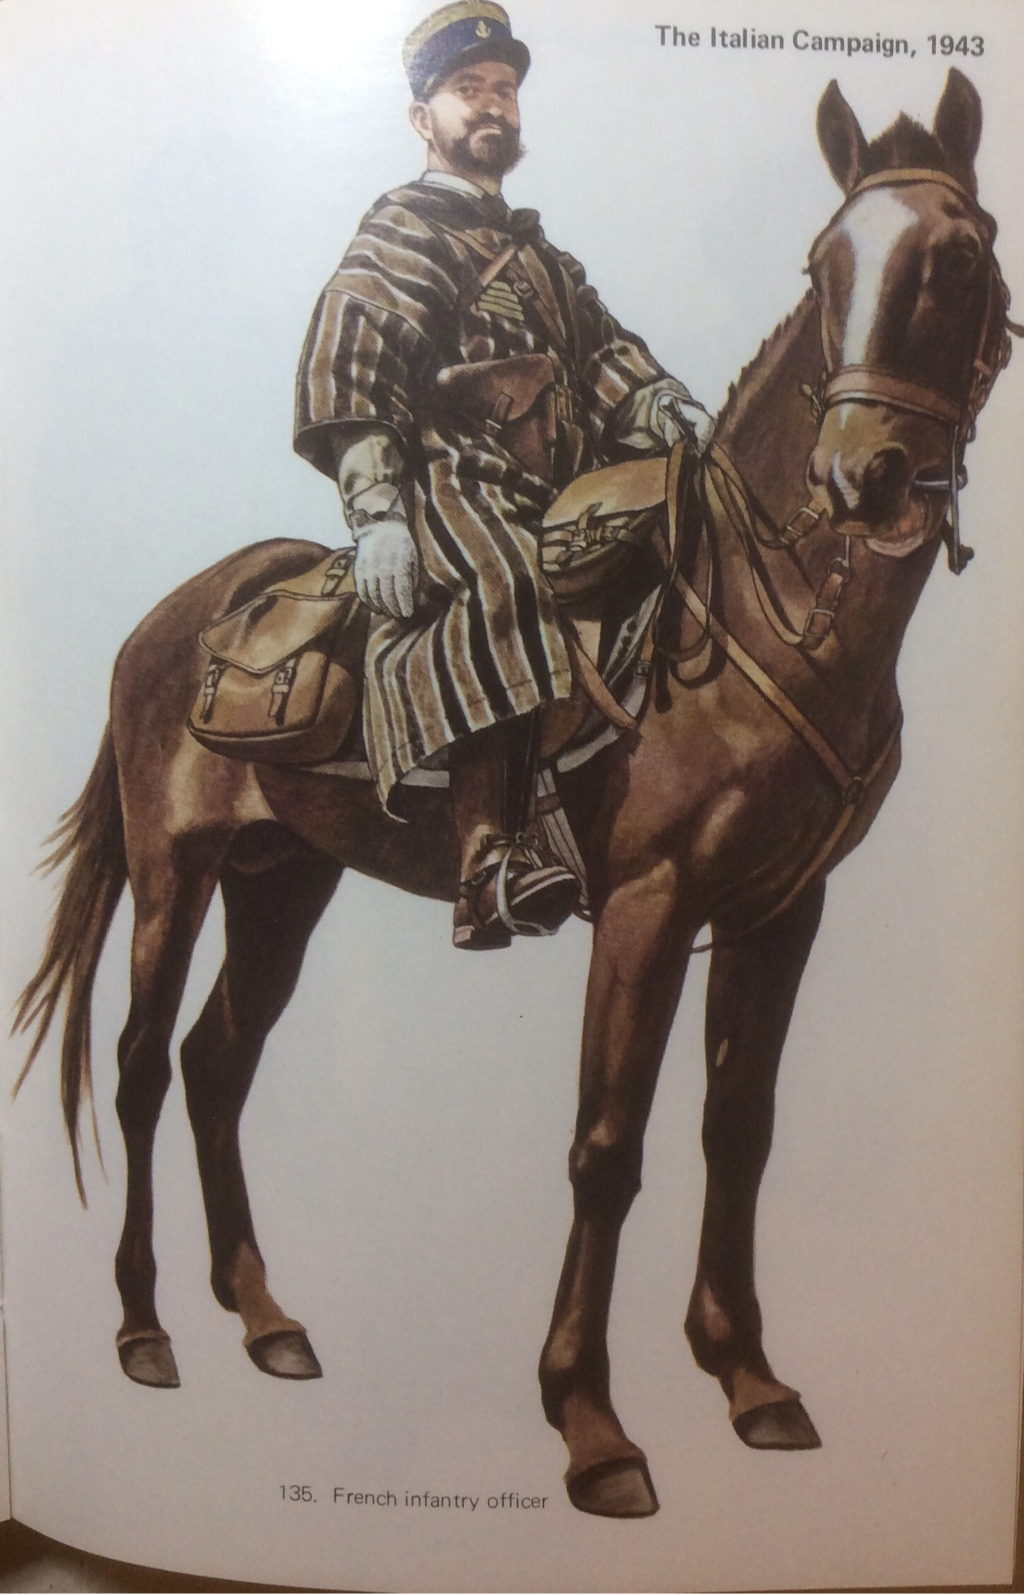 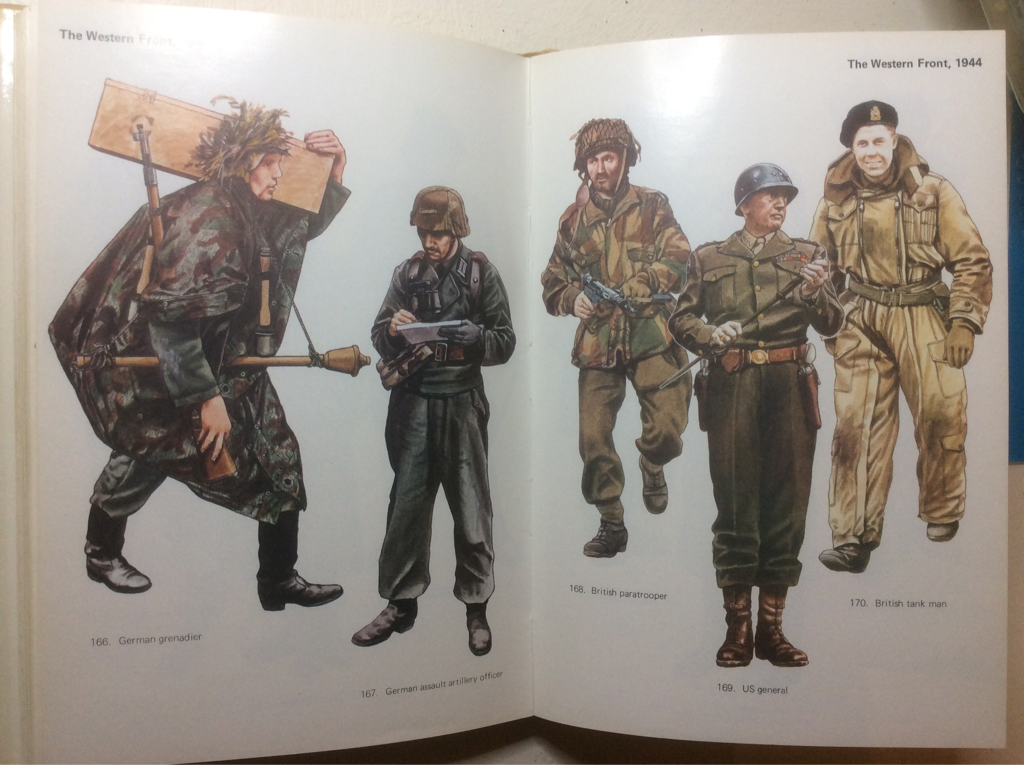 I have spent the past several evenings making lengths of model bocage for our scenarios in Normandy. It was a bit of trial and error but I am quite happy with the end result. I started with DAS air-drying modelling clay, some wooden skewers, green pan scourers, Icelandic moss in various shades and some clump foliage by Woodland Scenics. The steps I followed were: 1. Make sausages of DAS, mould them into a Toblerone shape and stick lengths of skewer into them to provide a purchase for the foliage. Collect twigs from the garden and stick a few of these in to add height. From the options in our garden, I found that Thyme twigs look the most like miniature trees. Texture the sides with the point of another skewer. Leave to dry for at least three days. 2. Paint the dry DAS with earth coloured emulsion (I use Dulux Chalky Downs 1, a close match to GW steel legion drab). 3. Coat the sides of the DAS with PVA and apply green flock. 4. Tear up the pan scourers into ragged shapes. I discovered that the secret is to use the cheapest scourers you can find: my first purchase from a supermarket wouldn't tear up sufficiently. Pound shop scourers are much cheaper and better for this purpose. 5. Dab PVA glue onto the top of the DAS sausages and press down pieces of torn scourer, alternating with clumps of Icelandic moss. Dry overnight. 6. Dry brush the pieces of scourer with different shades of green acrylic paint, from darker to lighter. 7. Dry brush selected pieces of scourer with white, yellow or pink paint to represent blossom. This works for Normandy in June but if you're being picky, it wouldn't suit high summer! 8. When all the bushes have been coloured, apply clump foliage to the Thyme twigs with super glue. 9. Finally, titivate the bases with random bits of foliage. Lessons for future projects: DAS warps! Pieces longer than 6" tend to twist as they dry so don't make them too long. Don't bother to texture the DAS as it doesn't show through. Sticking clump foliage to twigs is a messy nightmare: PVA won't hold it and superglue gets everywhere. I'm sure Woodland Scenics must make a specialist glue for this. I wondered whether to use just Icelandic moss as it looks more realistic than scourer, but scourer is much more rigid so I think a combination will be more hard wearing. And at gaming distance, it looks pretty convincing I hope.
Overall, this has been a fun project but very messy. I'm looking forward to seeing my bocage in action. |
Archives
November 2023
Categories
All
|


 RSS Feed