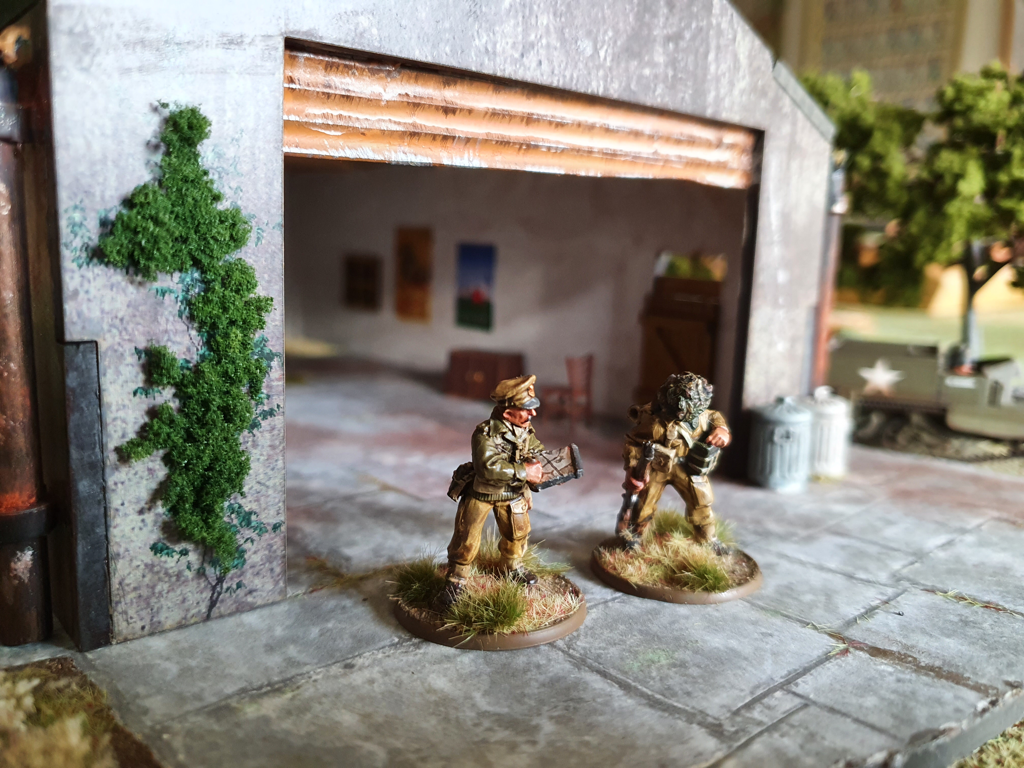
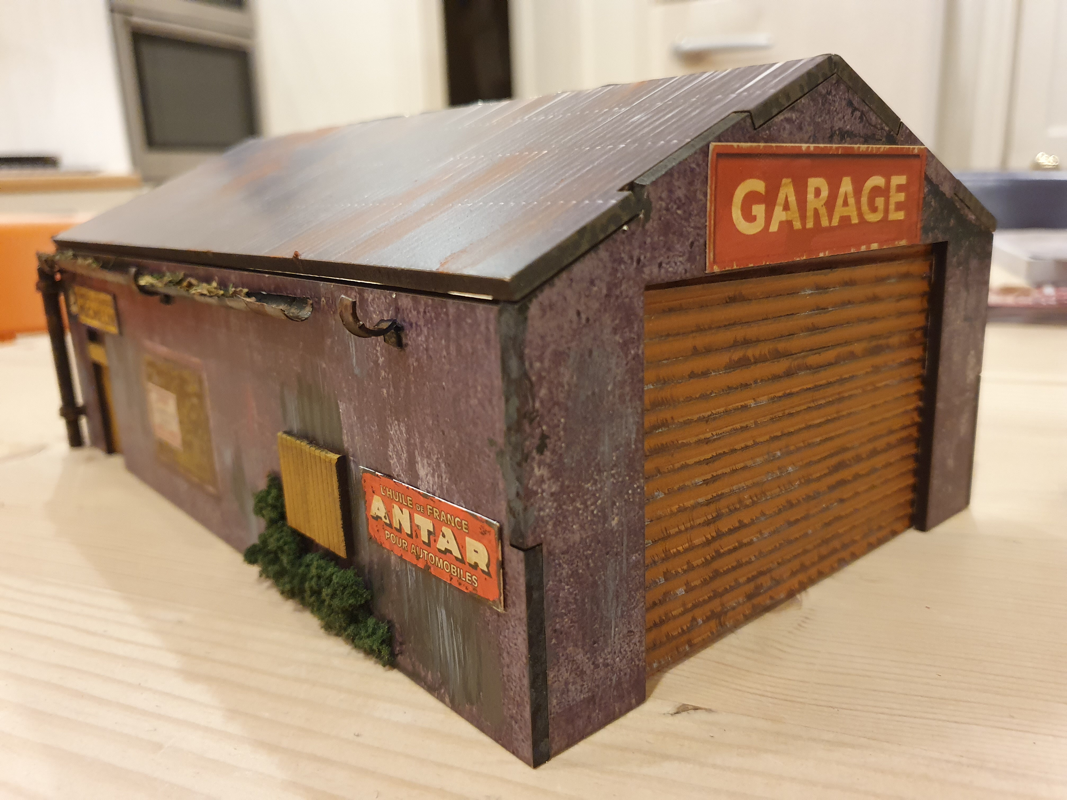
 Two weekends ago I spent a happy Saturday at Warfare 2021, held this year at Ascot racecourse. It was a good venue and so great to be at a wargame show again. It was particularly fun browsing the Great Escape Games, Warbases and Caliver Books stalls. I also enjoyed the Extraordinary Laser Company's display of pre-printed mdf buildings, which I hadn't seen before. Ever ready to add to the 28mm terrain collection, I picked up the XLS Garage from their Urban Decay range for £15. I don’t play post-apocalypse-dystopian nightmare games (apart of course from Zombicide - who can resist chainsaws and rollerskates?) but had in mind to adapt the model to make a 1940s industrial unit for Bolt Action. First, take your Bits BoxThe model has a big footprint and could be a good centrepiece for a table layout. I decided to keep it as a garage, but dialled back in time to a small French town in 1944. The makeover involved the following steps:
I’m very pleased with the final model and really impressed by the quality of XLC’s products. The pre-colouring is great and construction is dead easy. I’m now looking through the range for other candidates for a 40s makeover. Oh, and I’m tempted by a new dice tower.
I was mildly disappointed to learn that Warfare will not be at Ascot next year, as it was such an impressive venue. However Reading Wargames Association have explained that Ascot hiked its booking fee for next year by 50%, which seems downright cheeky. So Warfare 2022 will be held in Farnborough instead. I plan to be there.
0 Comments
 A bit of August LardI’ve always liked the look of rules by the Two Fat Lardies but until recently I’d only played Chain of Command, What a Tanker and Pickett’s Charge (which while excellent isn’t exactly a full Lard experience). Lately I have started visiting Staines Wargames Club on a Friday evening, where Lard games are popular. So in the space of a fortnight I had my first taste of Infamy! Infamy! and of Sharp Practice. Both games were great fun. Arresting the Chief’s sonIn my first game of Infamy! I was required to take my Roman patrol to a Gaulish village to arrest the chief’s son for unspecified anti-Roman activities. The men of the village were out hunting at the time my force arrived. Chris had set up an atmospheric village with huts, vegetable patches, sundry rubbish and a palisade wall, surrounded on three sides by forest. I had to check each hut for the presence of the chief’s son, as quickly as possible because Ian’s hunting party was due back at any moment. The patrol found the suspect in the hut furthest from the village entrance, protected by a group of elite Gallic warriors. Luckily the search party were veteran legionaries and after a tough fight, the chief’s son was in custody. Meanwhile the hunting party had started to arrive. Fortunately for the Romans, no Gauls arrived between the patrol and its line of retreat. The patrol started to retire from the village, pressed by a growing band of angry Gauls. Had the chits been drawn differently, the captive would have been freed but I was fortunate to get enough distance between the patrol and its pursuers that we concluded the arrest had been carried out successfully. This was a tense and engaging game which really benefited from the storyline. Alas, I was too busy searching huts to take photos but the pretty table and lovely figures were a big contributory factor. Crossing the NiagaraThe following week Chris hosted a game of Sharp Practice, set in the War of 1812. Paul commanded his own British force while I had Chris’ Americans. The scenario was Crossing the Niagara from the War of 1812 Sharp Practice supplement, which involved a US force landing on the Canadian bank against British/Canadian opposition. Again the table was very fine, with some particularly lovely buildings (and this time I have the photos to prove it). 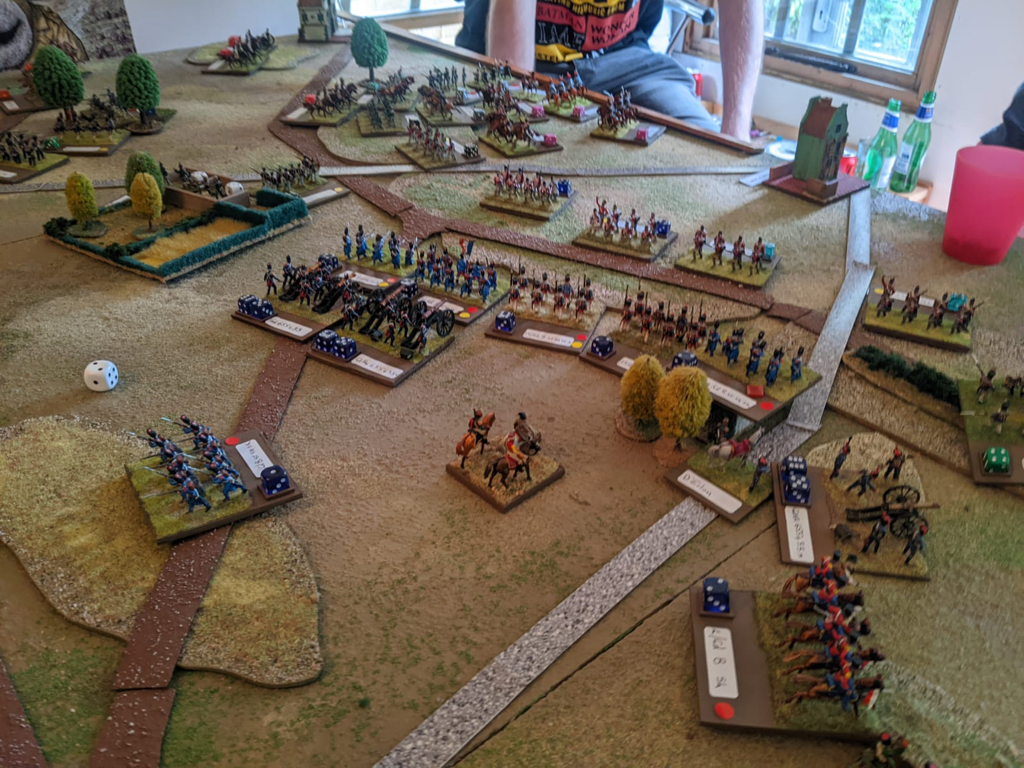 The US forces landed by boat in two waves, One group of British regulars were on the scene at the start while Canadian militia and an artillery piece arrived during the game to reinforce them. The challenge for both sides was to get their troops organised and firing before the opposition managed it. In our game, my US troops were able to form a firing line first and forced the forward-most British unit to retire. The US force maintained this edge for the rest of the game but did not dislodge the British entirely from its positions at the end of the table. Nevertheless the umpire concluded that the US beachhead was secure and so awarded the US a winning draw. I come late to Sharp Practice and there is nothing original I can add to the reviews already out there. I will say that I enjoyed it very much. The movement and firing mechanisms couldn’t be more straightforward. I love the random sequence of play, which gives suspense to every chit draw. I particularly like the rule that made it difficult to stop my militia from blazing away once they started firing. These rules are great for narrative play and Chris managed the story very well. On the strength of these games I have bought a pdf of Sharp Practice and some movement trays to use with my 15mm Napoleonics. I have a lot of individually based skirmishers on 20mm round bases and just need to add more command figures. I did briefly consider a 28mm contingent but my investment in 15mm is too big, both in figures and scenery. I have a lot of surplus skirmishers since changing rules from Lasalle to Lasalle 2. Plus, I should be ready to game with them months earlier than if I started on 28s. Being an impatient Wargamer, that is a big advantage!  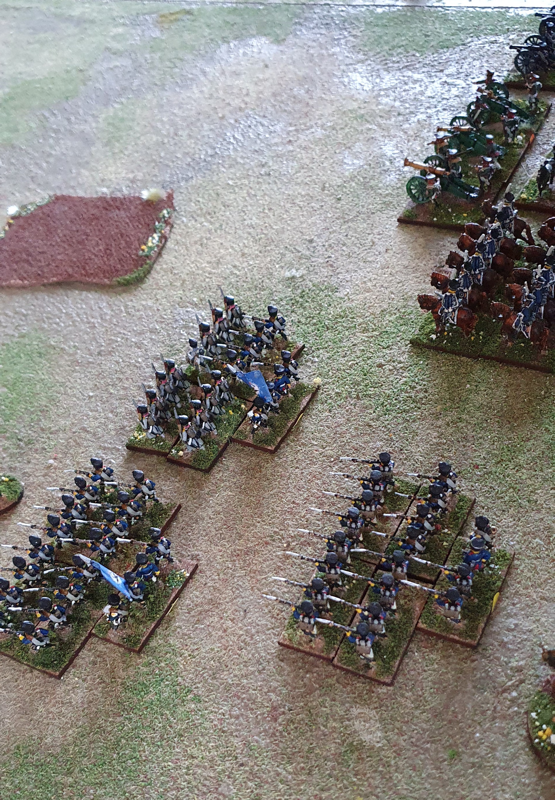 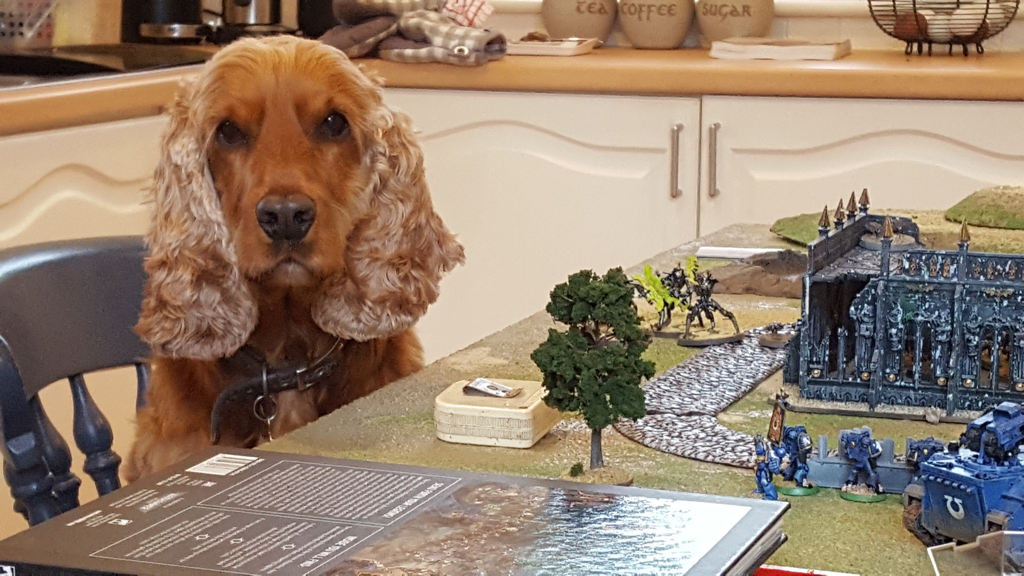 Copper is disappointed by my Ultramarines’ performance We and Games Workshop got historyBetween 1997 and about 2015, Games Workshop was a central part of our family life. We played every system they released between Gorkamorka and 40K 7th edition, with the exception of Inquisitor. Nick, our older son, was (and still is) a gamer above all while his younger brother, Will, enjoyed the modelling and painting, even selling his skills to raise cash while at university. I both played, but not as well as Nick, and painted, though not a patch on Will. The boys have grown up and moved out and our gaming opportunities have become rarer. Wargames still have a pull: I started playing historical games again and Nick has been happy to join in, while Will still enjoys picking up obscure modelling materials at wargame shows. At most, we now play a couple of GW games a year. I stopped buying White Dwarf soon after Age of Sigmar was released, not in protest exactly, but the new universe just didn’t interest me. 40K 8th edition also passed us by, though I did enjoy the one brief game that Ian Barber ran to introduce the new system. In short, for no particular reason, my 40K knowledge ended with 7th. My Firstborn: beaten by my first bornUntil autumn 2020 that is, when Nick bought me the Indomitus boxed set as a surprise lockdown gift. We had both been curious about 9th edition and he couldn’t resist the bargain of large new forces for two of our favourite 40K armies. A small test game between Orks and Cadians went well (for the Orks), Christmas brought the Space Marine and Necron codices and we were back in the thick of it. Nick came over on Father’s Day and we played our first biggish game with the new rules. Nick took Necrons and I led the Ultramarines. Nick had some of the new Necron models but my army was a continuation of my 7th edition force. Who knew when I originally collected them that I would be fielding ‘Firstborn’ Space Marines? Honestly, I turn my back for a moment and the lore changes everything! We fought over a ruined Imperial settlement, which allowed a lot of cover to both sides. This favoured the close combat specialists who could close the range without exposing themselves to too much firepower. I was happy with my deployment, including landing a drop pod and some terminators behind Nick’s line, so for a short time Ultramar seemed ascendant. Then Nick’s warriors shot up my Assault Marines, his scarabs ate up my dropped squad and his destroyers destroyed my razorback squad. That basically put the lid on my efforts and by game’s end he held all but one objective. It was an exciting game that moved fast despite us both having to refer often to our faction rules. My mistakes included focussing overmuch on Nick’s Monolith, which I did nearly destroy but only after pounding it with my Vindicator for most of the game. Those shots could have been more successful thinning out Nick’s Necron warrior horde. I also failed to appreciate that under 9th edition Ultramarines can fall back from close combat and still fire. Had I done that instead of staying engaged, I might not have suffered the humiliation of a whole squad succumbing to a tide of tin cockroaches. My ‘gun line’ on the other side of the table might also have lasted longer by keeping more distance between itself and the Skorpeth destroyers. Just wait until next time! As ever, it was a pleasure to be across the table from Nick, adding another chapter to the story of our games since the late 90s. That’s a lot of happy memories, for which I will always be grateful to Games Workshop. Good to be back?So how does it feel to jump straight from 7th edition into 9th? I can’t deny it’s confusing. I suppose vehicles have changed the most and they strike me as more resilient than before. Right up to 7th edition, a couple of lucky dice rolls could wipe out a very expensive piece of kit. Things can still go wrong for vehicles but they generally hang around for longer, no doubt making them a less risky investment. The stripped back rules themselves are appealing and I especially like the way morale is now treated. I love the extra involvement provided by command points, which give a nod to Chain of Command, one of the best World War 2 rules on the market. Anything I don’t like? Nope. I even like the Primaris Marines, who seem more like the superhuman giants encountered in 40K literature. The ‘Firstborn’ plot twist is a clever bit of reverse lore engineering. I would, however, observe that 9th edition seems no less complex than older editions. The basic rules are now wonderfully simple but the complexity has transferred over to army and faction rules, the range and detail of which is bewildering. I had expected today’s 40K to be more accessible for new, casual or ageing players like me, but I don’t think it is. If I am to play my next game half-way effectively, I’m going to have to revise, remember and apply all the subtleties required to get the most out of an Ultramarine force. I really look forward to our next game but will timetable in some serious pre-fight preparation first. 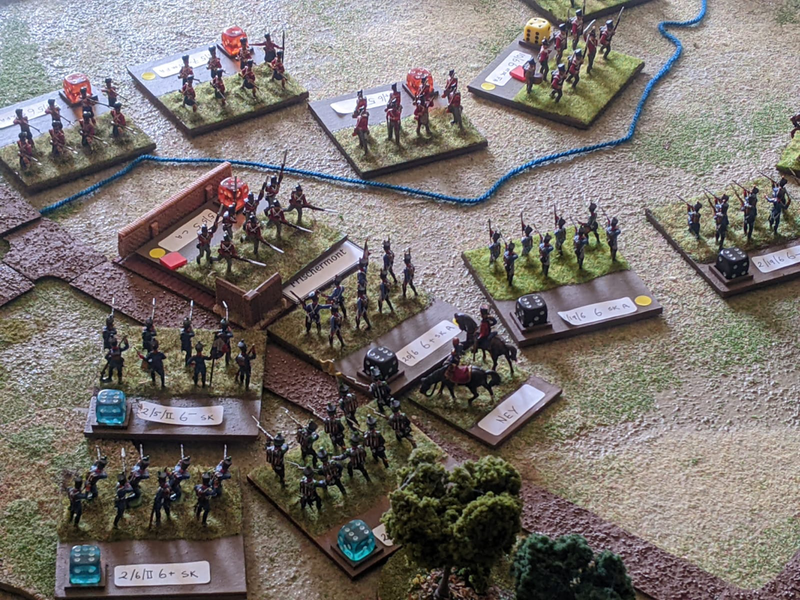 Hell, yeah! When Firstborn were metal... On 16 January Spencer and I played a game of Chain of Command. I am still learning the ropes but Spencer did a great job helping me to address the subtleties of the game. The scenario was loosely based on a German counter attack during Market Garden, with Spencer’s elite US airborne in a built up area responding to an assault by my reinforced platoon of regular grenadiers, with Panther support. His morale should by rights have been much higher than mine but the dice rolls left him with 9 and me with 8. 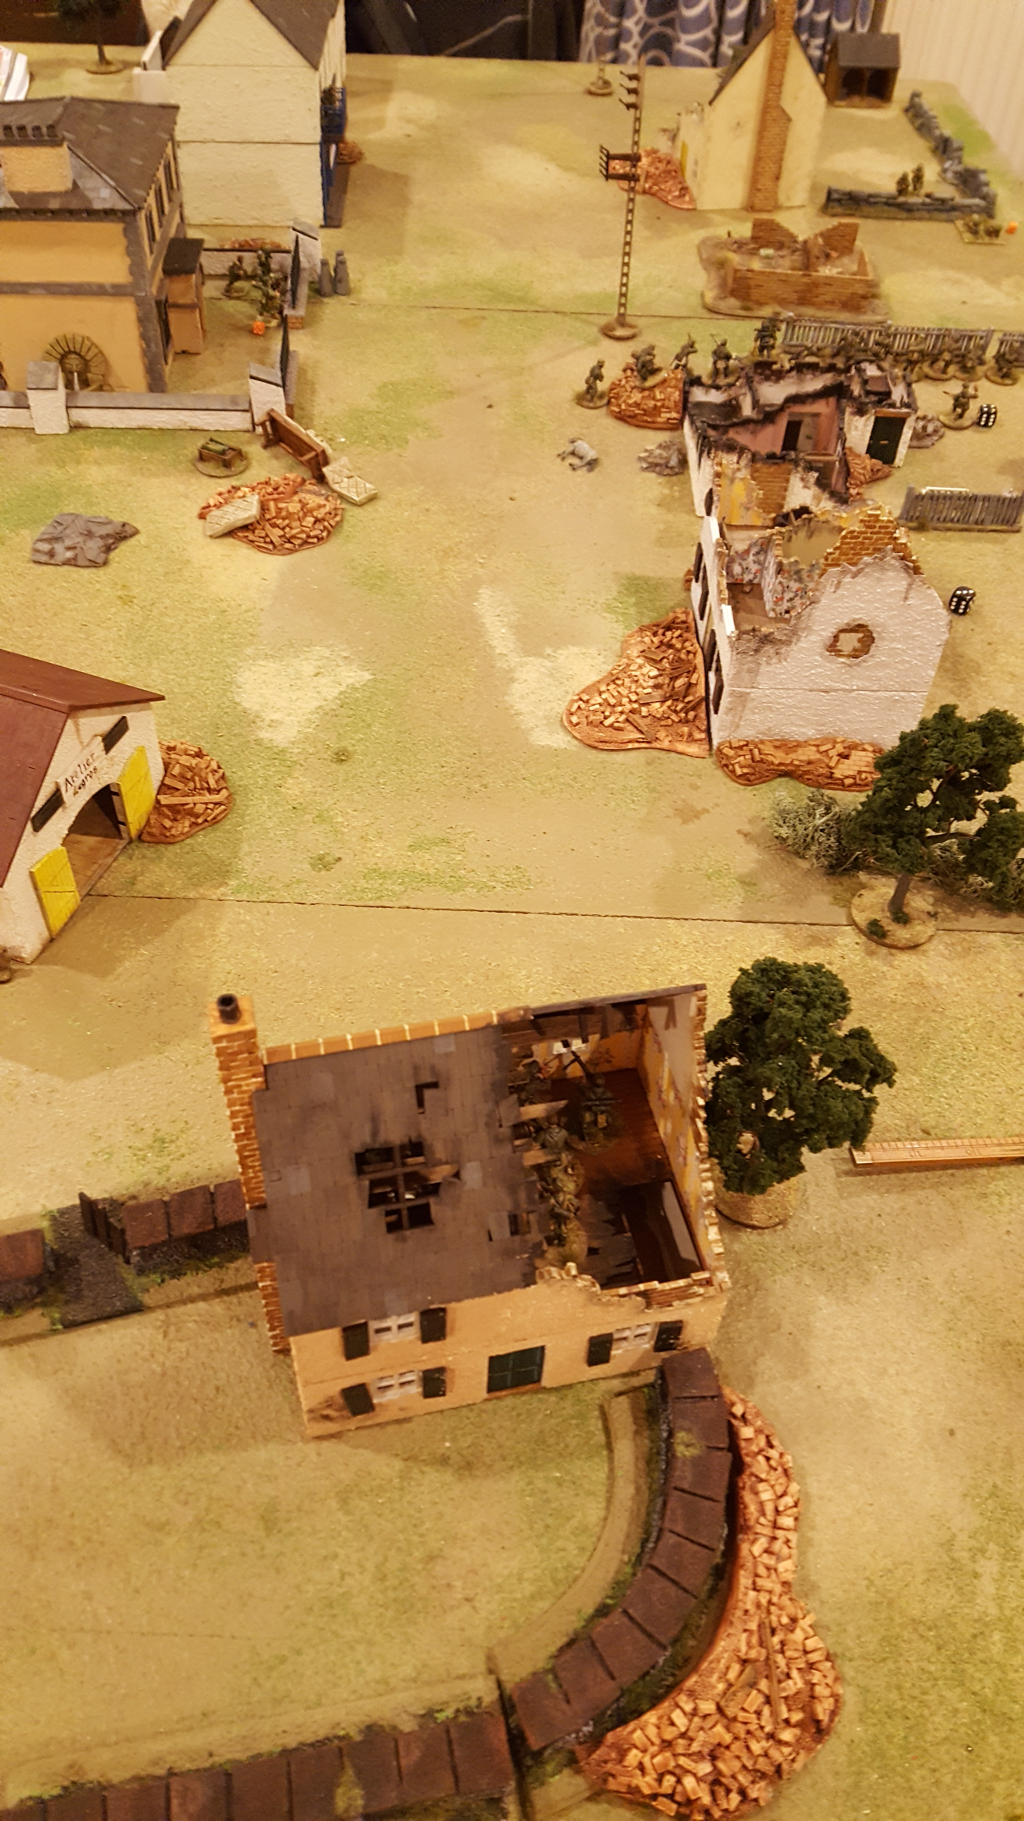 The 6x4 foot table had a street going lengthways down the middle, with houses and ruins on either side and a T junction at one end. Most of the scenery was mine but Spencer brought a lovely lot of rubble, some home made but most from Charlie Foxtrot. The patrol phase saw each of us trying to gain ground around the other’s right. I was quite happy with the outcome as I think I finally realised how important it is to get patrol markers out in front of the desired jump off points. On the first turn, Spencer deployed a squad and senior leader on his right. He placed an MMG in rubble and the balance of GIs going tactical in the open, in an early bid to take my left-hand Jump-off Point which was behind his right rear. In my turn I deployed a grenadier squad on this JoP and fired at the Airborne in the open. Some very lucky rolls put a lot of shock on the paras and Spencer decided to pull his squad back behind a wall. Unfortunately for him, he rolled low for movement which meant his squad could only retreat to the wall and had to stay on the German side of it for another turn. I brought on an MG42 and a Panther to lay down concentric fire on the Airborne squad. The Yanks shook off the resulting shock, got over the wall and returned fire. The duel between my regulars and the smaller number of Spencer’s elites was surprisingly balanced, but my original squad’s losses rose and it became pinned, with its junior leader first wounded,then killed. My morale by now had dropped to 5. However, Spencer’s losses also gradually rose and he decided he wouldn’t be able to break the pinned squad before his own losses went critical. Concluding this could only end badly, Spencer withdrew his squad out of sight behind the central building Meanwhile, in the centre, I brought in my other two squads, placing one in a ruin facing forward and the other behind them and facing right. Spencer deployed a sniper who started nibbling away at the first of these squads, then he brought in another Airborne squad and senior leader on my right flank. As these troops advanced, Spencer brought his original squad round from behind the building to provide supporting fire. Thus far, the game had been going Spencer’s way, with his morale still intact and mine down by 3 points. But I had been rolling lots of 5s and found myself with two Chain of Command dice. Spencer sent his left hand squad to assault my right flank, which I interrupted with a CoC die. Spencer rolled low for movement and failed to make it into cover. I laid more fire into the advancing Paras, who lost men and some morale points to bad stuff but were still grinding forward. I used the other CoC die to interrupt them again but they still kept coming. Then, I rolled three 6s and was finally able to break Spencer’s left and bring his morale to zero. Game over. That was fun. Really fun. I cannot gloat as Spencer was most generous in helping me to work out my options and reminding me of the significance of the end of turn. The game had a strong narrative feel and I came across some new and interesting rules wrinkles that didn’t crop up in my first two games.
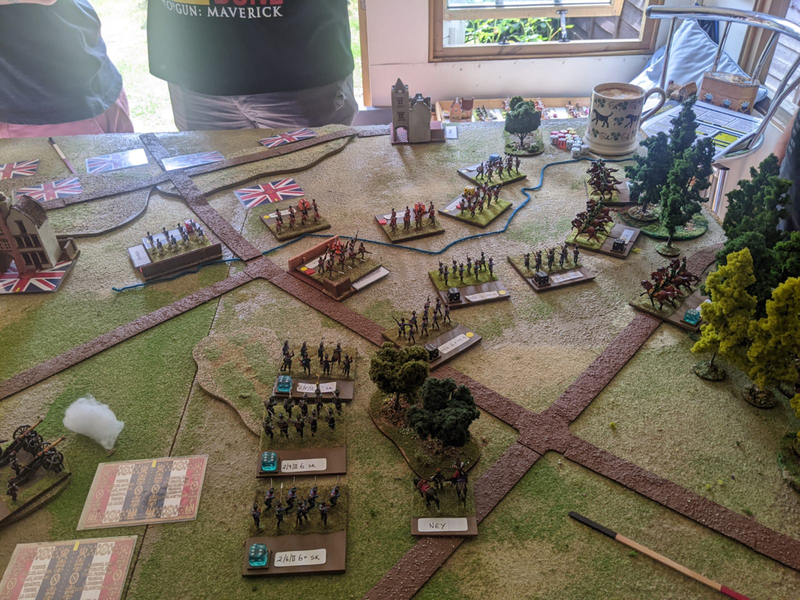
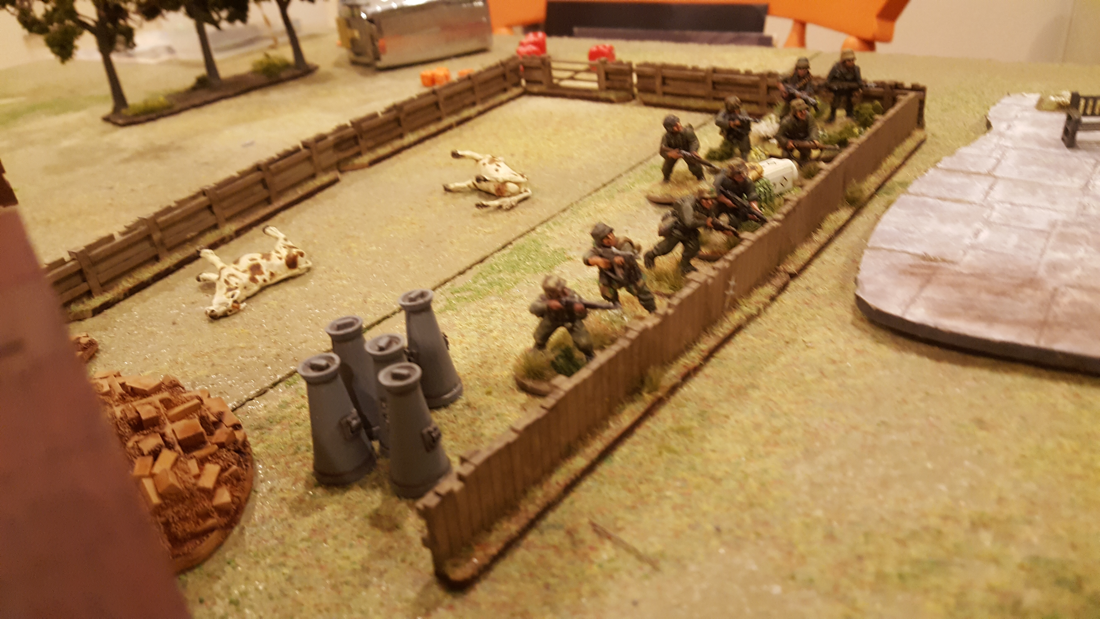
I was happyish with the table but have decided to buy an urban game mat, as the green high street just looked wrong! I am thinking I would then add green spaces back by making some back gardens and placing these as necessary. I also need more rubble and more walls. Time for another chat with Mr Foxtrot. We played a 200 point game of Art de la Guerre on Wednesday, with Spencer and Matt pitting their Early Imperial Romans against my Ptolemaic army. Both of them are building their own Roman armies, Spencer’s set a little earlier than Matt’s so with oval shields. Together, they fielded ten bases of legionaries, one of equites and two light infantry bases, supplemented by some Hellenistic horse and medium infantry. My Ptolemaics had six bases of pikes, four of thureophoroi, five of xystophoroi, two Nubians and a bunch of light infantry. The Romans fielded two commands entirely of infantry and put all their cavalry in their right hand command. The Ptolemaics had the pikes in the centre with cavalry and light infantry divided more or less evenly between the two wings. The Roman plan was to avoid the front of the pikes by drawing their centre back and to the left like a matador’s cloak. Meanwhile their horse would crush my left wing horse and fall upon the rear of my pikes, while their left would fend off my right wing. 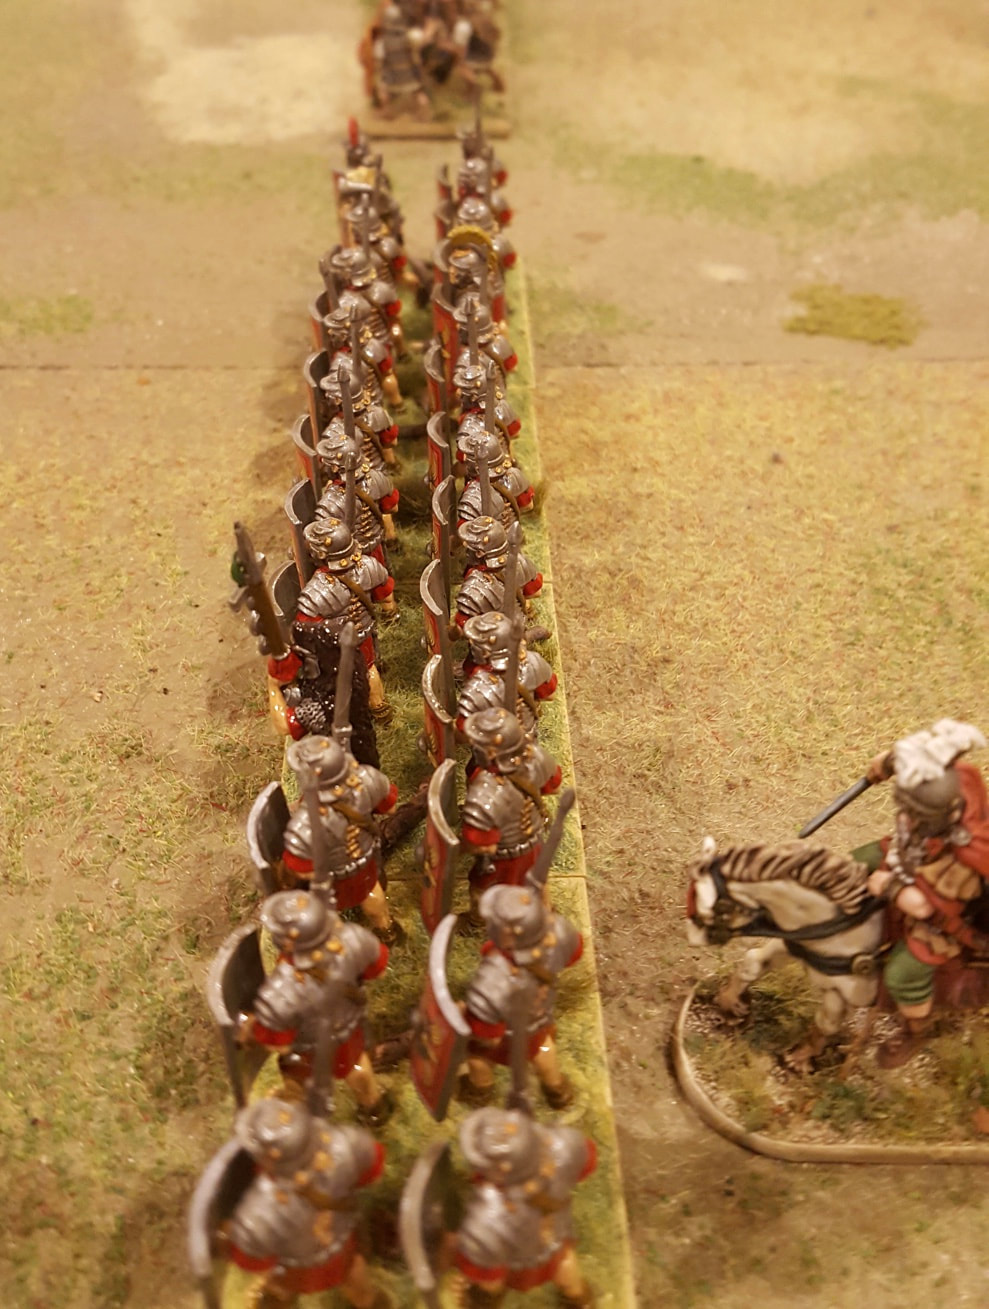 The legions advance 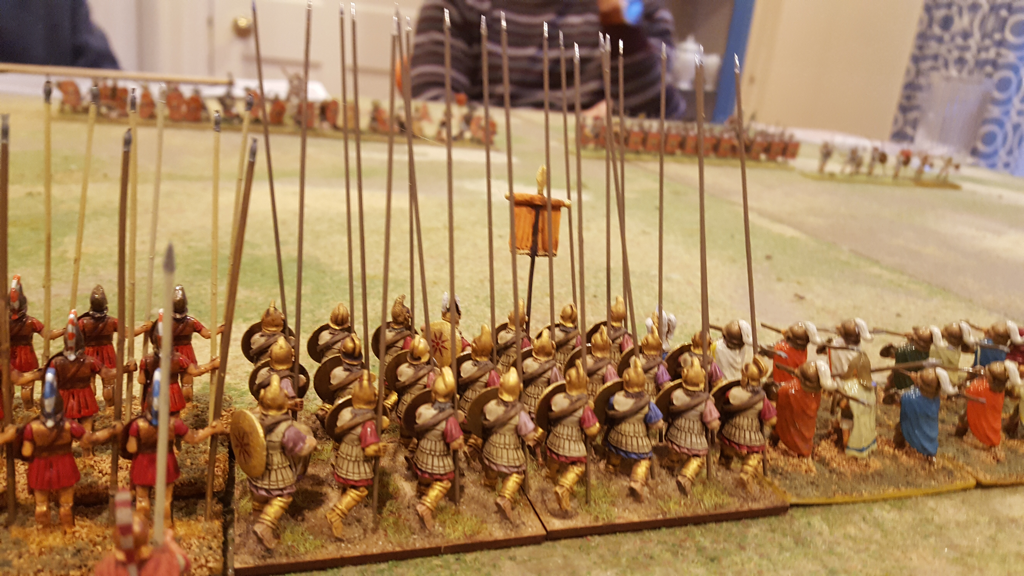 The Ptolemaic centre To begin with, the Roman plan went well. Their right wing drove my Nubian horse right off the table. But as they turned to engage my centre, their commander threw himself into a melee with some thureophoroi in which he was killed. From then on, the Roman right had to operate with no command roll modifiers and a 2CP cost for each order. Meanwhile, my pikes were able to close with the Roman centre before it could get out of the way. On the Roman left/Ptolemaic right, the Greek/Macedonian horse faced off against Matt’s legionaries with neither side closing.  Stand off on the Roman left The combat in the centre went well for the pikes, as their Roman opponents were out of position. Even so, the Romans were a tough nut to crack and took time to wear down. On the unengaged flank, the Ptolemaic horse finally charged the Roman left but there followed several rounds of inconclusive combat. Eventually, the uneven struggle in the centre tipped too far in Ptolemy’s favour and the Roman army broke. 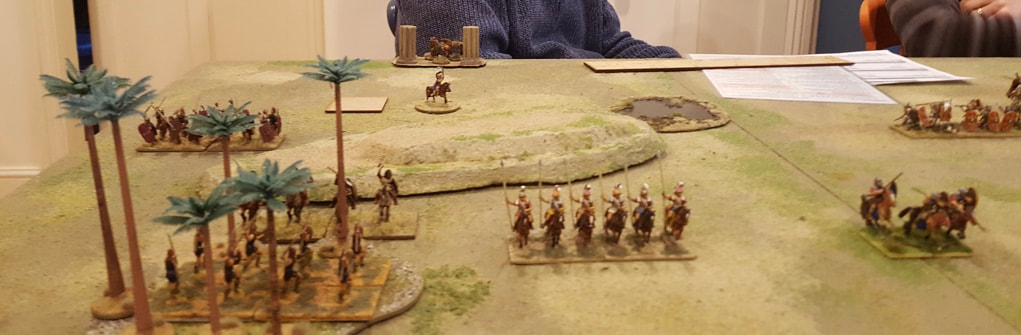 The Roman right goes deep, but will shortly lose its commander The game ran at a fair pace. We are all now more familiar with the rules although still needed to do some checking here and there. There were various points to note for future games. One is the powerful combination of an elite unit with armour. The armour rule really reduces the chances of an emphatic or rapid result. Another is the crippling effect of losing a commander. Before you get stuck in with a general, make sure it’s worth the risk of losing him. Another thought is that the threat of combat can be more effective than charging in. For most of the game my right wing was facing off against the Roman left, stopping it from turning to attack my centre from behind but without actually charging it. With hindsight, I needn’t have charged at all since my victory points were coming from elsewhere. Once we did start fighting on this wing, all I really did was increase the risk that poor dice rolling might give the Romans victory points unnecessarily. It is always tempting to get stuck in with everybody but in some situations, I don’t think this is a smart option. 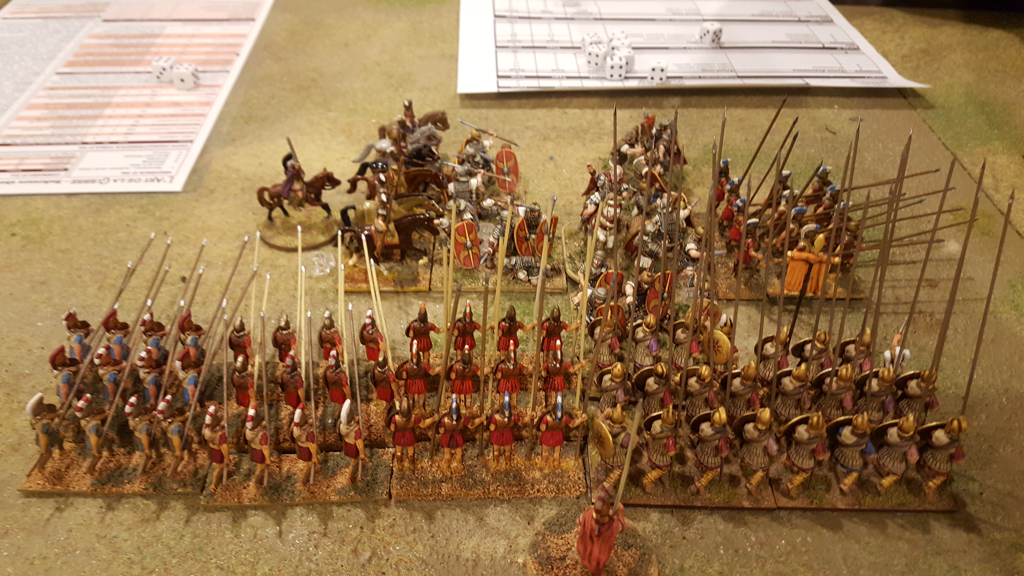 The end of the Roman centre, fighting to front and both flanks (those pikes on the right are facing the wrong way so the bases can touch...) As usual with these opponents, the game was played in a generous and cheerful spirit. Special mention must go to Spencer’s handiwork on his legionaries. Exquisitely painted and posed, each base is a vivid little diorama. He isn’t exactly a fast worker but the results are splendid.
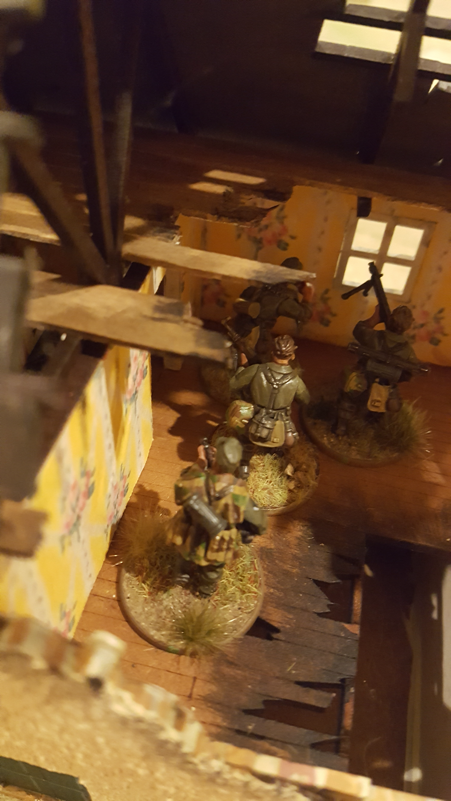
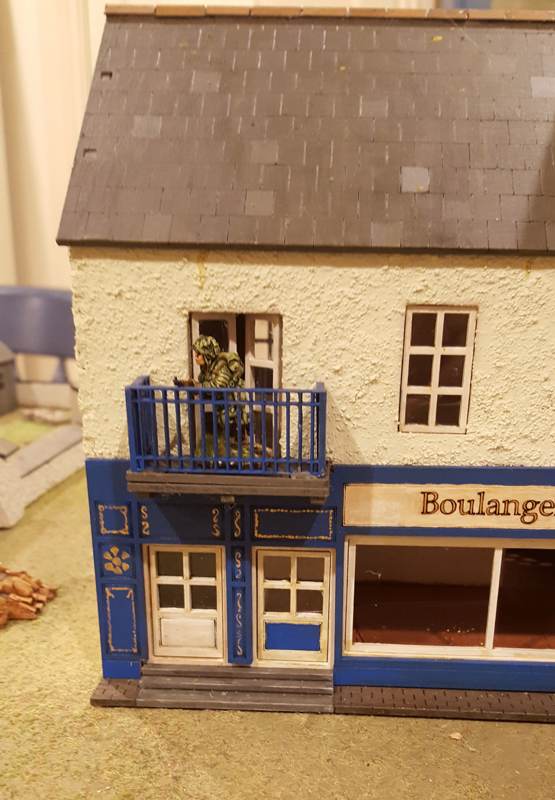
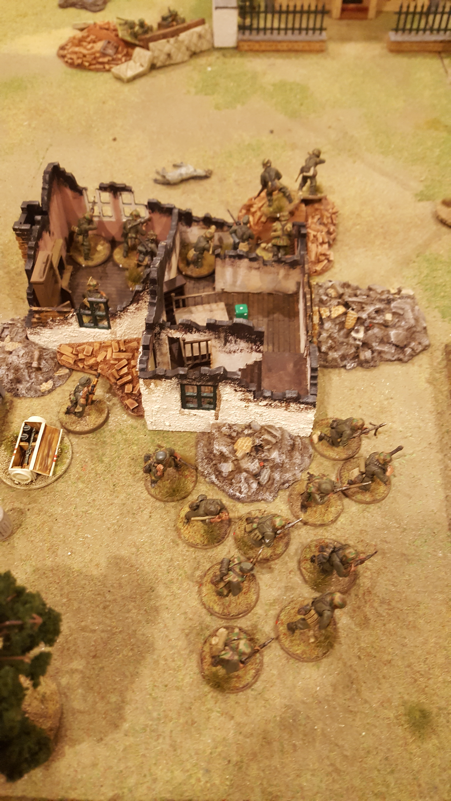
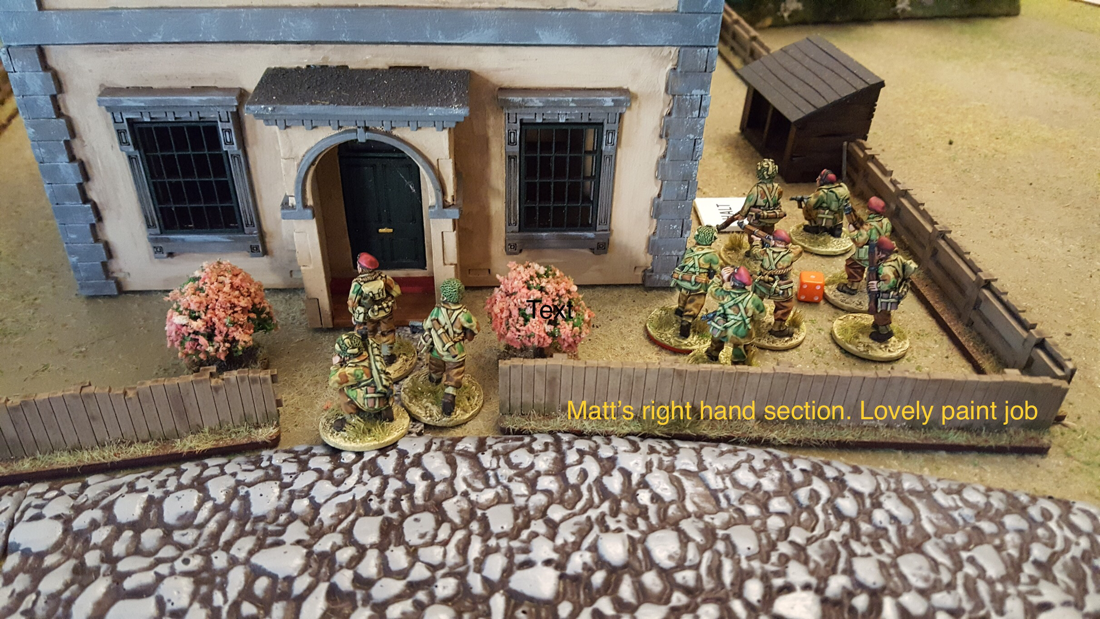
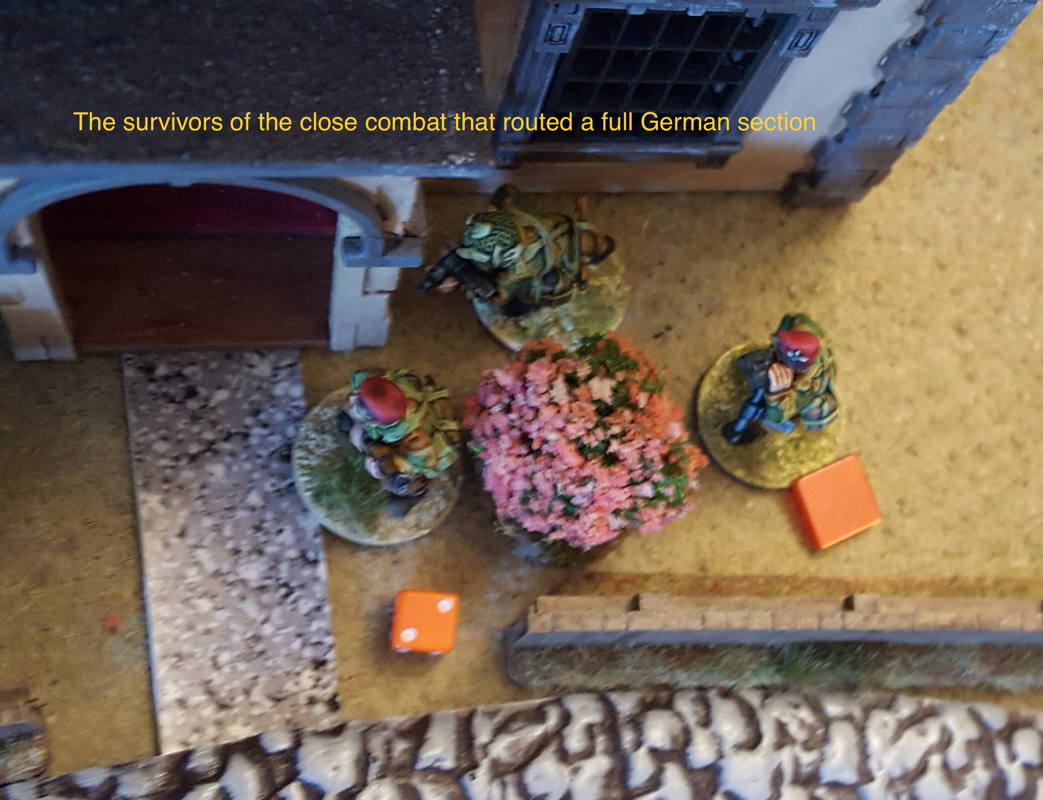
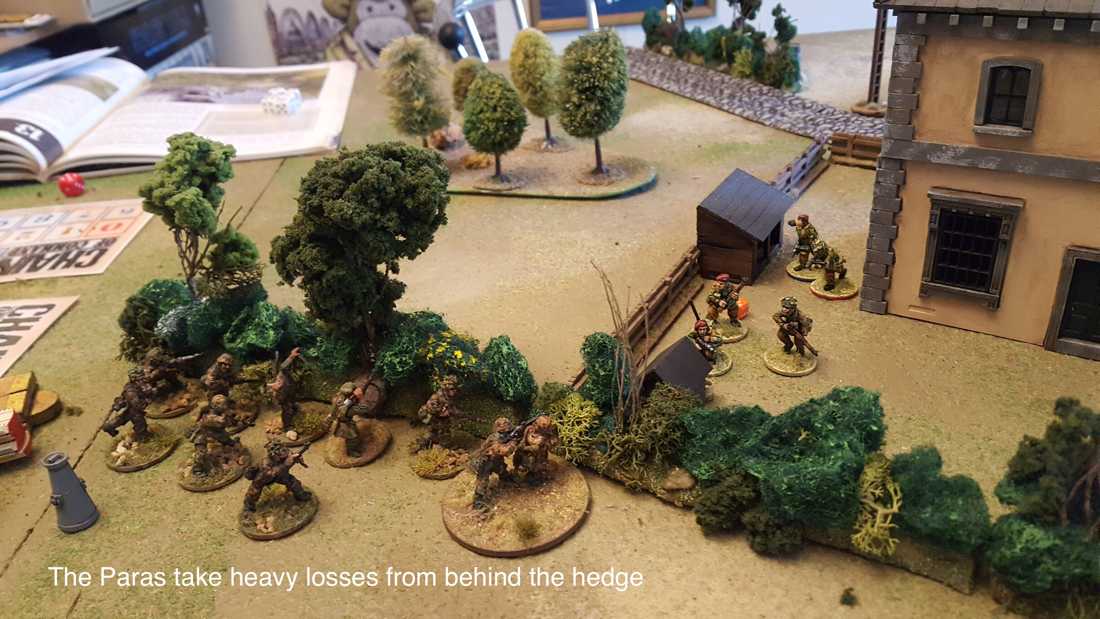
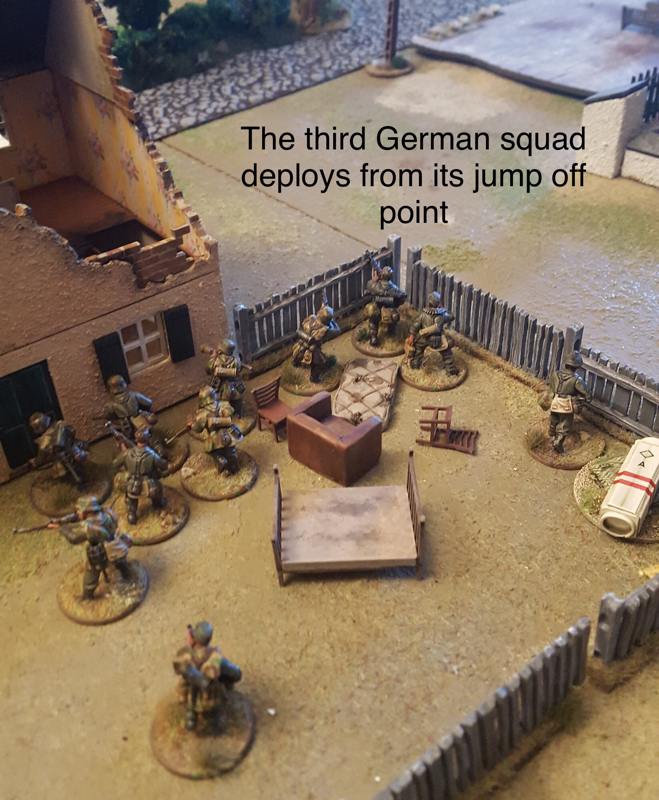
The figures on the table were a mixture of Heroics and Ros plastics, Minifigs, First Corps, Victrix, Warlord and Black Tree Design. Oldest painted in 1981 and newest finished last Tuesday. 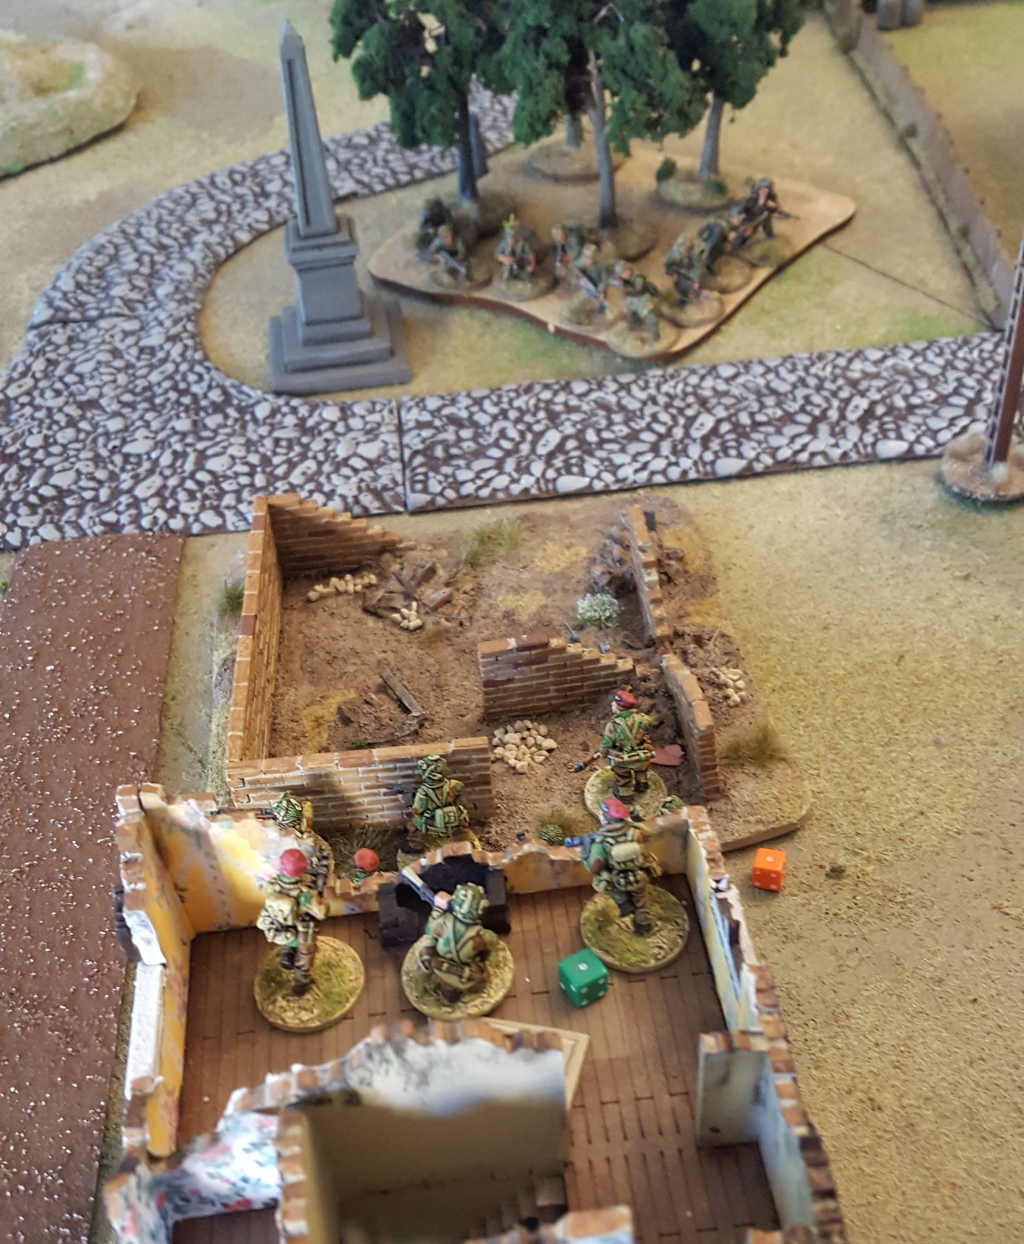 On Wednesday evening I played my second game of Chain of Command, arranged by Spencer. I took a German platoon with an extra section and HMG, plus a STUG to introduce the vehicle rules. Spencer took a platoon of British airborne, together with a Sherman and a flamethrower. Let’s get it out of the way quickly: I was pulverised. We played a patrol scenario and both came on in the same table third (my left, Spencer’s right), which had a big house around the half way line. We ended up with jump off points quite close to and either side of this house and it was the scene of an interesting sequence of events. Spencer deployed first and placed one section behind the house, one in a hard cover ruin in the centre of the table and one behind the ruin, ready to swing round to his left. I deployed a section behind hedgerow on my left, a second further along the same hedge nearer the centre, a third in woods close to Spencer’s section in hard cover (what was I thinking?) and the fourth behind a Hill on my right. On his right, Spencer advanced his right hand section along with a senior leader, aiming to knock out my left jump point. I met him with fire from behind the hedgerow and from a fence behind his left flank.This took out several Paras and he decided to withdraw behind the house. Thinking I would go for a wipeout, I sent a full strength section into close combat with his five (count them) surviving men. Well! That was quite a way to find out how tough elite infantry with stens and a senior leader can be. Spencer had many more dice to roll than I. My section lost six men and routed back to their starting hedge line, while Spencer lost only two. His depleted section took no further part in the game but they didn’t need to as they had done their work. 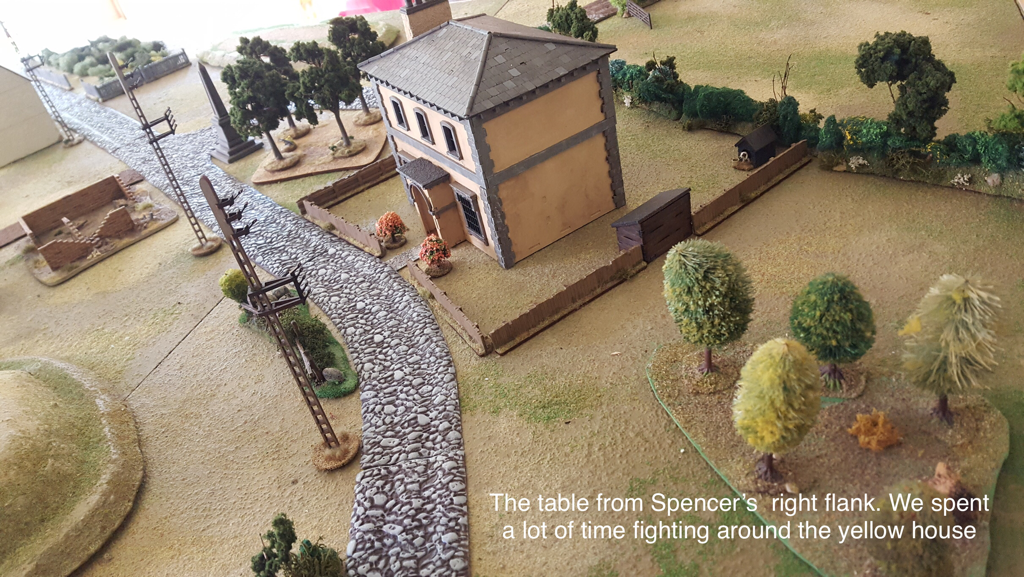 In the centre my third section in the woods fought an unequal duel with Spencer’s middle section in hard cover. I had thought my MG42 with its extra dice would partly counter their cover advantage but when that combined with elites being harder to hit, I was heading for a sticky end. On Spencer’s left I think we both took some odd decisions. His left hand section legged it towards my right flank, then ran back almost the way it had come, intending to assault my section in the woods. They stopped short in the open and got shot up good. My right hand section, meanwhile, deployed behind a hill that lacked any cover and started out to meet Spencer’s flanking section, but when Spencer turned this unit around, mine jumped up on the hill and helped to shoot it up. Next to appear were our respective AFVs. Neither made a huge impact on the game although each helped to whittle down enemy numbers. In Force morale terms, Spencer made early gains through his brutally successful hand to hand defence, reducing my morale further as he broke my guys in the woods. I made some counter gains by beating up the section he had sent to his left then brought back again, but Spencer used a chain of Command die to end the turn and two of my routed sections left the table. In the final stage he deployed a flamethrower who fried my third section then engulfed my senior leader in flame, taking my force morale to zero. Game over. Lessons for the next game? Regulars won’t win a firefight with elite troops in hard cover. Don’t even think of close assaulting elites as you’ll get stomped. Before you place a unit, think about the avenues open to it after deployment: beware dead ends. Also (and I did know this but it’s easy to forget) you don’t have to mirror your opponent’s deployment. My right hand section was wasted for most of the game and could have been more useful reinforcing the hedgerow line on my left. Finally, think more about the mechanics of the patrol phase and remember the jump off point will be some distance behind the patrol markers once these have been locked down. The game was great fun and looked good. In particular, Spencer’s Paras were beautifully painted. I’m looking forward to the next one. 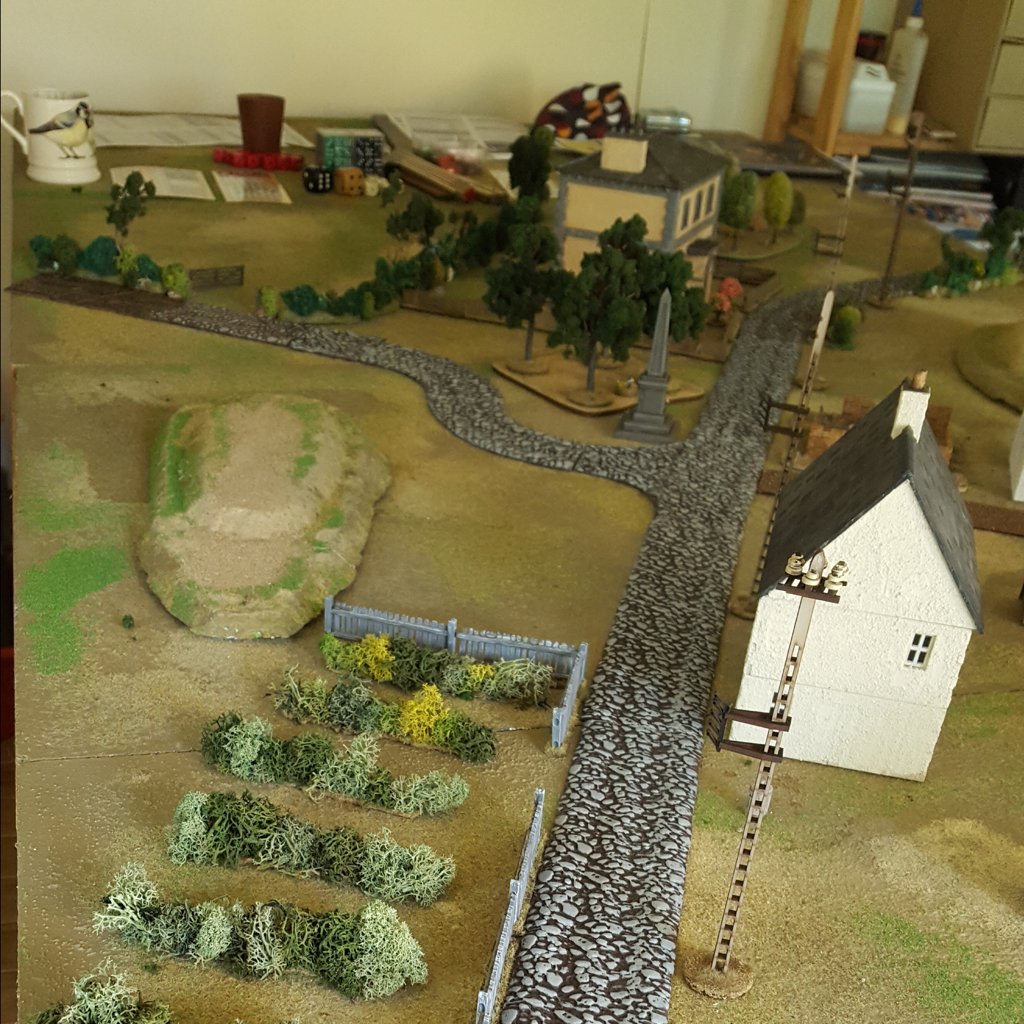 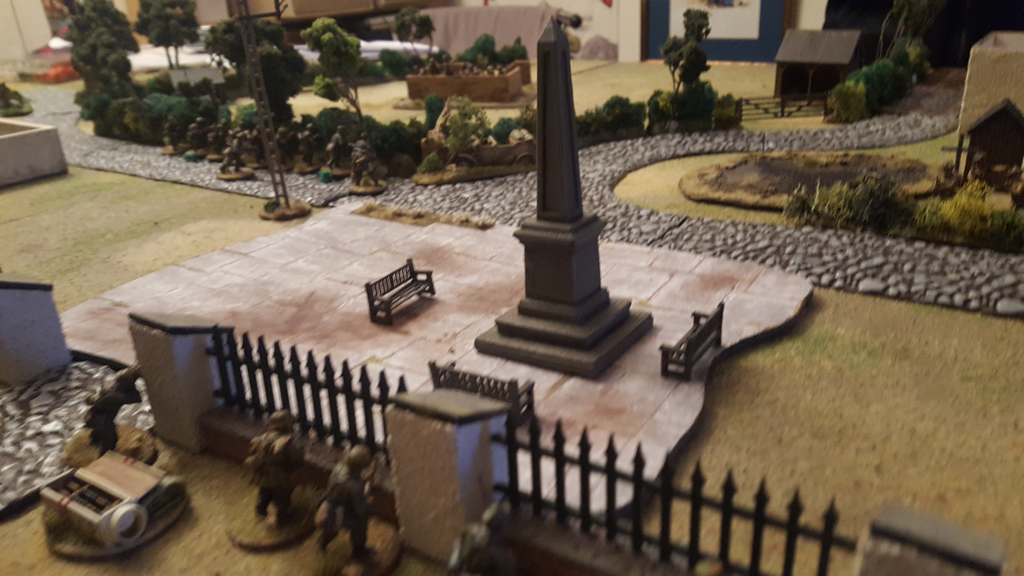 This week I finally played my first game of Chain of Command. I have had the rules for about four years but found them a daunting read and never got around to trying them. Somehow Bolt Action was that bit easier to grasp. Then along came Spencer, member of the Staines Wargamers and keen CoC player, who very kindly agreed to run a game in the shed for me and Matt, who has played it a little but is also pretty much a beginner. What can I say? I am hooked. These rules are so much more intuitive in play than in print. We had a platoon of regulars each, with no supports. Matt took the Brits and I had the Germans. It was a patrol encounter with a twist: there was a crashed kubelwagen near the middle of the table that I needed to control and Matt needed to deny me. 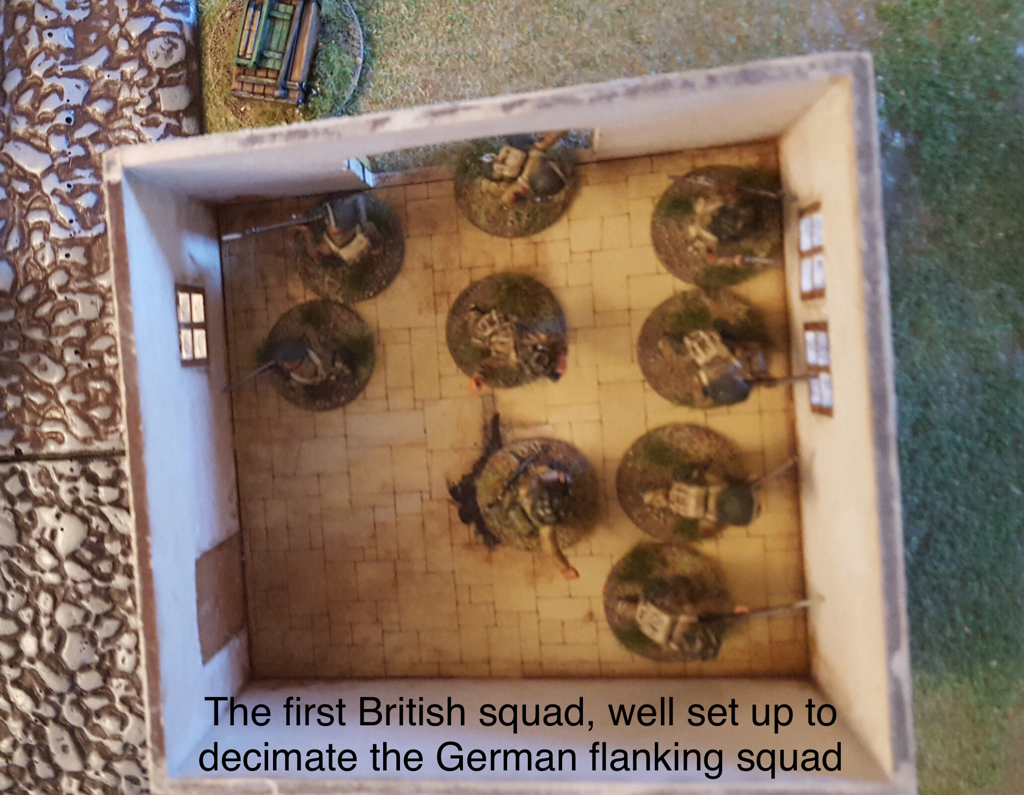 Chain of Command has been around for a long time so I presume it’s main design elements are pretty well known. The salient features for me are the patrol phase, jump off markers and Command dice. Spencer offered some useful tips for using the patrol phase to win ground, which was actually an intriguing game within the game. When it ended, Matt had a row of jump off markers in the centre of the table while I had two markers facing his in the centre and a third a little behind his left. I hoped this would give me a flanking advantage but in the event my daft deployment nearly cost me the game. Once we started placing figures, I quickly got into trouble. I deployed my first squad from the jump off point on my right flank in the open, placing the LMG team on overwatch and going tactical with the rifle team (increasing their cover save). Matt then deployed his first team in the building on his left, fired at my squad and began to dismantle it. Thanks to rolling several sixes, he played three phases on the trot, by the end of which I had lost my LMG team, junior leader and a couple of riflemen. My remaining troopers were pinned in the open. Bummer. 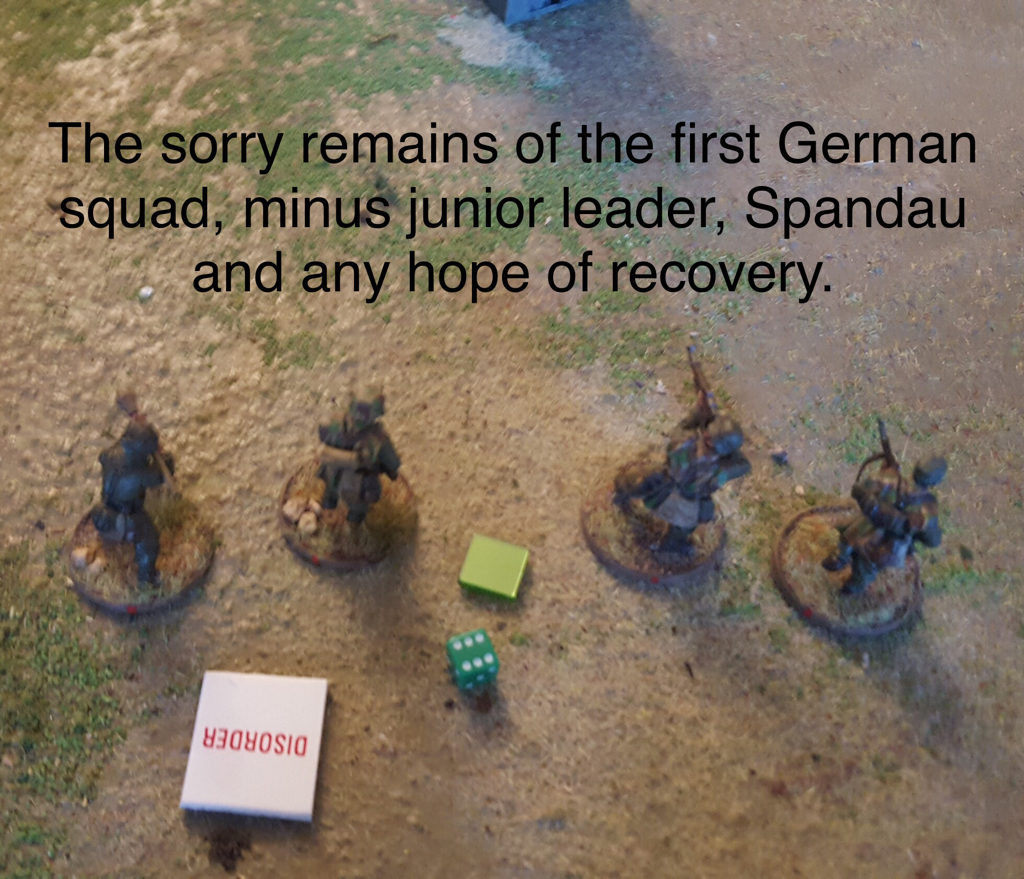 When my next turn came around I could do nothing to help the battered squad so deployed my remaining two squads and senior leader on my centre and left, close to the kubelwagen. Matt meanwhile deployed his second section beside his first on his left and his third section in the centre. I think his decision to reinforce his first section gave me a chance to recover from my stupid first move, as although he could now wipe out my first squad, I had more weapons firing at his troops in the centre than he had firing at mine. To cut a long story short, my left hand squad and senior leader reached the kubelwagen and lined a hedgerow, from which they won a duel with Matt’s third section; Matt moved his second section forward but they were pinned by my central squad; and he took his first section out of their building to put an end to my first squad and neutralise its jump off point. By game end, I had lost one squad and a jump off point, but Matt had lost two sections, two jump off points and control of the kubelwagen. I used my first and only Chain of Command die to end the turn and Matt’s force morale fell to zero. The game was exciting throughout and I only just managed to swing the win. The dice favoured Matt at the start with his series of rolled over phases but later on, I had some well above average shooting results, so (as always) the luck evened out. Spencer was an excellent tutor and umpire, advising us both on rules niceties and options. I found the rules far easier to absorb in play than they had been while reading the book. I think this is true of all rules to an extent but I do find Lardies rulebooks especially hard to navigate. As for subtlety, I am sure it will be several games before I start to get the hang of how to play properly. Having played a great deal of Bolt Action, I suppose I am bound to compare the two rules. BA is easy to learn and plays quickly. It has lots of tension and is always fun. It can however see some pretty unlikely tactics, the ranges are way too short and a lot of hardware appears on table that should be a long way away. I also hate the fact that some players create gamey army lists to get a killer - but unhistorical - army, but that isn’t the fault of the rules themselves. By contrast I think Chain of Command will take longer to master, even with the help of Spencer. But it will be worth the effort. CoC is definitely exciting to play. I really like the friction and uncertainty from the Command dice; the combat mechanics are not that complicated once you learn them and the players are faced with a wider range of tactical choices than with BA, both in what their figures can do and how they can operate. Of course, the most important factor to affect enjoyment in any game is the other player. Matt and Spencer were great company and the evening flew by. Spencer has recklessly agreed to come again. Before he does I’ve got some jump off points to build.  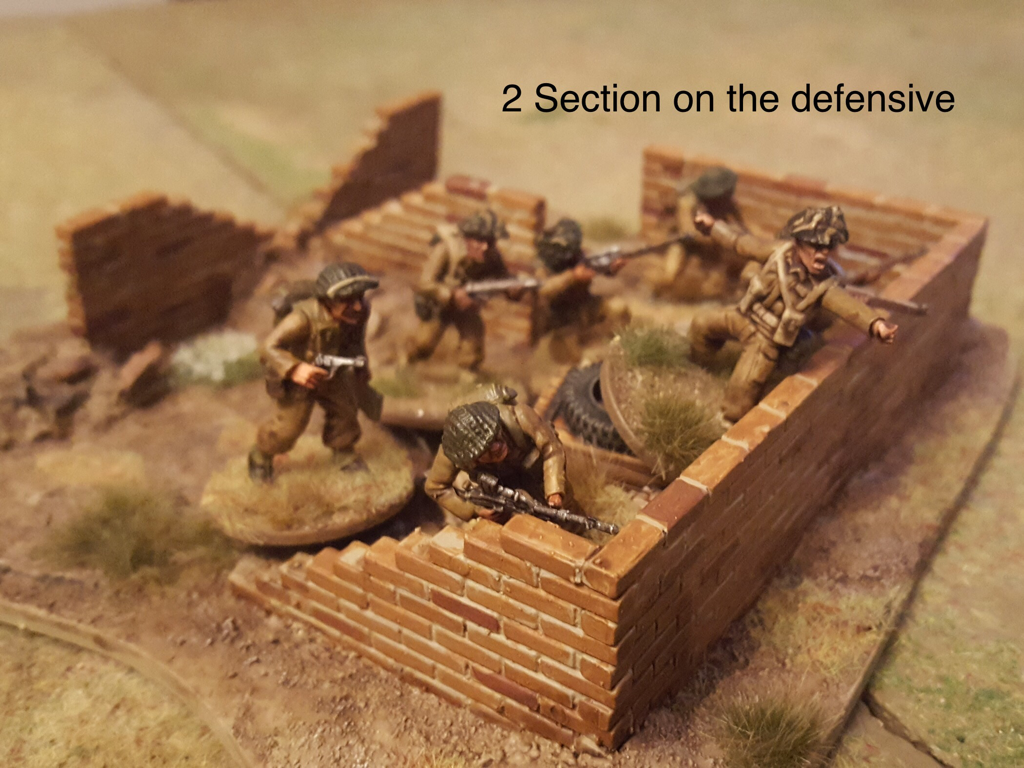 |
Archives
November 2023
Categories
All
|


 RSS Feed