|
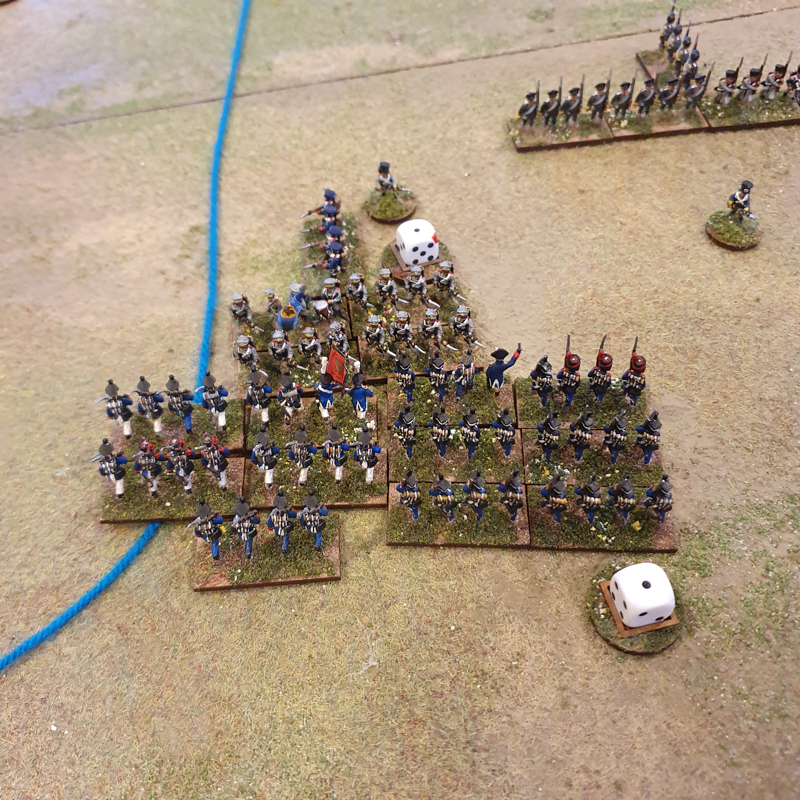
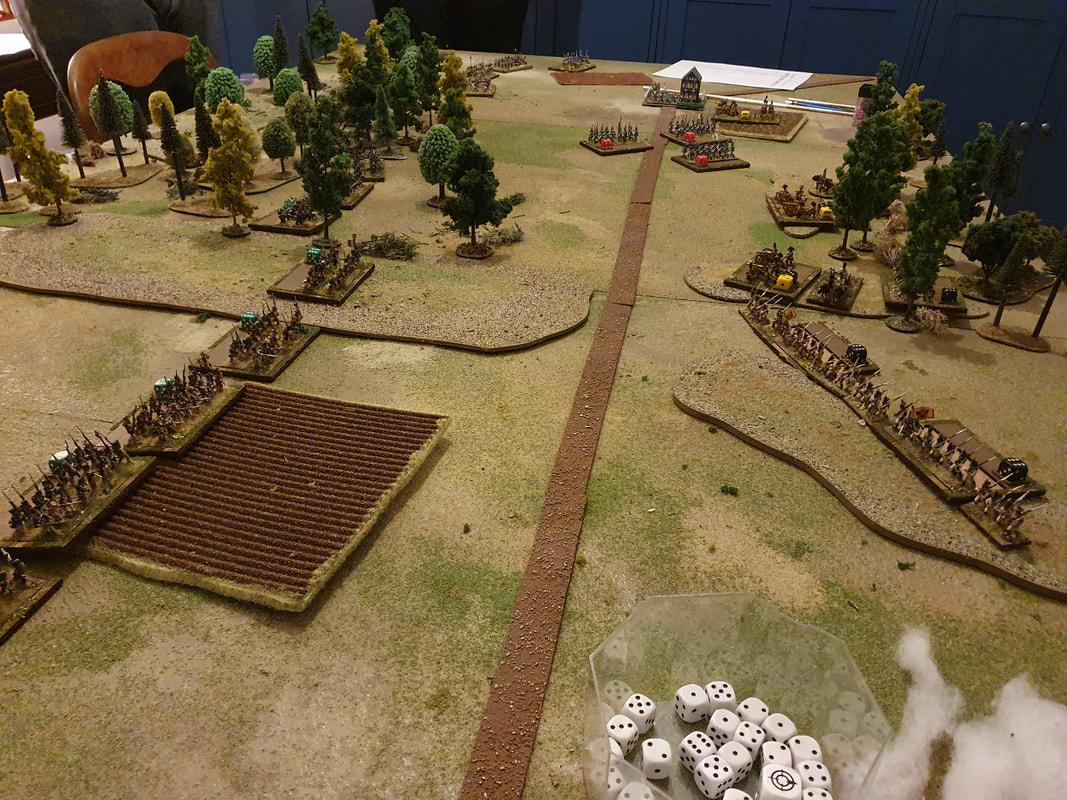
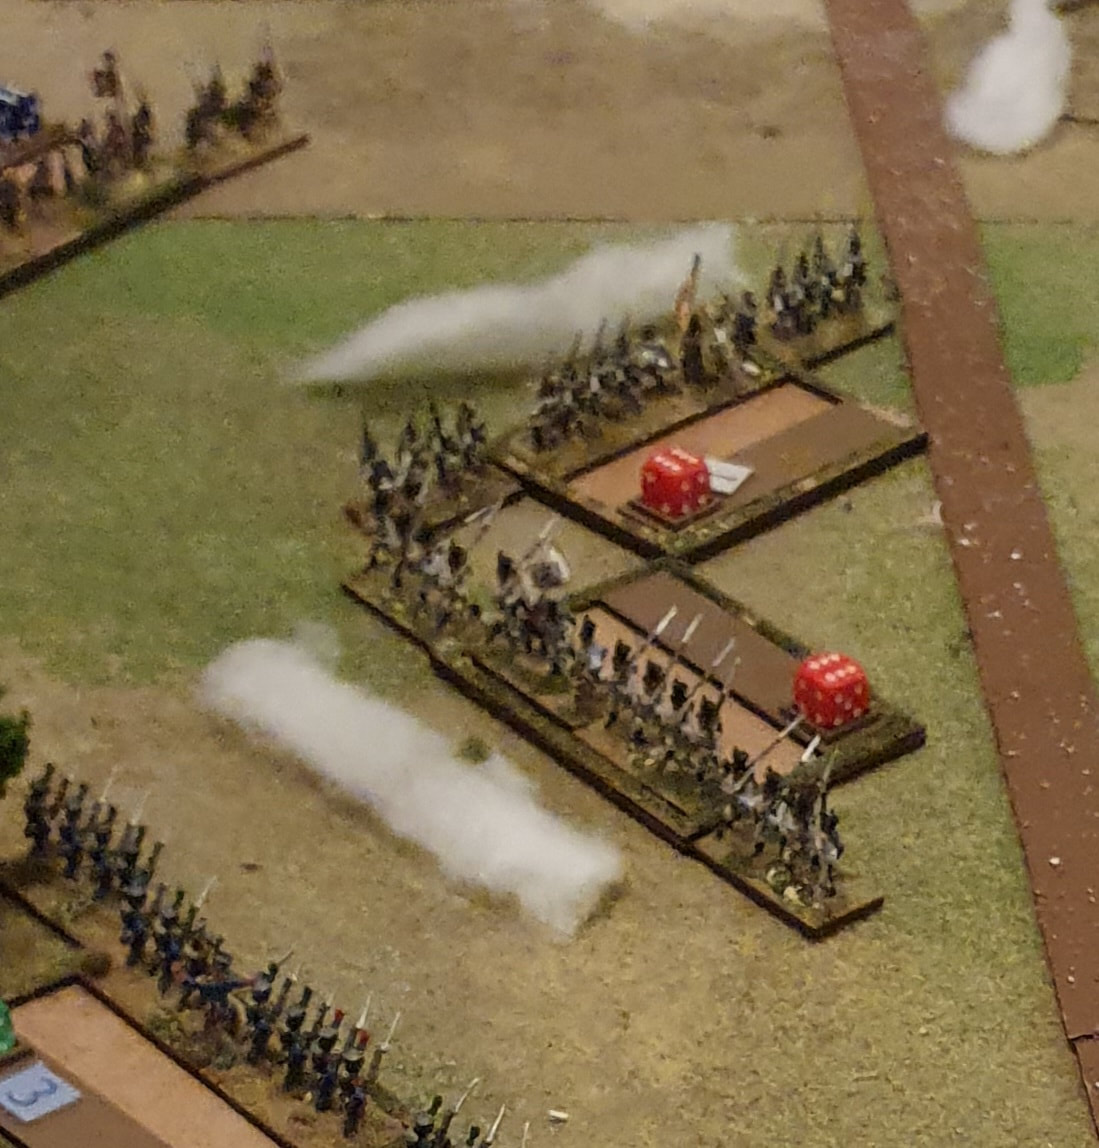
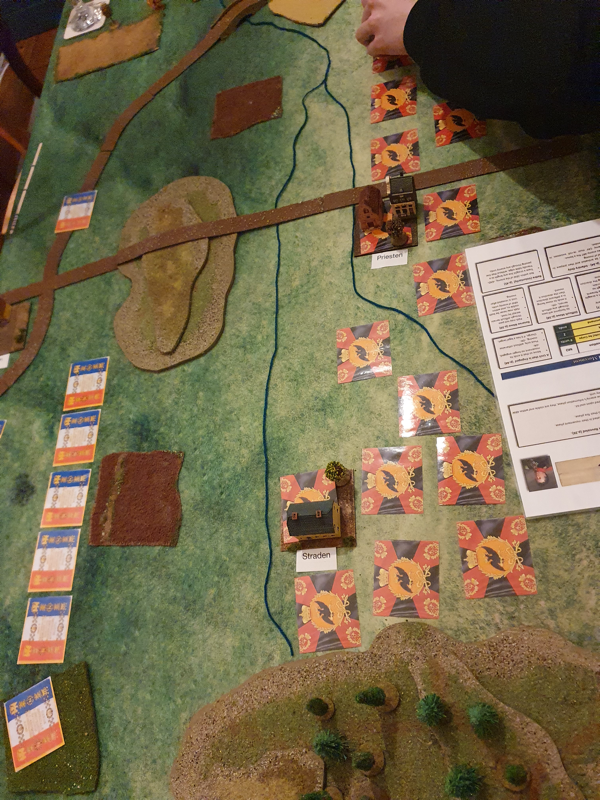
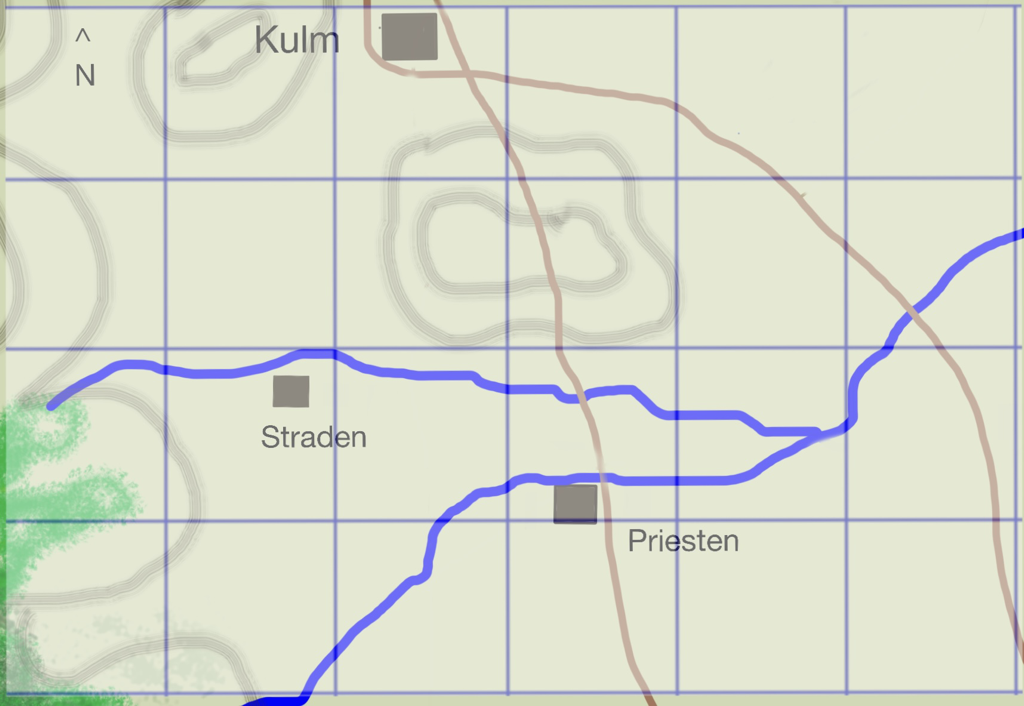
On 17 October, Dan, Harry, Will and I played a game of Lasalle. If I’d been thinking about the date I’d have run a Leipzig scenario but my brain was on go-slow and we played an 1809 game instead. The scenario was “Feeling for the enemy”, Friant’s attack towards Ober Sanding on 21 April 1809. It is downloadable here. The scenario begins with Rosenberg’s Austrians deployed along the Regensburg-Eggmühl highway facing West and Friant’s French arriving in the south west corner of the table. The French aim is to take the village of Ober-Sanding on the Austrian right, which would cut the highway and hence the Austrians’ connection to Regensburg. The table is unusual in having a lot of woodland, especially on the French side of the valley. Dan took the Austrians and Will and Harry, the French. Friant versus RosenbergThe game began with the French 15th Light, the best French regiment, advancing eastwards through the woods in the centre. Dan had deployed two Grenzers battalions on the edge of the woods, ready to slow the French down, but the 15th despatched them almost immediately (to my embarrassment since I had encouraged Dan to place them there). Meanwhile the French left, comprising 6 battalions, moved northwards through the woods and came out opposite and slightly overlapping the village. Up to this point, Dan had had atrocious luck with his dice rolls, his artillery barely troubling the French as they emerged from the woods. Also his reinforcements failed to show, which was less surprising since they needed two sixes to appear (each turn the players roll a number of dice equal to the turn number. Standard reinforcements arrive when one 6 is rolled; delayed reinforcements like Dan’s require two 6s). Fortunately for him, Dan began rolling better as the French attack on Ober Sanding started. As Harry now had to leave, Will assumed full command of the French and began his attack on the village with three battalions in line and three in battalion mass to the rear. His firing reduced the garrison to rubble but Dan was able to race a reserve battalion into the village before the French could occupy it. This battalion was then assaulted by two French battalions who were repulsed in short order. Meanwhile Dan advanced his centre to support his village and, at just the right moment, his artillery and musketry so disrupted the 15th Light that it ceased to be a factor in the game. Post-match analysisThe game ended with Will still outside the village but his reserves ready to mount another assault; the French centre incapable for now of forward movement; and the French right poised to put pressure on Dan’s outnumbered left. Dan’s centre was well-placed and holding their own and he still held the town on the right but he no longer had a reserve available should the garrison be bundled out by the French assault. Dan’s off-table reinforcements were still refusing to appear.
We agreed the game was a draw since it could still have gone either way. I’d give bragging rights to Dan however as I realised too late that the scenario heavily favoured the French, in two important respects. First, the French had such a big skirmish advantage that they went first every turn and had way more momentum than they needed. This negated any challenge arising from moving through the heavy woodland. Second, the French reinforcements only needed to roll one 6 to arrive, which happened quickly and gave them too much of a numerical advantage. After the game I amended the scenario to reduce the French skirmish advantage (though they do still have one) and to require reinforcements on both sides to roll two 6s before they could appear. I hope this will make the Austrian task a little easier. The scenario and orders of battle were taken from John H Gill’s Thunder on the Danube (volume 1). The Lasalle rules worked well and Will and Harry, both new to the rules, picked them up effortlessly. Next time, I’d like to try the same scenario using Soldiers of Napoleon to see how it compares. I was grateful to all players for the enthusiasm with which they assumed their Napoleonic roles!
0 Comments
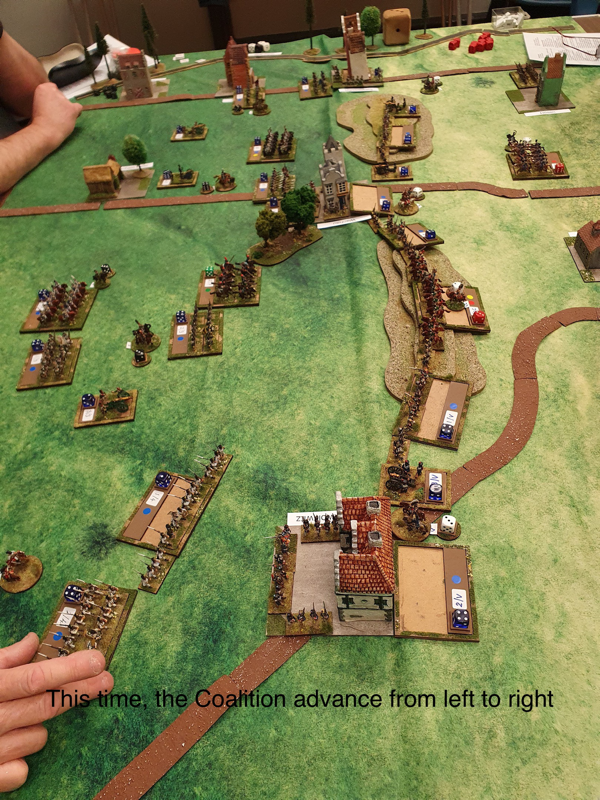
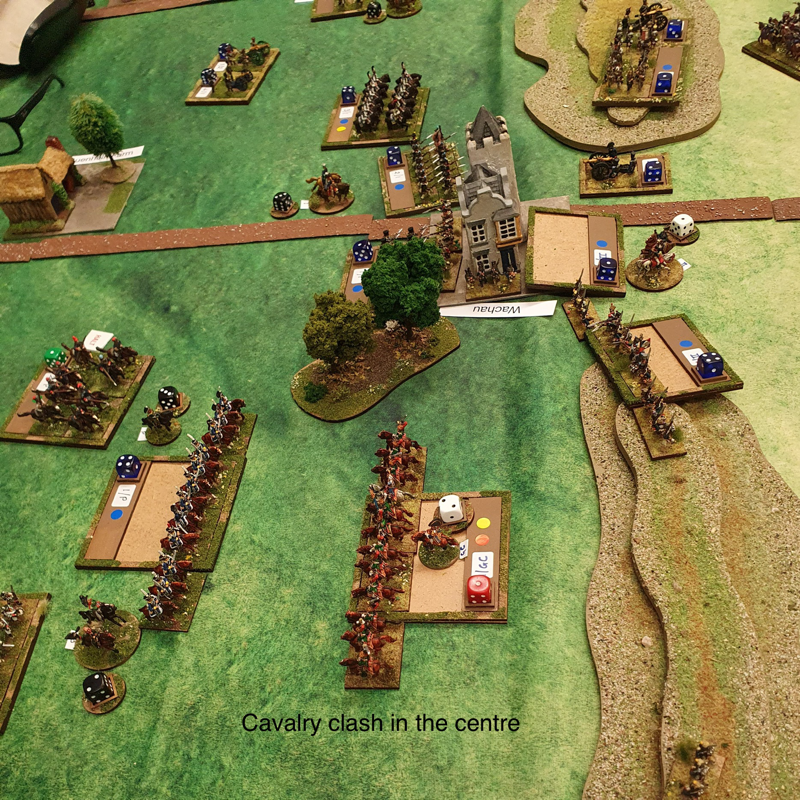
The other evening I laid on a game of Absolute Emperor at the Staines Wargames Club. I put together a scenario based on the Allied attack on the morning of the first day of the battle of Leipzig, 16 October 1813. It was deliberately a smallish game, as two players were new and the rest of us are still learning the rules. Ian and Paul led the Allies against Nick and Chris commanding the French. We used the house rules/clarifications that Chris and I had pulled together after our first two games. These don’t so much replace any published rules as clarify situations that the rules don’t directly address. I have uploaded the scenario here. The standard victory conditions were slightly modified by giving the Allies a bonus elan point for every town they take from the French during the game. How it played and some more thoughts about AETo cut a long story short, the Allies won, with the French line still intact at the end but withdrawn to near their baseline. These are my thoughts after our club night christening:
 What next? Well, we could find another bit of Leipzig to refight but even I am feeling the need for a change from the Battle of Nations. I am thinking of an 1809 game, perhaps the Wagram scenario in the AE rulebook. I do have a soft spot for Austrians. I am also wondering about doubling the size of infantry and cavalry units, to reinforce the message that these are big formations.
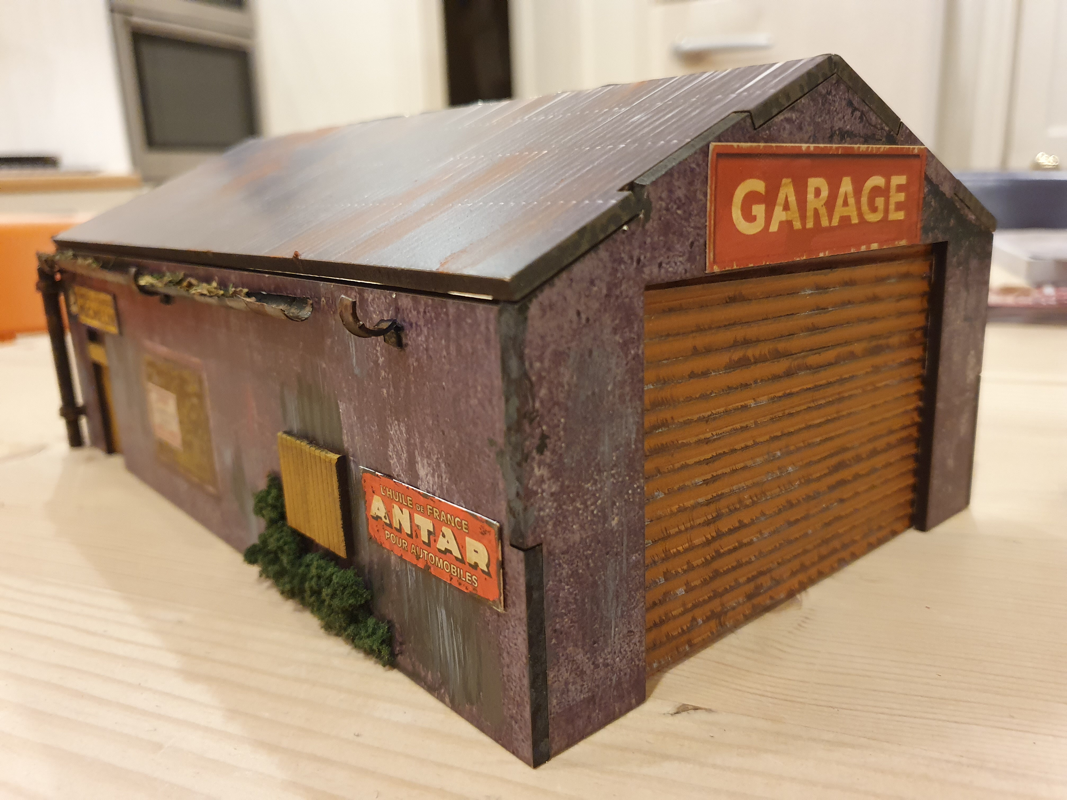
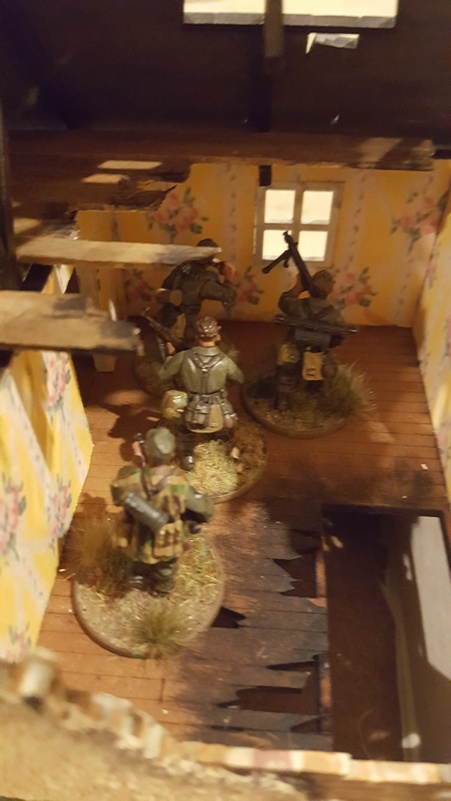
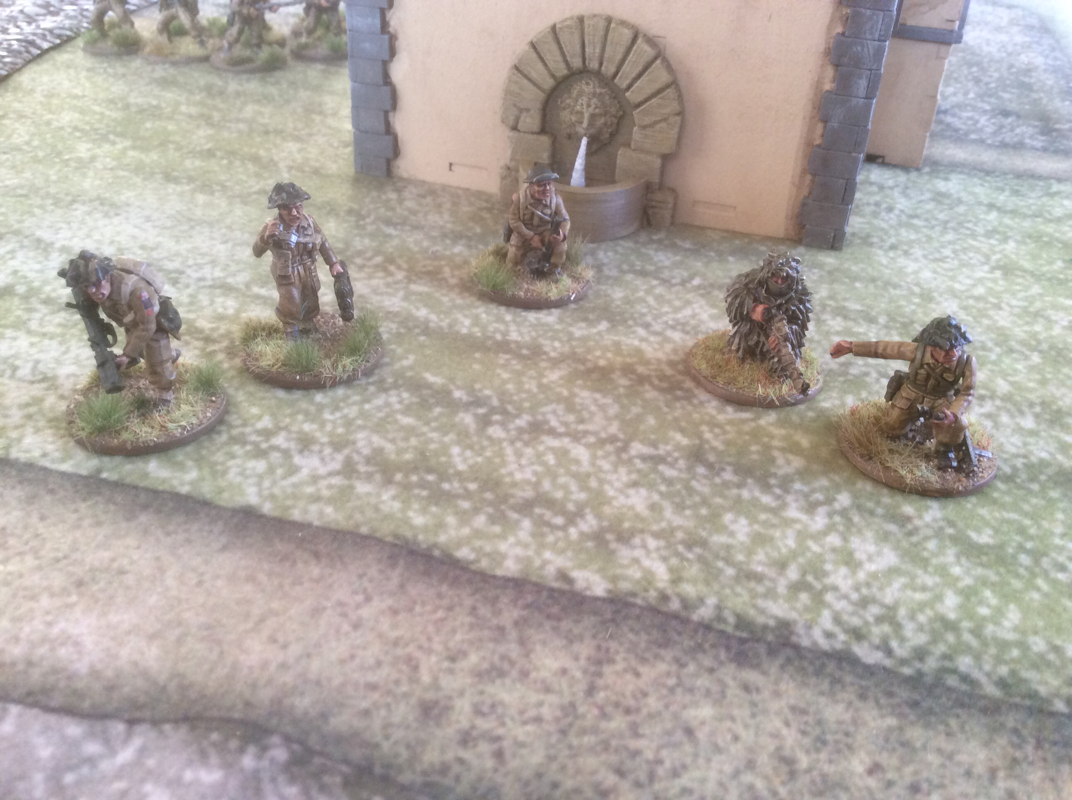
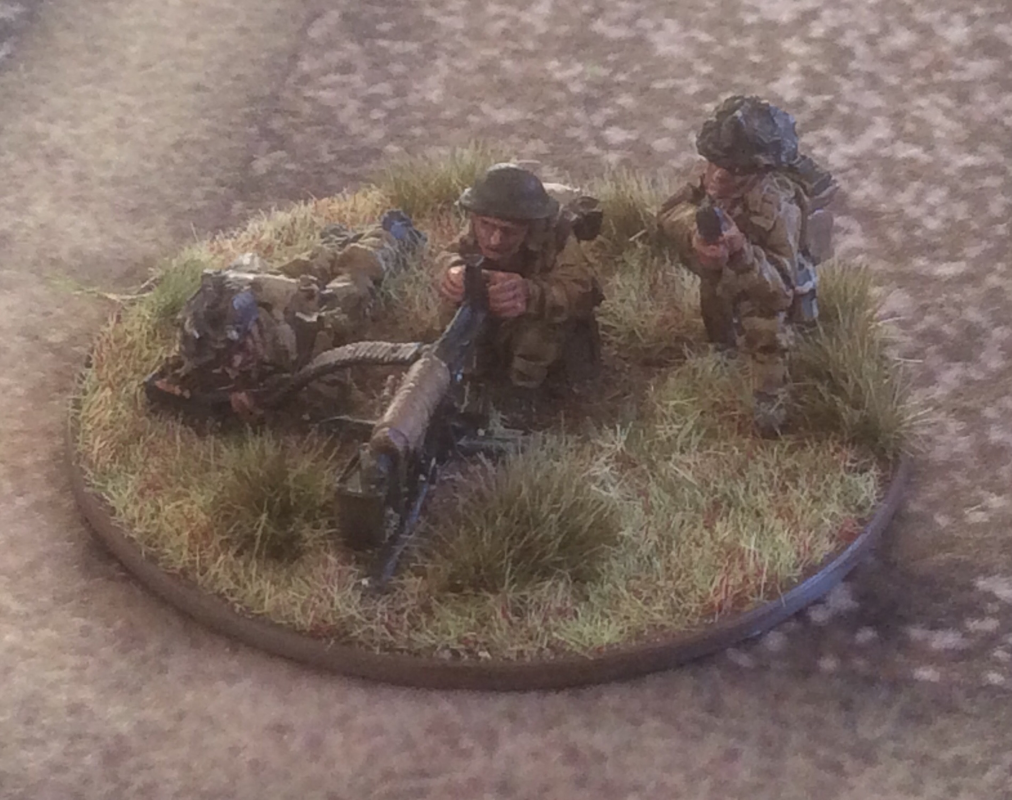
 We recently played our first face to face game of Bolt Action since the Covid outbreak began. It was a tense game, only decided in the final turn. We used the Operation Jupiter scenario from the D-Day British and Canadian campaign book. Dan took the German defenders while Harry led the British, with a 10% points advantage. The British had a guaranteed preliminary bombardment with extra pinning power, to reflect the contribution of nearby naval guns. The scenario required Harry to get troops into the German defence zone, while Dan’s victory points could only come from killing enemy units. The British were a regular infantry platoon with a medium mortar, MMG in Bren carrier and Sherman in support, while the Germans also had a regular platoon, supported by a Command halftrack with light AT gun and a medium mortar. There were buildings in the centre of the table and scattered woods. Dan set up two squads, the Lieutenant, MMG, sniper and Mortar spotter in the buildings in the centre. He placed a third squad in woods on the right, with the mortar behind. His half track was in reserve. Harry’s preliminary bombardment was made even more effective by the additional pin on each unit required by the scenario (those naval guns!). The only casualty, however, was Dan’s medic, to Harry’s profuse apologies. The British arrived in two waves. Nobody came on in the centre; a couple of small teams arrived on the left wing; but the majority of units, including Sherman and Bren carrier with MMG team, arrived on the British right, in a bid to reach the German rear zone before Dan could redeploy his firepower. The plan very nearly worked. Dan’s reactions were slowed by having to roll off pins from the preliminary bombardment, but he was able to shift one squad left and brought his half track on facing the main British attack. The half track was able to knock out the Bren carrier, taking an MMG crewman with it, but was promptly destroyed by the Sherman. A shame for Dan but great narrative! Harry’s FAO called in an artillery barrage against the main German position but this fell long and plastered an empty field. In mid-game, the British right moved steadily forward, sparring with one German squad and the MG42 in the centre. Meanwhile Dan’s right went hunting for victory points. As he gained more VPs for destroying enemy units than Harry, it was cost effective for him to try to mop up the small teams on the British left. The end game saw a bid by Harry to get enough units into the German rear to beat Dan’s VP tally. This involved crossing open ground covered by German fields of fire. Crucially, in the final turn one unit stopped just short of the zone while another failed to move, being unable to shake off its pins from the enemy crossfire. Had these units made it over the line, Harry would have won. Instead, the day went to Dan. The game reminded me why Bolt Action is such great fun to play. There were several nail-biting moments, hanging on the sequence of the order dice draw or critical initiative tests. There were no interruptions to check the rules and no arguments over interpretation. It was a fast paced, entertaining game that reached a clear conclusion in an evening. And when the players bring Brew Dog and crisps, that makes for a perfect evening.  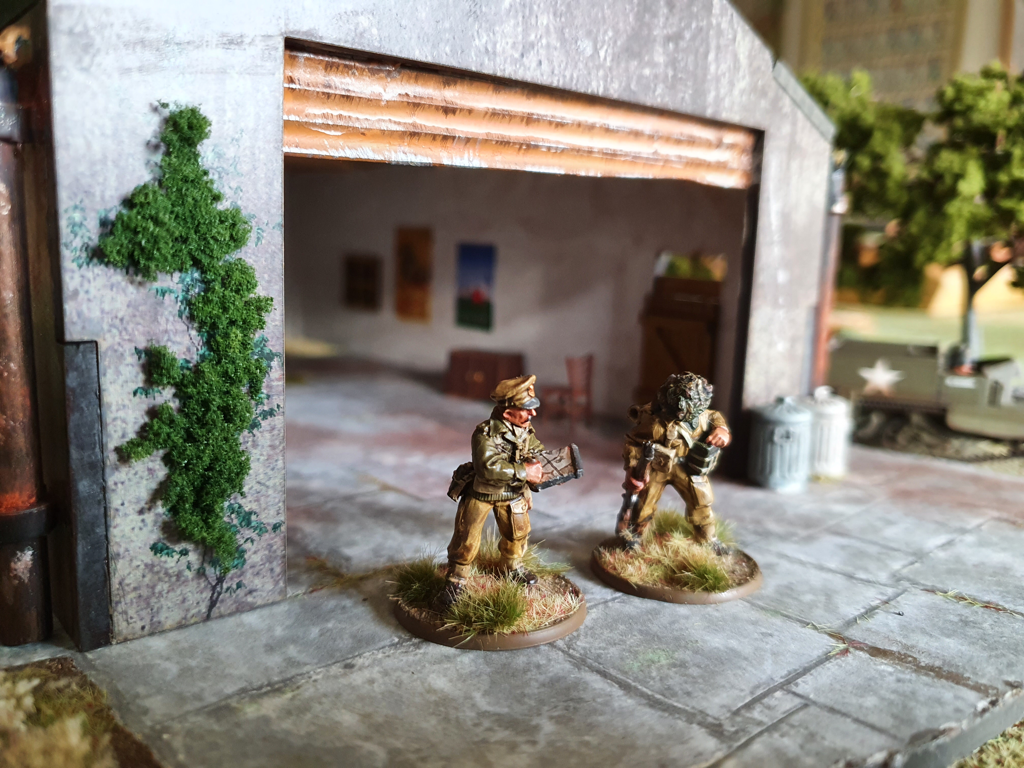 Two weekends ago I spent a happy Saturday at Warfare 2021, held this year at Ascot racecourse. It was a good venue and so great to be at a wargame show again. It was particularly fun browsing the Great Escape Games, Warbases and Caliver Books stalls. I also enjoyed the Extraordinary Laser Company's display of pre-printed mdf buildings, which I hadn't seen before. Ever ready to add to the 28mm terrain collection, I picked up the XLS Garage from their Urban Decay range for £15. I don’t play post-apocalypse-dystopian nightmare games (apart of course from Zombicide - who can resist chainsaws and rollerskates?) but had in mind to adapt the model to make a 1940s industrial unit for Bolt Action. First, take your Bits BoxThe model has a big footprint and could be a good centrepiece for a table layout. I decided to keep it as a garage, but dialled back in time to a small French town in 1944. The makeover involved the following steps:
I’m very pleased with the final model and really impressed by the quality of XLC’s products. The pre-colouring is great and construction is dead easy. I’m now looking through the range for other candidates for a 40s makeover. Oh, and I’m tempted by a new dice tower.
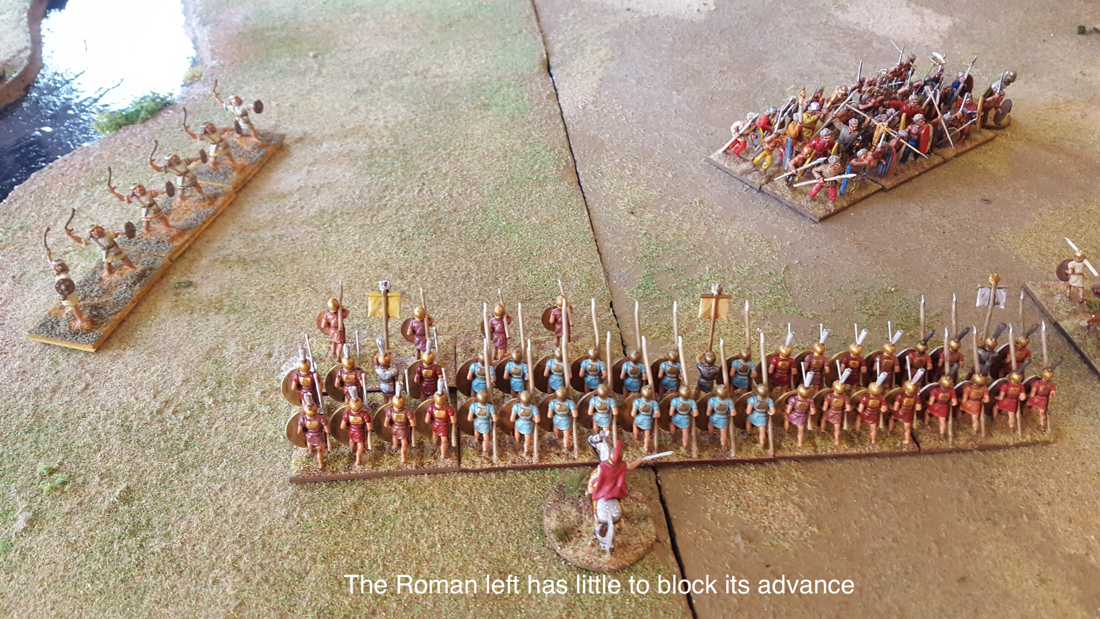
I was mildly disappointed to learn that Warfare will not be at Ascot next year, as it was such an impressive venue. However Reading Wargames Association have explained that Ascot hiked its booking fee for next year by 50%, which seems downright cheeky. So Warfare 2022 will be held in Farnborough instead. I plan to be there. Over the Easter weekend I was able to play two socially distanced wargames with my son Nick, using the To the Strongest rules (TtS) by Simon Miller. We play TtS with 25mm figures on a 6” grid. The figures are a mix of ages and manufacturers, some of them dating back to 1981 when, aged 21, I started collecting Classical Greeks by Minifigs and by the long-defunct Rospaks. I have added to the collection over the years, with both modern sculpts by First Corps and Newline Designs and older models picked up through eBay or gifted by a friend who has downsized to 15s. I now have Greeks, Macedonians, Gauls, Iberians, Carthaginians and Republican Romans. The Romans are an entire army of very early Minifigs from the collection of a gamer who had passed away. I felt honoured to re-home them. Their spears are like telegraph poles and sculpting definition can be fuzzy but they have great character. And unlike so many ‘heroic’ scale figures, their proportions are realistic. To my eye, too many 28s today look like Space Marines in togas. But I digress! 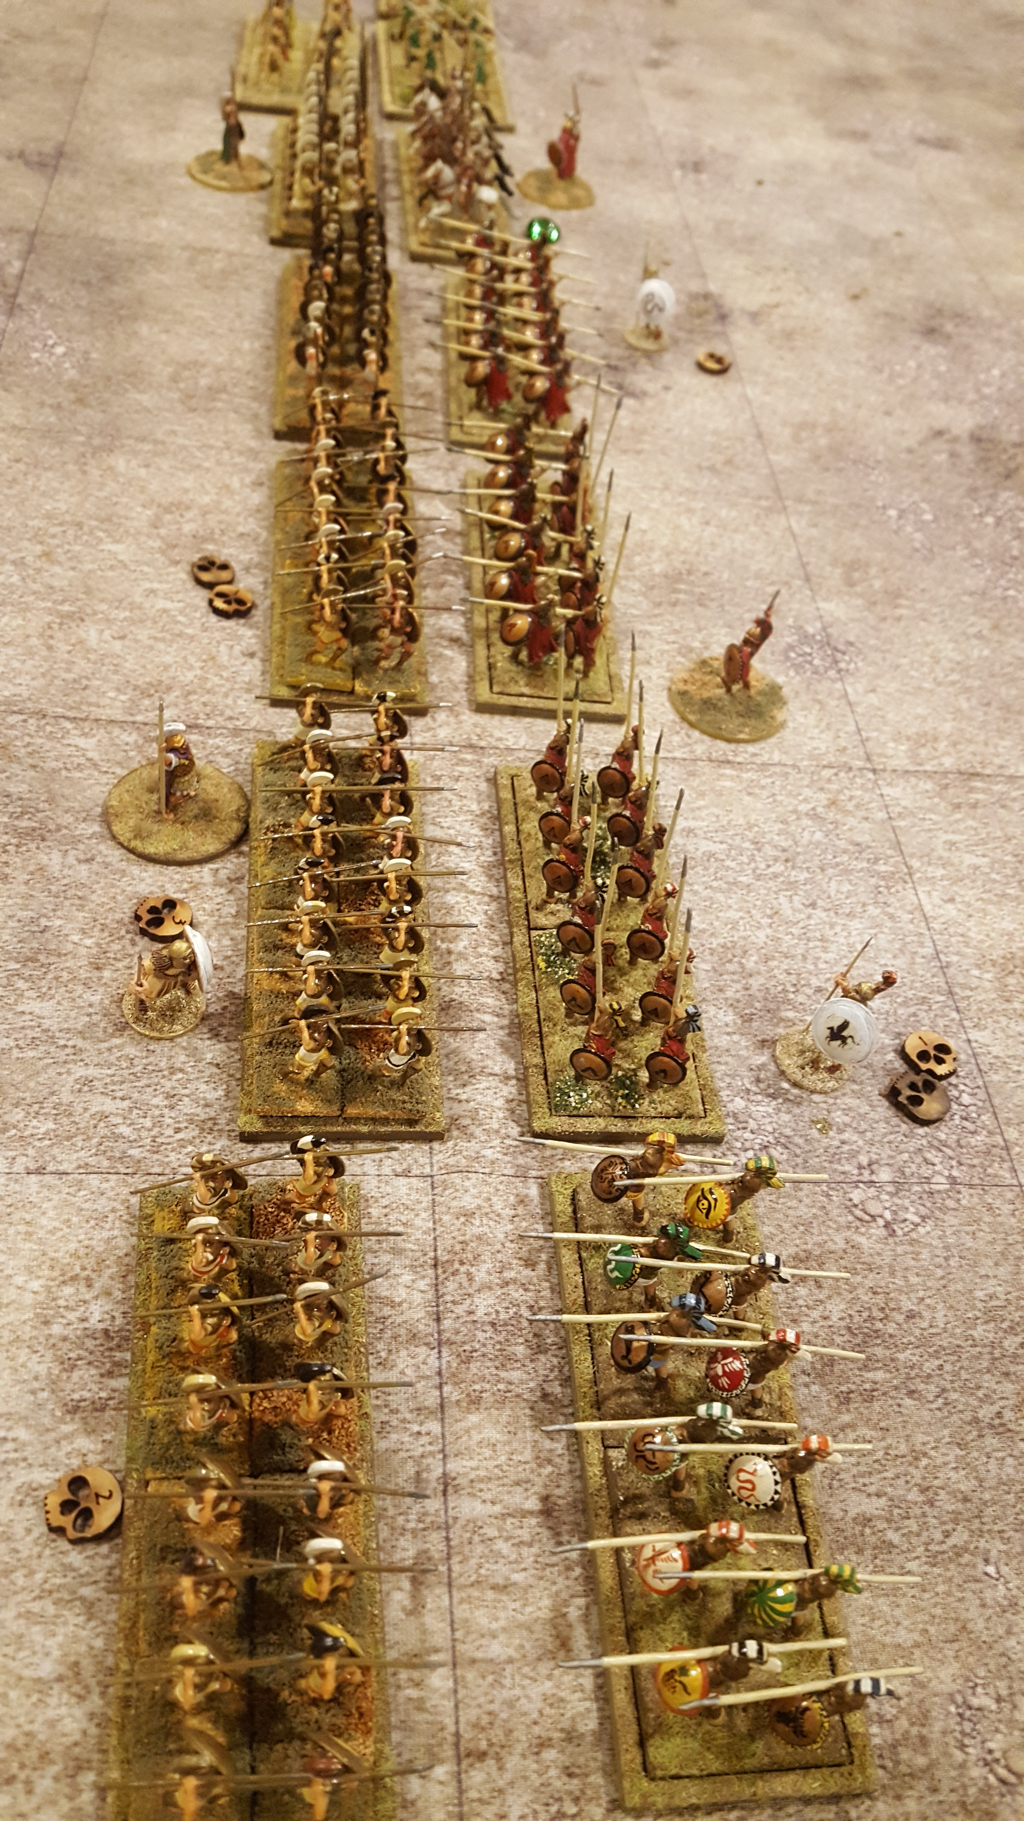 The death of LeonidasOur first game was a battle between my Athenians and Nick’s Spartans. His hoplites had the qualitative edge while I had more lights. While the two flanks bickered, our centres got stuck in, with Nick’s lads doing marginally better. We both had success with our left flank forces, so as the fight developed, each of our right flanks had to deal with the danger of being rolled up. I was losing victory medals faster than Nick but then had the good fortune to kill his heroic general, which brought our losses into balance. The cards went my way next turn, destroying one more Spartan hoplite unit and the battle was mine. The whole thing was very close however and at game’s end I had only one victory medal surviving. Still, a win is a win! The game felt very satisfying as a clash between two hoplite armies, with no fancy manoeuvres and no detached generals. Our lights kept busy fighting each other but the game’s outcome was decided by the hoplites. 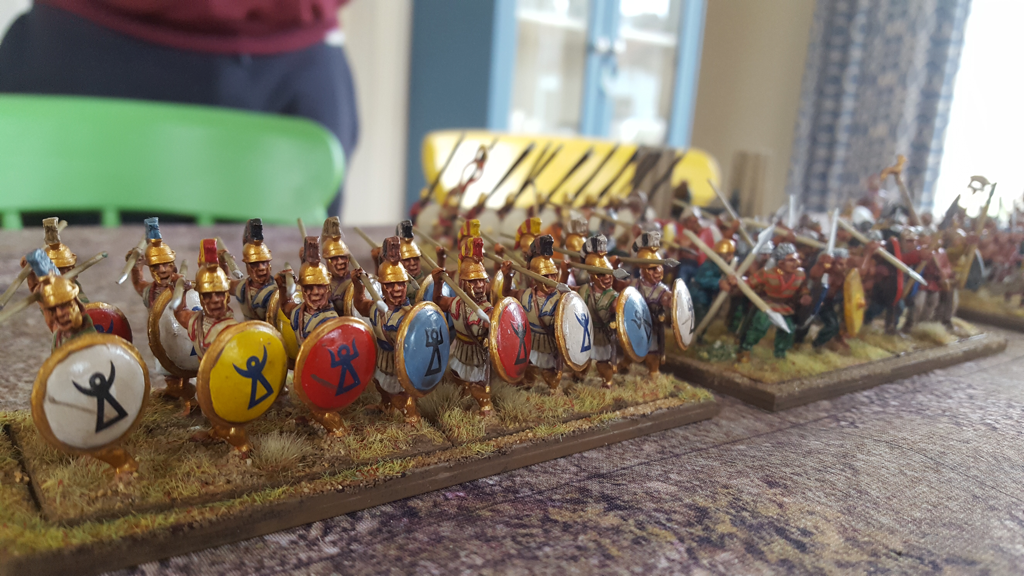 Hannibal ad portasGame two was between Nick’s Carthaginians and my Romans. I was seriously outnumbered and Nick set out to envelop my army. On the other hand my infantry were rock hard and their pila gave them an edge on the first turn of combat. I set out to demolish Nick’s centre while I refused both of my flanks and kept my triarii back to act as a fire brigade. Nick placed all his cavalry on his right flank and two units of elephants on his left, along with some high quality Iberian Scutarii. My centre started well, doing serious damage to some Gauls and wiping out a unit of citizen spearmen. However, the general in command of my centre then missed a turn at a key moment when he drew two aces in succession on his first activation. This allowed Nick time to patch up his centre while his left wing trundled down as far as my baseline and turned to face inwards. I squandered my next turn in a bout of tunnel vision, trying multiple activations on one unit so it could destroy a double-disordered unit of Gauls. Of course I failed the third activation on my unit and so ended the turn without activating a single other unit in the Command. I know, I know! Basic mistake and I should never be so dumb, except I was so fixated on the opportunity to destroy the single enemy unit I was attacking that I completely forgot my own advice. Meanwhile Nick’s left wing started grinding down the troops defending my right rear, as well as threatening my front line from the side. At this point our lines were in an ‘L’ shape, with particular pressure on my units in the angle. Then in one turn, a flurry of high card hits by Nick, met with low card failed saves by me, took him comfortably over the victory line. To his only slight disappointment, he had won without his elephants actually fighting anybody. But we agreed that they had done great work forcing me to conform to their advance.  Nick’s Carthaginians How (not) to play Republican RomansThat didn’t go well for me, but as we played we agreed some resolutions for the next time the Romans fight. Ideally, we would seek to use terrain to negate the enemy’s numerical advantage. In this game, it was Nick who exploited rough ground to shelter his advance down his left flank. Next, the Roman shouldn’t wait around to be outflanked by a bigger force: the heavy infantry should get stuck in quickly and try to eat up the enemy centre before the flanks and rear are threatened. Once engaged, the first priority each turn must be to use the Romans’ special line exchange rule for every unit that is disordered (representing the fresh principes replacing the tired hastati in the front line). This is a really powerful advantage but I lacked the discipline to sort out the line before other activations. At least twice, my command’s turn ended before I had attempted a line exchange. Finally, we decided that if possible, every command should have just one main function. My centre command Included both front line units and my reserve. Besides making it a very big command, I was trying to deploy the triarii to face Nick’s flank attack and to fight his centre to the front. Too often, the command’s turn ended before one group or the other had completed its tasks. It is of course one thing to draw conclusions after a game but entirely another to remember them next time I play. And in case I haven’t made it clear: I didn’t ‘throw’ the game. Nick conclusively won it, making great use of his army’s strengths and obliging me to respond to his movements. A classy win for Carthage. 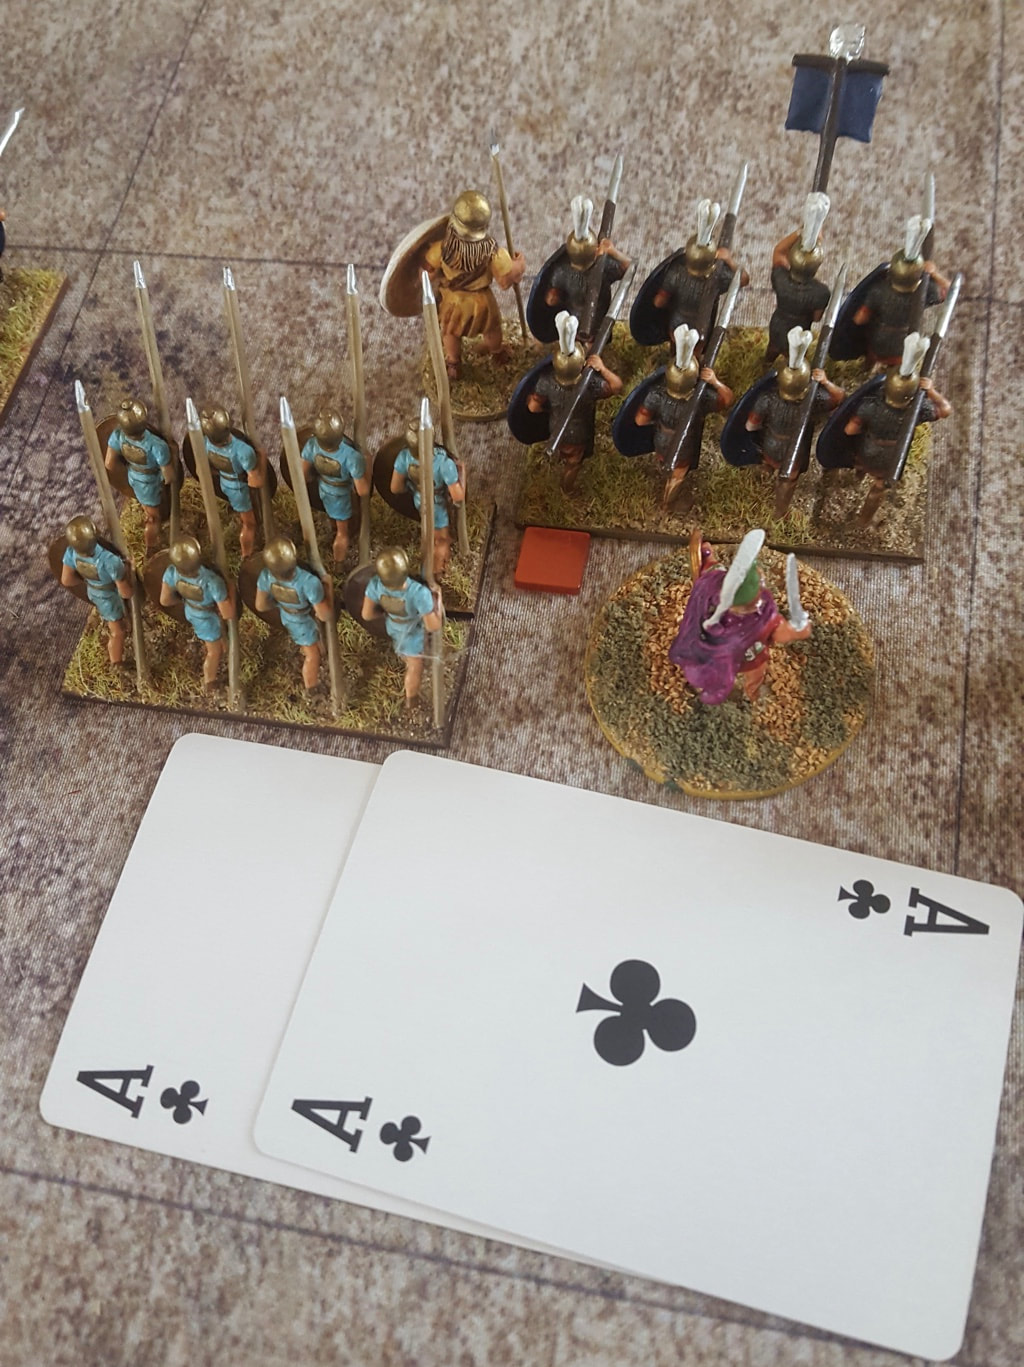 Aww, nuts! Turn over before it begins Out of lockdown with To the StrongestThe second game was much more fluid than the hoplite encounter had been and it felt a bigger challenge for both of us. The card activation system in To the Strongest is inspired. A sensible player can minimise the risk of their turn ending prematurely but very occasionally, as when I drew two aces in succession at the start of one turn, bad luck just happens. Fair enough. On the other hand, it is all too easy for an idiot like me to get drawn into the drama of a single combat and completely forget that I should be taking care of other activations before trying again with the critical combat. I reckon a game that draws me in so completely is doing something right.
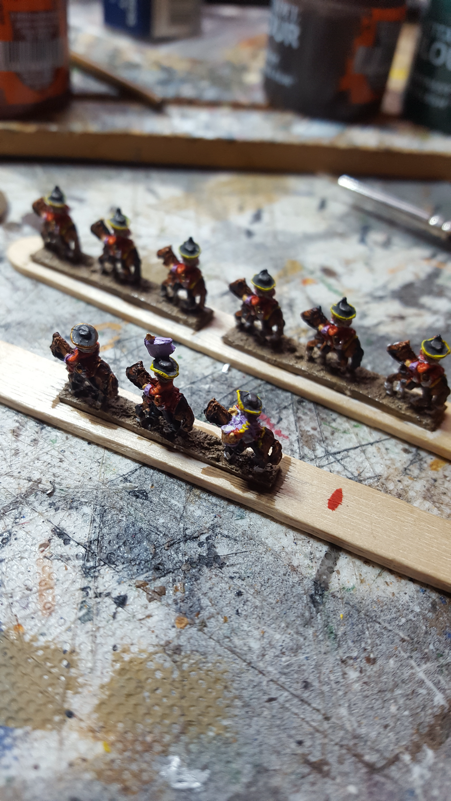
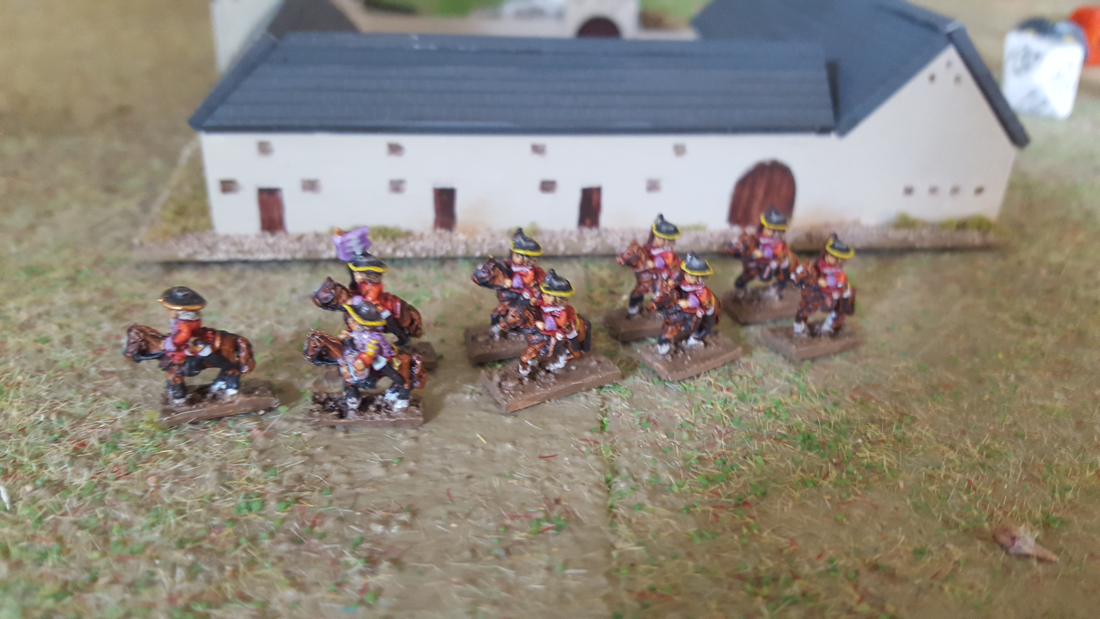
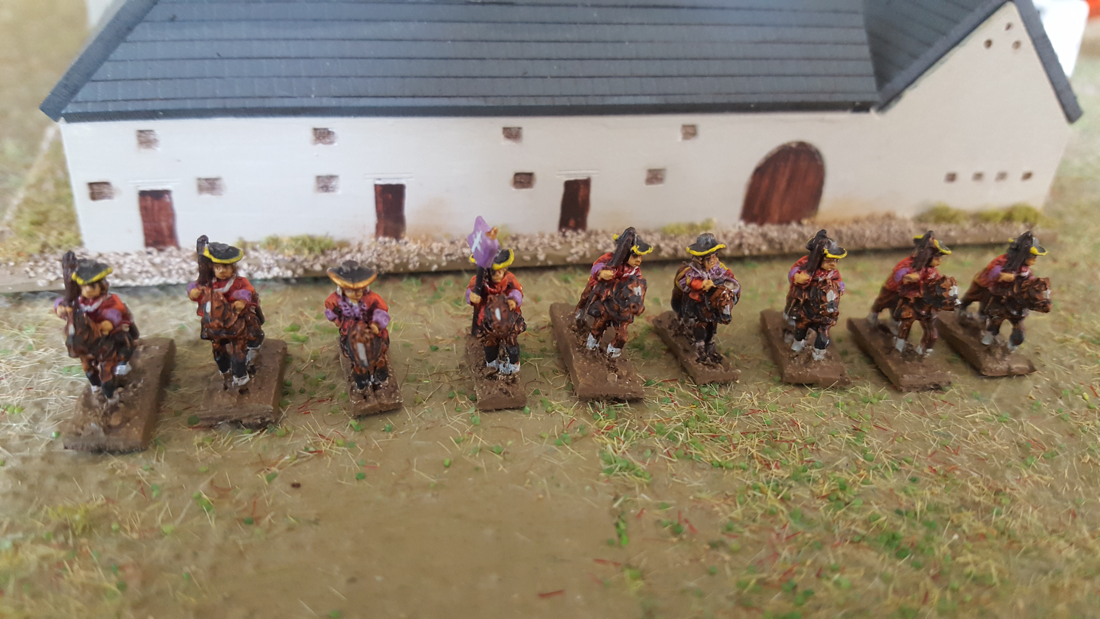
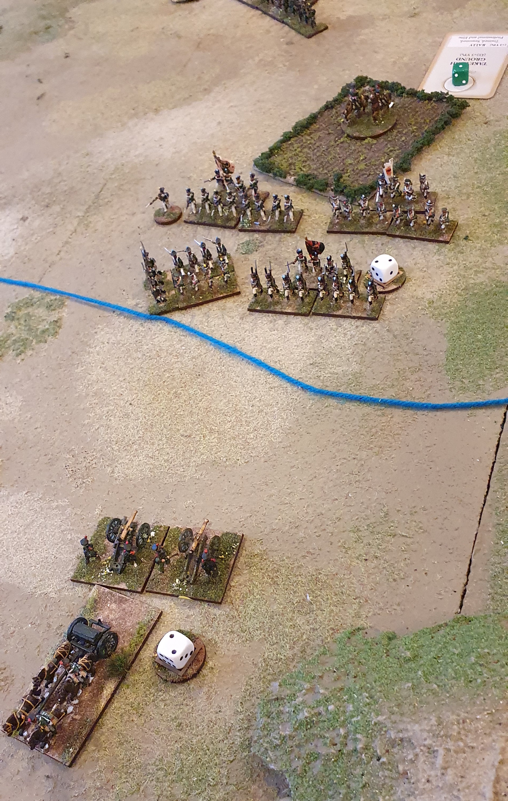
I remember that when I first read the TtS rules, I wondered if units had enough hits/lives to sustain a good game. I also worried that a squared grid might be too restrictive on movement. Neither concern survived contact with actual play. I very soon concluded that these rules are perfectly gauged to give an exciting and rewarding game, with the strong sense of what I would expect from an ancient battle. They are also so easy to learn and (crucial at my age!) to remember during play. After months and months without a face to face game, it was wonderful to be playing again. Fingers crossed, if the road map out of lockdown stays on track, we can soon play a great many more.  Our last game before lockdown: 6mm Lasalle When the lockdown began, a few jokes did the rounds that wargamers would barely notice the difference since we already spend so much time alone with our hobby. Of course, the same joke has been applied to online gaming, model railways, stamp collecting and other indoor pass times. And to some extent, I do think those of us with hobbies like these might have had some advantages compared to people whose leisure involves, say, team sports or ballroom dancing. But the past few months have brought home to me that interacting with other gamers is central both to my enjoyment of wargaming and to my motivation. It has been a challenge to make up for the absence of face to face gaming. Although we haven’t met to play since mid-March, I have found our little wargaming WhatsApp group to be a source of entertainment and solace over the past several months. We range in age from mid 20s to 60 and have diverse interests but I greatly enjoy our chats and following other gamers’ projects. Our first attempt to fill the gaming void was a play-by-email ACW campaign. Players supplied their instructions each turn and I resolved the moves on a master map. I played out larger battles solo, using plans submitted by the players, and worked out lesser encounters with a simple combat results table combined with some free kriegspiel. The most fun for me was inventing a bit of incidental narrative, such as the nighttime escapade of a federal cavalry unit passing through rebel lines, aided by a local school mistress who supported the union cause. This incident had very little impact on the big picture but added some flavour to my next report to General Frémont. I ran the ACW campaign with two groups of players and I think it went quite well. I hope the players enjoyed it too: I was given a rather fine bottle of Black Dog gin by one group after their campaign ended. I wish I could have played more socially distanced games once the lockdown eased but have only managed one, with my son Nick, which was a knockabout ‘Middlehammer’ game between Orcs and Empire. I suspect our choice of an old Games Workshop System was influenced in part by the desire to play a familiar game from happier days. Or is that a bit deep I wonder? For the rest of my hobby time I’ve been rebasing old figures, painting models that I’ve had for years and writing scenarios for when face to face gaming comes back. I’ve also ordered my first 15mm Napoleonics for at least twenty years, mostly in the form of gun limbers but also an entirely new army: I’ve always loved Bavarian uniforms and am delighted to have added them to my collection. This afternoon new measures were announced by Boris Johnson to tackle the resurgence of Covid cases in the UK. Maybe it’s time I started looking at another email campaign... A few weeks ago I responded to an invitation from Per Broden, 6mm gamer and blogger, to join in a project to build two 6mm armies that will be auctioned for charity. Per had agreed with Baccus Miniatures that the company would send each participant a unit of troops to paint up and contribute to one of two ‘Imagi-nations’ for battles using the Twilight of the Sun King rules, set at the close of the seventeenth century. Per introduces the project on his blog, RollaOne, here. Once collected and based, the armies will be auctioned, with proceeds going to the Combat Stress Charity. Baccus is providing the miniatures for free. I was lucky enough to get in before all the units went and was allocated a regiment of dragoons in the Slavic-themed Army of Siarus. My instructions for painting the Simmutov Dragoons was to give them red jackets and Purple facings. The figures arrived last week and slotted in between two units of 15mm Napoleonic Bavarians. My first non-Airfix wargaming figures were 6mm Heroics and Ros Napoleonics, bought in the mid 1970s when the rangę was very small. I also have two old Heroics and Ros armies for the War of Spanish Succession, which I still theoretically play with, although the last game was Blenheim in 2014. I have added to the Napoleonics in recent years with MDF figures by Commission Figurines. I have bought model buildings and 6mm standards from Baccus as well as a couple of their rule sets, but never tried their figures. I was very interested to see what my dragoons would look like. I was impressed. The figures are chunkier than Heroics, with lots of raised detail and bags of character. I especially liked their little faces! They painted up very easily and responded well to washes. Per provided some useful painting tutorials on his website. I decided to give my dragoons yellow hat- and saddlecloth lace and chose a light purple for the facings which I thought went better against the red jackets than dark purple. The finished unit went in the post on Saturday. I look forward to seeing the completed armies, based and ready for battle. This has been a really fun project that deserves to earn a healthy sum for Combat Stress. When wargame shows resume, I will be tracking down Per Broden to shake his hand and if he’ll let me, buy him a coffee or better still, a beer.
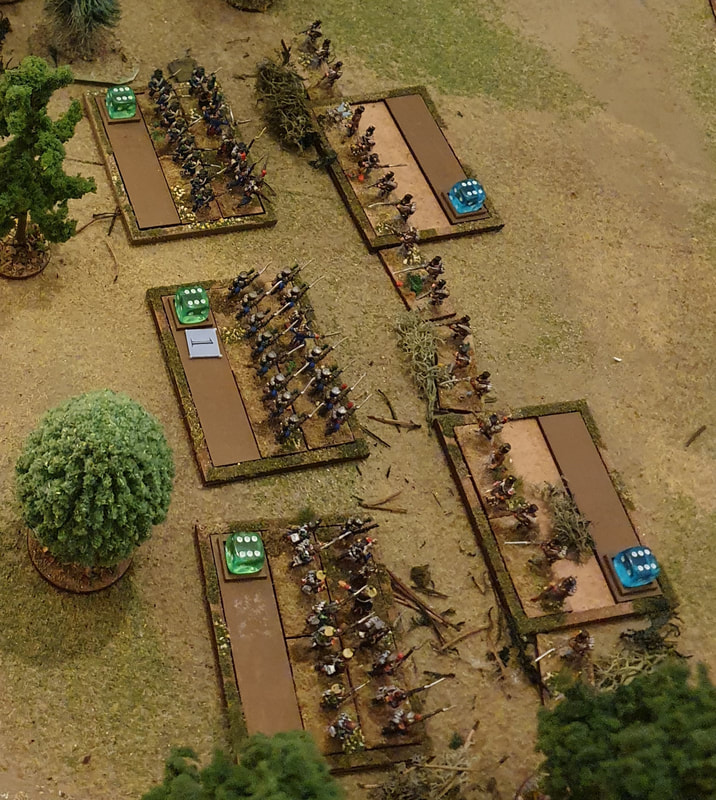
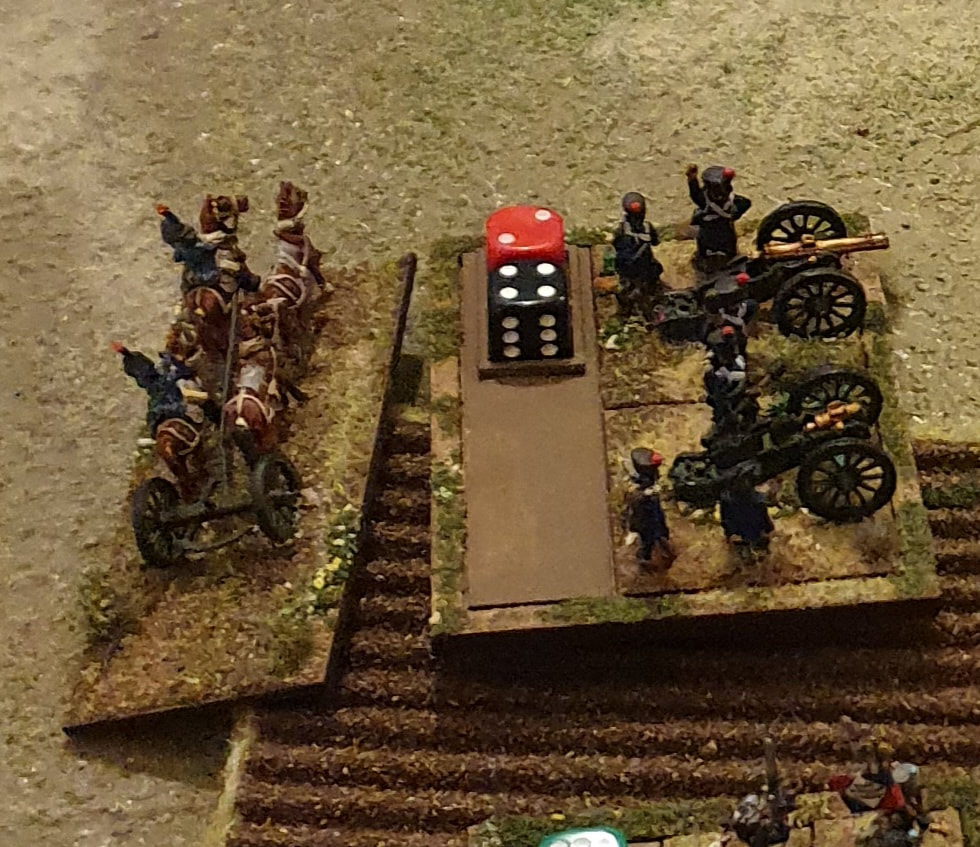
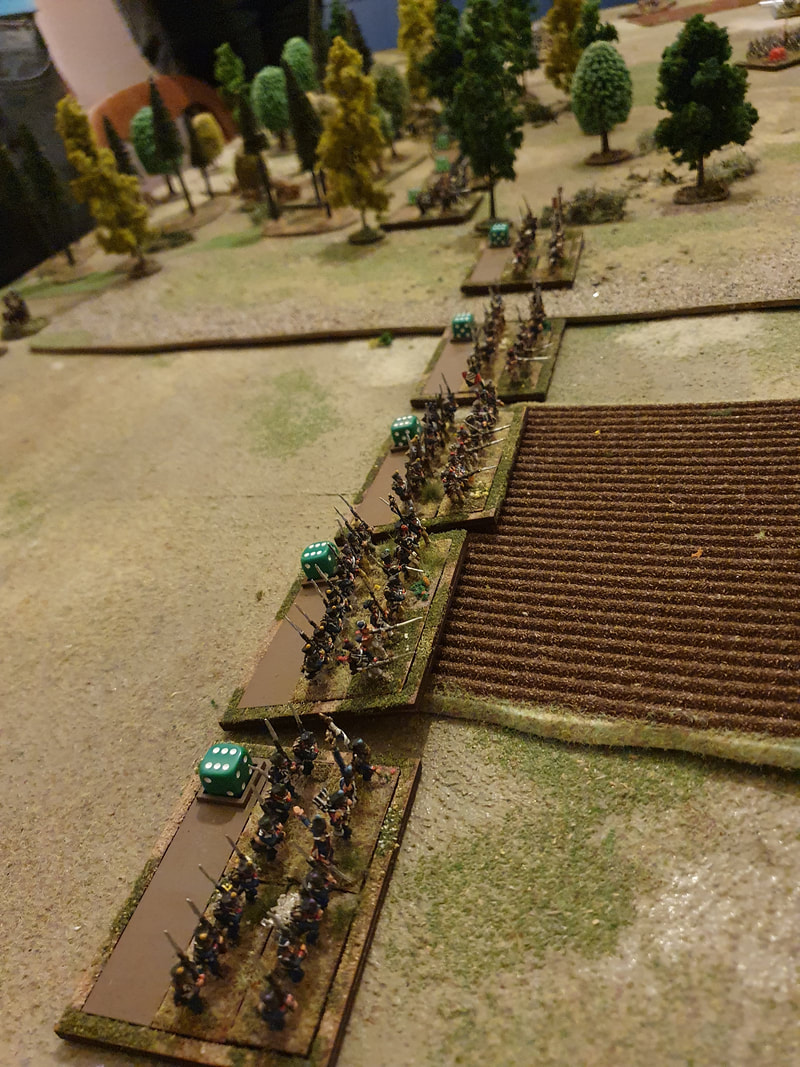
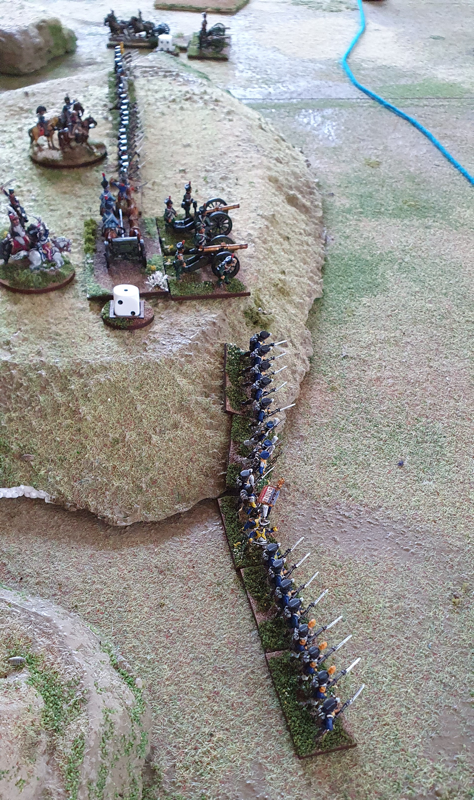
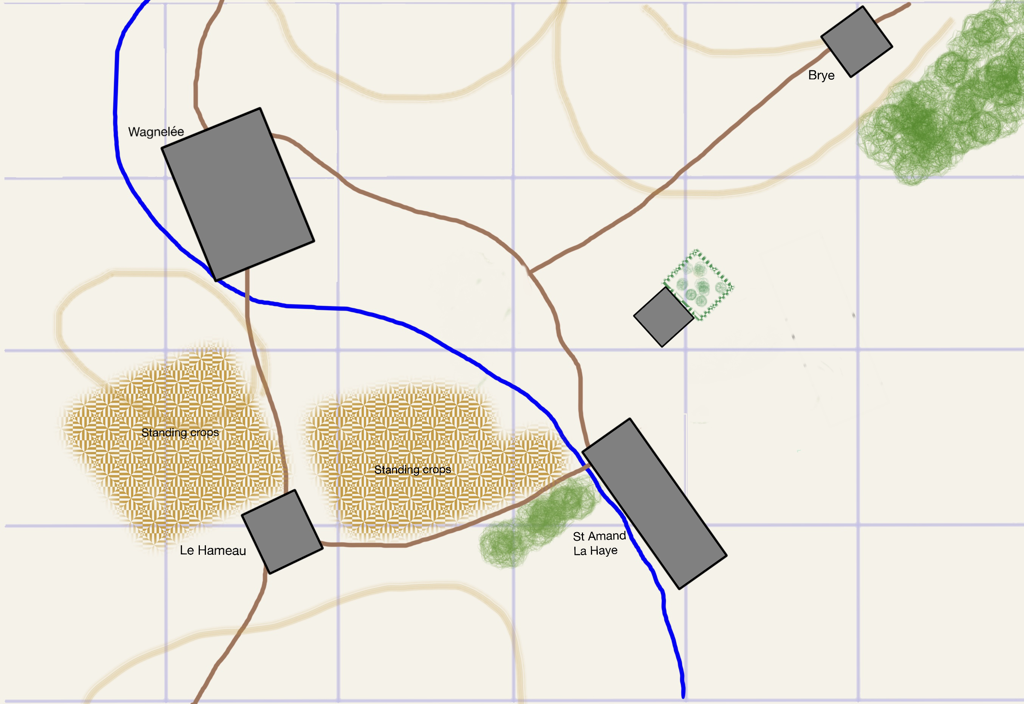
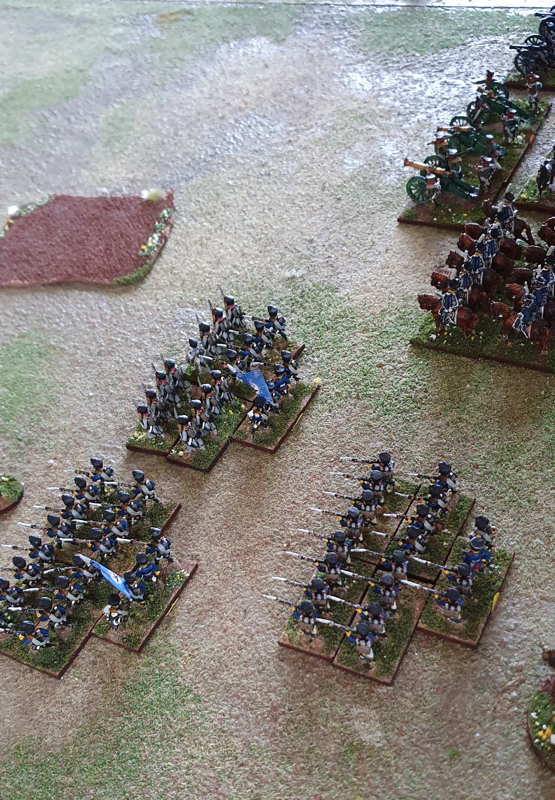
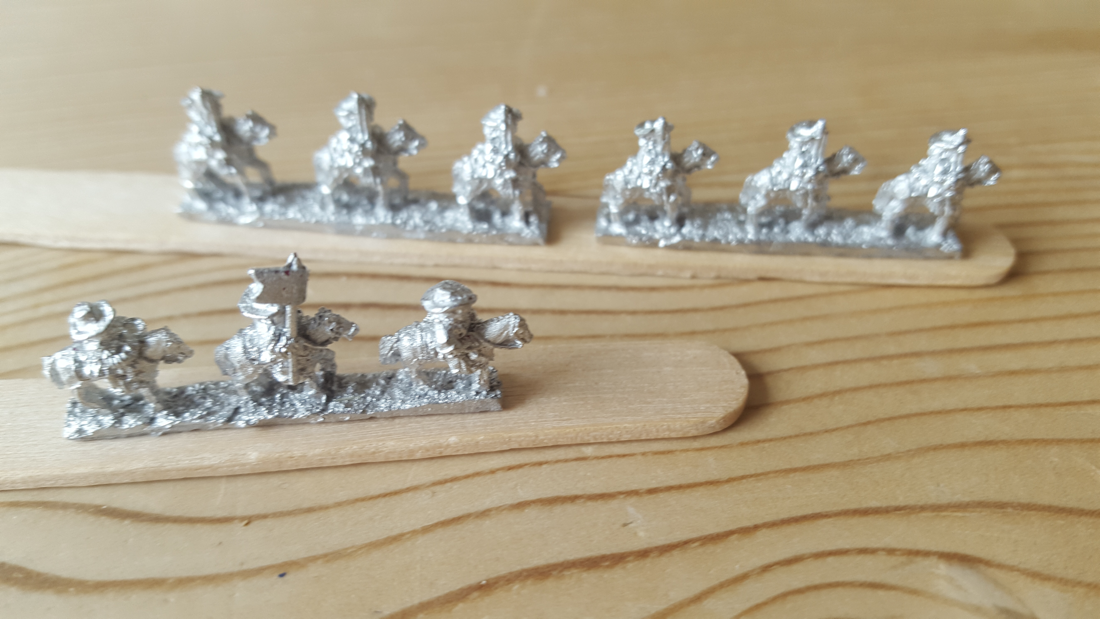
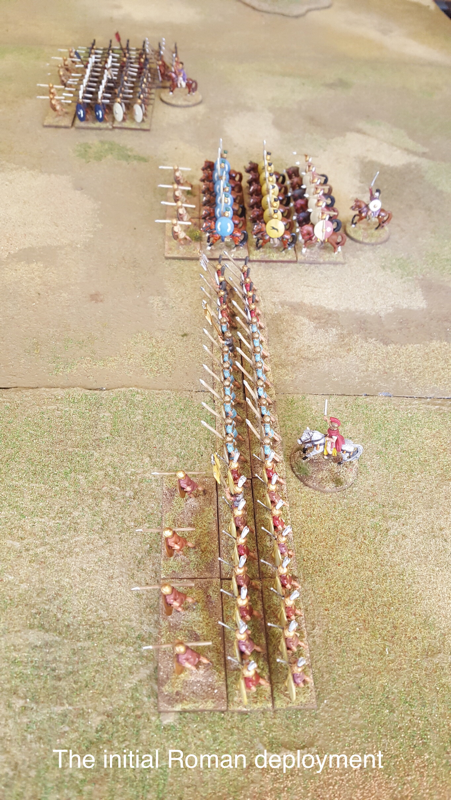
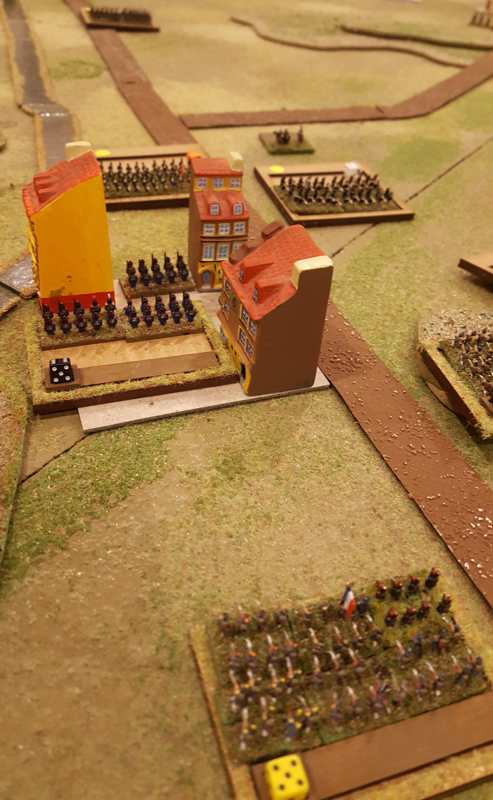
We played a 200 point game of Art de la Guerre last Saturday. Spencer having confessed a weakness for elephants, I revisited the lists for the battle of the Metaurus that we used a year or so ago. Spencer took the part of Hasdrubal, arriving in Italy to reinforce his brother Hannibal, while Matt led the combined consular armies of Nero and Salinator. The army lists were adapted in two ways to reflect the scenario. First, the Gauls in Hasdrubal‘s army were made mediocre and not impetuous, to reflect their poor quality (Roman accounts say they were drunk, but more likely they were just disaffected and wobbly). The Romans were not told about this drop in quality until the Gauls’ first combat. Second, the cavalry limit for the Romans was increased as Nero’s highly irregular decision to join Salinator had given the Romans cavalry superiority, an unusual situation in the Punic wars. The battlefield was flanked by the river Metaurus on the Carthaginian right, with open plain in the centre and rising ground on the Carthaginian left/Roman right. A hill with a steep ravine at its base ran in front of the Carthaginian left while a more gentle hill faced it on the Roman side of the table. To reflect the fact that Hasdrubal had been retreating and turned at bay when his pursuers got too close, Spencer was obliged to set up his entire army first. He placed his cavalry on his right, his Gauls in the centre and his Spanish and elephants on his left, including on the hill protected by the steep ravine. Matt set up with Nero’s infantry on the left, his combined cavalry in the centre and Salinator’s infantry (his largest command) on his right. However, instead of matching Spencer’s frontage, Matt deployed in some depth and his extreme right set up opposite Spencer’s centre. This left the Spanish on the hill with no opposition to their front. Matt’s plan was to grind down the Carthaginian right and centre before Hasdrubal’s left could engage. As the need arose, he was ready to peel off troops from behind Salinator’s front line to hold off Hasdrubal’s left wing if and when it did reach his flank. On seeing the Roman deployment, Spencer began racing his cavalry to the left behind his front line, in an attempt to get around the Roman right flank. However the gap behind his line was narrow and Matt charged this horse as they tried to pass. The horse managed to evade but now found themselves penned in behind the Carthaginian centre. Thwarted in their plan, Spencer’s cavalry then returned almost to their starting position on the right flank and got stuck in. It was a valiant attempt to seize the initiative but Matt had neutralised it by maintaining his objective, ploughing forwards and restricting Spencer’s room for manoeuvre. Unusually for a game of ADLG, we ran out of time before a clear victory was won. A points count gave a draw, although we agreed that the moral victory was Matt’s. Certainly for most of the game, the Romans chewed up their opposition and caused much more serious losses than they incurred. However in the later stages, when Spencer’s cavalry stopped manoeuvring and started fighting and his left wing engaged Matt’s right, Roman losses rose quite fast. The outcome seemed much less certain at the point when we finished than it would have, had we stopped three or four turns earlier. Even so, I think Matt would have carried the day as he still had more hitting power in a position to do damage. It’s always interesting to see how players interpret their brief. Matt took a risk by deploying on a narrow but deep front. At first it looked like he was inviting a Cannae-style envelopment. Had the terrain been more open he would have been in serious trouble. But the ravine-fronted hill on Spencer’s left, while strong defensively, would also impede a Carthaginian advance to envelop the Roman right. It was probably this fact that prompted Spencer to try to send his cavalry around Matt’s right. He nearly succeeded but Matt fended off the attempt with his steadily advancing legionaries. When Spencer did advance his left and it eventually made contact, it did a lot of damage but too late in the game to swing the balance. It was fun playing a scenario as opposed to a straight points battle. At least, I found the narrative more compelling for knowing who the players were supposed to represent. As usual, the players were great company and courteous to a fault: maybe next time we should play something from the Lace Wars so each can invite the other to shoot first... Figures are a combination of 25mm Minifigs, Garrison, Newline, Black Tree and First Corps. The Roman army in their entirety are very old Minifigs and they really can’t combine with other ranges, but I am very fond of them, telegraph pole spears notwithstanding. 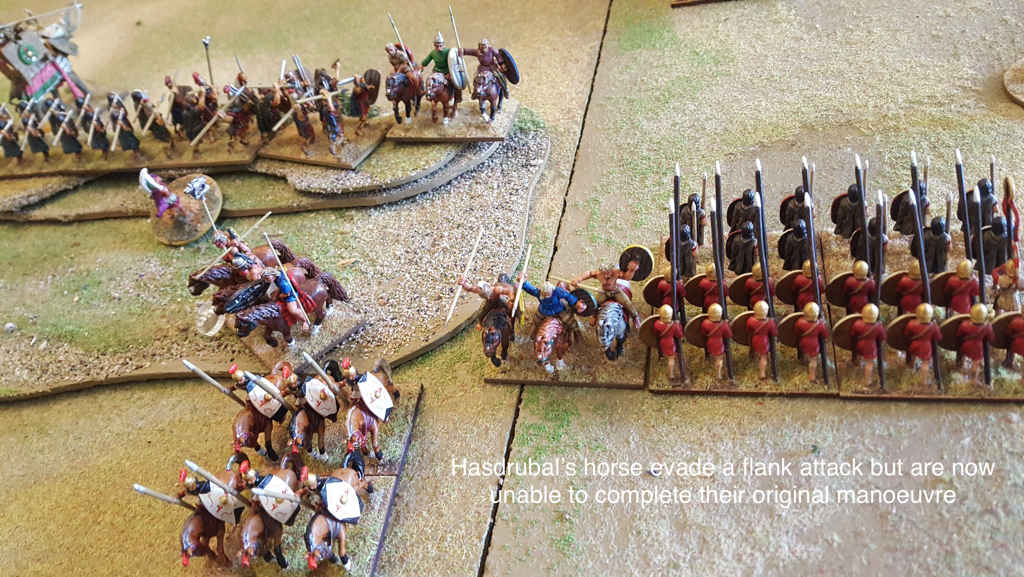 Moises has asked what became of my planned Bolt Action British force that I was building in 2016. I have collected pretty much everybody I need for a reinforced platoon. I like to play them as regulars, with three full ten-man sections. The MMG appears in most games along with the PIAT, although I have not so much as dented a German tank with one yet. I also tend to take one or both mortars, which rarely kill many enemy but do oblige them to change position, which is useful against a well placed team weapon. I also picked up the Warlord sniper in a gilly suit, mainly because it is such a lovely model. Also, while I like the 6 pdr, I don’t field it too often as unless I am expecting to defend against armour, it is rather too easy to ignore. I have used the Bren carrier to carry weapons teams, which adds some mobility. The Cromwell has come out from time to time but represents a big investment in the size of game we mostly play. 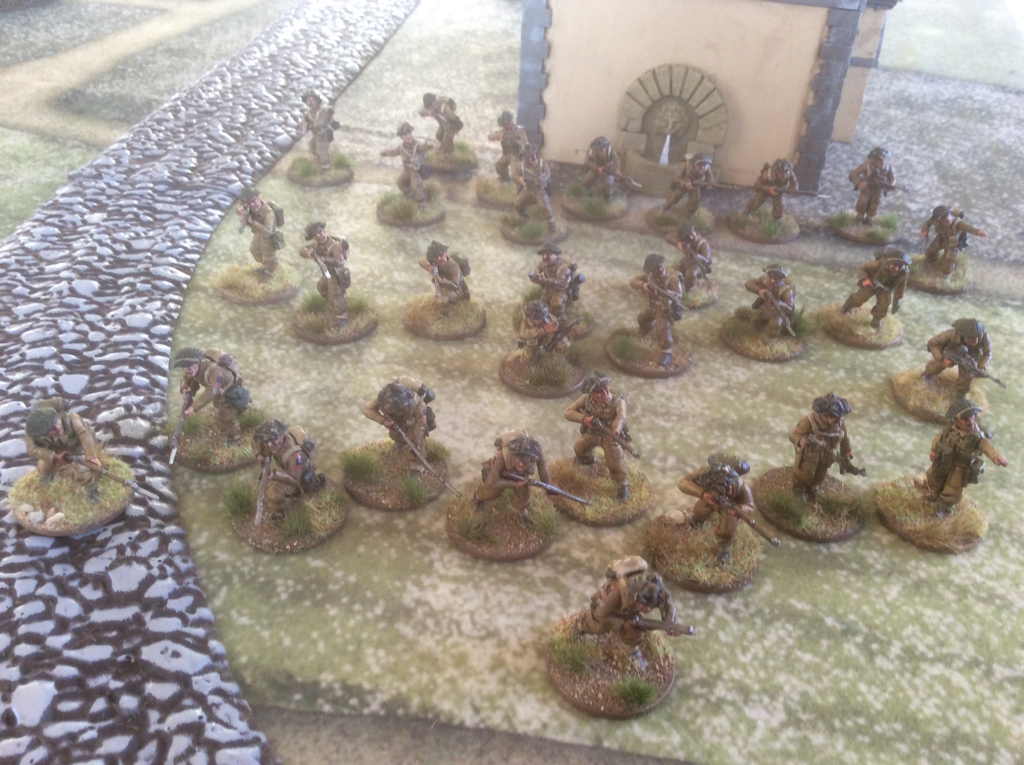 The current army looks like this Officer plus two men 95 (first lieutenant) Medic 23 3 x ten man infantry sections 369 (each with lmg and smg) MMG team 50 PIAT team 40 Sniper team 50 Light mortar team 35 Medium mortar team 50 QF 6pdr antitank gun 75 Bren carrier 60 Cromwell tank 205 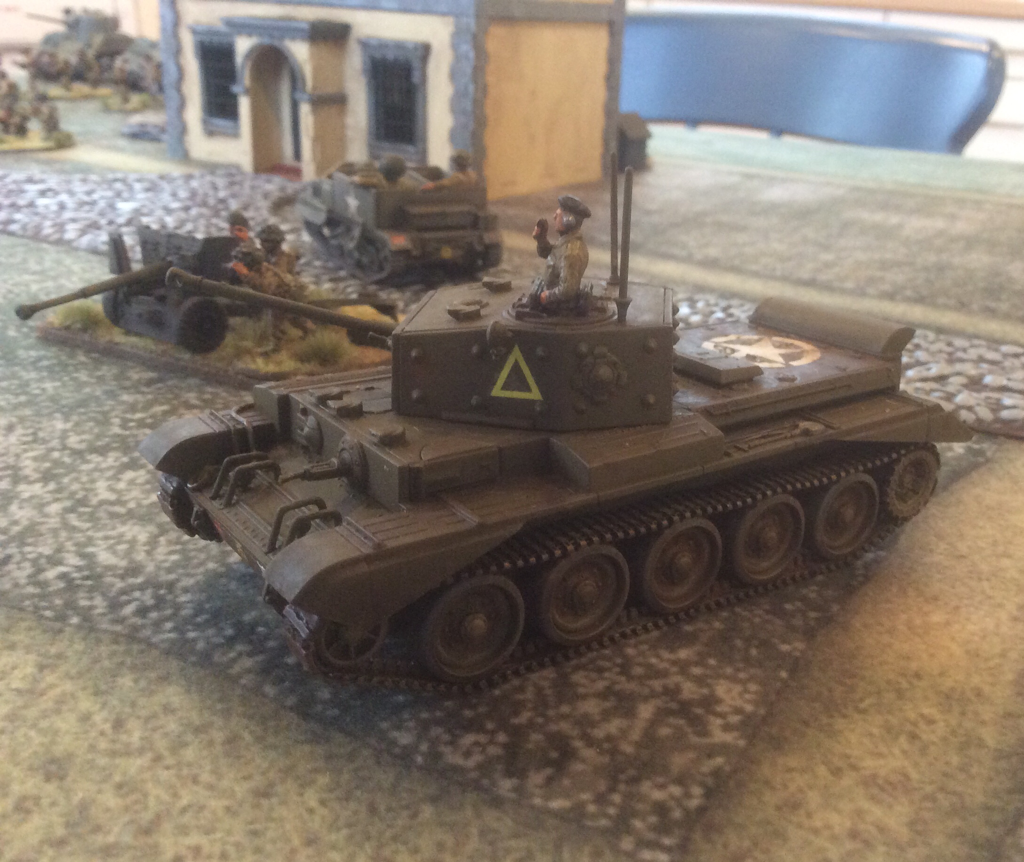 In a mad moment I bought the TankWar starter set so also have three Shermans painted as Guards Armoured Division. They have only seen action in a few Tank War games but I like to know they’re there. I don’t have ambitions to add to the army at present, except to get some new Bren teams if I find some I like by another manufacturer. I just can’t get excited about the plastic Warlord Bren teams: they are too hard to distinguish from the other plastics. I’d like some Bren teams firing prone or something similar. I have also got an M10 Achilles waiting for assembly. I don’t exactly need it but I’ve liked the Achilles since I had a Minitank model of one many years ago. I like to build both sides for a period so have a late War German force, that again is about at its limit I think. As Matt, my most frequent current opponent, runs Americans, I have tended to play the Germans more often than the Brits for some time now. But after getting these lads out of the toy cupboard, I’m thinking they need another outing soon. 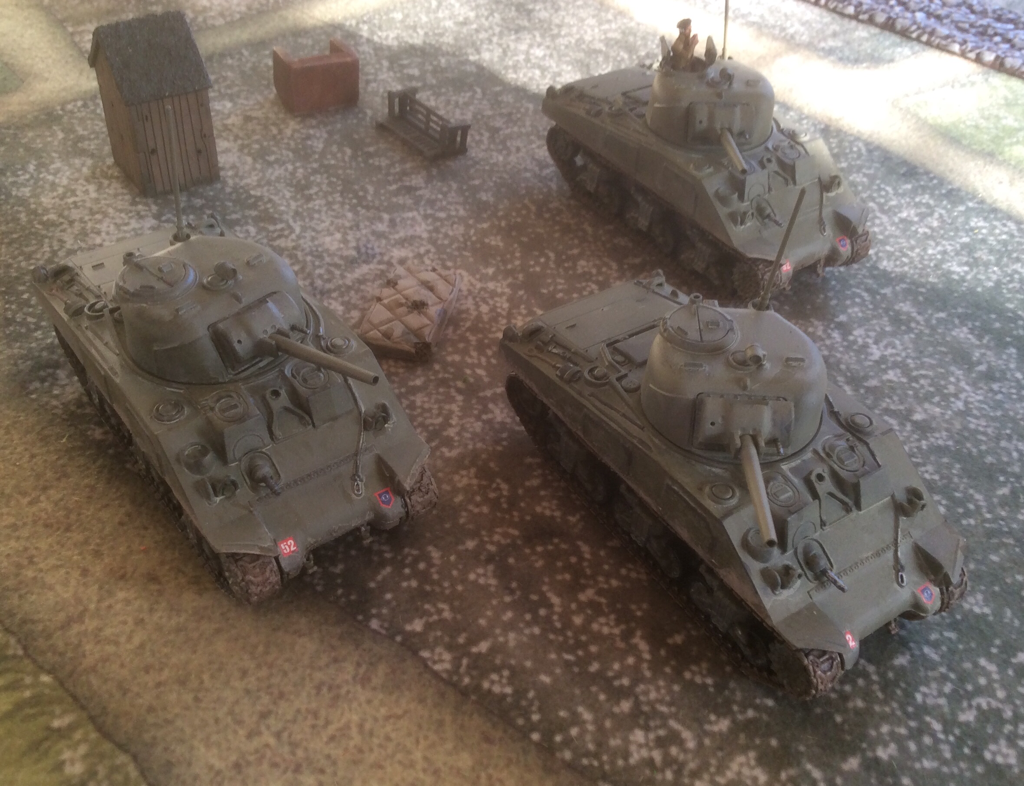 I had a gaming-heavy weekend last week, starting with the annual trip to Warfare in Reading. This continues to be my favourite show on the circuit. The stalls seemed pretty busy and I hope the traders made enough to come back next year. I picked up some 20mm AFVs and scenery bits for Battlegroup, a copy of the Lardies’ What a Tanker! rules and a lot more MDF 6mm Napoleonics from Commission Figures. I bought my first Commission figures at Warfare 2017 and am really impressed with them. At playing distance they are indistinguishable from metals and at £2 for 96 infantry, they are fantastic value. My friend Keith came up to Warfare from Devon and stayed overnight. We played a game of Blücher when we got back from the show. I’d written a scenario for Möckern, the northern battle on the first day of the battle of Leipzig, 16 October 1813. I had first planned to use 15mm figures but realised I had enough 6mm figures to play it at that scale, provided I paint up a couple more French units. I wanted to see how 6mm units affected the feel of the game so after a couple of evenings with the paintbrush I had the full order of battle. The two extra units were of the French Naval Artillery, who wore blue greatcoats with red epaulettes and were mistaken by their opponents for sailors of the Guard. 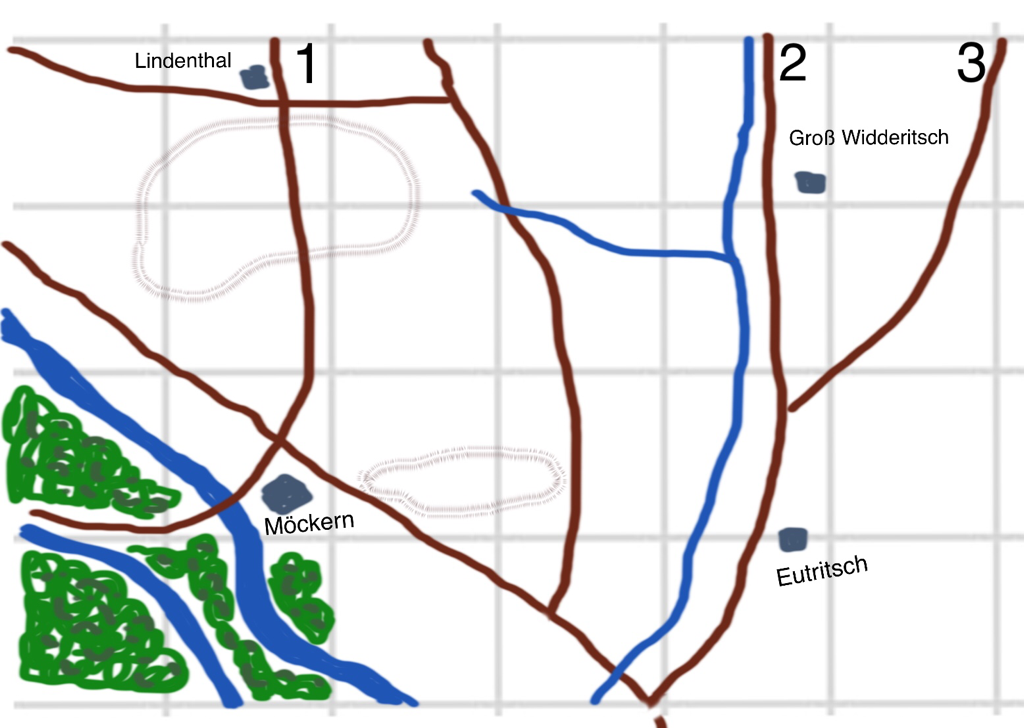 The scenario is on the Napoleonic scenarios page here. The background to the battle is as follows. On 16 October 1813 Napoleon’s army stood at bay in the city of Leipzig, surrounded by advancing Allied armies. Napoleon’s plan for the day was to strip his northern flank to reinforce an attack by his troops facing Schwarzenberg’s Army of Bohemia to the South. He ordered Marmont to take his VI Corps out of its entrenchments north of Leipzig and set off southward. However, after Marmont had abandoned his position and was approaching Leipzig, Blücher’s Army of Silesia appeared from the North. On his own authority Marmont halted his retreat and took up a defensive position before the city, with his left flank resting on the village of Möckern. Thanks to Blücher’s aggressive advance, Napoleon would now have fewer troops at his disposal against Schwarzenberg. Moreover, his northern flank was significantly at risk from Blücher’s advancing army. Fortunately for Napoleon, Blücher did not take full advantage of his opportunity on 16 October. Blücher believed that significant French forces were approaching from the North East and he feared an assault on his left flank. He spent most of the battle on that side of the field and he held back much of his army in anticipation of an enemy attack that didn’t happen. The burden of the day’s fighting consequently fell most heavily on Yorck’s First Corps.  The scenario gives the Allies only those forces that were committed early enough to affect the outcome. By doing this, what would otherwise be a walkover becomes a tense contest. As the Allied commander, Keith began the game with an attack by Prussian Grenadiers on the village of Möckern, which was held by a Naval artillery brigade. The Grenadiers were his best troops but the odds were still against them. Even so they kicked my troops straight out of the village. My reserve brigade pushed the Prussians out in my next turn but Keith’s second brigade was on hand to bundle out my troops again. By this time his main body had come up and assaulted my centre. Now that more of my units had been pinned by this advance, I had no more reserves to retake Möckern. Before long I reached my morale limit and the day was lost. The game followed the events of the historical battle pretty well. I might have hoped to hang on to Möckern for a bit longer at the outset, as the dice were firmly in my favour. But it was fitting that Prussian Grenadiers should roll the best possible result. I particularly like the way Blücher handles fighting for built up areas. Victory goes to the side with the last formed reserve. If you want to hang on to a town it is vital to have fresh troops in support within a Charge move away. The new occupants will be easier to evict if you don’t give them the time to form town order. In hindsight I made two important mistakes. One was to open fire with my artillery at too long a range and against the wrong targets, thereby wasting shots. The other was to advance cavalry to engage the enemy near his baseline. Thinking about it after the game, I should have held all my force back to wait for the enemy assault. A cavalry unit is if anything more dangerous when uncommitted. I was already outnumbered and there was no merit in reducing my strength still further. 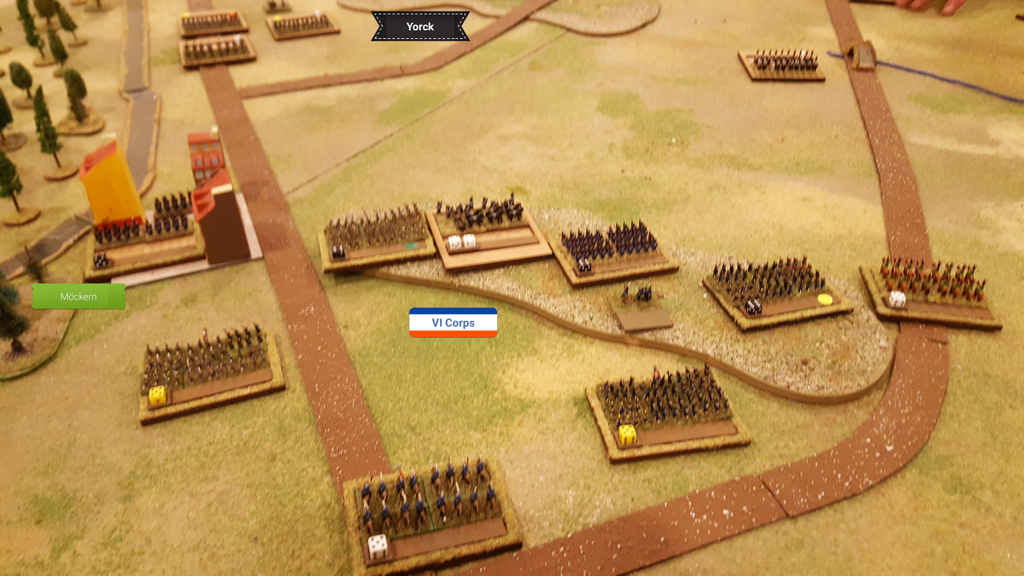 How did it feel using 6mm figures? Very satisfying. We liked the impression of distance and the look of the table was more convincing than with my 8-man-per-brigade 20mm armies. I had to make do with some unfinished movement trays that weren’t quite the right shape but I was still happy. I am now waiting for pay day to order a new batch of proper-sized trays. I love this hobby! |
Archives
November 2023
Categories
All
|


 RSS Feed