|
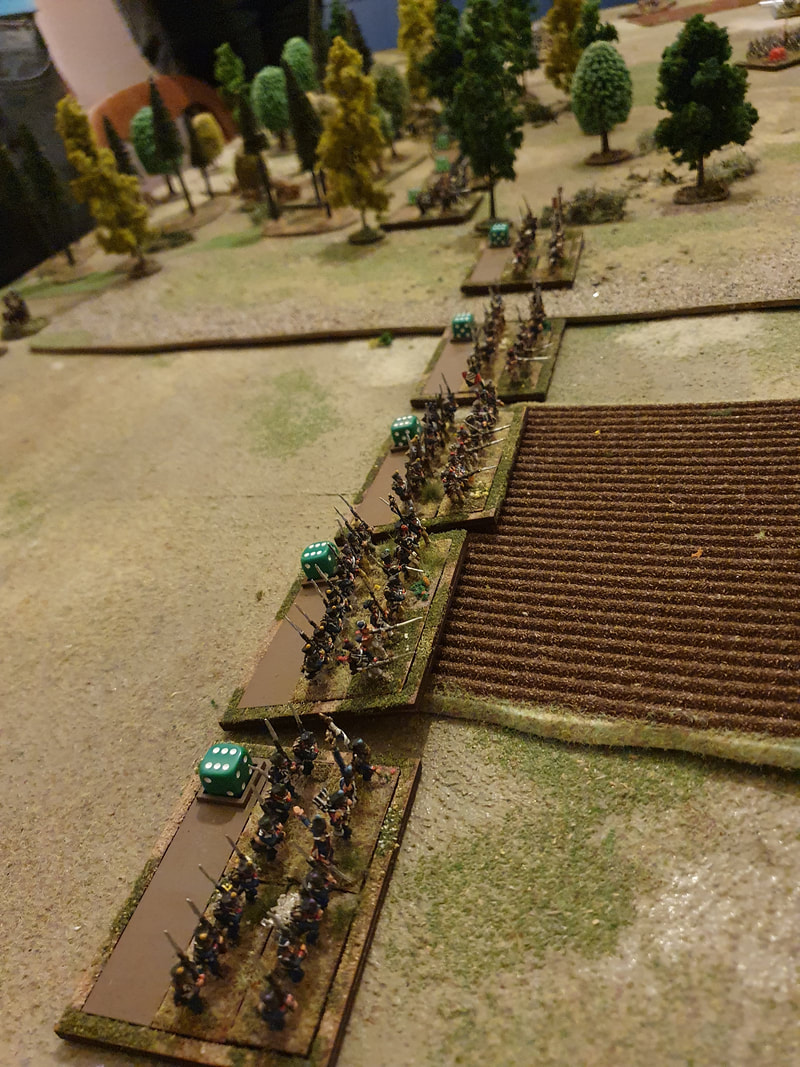
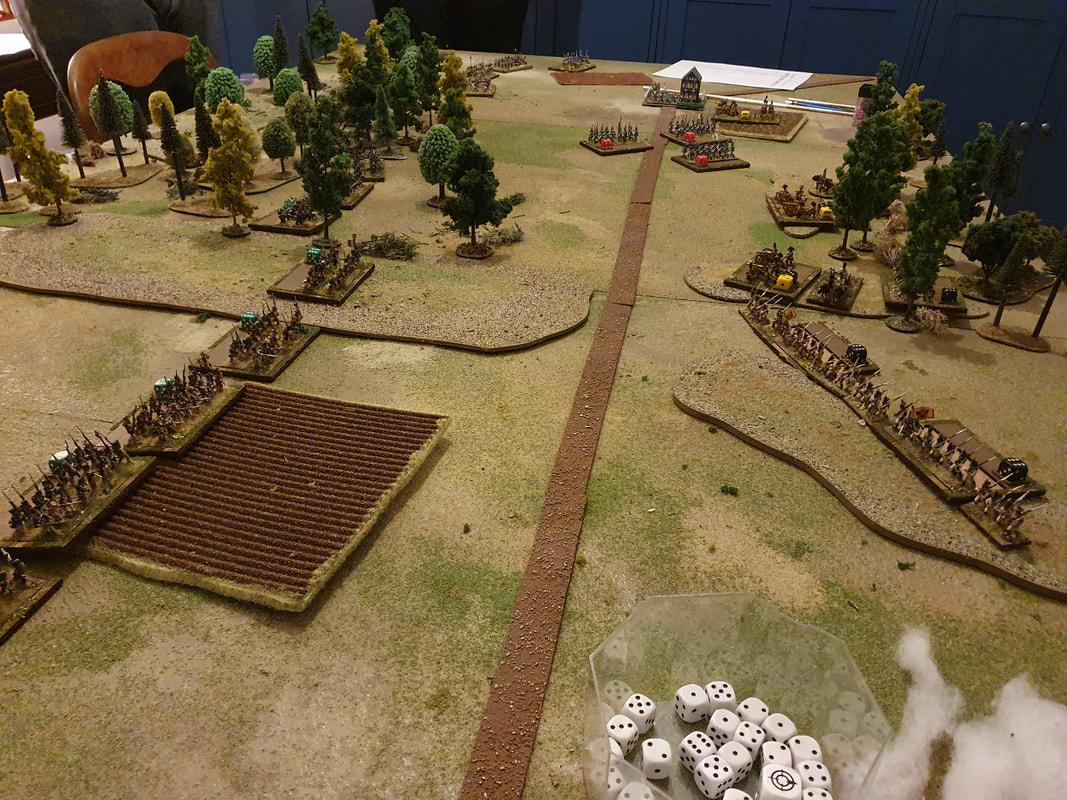
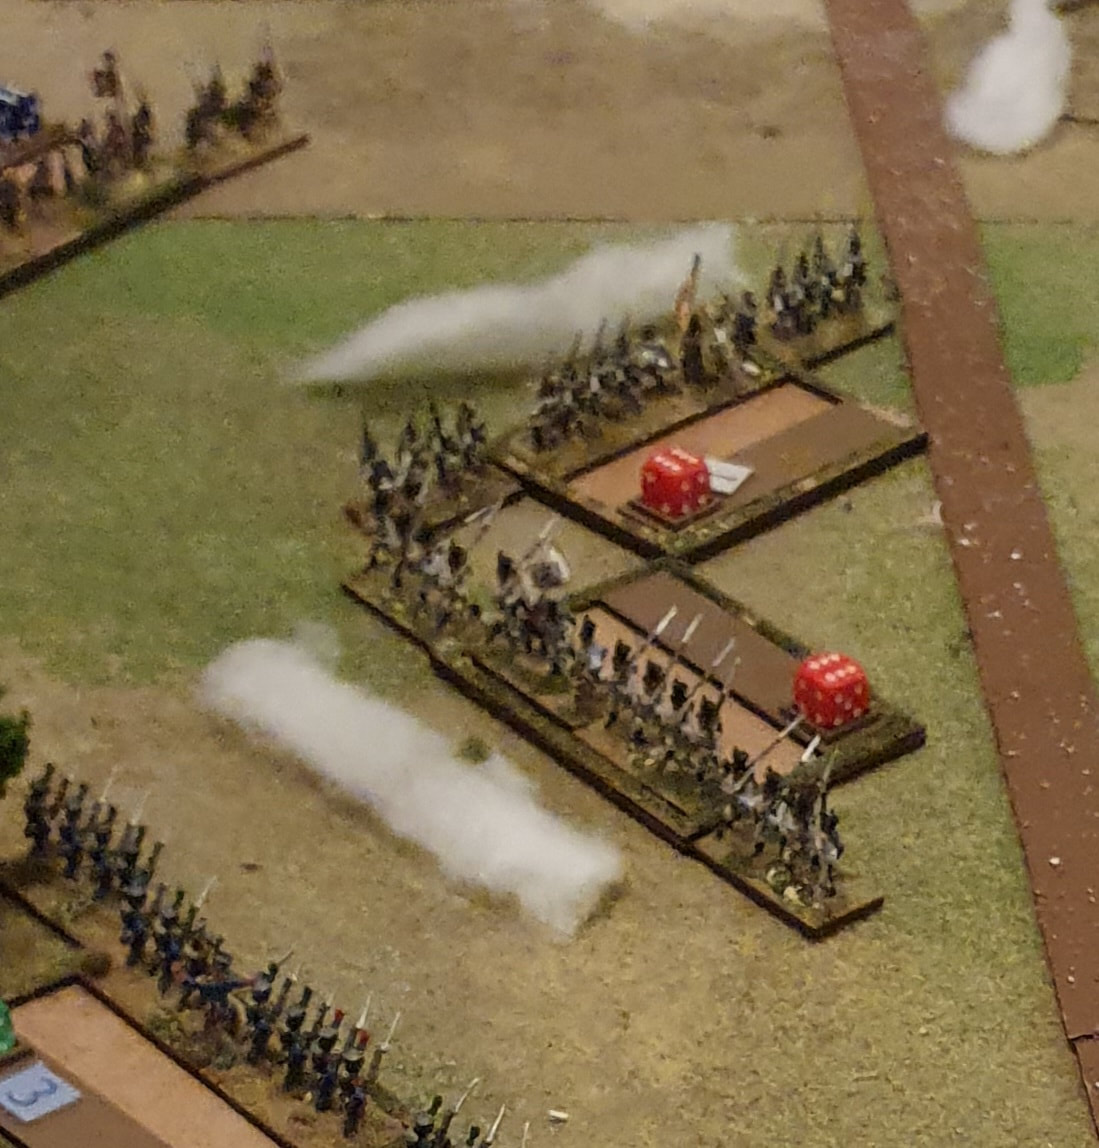
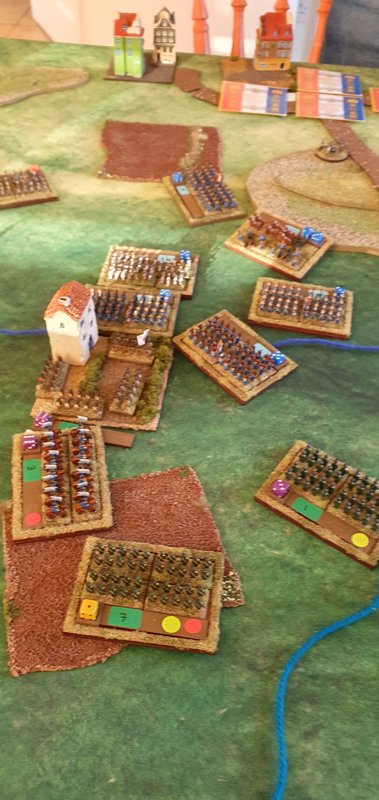
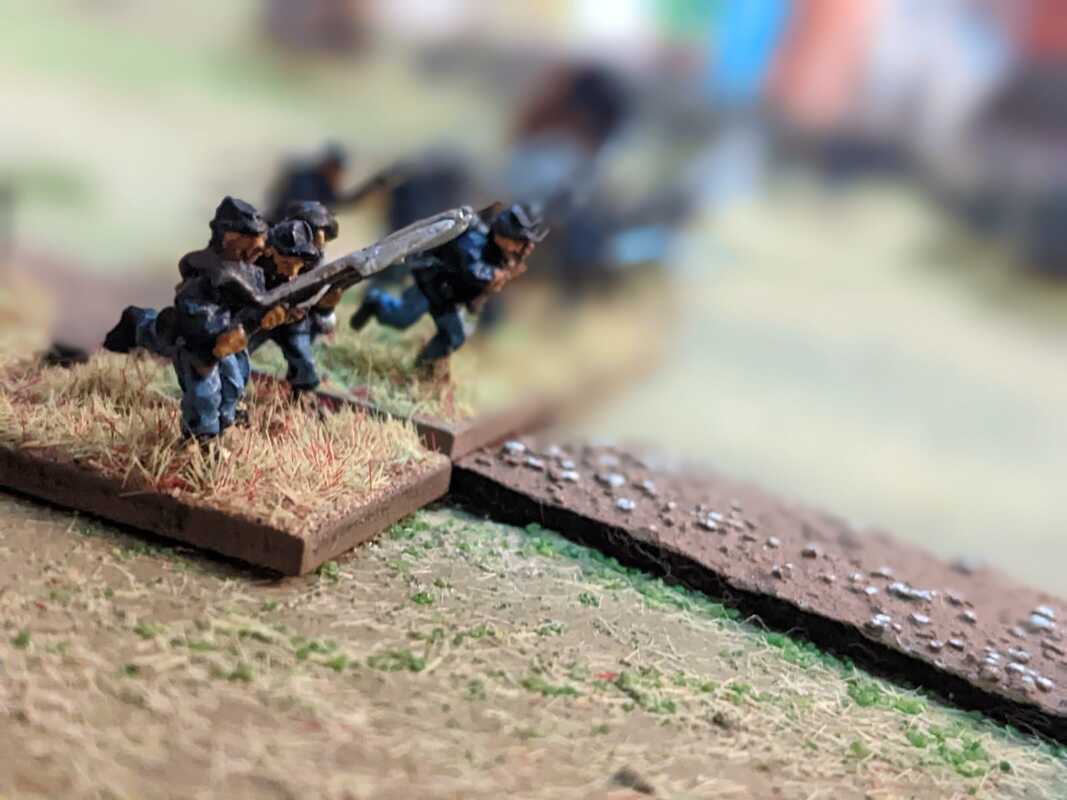
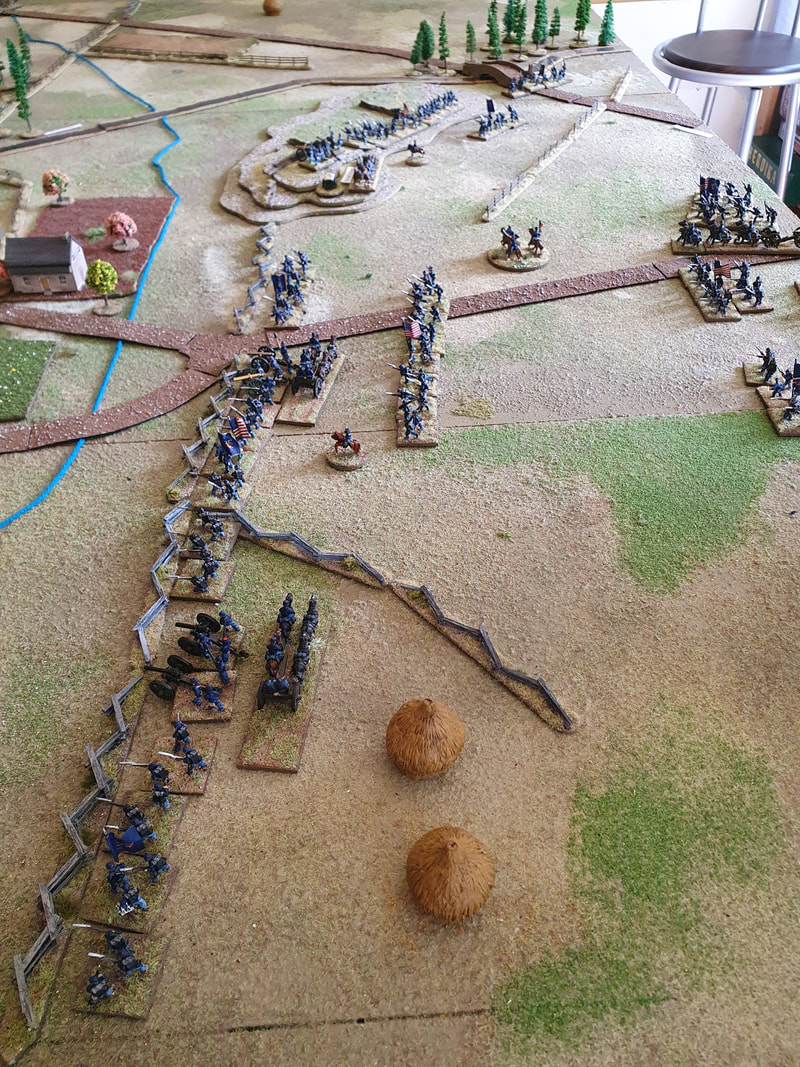
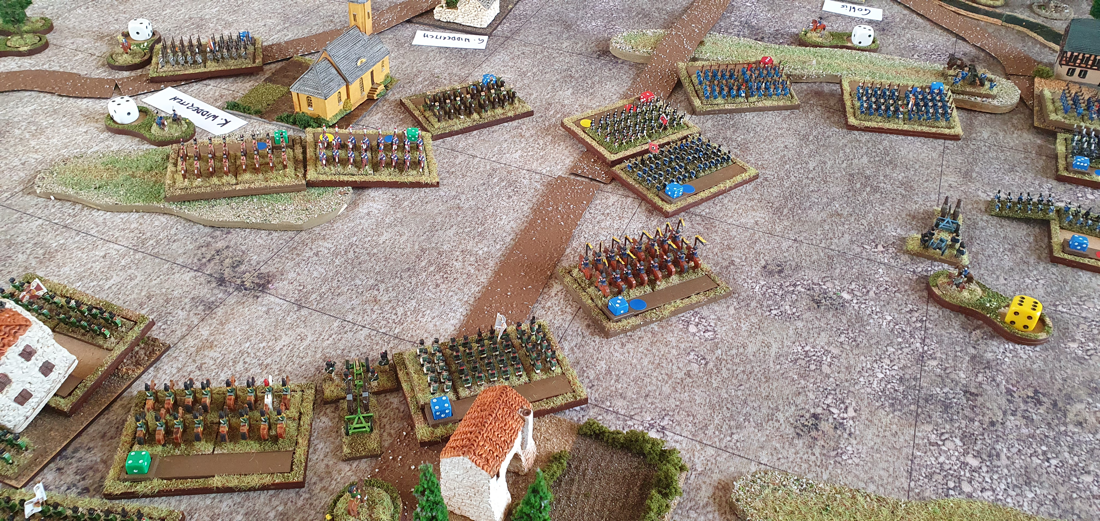
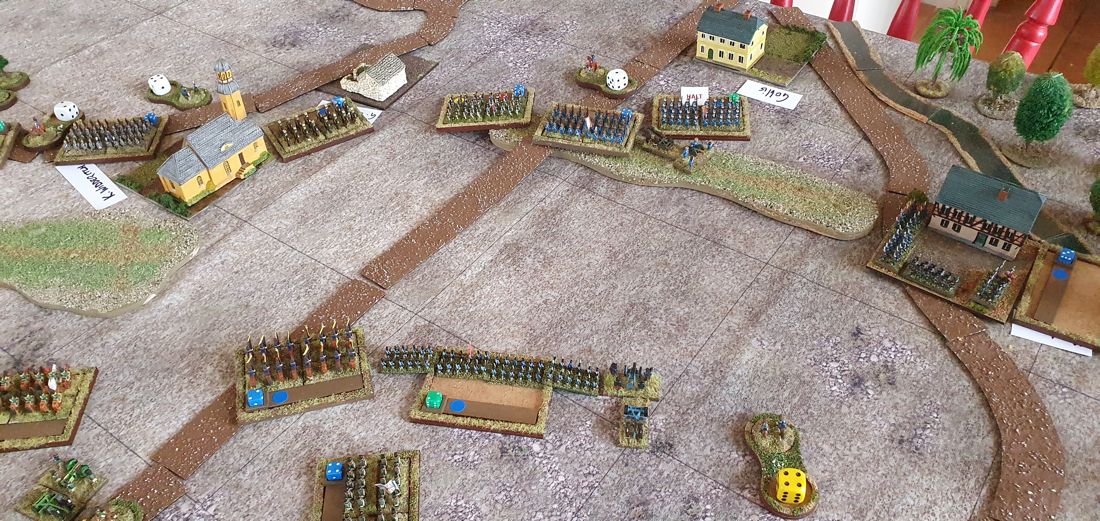
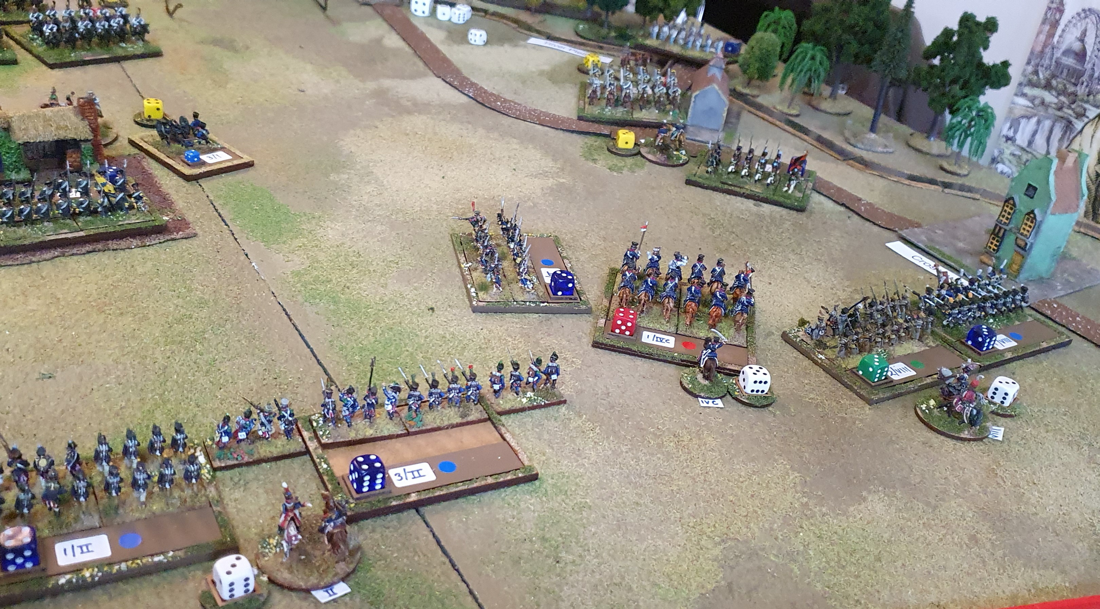
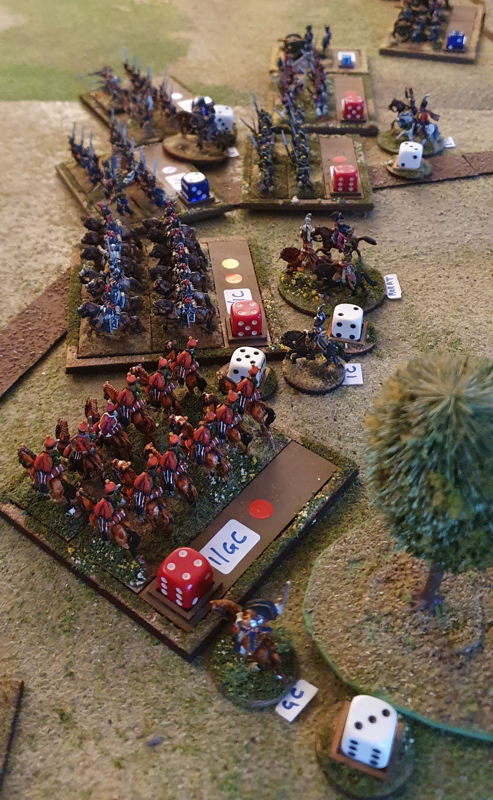
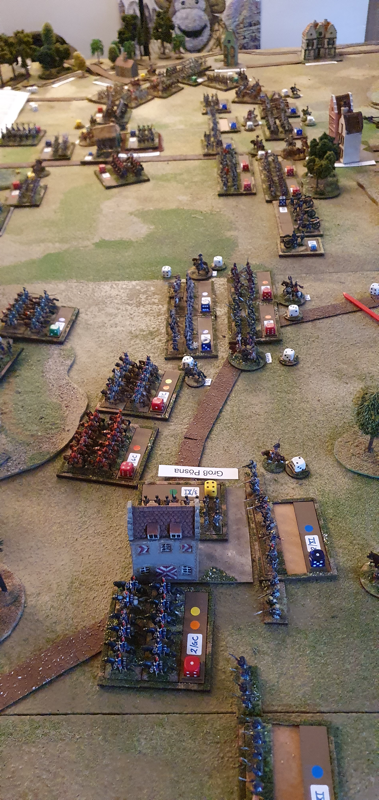
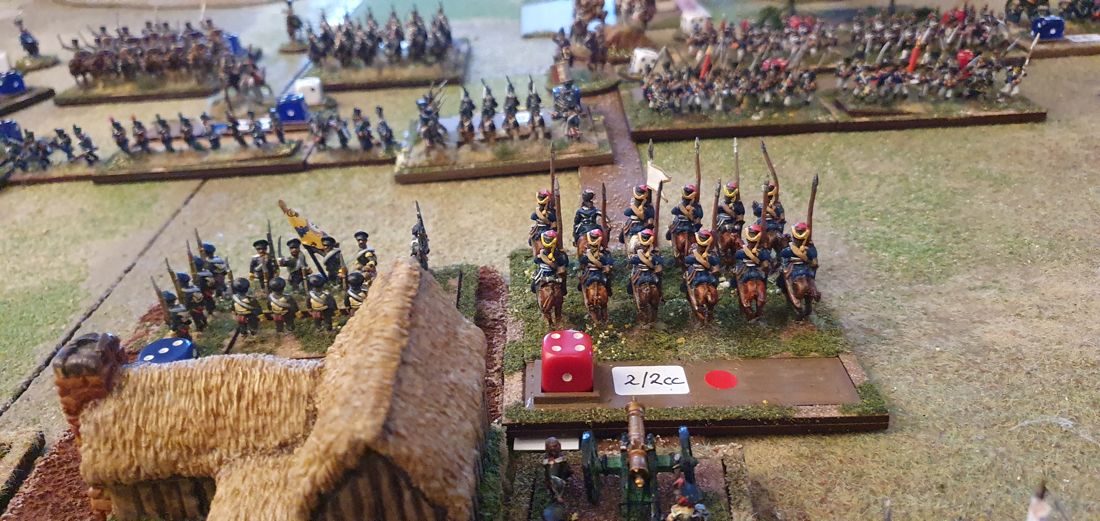
On 17 October, Dan, Harry, Will and I played a game of Lasalle. If I’d been thinking about the date I’d have run a Leipzig scenario but my brain was on go-slow and we played an 1809 game instead. The scenario was “Feeling for the enemy”, Friant’s attack towards Ober Sanding on 21 April 1809. It is downloadable here. The scenario begins with Rosenberg’s Austrians deployed along the Regensburg-Eggmühl highway facing West and Friant’s French arriving in the south west corner of the table. The French aim is to take the village of Ober-Sanding on the Austrian right, which would cut the highway and hence the Austrians’ connection to Regensburg. The table is unusual in having a lot of woodland, especially on the French side of the valley. Dan took the Austrians and Will and Harry, the French. Friant versus RosenbergThe game began with the French 15th Light, the best French regiment, advancing eastwards through the woods in the centre. Dan had deployed two Grenzers battalions on the edge of the woods, ready to slow the French down, but the 15th despatched them almost immediately (to my embarrassment since I had encouraged Dan to place them there). Meanwhile the French left, comprising 6 battalions, moved northwards through the woods and came out opposite and slightly overlapping the village. Up to this point, Dan had had atrocious luck with his dice rolls, his artillery barely troubling the French as they emerged from the woods. Also his reinforcements failed to show, which was less surprising since they needed two sixes to appear (each turn the players roll a number of dice equal to the turn number. Standard reinforcements arrive when one 6 is rolled; delayed reinforcements like Dan’s require two 6s). Fortunately for him, Dan began rolling better as the French attack on Ober Sanding started. As Harry now had to leave, Will assumed full command of the French and began his attack on the village with three battalions in line and three in battalion mass to the rear. His firing reduced the garrison to rubble but Dan was able to race a reserve battalion into the village before the French could occupy it. This battalion was then assaulted by two French battalions who were repulsed in short order. Meanwhile Dan advanced his centre to support his village and, at just the right moment, his artillery and musketry so disrupted the 15th Light that it ceased to be a factor in the game. Post-match analysisThe game ended with Will still outside the village but his reserves ready to mount another assault; the French centre incapable for now of forward movement; and the French right poised to put pressure on Dan’s outnumbered left. Dan’s centre was well-placed and holding their own and he still held the town on the right but he no longer had a reserve available should the garrison be bundled out by the French assault. Dan’s off-table reinforcements were still refusing to appear.
We agreed the game was a draw since it could still have gone either way. I’d give bragging rights to Dan however as I realised too late that the scenario heavily favoured the French, in two important respects. First, the French had such a big skirmish advantage that they went first every turn and had way more momentum than they needed. This negated any challenge arising from moving through the heavy woodland. Second, the French reinforcements only needed to roll one 6 to arrive, which happened quickly and gave them too much of a numerical advantage. After the game I amended the scenario to reduce the French skirmish advantage (though they do still have one) and to require reinforcements on both sides to roll two 6s before they could appear. I hope this will make the Austrian task a little easier. The scenario and orders of battle were taken from John H Gill’s Thunder on the Danube (volume 1). The Lasalle rules worked well and Will and Harry, both new to the rules, picked them up effortlessly. Next time, I’d like to try the same scenario using Soldiers of Napoleon to see how it compares. I was grateful to all players for the enthusiasm with which they assumed their Napoleonic roles!
0 Comments
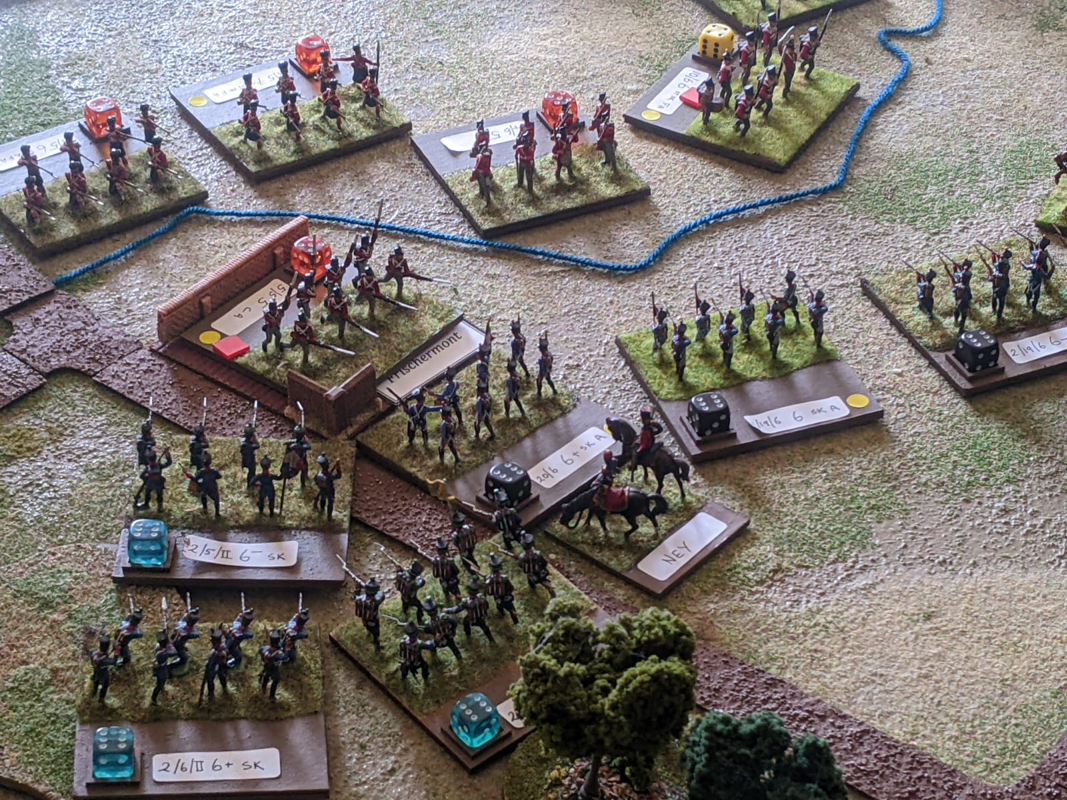
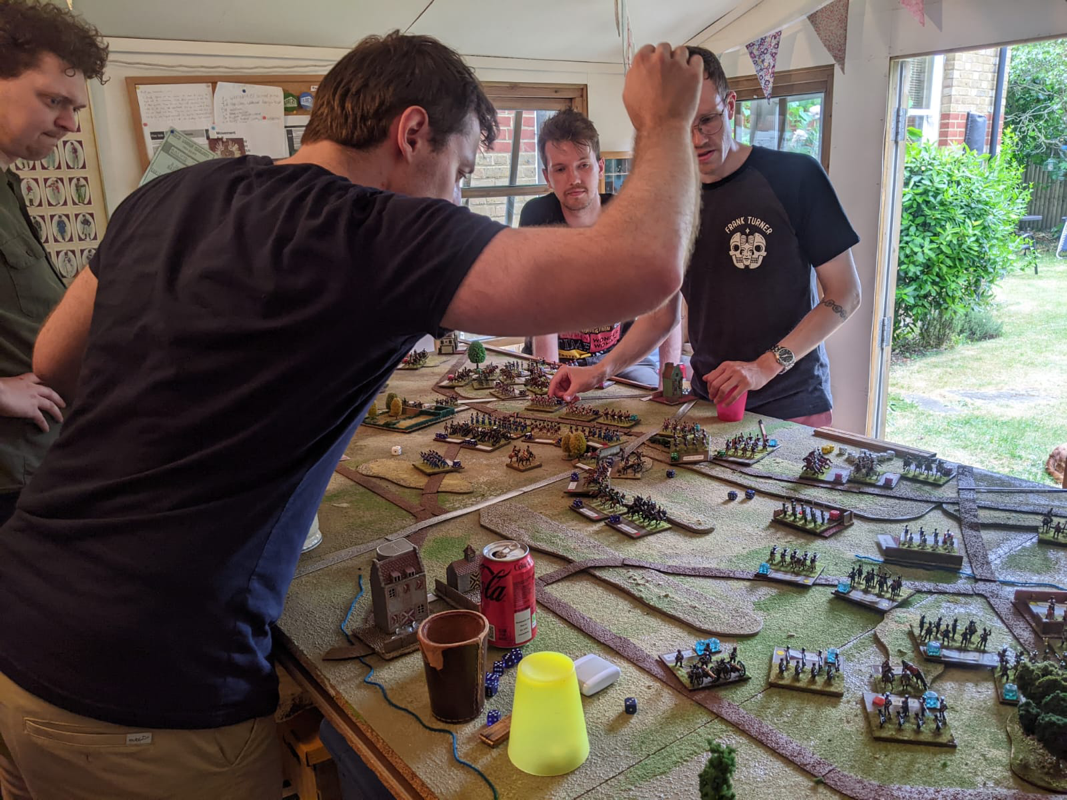
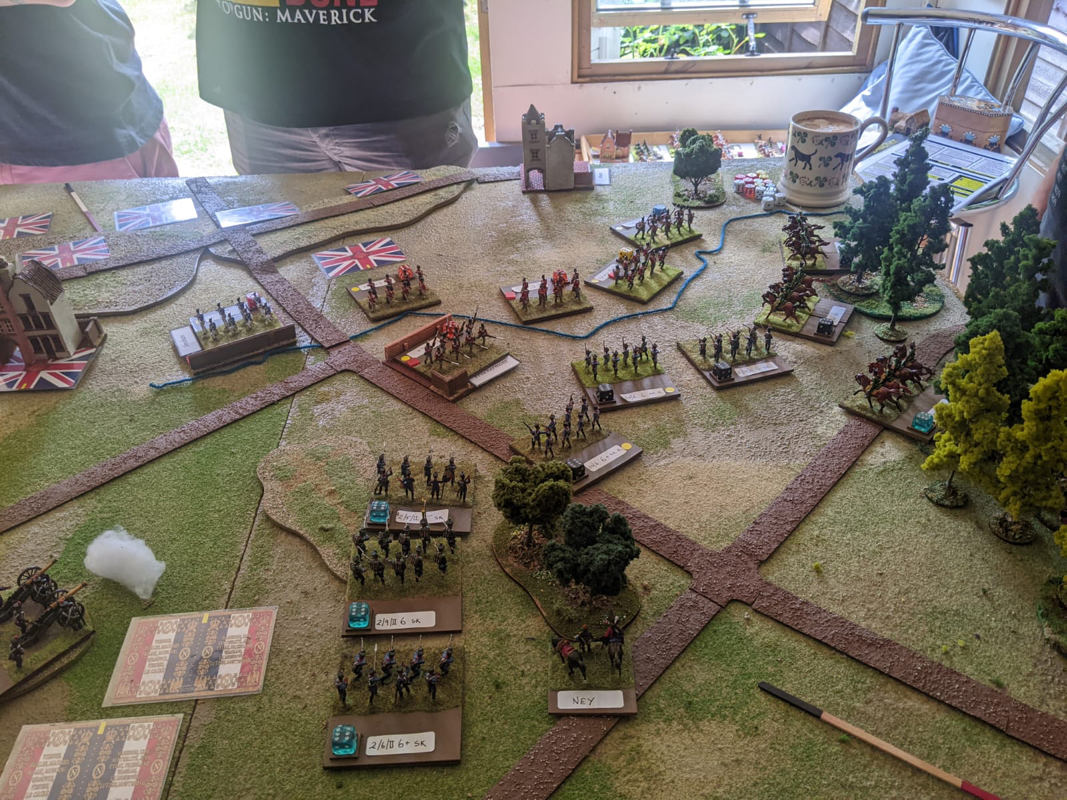
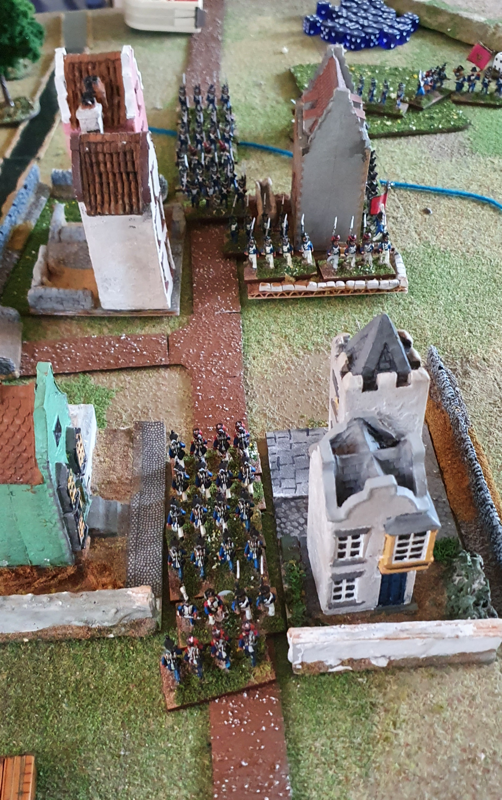
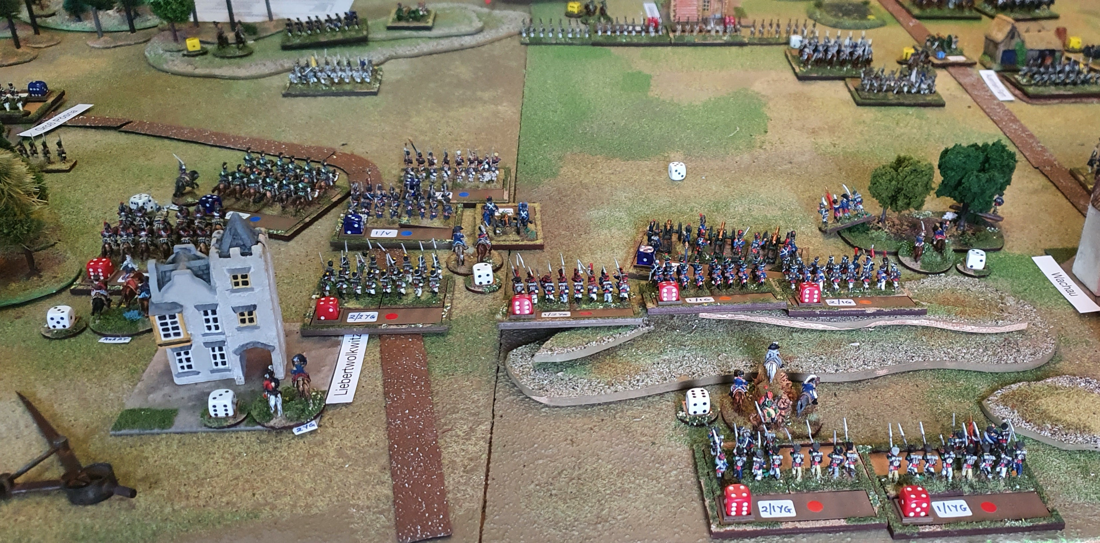
Back in 2015, a group of us played a game of the Battle of Waterloo using Sam Mustafa’s Blücher rules and a collection of polythene 1/72 scale figures, some of them dating back to 1970. A few years later we played Ligny. The figures have spent the years since then in boxes, labelled up and waiting for the Waterloo itch to return. In February this year I got the figures out, repainted a few and rewrote some faded labels, then hosted a Waterloo refight for four of us in the dining room (too cold for the shed). I had read a few more Waterloo histories since 2015 and changed the deployment rules from the original scenario. Ian and Paul led the Allied and Prussian armies while Chris was Napoleon. We had a great game that ended with Chris breaking through the Allied centre and opening the road to Brussels. A couple of months ago I noticed that 18 June this year would be on a Sunday, as it was in 1815. Not exactly a rare coincidence but I’ll use any excuse to play the battle again. This time, we had six players: Nick, Dan and Will played the French (Napoleon, Ney and D’Erlon); versus Harry, Jack and me (Wellington, Picton and Blücher). I took the Prussians so I could help with easing newcomers into the rules. Blücher is a very easy game to learn but with both Jack and Will playing for the first time, we cut them some slack for the first 5 minutes - and were then ruthless, obviously. In fact, both teams were well on top of the system in no time. The orders of battle, reinforcement schedule and briefings are on the Napoleonic Scenarios page here Opening moves The game began with the French going wide on both flanks: Will took two cavalry Corps and part of I Corps around the West of Hougoumont, while Dan led II and VI Corps in an assault on Papelotte, Smohain and Frischermont on the Allied left. Both attacks were intended to pin Allied reserves in place while Nick went straight up the Brussels road with the Guard. Harry and Jack used the reverse slope effectively, thereby negating much of the power of Nick’s artillery. In the East, they ran an aggressive defence against Dan, which led to a sticky end for one Hanoverian infantry brigade that overreached itself and dissolved in the French rear area. On the opposite flank, a plucky Dutch brigade bought valuable time, as it survived repeated cavalry charges before finally going under. The mid-game While the flank fights settled into seesaw combats, the Guard made its move up the centre of the field. Nick took La Haye Sainte but his leading units suffered heavy losses from Allied artillery and musketry and he withdrew them before they disintegrated. Fortunately for him his reserves were close behind, including the Guard cavalry who made it onto the Allied ridge. Harry and Jack sent units up and down the line to plug gaps and their line between the Brussels road and Hougoumont held firm, but they started to run out of reserves and a hole developed in the line between the Brussels road and Papelotte, which the French Guard Cavalry filled. Meanwhile the Prussians, on a fixed variable reinforcement plan (available at most High Street banks), were delayed by two turns, which was unfortunate for the Allies as they were unable to strip troops from their left to create a new centre. When the Prussians did arrive, they got stuck in to Dan’s right flank but did not trouble him too much: he refused his right and although his line was now bent backwards, he didn’t need to ask Nick for more troops. 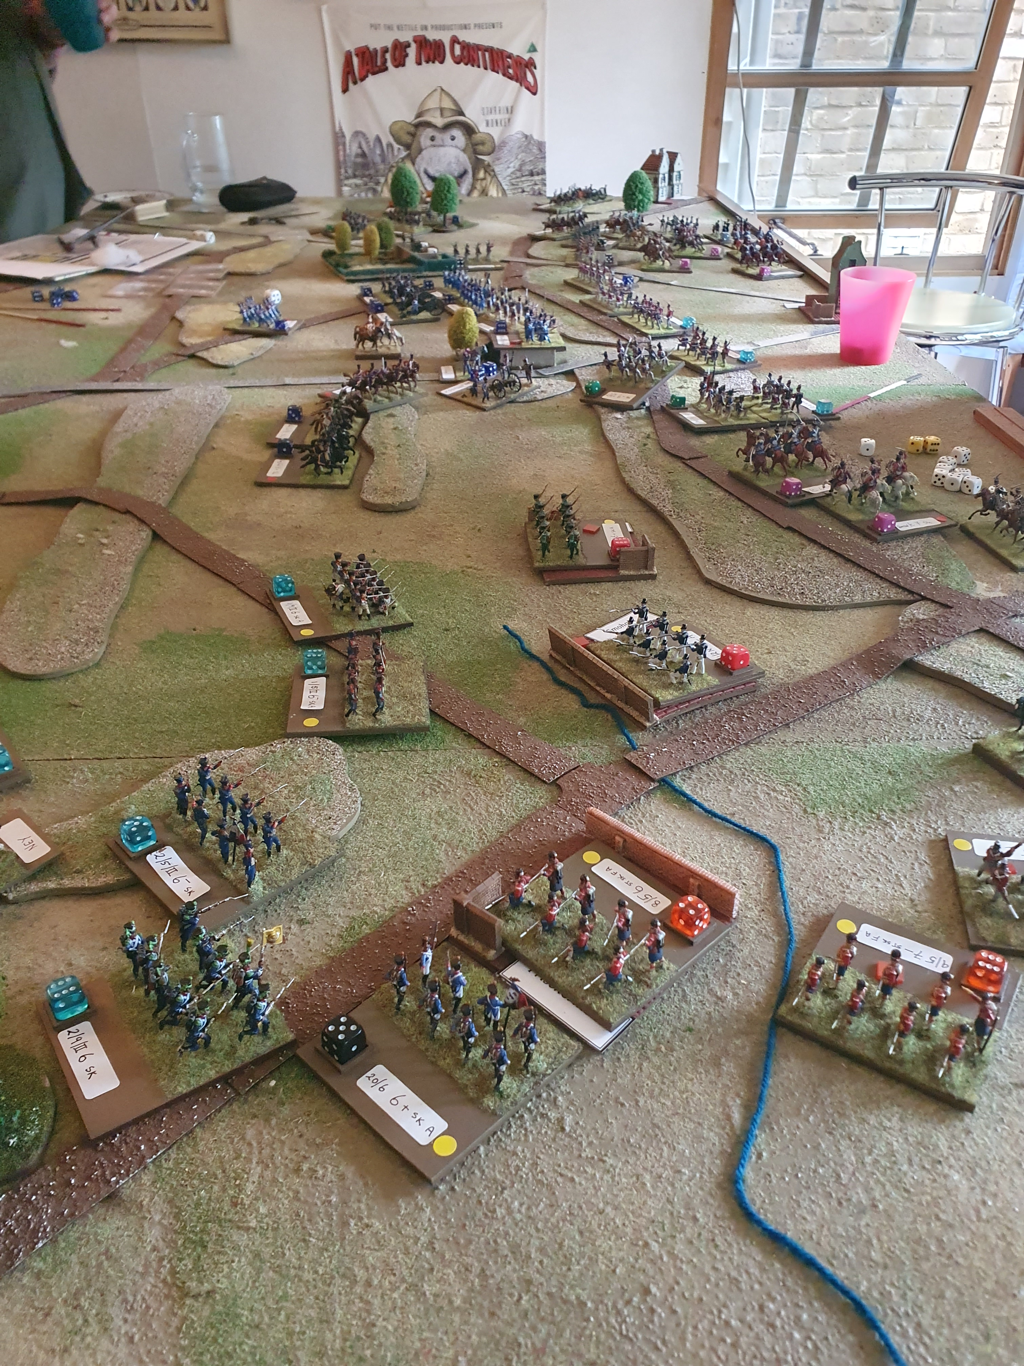 Final Whistle Throughout the day, the Allies had been losing more units (and hence morale points) than the French, partly because of some aggressive counterattacks and partly, I think, because being on the defensive, they could only guarantee that a damaged unit would not be drawn into combat again if they sent it off the table. In the second half of the day they adopted this approach which preserved morale points but meant they eventually lacked the units to man the whole front line. We were approaching nightfall and if they could hang on to their morale, the day would have been theirs as the Brussels road was still not open (though the ridge to its east was filling up with Frenchmen). However, at the start of the last French turn of the day, the Allies had 2 morale points remaining and first Nick, then Dan was able to destroy an Allied unit, breaking Allied morale. The day had been very close but this time, Napoleon would spend the night in a Inn at Waterloo while Wellington sped back through Brussels and on to the sea. Went the Game well? I had a lovey day and at my age, that’s what matters! But I do believe the rest of the crew enjoyed it too. I have the following thoughts about the scenario:
 I am really grateful to my five co-players for a game played with good humour and Peroni. Thanks also to Caroline, ably assisted by Will (2) and Katie, for the catering and general hospitality.
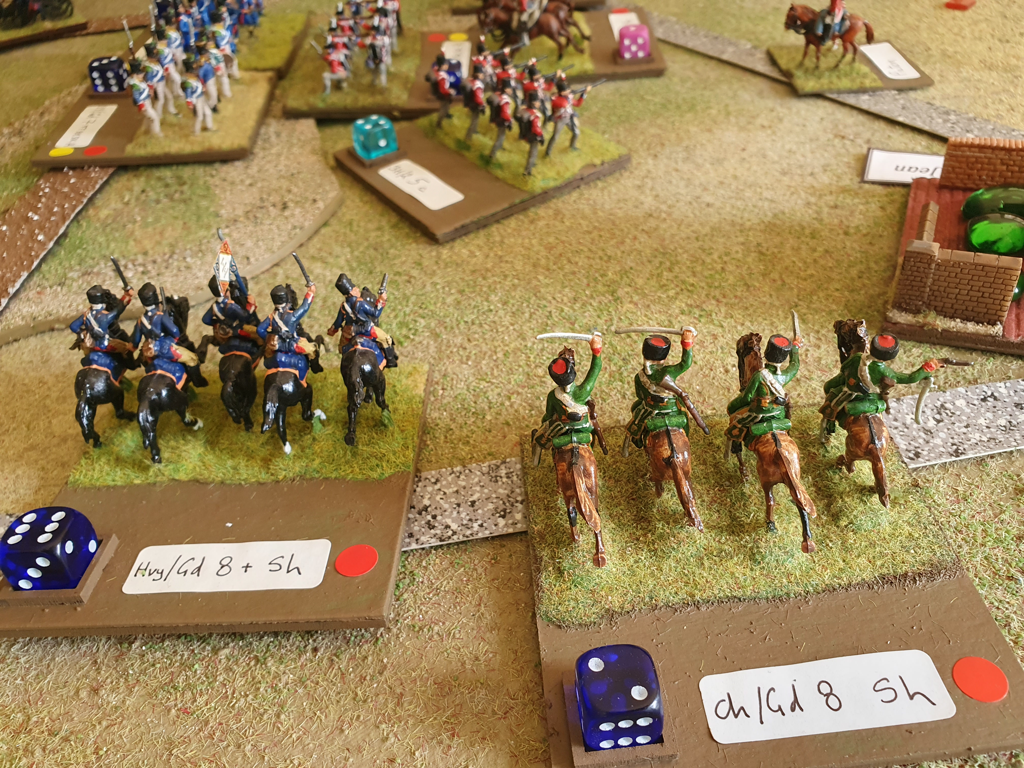
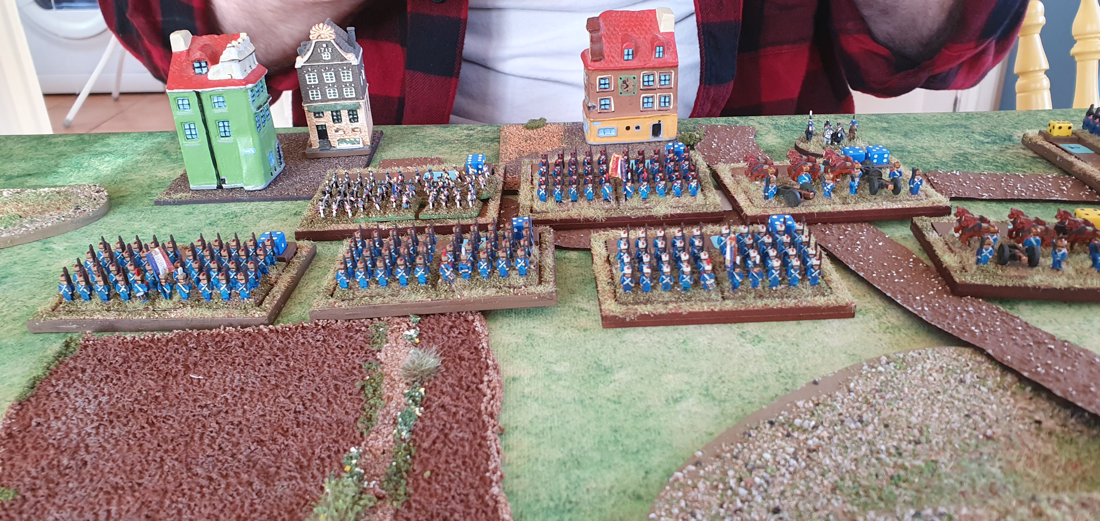
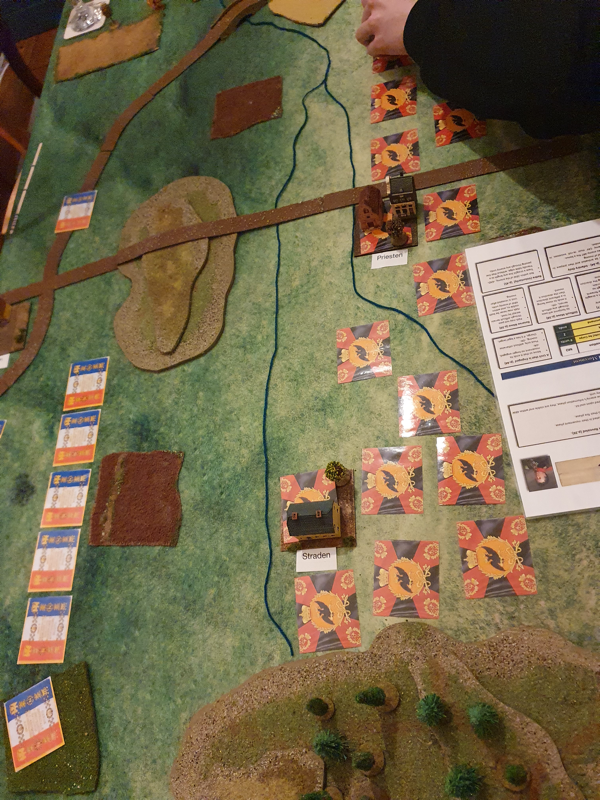
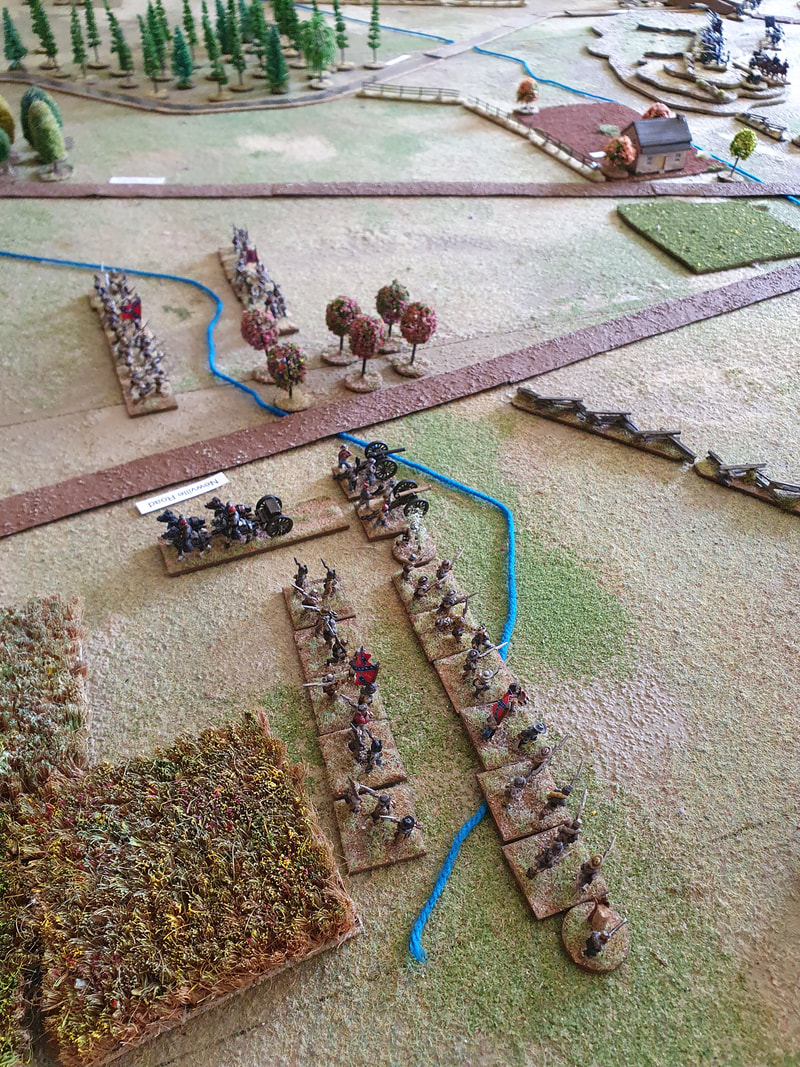
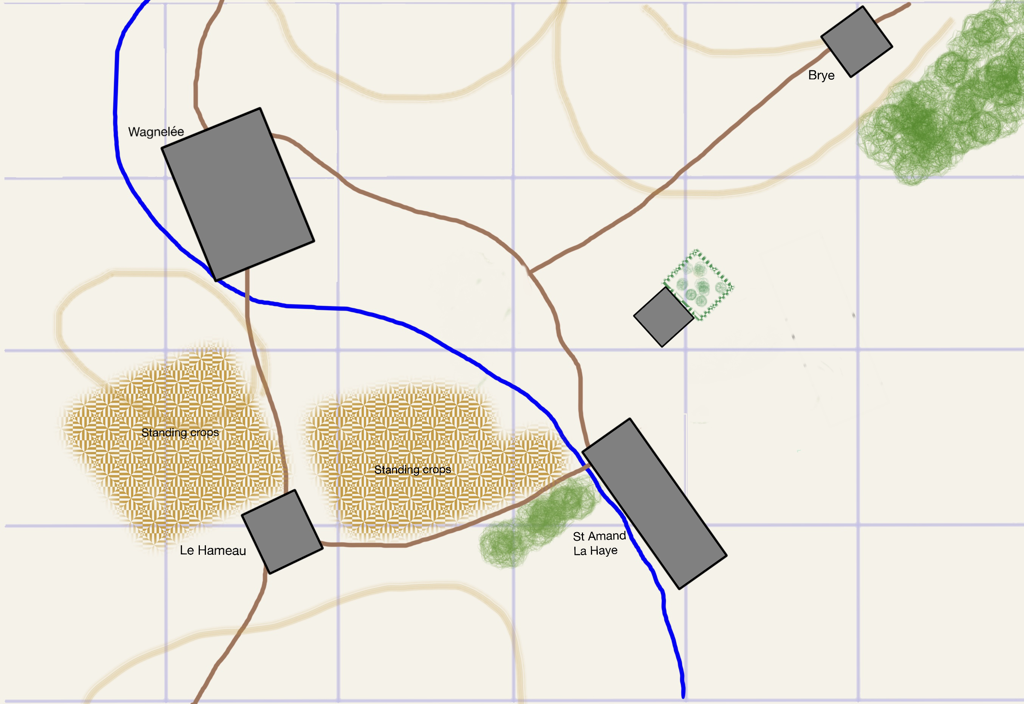
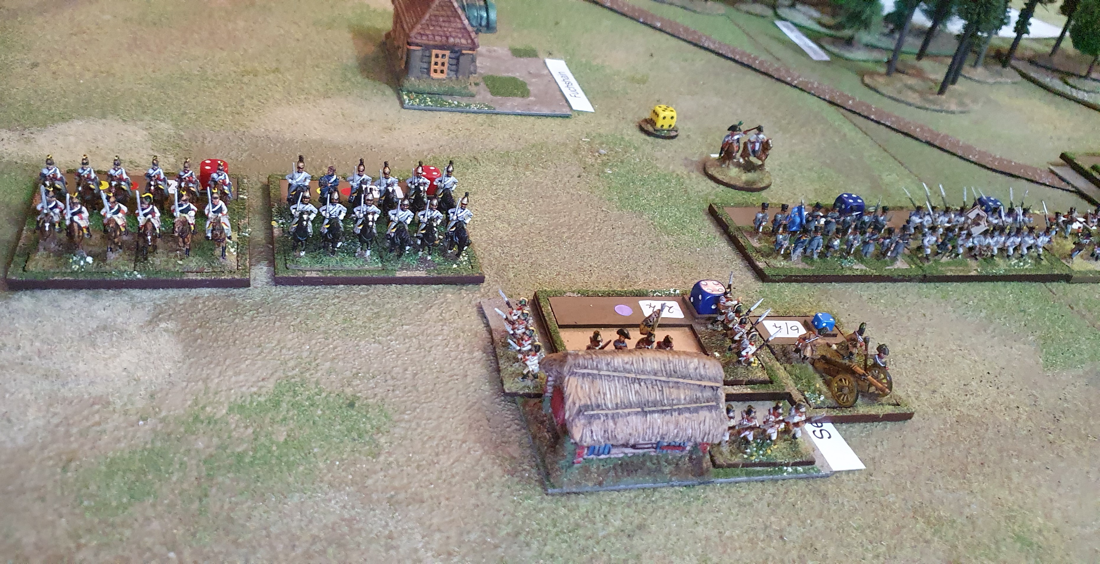
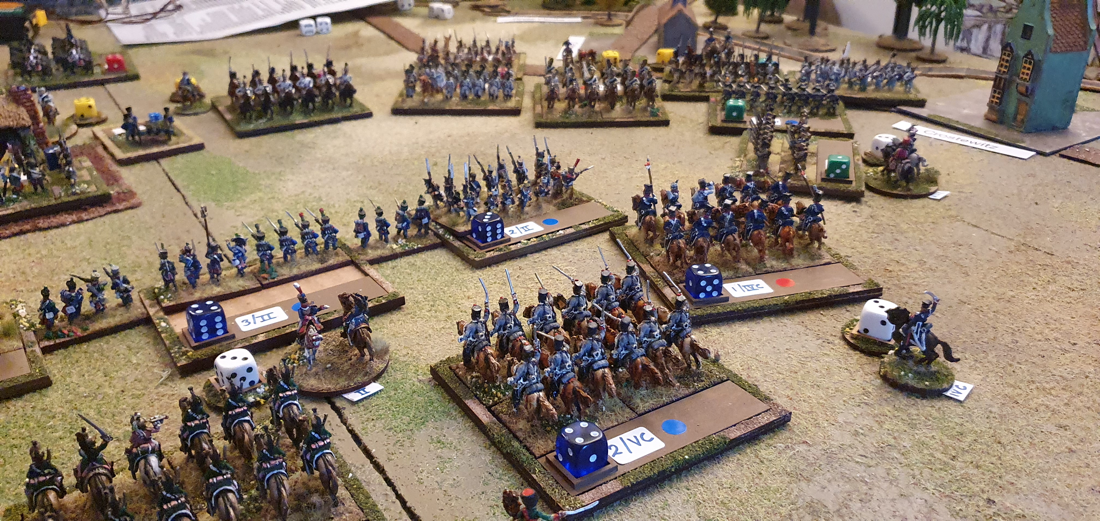
In my last post I said I had written a new scenario for the first day of the Battle of Kulm, 29 August 1813, using Sam Mustafa’s Blücher rules. It is on the Blucher Scenario Page. We have now played the scenario three times, with two wins for the Russians and one for the French. All three games were close and the players seemed to enjoy them. We played the first game at my local club with two players a side and me as umpire. One player had played the rules before but the others were all new to them. They picked them up quickly, all being experienced with the period and with various other Napoleonic rules. The second game was between me and my son Nick, who has played Blücher several times. I umpired the third game for Harry and Dan, both new to Blücher and still quite new to Napoleonics. Over the three games and between these eight people, I believe the rules passed the tests for accessibility, plausibility and fun. Hats off to Sam Mustafa and his play testers for such a polished product. He does make exceedingly good rules! The figures we used are 6mm on 80mm x 40mm movement trays. Most are MDF Commission Figurines, with a few metal Heroics figures. The scenario held up well but I tweaked it between the first and second games, mainly to simplify the map. I had got out of the habit of making maps for Blücher’s scale and on the first version I included secondary tracks and altogether too many building bases. The table was cleaner for games two and three. The orders of battle and reinforcement schedules remained the same for all three games. For game three I added traits to the two commanders, because it seems to encourage player engagement if their model general plays a distinct role in the battle. I made Vandamme inspiring (+1 die in combat) and Ostermann-Sacken heroic (has the Rally ability). From time to time when we play Blücher, somebody proposes a House rule, normally regarding the (in)ability of infantry to fire into or out of a built up area. Another recurring suggestion is to allow prepared infantry to fire a proportion of their elan out to their flanks. I’ve been happy to make house rules for various sets, especially Napoleon’s Battles, which acquired a mass of add-on rules over the decade or more that we played it. However, I still resist adding house rules to Blücher because it flows so well and the justification for most rules decisions is provided by the author. For example, his argument against firing into/out of BUAs is that this rule doesn’t mean musketry didn’t take place, just that at the concentration it occurred, neither garrison nor troops in the open would have suffered an appreciable drop in combat effectiveness. Infantry cannot shoot a garrison out of a town: it has to kick them out. And of course, combat in Blücher represents everything involved in an assault, including close range musketry. So anyway, as yet we have no house rules and I doubt we will ever add them. 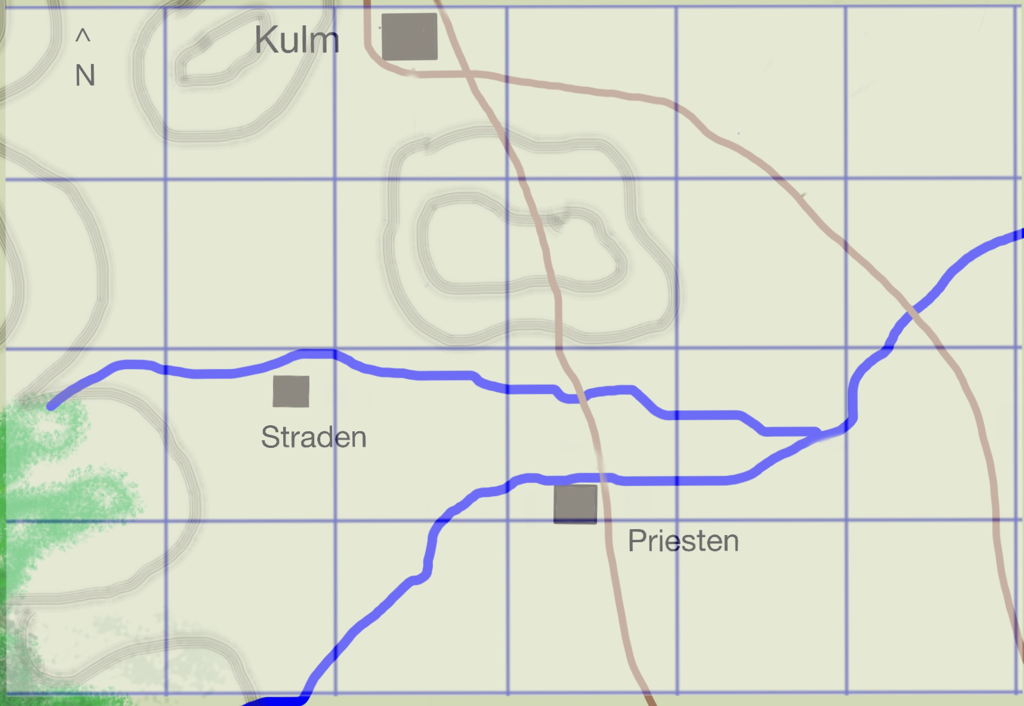 How the games playedI’m never sure how interested people are by blow-by-blow battle reports. But the differences between how the three games played were interesting. The first, which was a French victory, saw the French concentrating on the right wing and pouring a lot of effective skirmish fire into the Russians, who were all deployed forward along the stream between the two villages. The Russians had almost no units in reserve, which meant the French, with superior skirmishing ability, were able to grind them down before closing. When the French attacked across the stream, the already depleted Russians were easier to defeat. In game two, a Russian win, the Russians deployed some way back from the stream line (except for garrisoning the two villages) and kept a big reserve that they sent forward sparingly. In this game the French ran out of time to take their objectives and found that the fresh units they needed to assault the villages were too far away to affect the final phase. The third game saw the French take both Straden and Priesten, but they were kicked out of both by Russian counter-attacks. Straden changed hands four times, ending up n Russian possession. I really like Blücher’s mechanics for fighting for BUAs. The initial fight to eject a garrison is tough but if/when it succeeds, a seesaw fight can follow as each side sends in fresh units to try to retake the BUA before the enemy occupying it can form into garrison. This chimes with accounts of village fighting being far more fluid than some rules make it, and where final possession often went to the side with the last formed reserves to send in. All three games were close. My notes to self after playing them include: don’t put all your units up front; reinforce when you have to but don’t expose units unnecessarily; cavalry can affect more enemy units when it is a threat than once it has charged a target; and remember that even winners take a loss in combat, so you can grind a strong enemy down by sending in a succession of assaults. Overall, this has been a fun scenario and I’d like to reuse it in a year or so. I have uploaded a new scenario here for Soldiers of Napoleon (Scenario SoN 3), covering Girard’s 7th Division’s defence of St Amand La Haye during the Battle of Ligny on 16 June 1815. I started with the Lasalle scenario that I had already written for the same action, but was soon moved to revisit the sources because of an interesting difference in approach between the two rule sets. Lasalle 2 makes all units a standard size (Russian artillery excepted). Lasalle 1 did have an option for large battalions, but even then there were only two sizes. Sam Mustafa is an accomplished designer who tests his rules extensively before releasing them. Lasalle 2 works very well indeed and there is no doubt that standard unit sizes (and hence frontages) makes for smooth play. The argument for standard sizes generally runs that it is hard to know exactly how many men were present at any given point and that on average, most battalions were around 500 men strong after a few months campaigning. If an army’s battalions were seriously understrength, as the Russians often were in 1813, the player is free to represent two actual battalions with one model battalion. Fair enough. I didn’t give much thought to this approach until reading through Soldiers of Napoleon. The approach to unit creation in Soldiers of Napoleon is more fluid than in Lasalle 1 or 2. A battalion can be any starting size from 2 to 6 ‘stands’ and the rules for firing, melee and morale management are geared for this. Looking at the orders of battle n the 1815 campaign, I was struck by the wide variation of battalion strengths between the French and Prussian armies. On the whole, Prussian battalions are significantly larger than the French. Now, at the scale of a divisional fight, the difference in battalion sizes could have a significant impact on play. So in adapting the Girard scenario to SoN, I have tried to reflect actual unit sizes in the order of battle (using the ratio of 132 infantry or 100 cavalry to a stand). Consequently, the largest unit is a Prussian Line battalion of 6 stands and the smallest is a 3-stand French battalion. I look forward to testing the effect this has on scenario balance when we play it on 11 September. I have a feeling that Girard is going to have a tough time hanging on to his real estate!  Last week I ran two games of Longstreet over two days, for two groups of players. The scenario was Blocher’s Knoll, which is on the scenario page here. I had written the original scenario 7 or 8 years ago but updated it for the latest outing, having read a bit more about Gettysburg in recent years. The scenario concerns Ewell’s assault on the Federal right wing just north of Gettysburg on 1 July 1863. Howard’s XI Corps is spread thin, facing north, from where Ewell’s Corps is approaching. Ewell, meanwhile, is marching down two converging roads, one of which points directly behind the Federal right flank. It is an opportunity to dislodge and roll up XI Corps. Game 1: “I was winning the battle at 4, but lost it by 5!” The first game pitted Dan and Harry’s Confederates against Spencer’s Federals. Spencer had three brigades of mainly cautious veterans (Pennsylvania Dutch, still smarting from their rough handling at Chancellorville), with Barlow’s division in front and Krzyżanowski in the second line. Dan led Early’s division on the left, heading for Spencer’s hanging right flank, while Harry kept Spencers attention from the front with Dole’s brigade. Spencer, who has a history of aggressive play, set out to spoil Dan’s attack with one of his own and to put pressure on Harry. Rather as one might expect, the cautious Pennsylvania regiments were just not suited for aggressive charges and bounced off the secessionists wherever they met them. However, a cautious veteran is still a veteran and they fought much better in defence. Losses mounted on both sides but the Confederate left hook developed well and when Blocher’s Knoll fell to Early, Spencer seemed perilously close to defeat. Spencer then got a break that totally changed the picture. In his enthusiasm to outflank the Federal position, Dan sent a regiment in march column over the bridge across Rock Creek, right under Federal noses. Spencer hit the march column with a big, seasoned regiment and almost wiped it out. In the victory step of his turn, he rolled high and the game was over. Longstreet’s victory conditions are a feature of the rules that I really like. They permit scenarios between unbalanced forces where the final issue may not be in doubt, but the weaker force can still win the game. Spencer had fewer numbers and poorer quality troops but he deservedly snatched victory from defeat when he punished Dan’s rashness. We agreed that had we continued playing, the Federals would soon have been rolled up by superior Secessionist numbers. It was a shame for Dan and Harry, who barely put a foot wrong until the march column/bridge incident. But somebody had to lose and they did so with good grace. Game 2: “More Troops? Where would you have me find more troops?” Game two was a two player clash between Chris’s Federals and Ian’s Confederates. Ian attacked Chris’s left with Dole’s brigade, while he marched Early’s division down the other flank, deploying his artillery to cover Blocher’s Knoll from the east while Gordon’s brigade attacked from the north east. I did think this would be a game-winning attack and the rebel guns did some serious damage to the defenders on the knoll. However, three factors conspired against a Secessionist win: Chris sent a regiment over Rock Creek to fire into the flank of the rebel artillery, which didn’t so much damage as distract it from it’s main purpose; Gordon’s Brigade took too many losses to carry Blocher’s Knoll on its own; and Dole’s brigade got itself annihilated in an unequal struggle against the stronger Federal Left. While losses were high on both sides, Ian’s crossed the line first and Chris took the win. So the Federals won again. As with the first refight, it was inevitable that the next assault would have succeeded, but in game terms, the initial attack had been too costly for the rebels. Ian observed that at game’s end he had Avery’s and Hays’ brigades still fresh, drawn up behind the artillery, while poor old Gordon had marched up Blocher’s Knoll on his own. Ian also reflected that he need not have pressed the assault by Dole against the Federal Left: he could have pinned Chris in place by standing off, ready to advance if the Federals depleted their left to support the right. As ever, both games were great fun (for me, at least!). I am glad to have dipped back into Longstreet and hope to have made some converts to these subtle and engaging rules.  The 2nd Silesians in the Coalition Centre SummarySoldiers of Napoleon provides a fast-moving and entertaining game. The cards pose tricky choices and have bags of period flavour. Our historical scenario gave moments of high excitement and a plausible outcome. Highly Recommended. DetailI recently bought Soldiers of Napoleon, the new card-moderated tactical rules by Warwick Kinrade, author of Battlegroup (and more besides). Five of us played our first game last week, using a scenario based on the fight for Markkleeberg during the Battle of Leipzig. This clash between Poles, French, Prussians and Russians seemed a good testing ground for the rules. The mechanics for movement, fire and melee are intuitive, straightforward and easy to learn. They hang together well, give good period flavour and on their own could have been the basis for a respectable IGO-YOUGO game. The card deck, however, takes things to another level. Every turn, each side receives a hand of cards linked to the number of Brigade or higher commanders on the table and players alternate card play until both run out. A card has three possible uses: to issue orders to a given number of units within a brigade; to rally units; or to play the special event that is described on the card. I’ve seen a couple of reviews that describe the rules at length so rather than repeat it all again, I’ll try to show how they affected our battle. I have put the Markkleeberg scenario here. I created it by following the game preparation procedure in the rules. The main Tactical Orders for both sides were chosen for them (Coalition attacking, Franco-Poles defending). The Order of Battle was fun to write because SoN doesn’t have standard unit sizes. A battalion or cavalry regiment can have between 2 and 6 stands, or roughly between 250 and 800 men. This suits the OoB for Markkleeberg well, as Helfreich’s 14th Corps was seriously understrength (so 3 stands per battalion), the Polish Cuirassiers only consisted of 2 squadrons/bases and the Prussian Landwehr battalions were numerous (but inexperienced). How the game playedWe played the scenario with two players per side. The Poles deployed their three brigades first, then the Allies set up in left echelon. Both sides had reserves off the table. The Russian 14th Corps advanced on the right; Coalition artillery in the centre bombarded the Polish hilltop position and the Prussian Foot screened Markkleeberg on the left. The Poles played a special event early on that allowed the Krakus lancers to advance far down the table and catch and destroy a Russian battalion in column (an incident that was only made possible by the special event: without it, the Russians would have had time to form square and fire at the threatening cavalry). This dislocated the Russian assault and bought time for the defenders, while the rest of Helfreich’s Corps formed square until the Krakusi retired. The Poles used another special event to bring in fire from the Grand Battery to their left rear. Phase 1 therefore gave the advantage to the defenders. In phase 2 the Russian assault got going again. A counter battery exchange in the centre went badly for the Poles and the Coalition artillery then whittled down the Vistula Regiment in the Polish centre as 14th Corps closed, supported by the Loubny Hussars. The French Reserve brigade arrived on the right and this, together with the Polish garrison of Markkleeberg, went forward to relieve pressure on the centre. Two Polish battalions chewed up a Prussian Landwehr battalion near the village and the Coalition left was now looking shaky. In response the Coalition played a special event to change the arrival location of their reserves to the Markkleeberg sector, which helped stabilise their left. In the final phase, the Coalition managed to shoot the Polish Division commander by playing a special event. The Russians then closed with the Polish centre and duffed it up enough to win the victory. The Love Child of Battlegroup and Longstreet?I love these rules! They do remind me of Longstreet, my (so far?) favourite rules for any period, which are also card-moderated and have a similar mixture of simple mechanisms and really challenging choices. Like Longstreet, SoN makes events possible that just don’t happen in many wargames, such as surprise attacks, missing ADCs, incoming damage from off-table batteries and stray bullets taking down senior officers. The sense of narrative and of history is really strong, which shouldn’t be a surprise from the author of Battlegroup. All involved in this game want to play again and we all took away some thoughts on how better to play the cards next time. SummaryThese are a great introduction to Ancients wargaming, especially if you want a fun game with not too many figures, They also offer a lot to the more experienced Ancients player: the mechanics are solid and you can increase army size for some truly satisfying big battles. Last week Harry, Dan and I played a game of Wars of the Republic by Eric Farrington, published by Osprey in their ‘blue’ series. Harry had picked them up after reading an encouraging review in Wargames Illustrated, along with his first instalment of 28mm figures for a Republican Roman Legion. While waiting for his 21st century miniatures to be painted, we used my 25mm Minifigs Romans from the 1970s. The rules are basing agnostic as all the factors, including losses, are dealt with at the unit level. The author describes using ten-figure units on individual bases but the photos throughout the rulebook are of some lovely Aventine Miniatures, mostly based in two ranks of four. My ancients are on 60mm wide bases, so we used two of these bases per unit, giving 8, 12 or 16 infantry and 6 or 8 cavalry figures depending on type. The only requirement is to be able to show when certain units are out of their optimal fighting formation, which we did by putting the bases out of kilter. The mechanics are mostly tried and tested, with shooting and combat resolved by throwing a number of dice, succeeding on 4s and above. Declining fighting power is represented by loss of Courage points. Morale is handled through discipline tests which, if failed, can cause a unit to waver, which worsens its fighting power and puts it out of formation, - particularly bad news for legionaries and phalangites. The stand-out feature of the rules for me is Commander’s Gaze, a pool of points that can be spent each turn to perform special actions, which include the adoption of optimal formations (e.g. legion and phalanx) and, perhaps controversially, the throwing of pila. How the game wentFor our first game, Harry gave us the battle of the Bagrades River from the first Punic War. Dan took the Romans while I had the Carthaginians, under the Spartan Xanthippus. Dan had a river at his back but the terrain was otherwise featureless, save a bit of undulating ground. Both armies conformed to the army list in the rulebook, which gave quite small armies: Dan had 8 units and I had 7. I’ll come back to army size later. Dan put his Cavalry on his left and his main infantry in a single line with velites in front. I had Punic cavalry on the right, Numidians on the left, elephants in the centre and the main infantry behind the elephants. The game moved smoothly and the result was certainly emphatic. After an initial, inconclusive clash between our main cavalry on one flank and some mostly ineffective javelin throwing by my Numidians on the other, attention focussed on the centre, where my elephants clashed with Dan’s velites, drawing both of our infantry lines into the fight thanks to the support rules. As this was a learning exercise, we rewound the action a couple of times, once we realised how the rules impact on play. For example, we learned that it isn’t sensible to support light infantry with heavy, since the heavies only contribute 2 dice to the outcome and are at risk of immediate destruction: when the elephants destroyed the velites facing them, this would have also removed the supporting hastati. We agreed to rerun the combat without the support of the hastati, - and to remember that it is far preferable to support heavies with lights! Our game ended with a Carthaginian victory, thanks above all to the elephants, who punched their way through the Roman centre with barely a scratch. First impressions: a lot of positives…There is a lot to like about Wars of the Republic. I especially enjoy the Commander’s Gaze system, which gives the players interesting choices and keeps both involved throughout the turn. The factors used to describe each troop type work together well and allow the game to reflect a broad range of troop types. The combat mechanism feels right for an ancient battle. A front line heavy infantry body is more likely to crumble under pressure than to break suddenly, so frontal clashes are liable to drag on unless/until one side’s flanks or rear are threatened. Then, once things start to go wrong, collapse can spread quite rapidly. All good stuff and great fun. 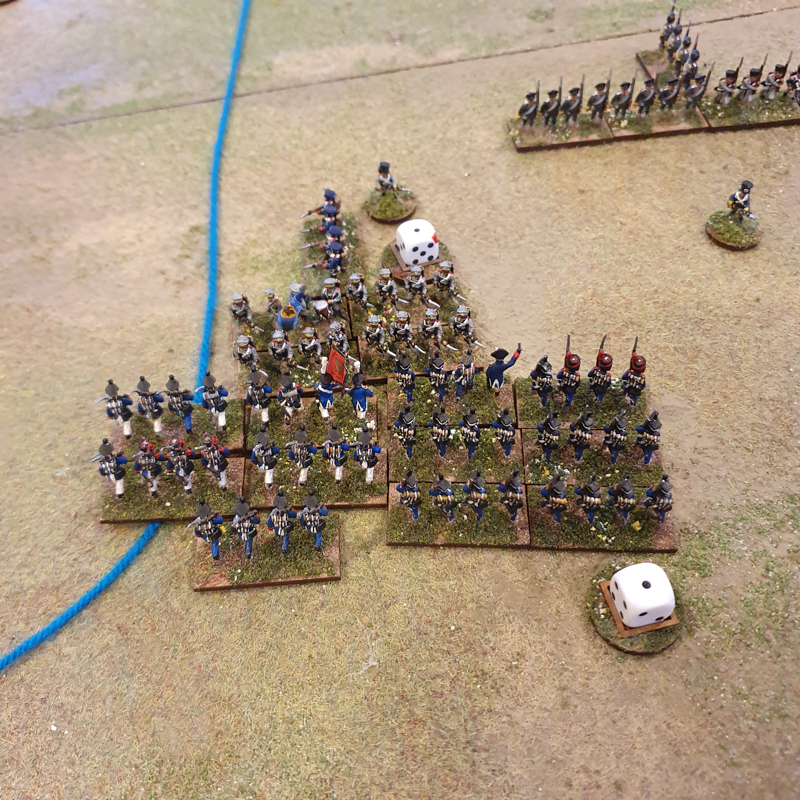 …and a few reservations. Can we fix it?The rules could be better laid out but that comes as standard with Osprey rules. For the price tag, I'll accept that. But I do have two main issues. First, the army lists. I have seen a few criticisms of these rules in hobby chatrooms and media for using too few figures. The author wants players to be able to fight ancient battles without having to collect masses of figures. I absolutely get the appeal of recreating biggish battles with small armies, both to those with less space and to attract people over from skirmish games like ‘Infamy! Infamy!’ or ‘SPQR’. It is certainly possible to have a fun game with 7 or 8 units in an army. However, it strikes me that a consequence of keeping army size small is that some support troop types take on disproportionate significance. For example, my one unit of slingers had a far bigger effect on the game than they would have had in history. Look at the armies in the the scenarios offered in the rulebook: they are far too small to give a convincing impression of history! My second reservation with the rules as written is with some of the unit statistics. Some units are over-, and some under-powered. Had we not made an in-game adjustment of the armour of Roman Equites, they would have been wiped out by the first hail of slingshots from my Balearic islanders. Also, I love my elephants but even I felt guilty that they were basically unstoppable, with no downsides to their use. Yes we can!Both the cramped army lists and occasional wonky unit stats can easily be fixed to satisfy self-important Ancients players like me. If unit minima and maxima in the army lists were adapted and recommended army sizes were increased, support troops could become a smaller proportion of the total and the emphasis would focus more properly on the troop types that really influenced the outcome of a battle. And unit stats can be fine-tuned by changing a factor here and there, without in any way breaking the game’s basic mechanics.
Why bother when so many other Ancient rules sets are available? Because these rules work very well as a game and are fun to play. In conclusion, I think they could become an ideal entry point into Ancients gaming. The other evening I laid on a game of Absolute Emperor at the Staines Wargames Club. I put together a scenario based on the Allied attack on the morning of the first day of the battle of Leipzig, 16 October 1813. It was deliberately a smallish game, as two players were new and the rest of us are still learning the rules. Ian and Paul led the Allies against Nick and Chris commanding the French. We used the house rules/clarifications that Chris and I had pulled together after our first two games. These don’t so much replace any published rules as clarify situations that the rules don’t directly address. I have uploaded the scenario here. The standard victory conditions were slightly modified by giving the Allies a bonus elan point for every town they take from the French during the game. How it played and some more thoughts about AETo cut a long story short, the Allies won, with the French line still intact at the end but withdrawn to near their baseline. These are my thoughts after our club night christening:
What next? Well, we could find another bit of Leipzig to refight but even I am feeling the need for a change from the Battle of Nations. I am thinking of an 1809 game, perhaps the Wagram scenario in the AE rulebook. I do have a soft spot for Austrians. I am also wondering about doubling the size of infantry and cavalry units, to reinforce the message that these are big formations.
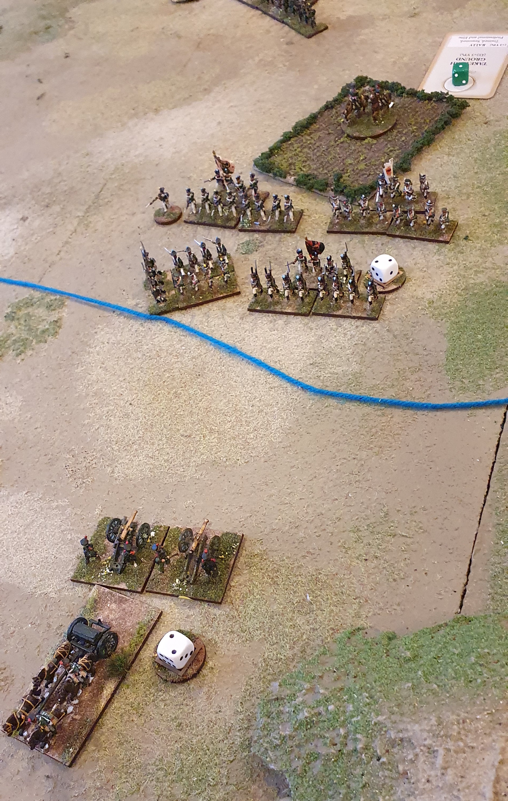
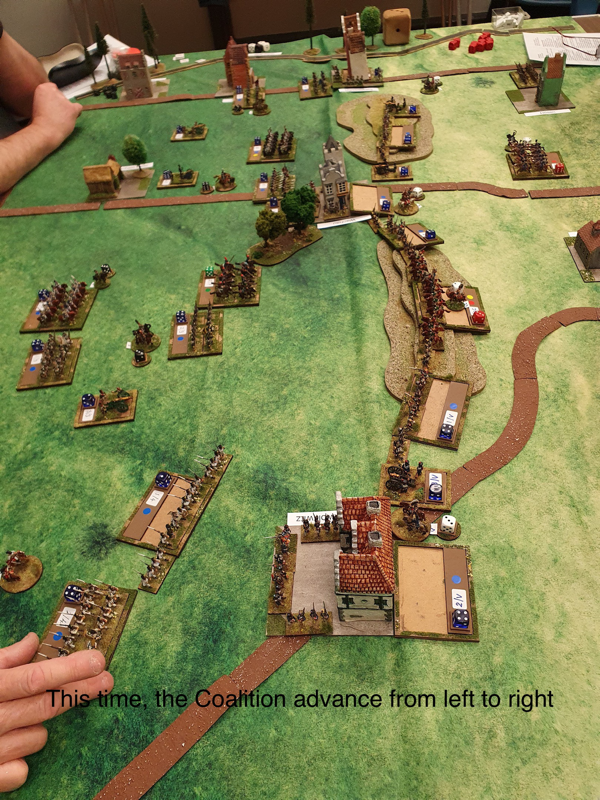
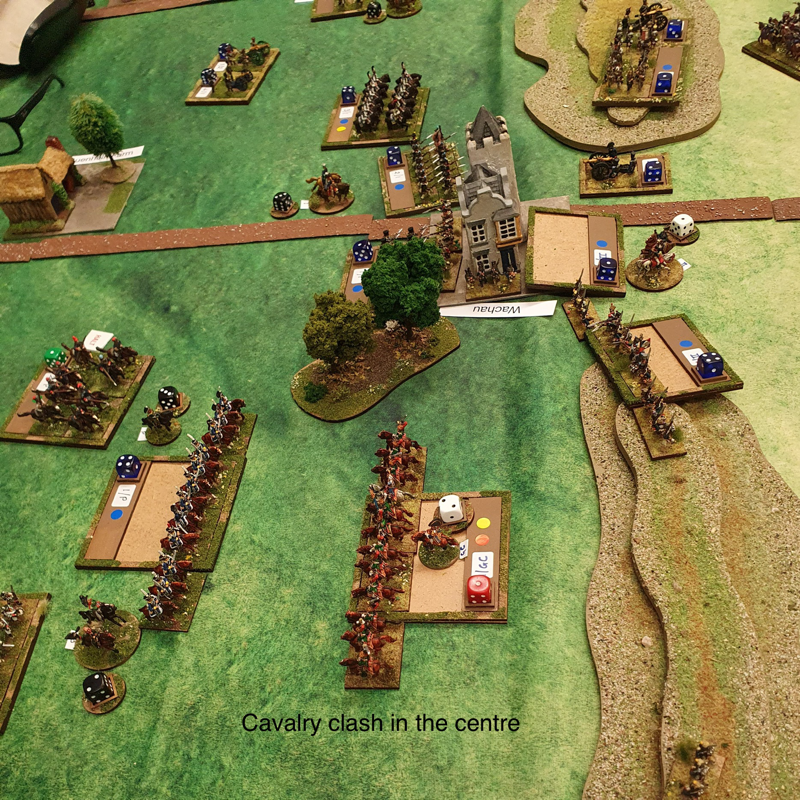
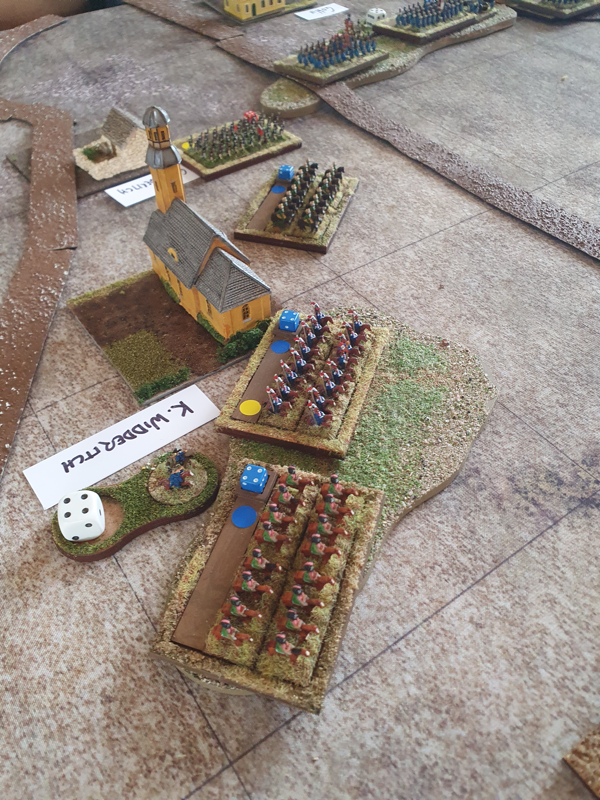
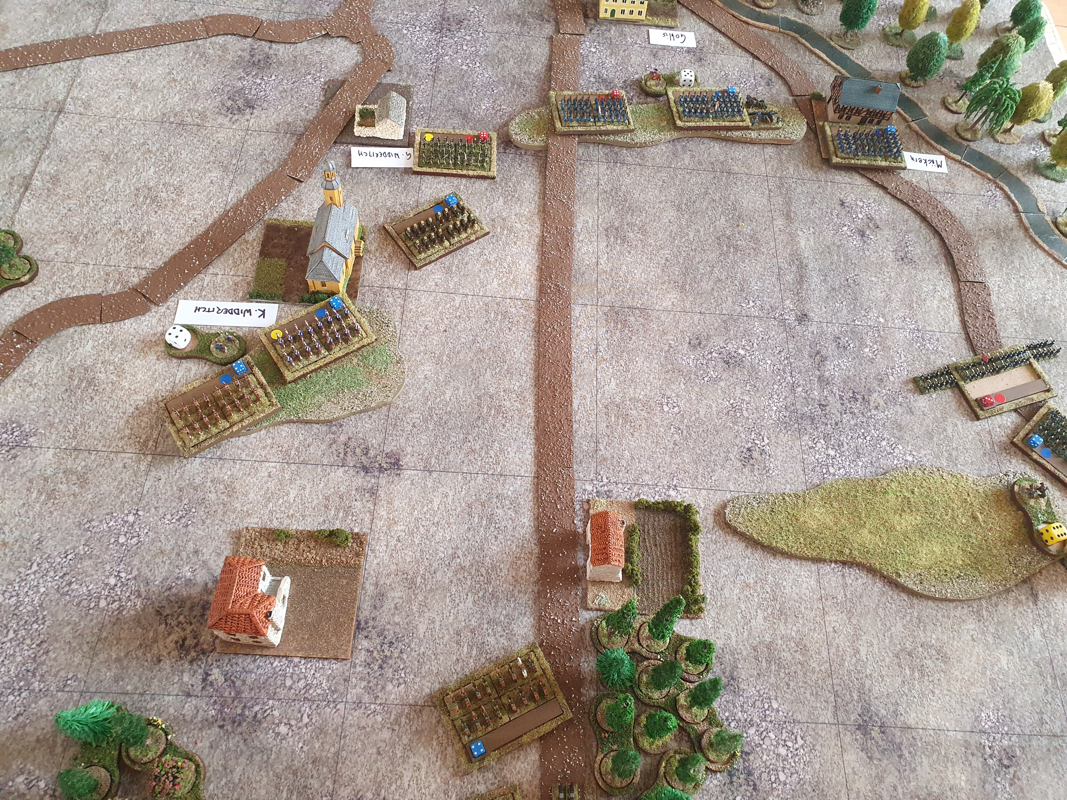
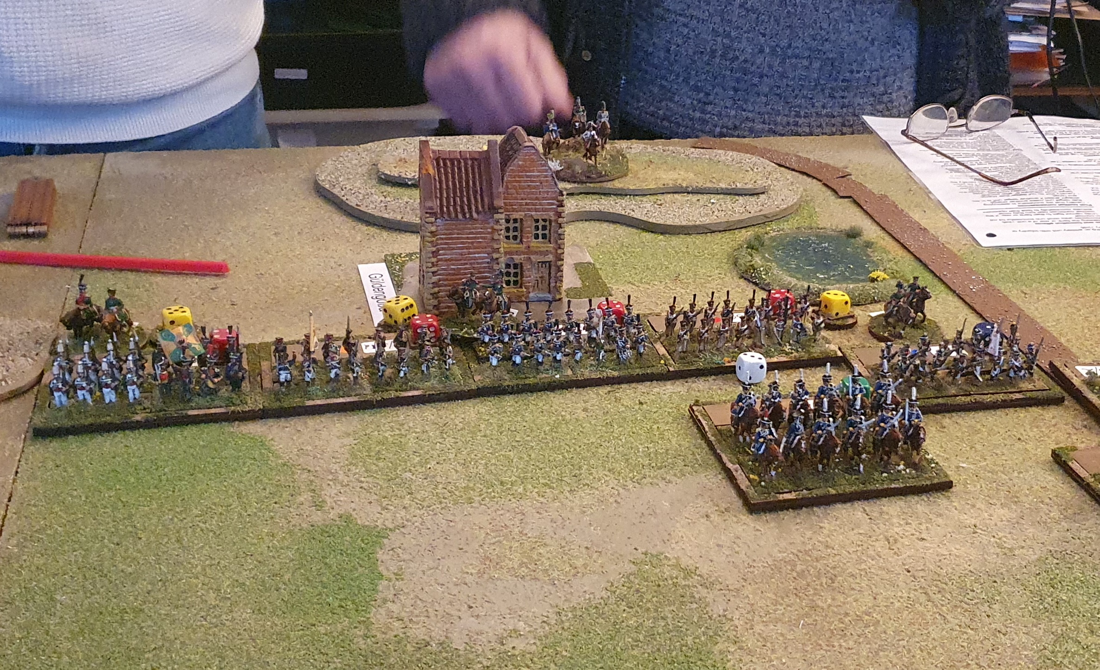
A quick game to sort out rules queriesThis week, Chris and I met to work through some of the questions that arose during our multiplayer Leipzig game on 23 January. As I mentioned in the report of that game in my previous blog post, the limited format of Osprey’s blue books means that cases will arise that the published rules don't cover. Easy to sort out in a one to one game but as we intend to play Absolute Emperor again with two or more players a side, we wanted to clarify how we will deal with them in future. So we sat down with our notes from the 23rd and played a game through as a workshop. Möckern: a tough little fight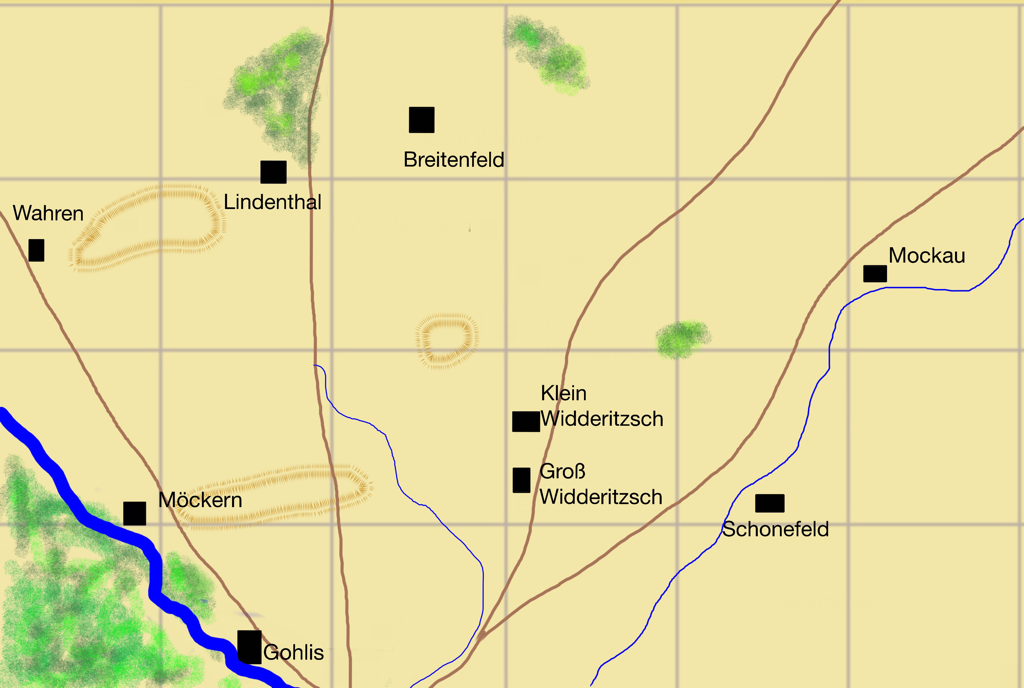 To give us an interesting situation I adapted a Blucher scenario for the combat at Möckern on 16 October 1813 for AE. This didn’t give that many more units per side than the introductory scenarios in the AE rulebook, though it did give an interesting asymmetry where the French had cavalry advantage while the Coalition had more infantry. Plus, I find a game based on a real engagement more, erm, ‘engaging’ than one that’s been made up. Chris took the role of Marshal Marmont, defending Möckern and the high ground beside it against my army of Yorck’s Prussians and Langeron’s Russians. See the scenario here. Although the aim was to create some situations where we could test or agree house rules, we actually had a tricky and challenging game. How the game playedChris set up his main line from Möckern in the west to beyond Klein Widderitzsch in the east. He had infantry on his left and mostly cavalry on the right. My Prussians advanced down the road from Wahren to Möckern and the advance guard, which was classified veteran as it included Grenadier battalions, assaulted the village. In the east, my Russians arrived between Breitenfeld and Lindenthal, to find that Chris had pushed his cavalry forward to threaten any advance beyond these villages. Meanwhile my further Prussian reinforcements started extending the Prussian line eastwards. The mid-game saw a steady grind in the fight for Möckern, in which I pulled back the advance guard as its strength nearly gave out, and fed in a fresh brigade to assault Chris’ unit in the village. Further east, my intended assault on his hilltop position was held up by effective artillery and infantry fire, which twice inflicted a Halt or worse result on the same Prussian unit. In retrospect I could have/should have spend some of Yorck’s elan to restore this unit’s forward momentum. At the point where two of my units were disordered by enemy fire, Chris launched a spoiling attack that swept one unit away and sent the other reeling backwards. In the same turn my assaut on Möckern village finally succeeded, but I had an embarrassing hole in my centre. Next turn, having more than done its job, Chris withdrew his army along the whole front, reasoning that his elan was now dangerously low and his cavalry in particular was close to breaking. We agreed that his aggressive forward defence had held up the Coalition advance sufficiently to give him the win. Some rules clarifications/amplificationsWe agreed various fiddly clarifications but these were our main house rules:
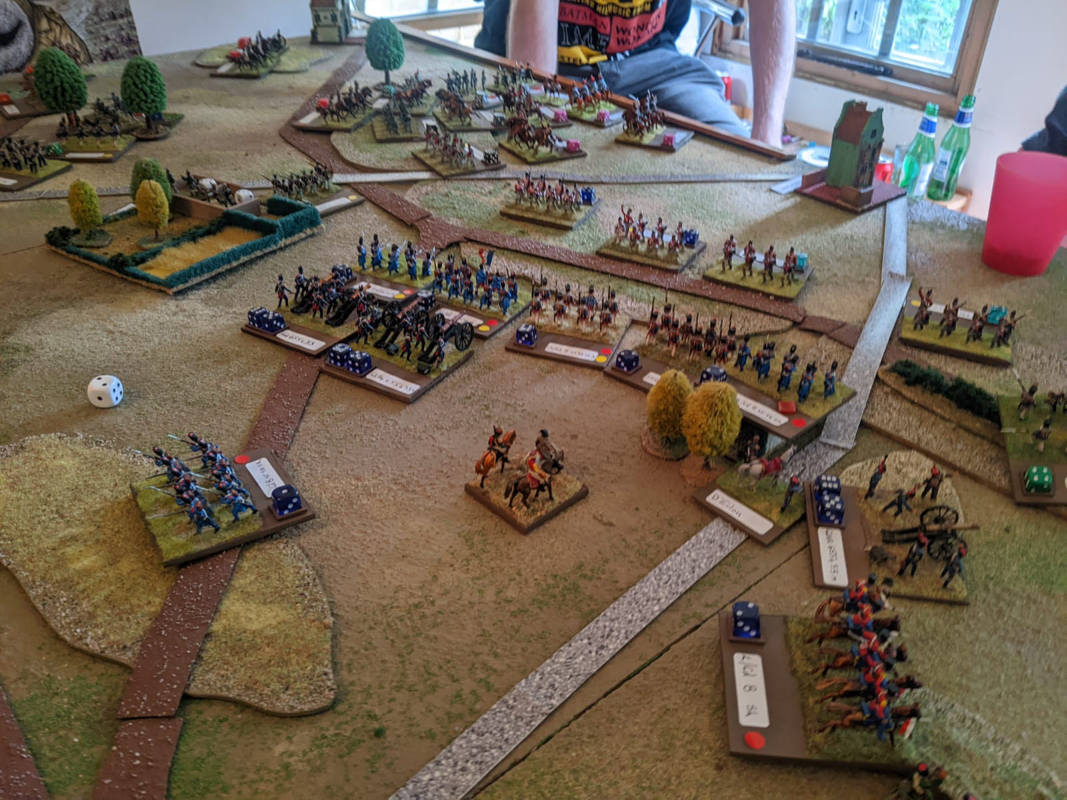
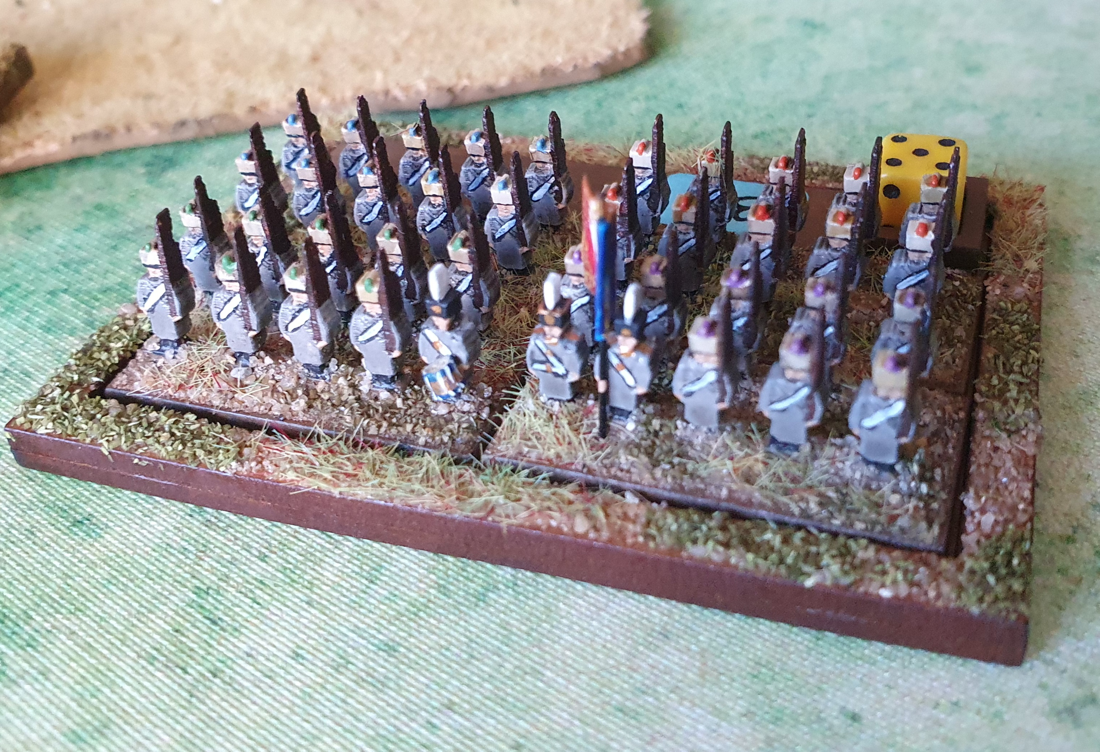
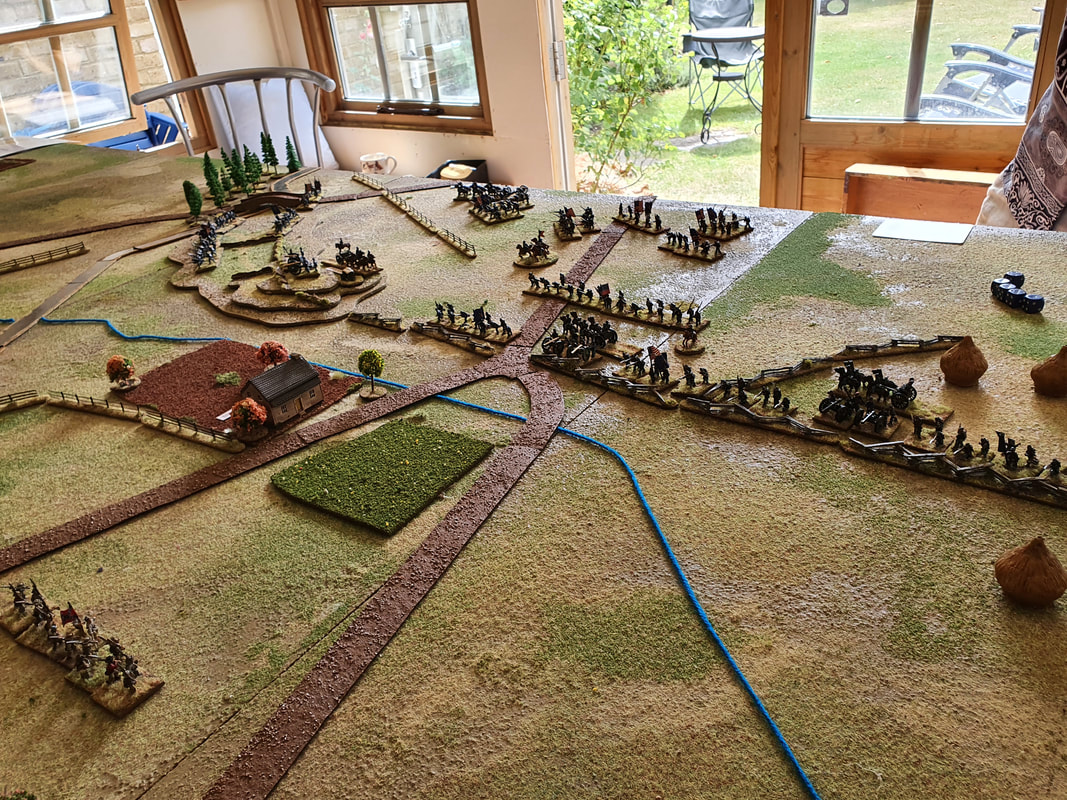
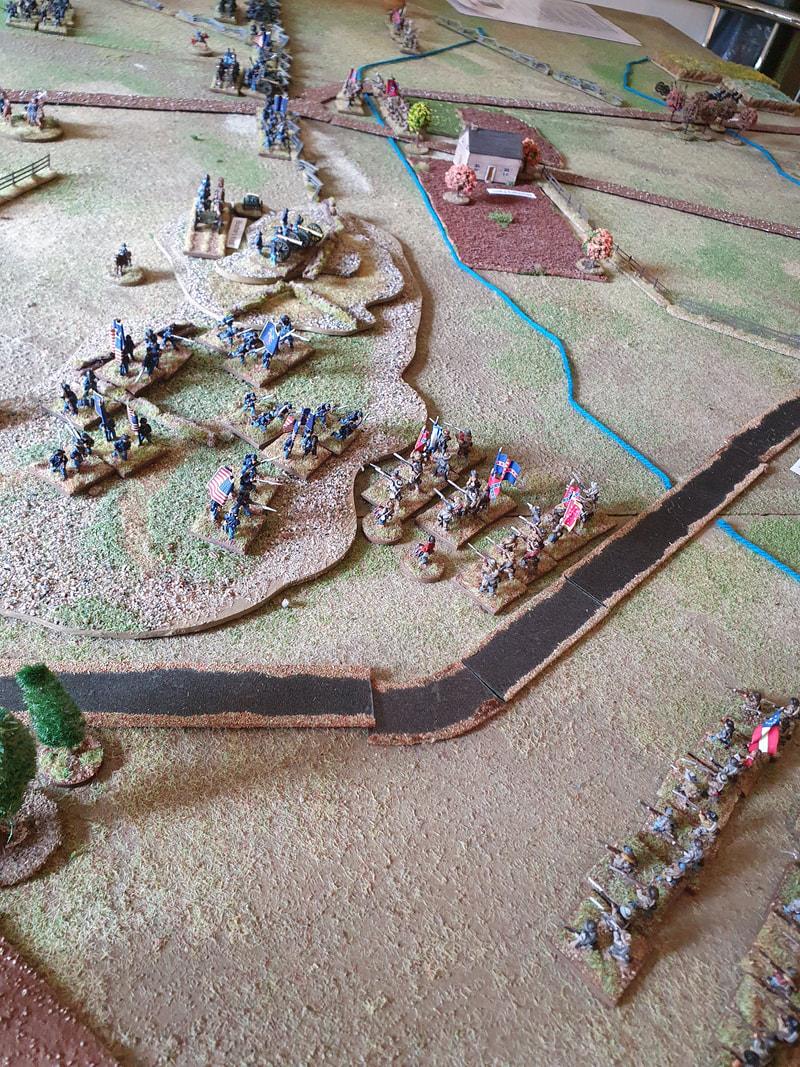
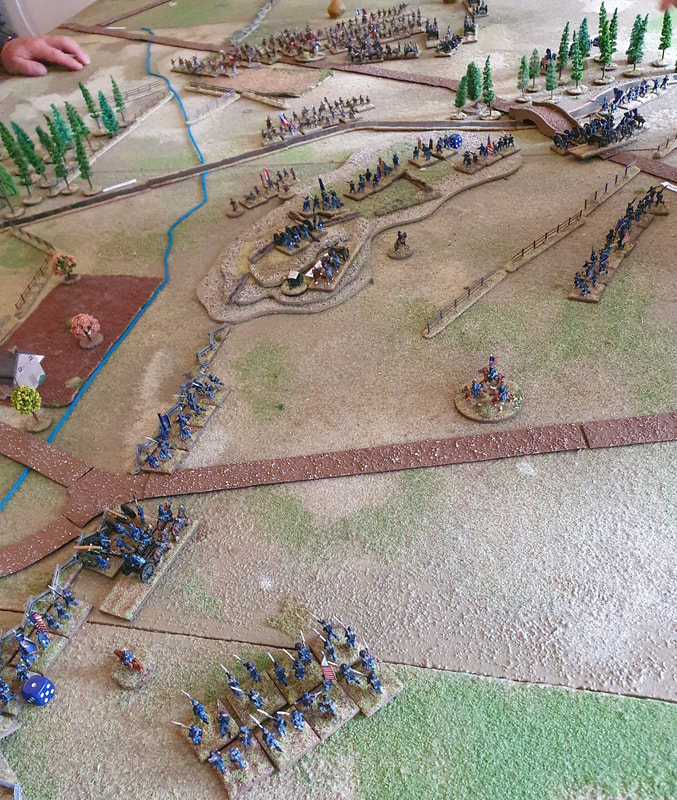
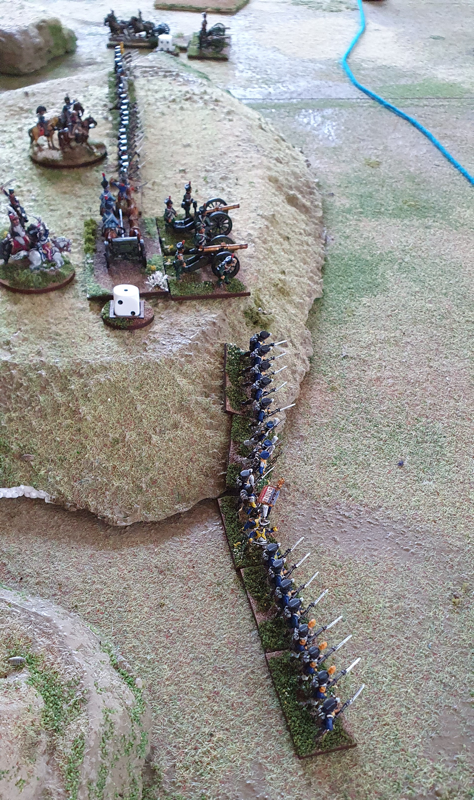
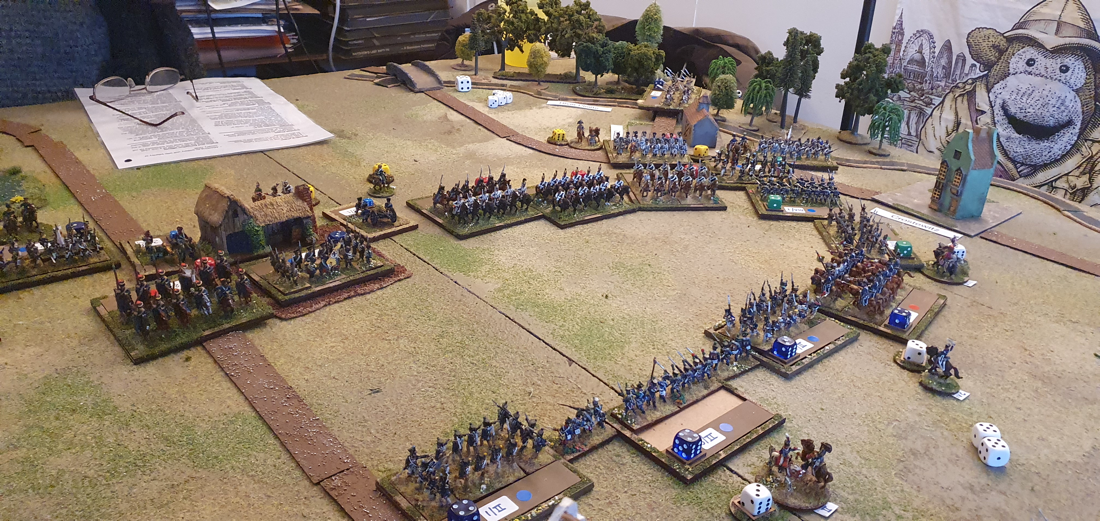
When we played AE with 15mm units, an infantry unit in line was 160mm wide so we used the standard AE movement and shooting distances. For this game, we used 6mm units which were 120mm wide in line. As this distance is 3/4 of the width of our 15s, we reduced all standard distances by a quarter. Thus, Infantry fire up to 3” instead of 4”, cavalry charge is 6” not 8” and so on. I am running a game at our club next Friday to try to attract more players. No doubt more questions will arise that we haven’t thought of yet! On 23 January eight of us gathered in the shed for a refight of Leipzig, 1813 - or rather, of the key confrontation on the first day of the battle. The catalyst was Ian, who was back on a short break from South Korea. We were also able to tempt Matt back from Shrewsbury, less epic than coming from Seoul but still an achievement. The rules we used were Absolute Emperor by Boyd Bruce, published in the Osprey blue wargames series. The basic unit in these rules is the division, which makes sense for recreating a battle as big as Leipzig. More on these rules later but the headline message is that the players picked them up quickly and enjoyed playing them, which gets them a big tick at the outset. Setting up the gameYou can find the scenario here. I’ve been playing games based on the battles around Leipzig since the mid-90s when I bought the first scenario book for Napoleon’s Battles, published at the time by Avalon Hill. I based the collection of my 15mm armies on the Leipzig order of battle and picked up as many histories of 1813 as I coud find. My German friend Clemens and I worked our way around the Leipzig compass, playing every scenario in the Avalon Hill book. Scott Bowden and George Nafziger both released books about the armies of 1813 and these led us to amend the Avalon Hill OOBs. After a break of a few years, in about 2010 I came back to Napoleonics and of course to Leipzig. In recent years we’ve played scenarios for Blücher and Lasalle and now, for Absolute Emperor. Writing the Orders of Battle for AE was quite straightforward. The main challenge was to decide how to represent the historical Russian formations, which had shrunk drastically over months of campaigning. I decided to focus on overall strength rather than formal organisation. For example, one of the Russian ‘‘Corps’ is represented by only one infantry unit. So apart from the 5th Guards and 3rd Grenadier Corps, the Russians in this scenario are quite thin on the ground. I also decided to start the game around the middle of 16 October, when several units on the table had already been fighting since the morning. I wanted to focus on the crucial struggle between Napoleon’s elite formations and the Coalition reserves, in which the French tried and failed to break the enemy centre. You’ll see that the scenario requires certain units to reduce their starting strength by 1 or 2 points, to reflect the losses they had suffered in the morning’s fighting. This wrinkle worked well and gave added punch to the fresh units on both sides that arrived from reserve. 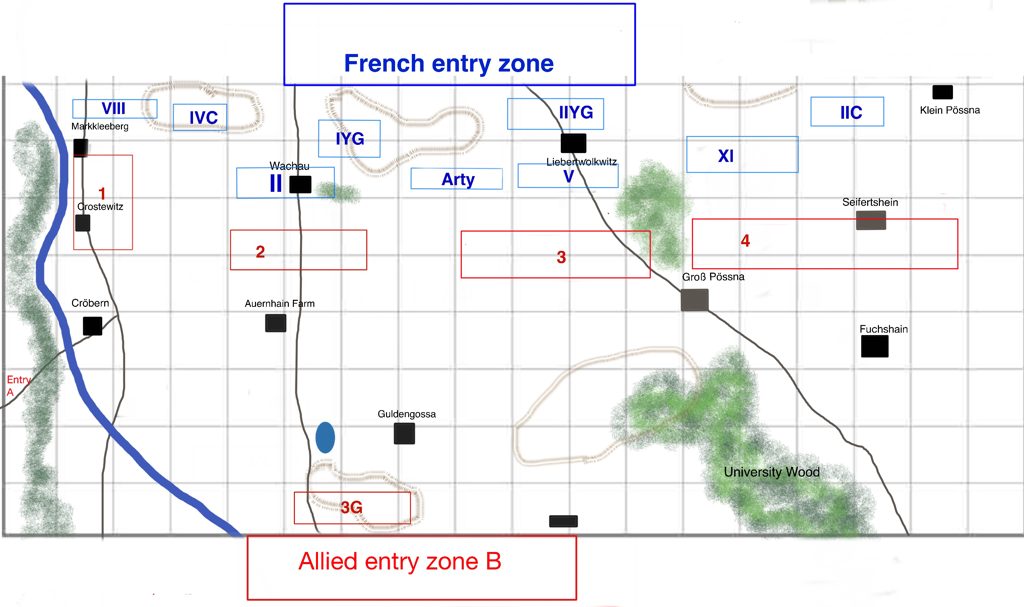 The map. The city of Leipzig is behind the French table edge. One square is 6 inches. Pre-game preparationsThe 15mm figures are all mine, mostly Old Glory, Battle Honours, Essex and Minifigs painted in the late 90s with an injection of new models in 2020-22. They are based for Lasalle but I use movement trays for Blucher and now Absolute Emperor. You might notice the infantry stands are one rank deep. Old habits die hard: having started out on Napoleonics with Bruce Quarrie’s rules, I still have an aversion to two deep stands as to my eye, they make a line formation look too deep when playing units as battalions. I know this is not the majority view nowadays (and my 6mm Napoleonics are based two deep..). The strip at the back of each unit has a sticker with its ID; a coloured sticker to show its starting quality; a dice cell to track losses and, where necessary, other stickers to show specific traits like heavy cavalry. The quality colours are orange (elite), red (veteran), blue (seasoned), green (conscript), yellow (exhausted conscript). A fresh unit with no losses begins with a die of the appropriate colour, showing 4 life points. When these run out, a die of the ‘exhausted’ colour is substituted. We found this a great help in play. I added a few house rules, partly to give the players more choices. Army and Wing commanders were given elan points that they could use, either directly to support fighting units, or to top up the elan of subordinate commanders. I also decided not to use the written order counters, instead telling players that they must obey the orders of the player in command. In our experience, a multi-player game brings enough of its own command friction. I’ll certainly use order counters for one-to-one games in future. What happened in the gameThe French side had 4 players and the Coalition 3. Matt was Napoleon; Paul took II, V and VIII Corps; Nick was Murat with the reserve cavalry and Harry led XI and II Cavalry Corps. For the Coalition, Chris as Schwarzenberg took columns 1 and 2 and the Austrian reserves; Ian led columns 3 and 4; and Dan was Constantine with the Russian and Prussian reserves. This led to Harry and Ian locking horns on the Eastern flank; Paul and Chris in the West; and Matt facing Dan in the centre. Nick, meanwhile, seemed to have horsemen in every sector of the field at one point or another. He had no difficulty channeling his inner Murat! The first stage of the game looked good for Napoleon and saw Harry push Ian back from his starting positions, while Paul headed down the river Pleisse. The Coalition lost several units in the east and the 3rd column was wiped out before the French had lost a single division. However, when the Coalition reinforcements arrived the confrontation became more equal. The Coalition were ready to give ground where necessary as all they needed to do was survive, whereas the French could only win by pressing their attack. The losses evened out somewhat when the Austrian reserves and 2nd Cavalry Corps took on Paul’s Poles and French in the west. In the centre the French Guard cavalry, V Corps and the Young Guard attacked the Prussian guard infantry who were, understandably, very tough to crack. In the west a minor disaster struck the French as Prussian heavy cavalry destroyed a French cavalry division and charged on into a march column of… Old Guard infantry! This division had been sent to bolster VIII Corps (as indeed happened in history) but was caught en route and in the worst possible formation. Soon after, we agreed that the French were not going to achieve the breakthrough they needed and that Napoleon would decide, as he did on the day, to call off the attack to avoid further losses. We totalled the remaining elan and found that the French had 3 more points than the Coalition. Technically this meant a marginal win for Napoleon but by such a small margin that we agreed it was at best a winning draw. Our day had run from 11.30 to about 4.30 with a break for lunch and we had got through 8 turns. Post match AnalysisAt the point we stopped playing, I asked the players to leave the units in place. I’m glad I did. I had spent the game at the eastern end of the table, so could only see the centre and eastern sectors from a distance. My general impression was that apart from some cavalry charges, the French centre and right had not gained much ground. But after the game, when I walked round the table, it was clear that the French centre had advanced further forward than I’d realised. There was admittedly a solid wall of Russian Grenadiers and Guards in front of it but the French, in turn, still had a force of Young Guard and heavy cavalry capable of engaging them. In short, the French came closer to breaking through the Coalition lines than I had thought. Could the French players have done better than their historical counterparts? It’s hard to see how, unless the Coalition reserves had been delayed in reaching the field (a possibility in the scenario, but an unlikely one). There wasn’t space for clever outflanking manoeuvres and the French attacks down the centre ran into too much tough opposition. There were some satisfying examples of game imitating history, for example when the Austrian reserves arrived to forestall the French right, while the Russian Guard Light Cavalry gave the French cavalry a bloody nose under the eyes of the Coalition monarchs. The biggest divergence from history was the retreat of Ian/Klenau’s troops in the east, effectively falling back on the big University Wood to form a refused flank. Ian did well in the face of a determined advance by Harry, supported by a couple of Nick’s cavalry divisions. The players picked up the important elements of the rules quickly and soon got stuck into the game. As always, they played with good humour and tolerance. From the noise levels and general chatter, I think they enjoyed themselves. I certainly did! Absolute Emperor: post-game rules reviewA multi-player wargame can really test a rules set. As mentioned above, the players picked up the basics of AE quickly and were soon struggling with each other rather than with the rules. The mechanics made sense and there were no outcomes that seemed illogical or ahistorical. A couple of situations arose for which we couldn’t find a rule, but we agreed a way forward and made a note to clarify the picture afterwards. We also agreed that we would happily play with these rules again. So on the general level, I am very impressed. If you are used to complete, watertight rules with extensive explanations and provisions for every possible situation, you may be surprised by Absolute Emperor. The full mechanics of some advanced rules are not explained. I have in mind particularly the rules for the Grand Battery and for elite formations. This shouldn’t put you off however. The Osprey rule book format is too restrictive to allow full explanations of every rules wrinkle, - but as these rules cost around a third of most available rule sets, I don’t mind joining some of the dots myself. The author runs a Facebook page for Absolute Emperor where he answers queries promptly. Also (and I love this!) he encourages players to adapt the rules to suit their interpretation of history. I admire a writer who is sufficiently confident in the core mechanics of his rules to be relaxed about individuals tinkering at the edges for their own satisfaction. There are subtleties behind Absolute Emperor that might not be apparent from just reading the rulebook. An example is the Built Up Area, where I had wondered before our game if a garrison might be ejected too easily. In practice, we discovered that the BUA rules make it difficult to evict a garrison that has not been softened up or is not outnumbered, but neither is a garrison impossible to crack (as is the case with some rules). I reckon Boyd Bruce has got the balance here right. In short, I would encourage anybody who has a copy of the rules to play them before forming a judgement on them, since so much more makes sense when you work things through on the tabletop. So AE will be back on the table again for more big battles. The only question now is which battle to choose. |
Archives
November 2023
Categories
All
|


 RSS Feed