Tales from a Wargame Shed
  • Home
  • About me
  • Blog
  • Periods played
    • Napoleonics
    • 17th Century Eastern Europe
    • ACW
    • Ancients
  • Scenarios
    • American Civil War scenarios
    • 17th Century scenarios
    • Napoleonic scenarios
    • WW2 Maquis campaign

Blog

​

Back to Macpherson's Ridge, 1863: History Repeating

6/2/2016

0 Comments

 
On 3 February Ian, Matt and I fought a three player Longstreet game, using a rebooted version of the Macpherson's Ridge scenario (available here). I have slightly amended the set-up to allow the action to hot up sooner than previously. I have also tidied up the map. I played the Confederates, while Ian and Matt each led a Union brigade. Figures are 12mm by Kallistra.
Picture
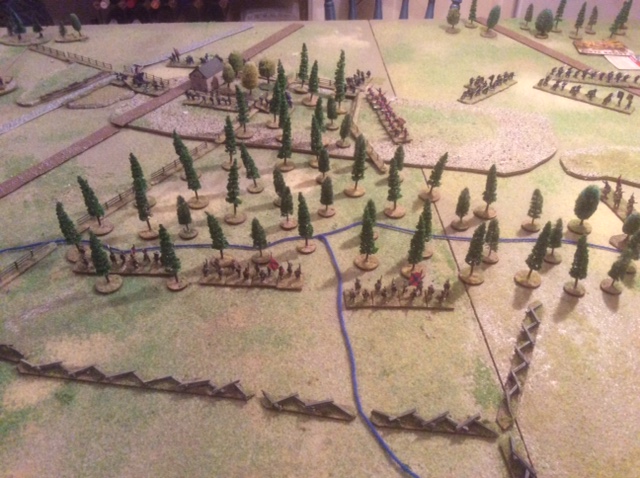
Archer reaches Willoughby Run as the Iron Brigade arrive in the distance
The game begins as Buford's cavalry retires through the advancing 1st Division. Archer, on the Confederate right, raced the Iron Brigade to the ridge and just reached the crest first. Davis on the left assaulted Oak Hill on the Union right and his eager recruits piled straight into Cutler's position, with mixed results. One regiment bowled over the opposition and then routed an Iron Brigade regiment in column that was marching to reinforce Cutler. The other regiment was held by the Federals and quickly started losing bases. Even so, in the middle game the balance of losses was markedly in favour of the rebels.
Picture
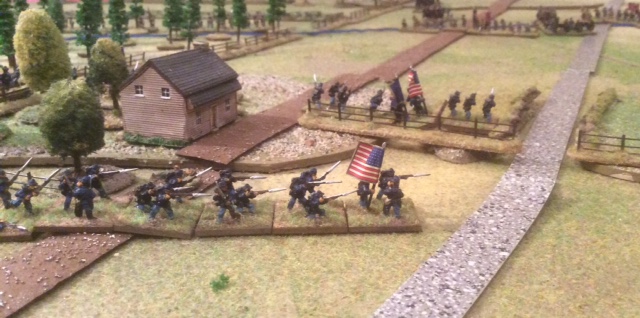
Wadsworth's last regiment rushes to reinforce Oak Hill. This unlucky unit is about to be swept away while still in column.
The situation changed conclusively over the last two turns. First, the Iron Brigade assaulted Archer and while this was tough, they had the better of the combats. Then the Federals played the 'Couldn't hit an elephant' card, rolling a 6 and so completely denying the Rebels a turn. In their next turn the Iron brigade continued their attack and the Confederates hit Break point. Losses at the end of the game were 25 Federals and 29 Confederates. It was another great game in which the Elephant card was played at an ideal moment. Ian had been holding it since his very first replenish and he timed its use perfectly.
Picture
High watermark for Archer: his brigade didn't make it beyond Macpherson's Ridge.
0 Comments


Leave a Reply.

      Enter your email address to subscribe to blog updates

    Subscribe to blog alerts

    Archives

    October 2020
    September 2020
    August 2020
    July 2020
    June 2020
    May 2020
    April 2020
    March 2020
    February 2020
    January 2020
    December 2019
    October 2019
    September 2019
    July 2019
    June 2019
    May 2019
    April 2019
    March 2019
    January 2019
    November 2018
    October 2018
    September 2018
    August 2018
    July 2018
    June 2018
    May 2018
    March 2018
    February 2018
    January 2018
    November 2017
    October 2017
    September 2017
    August 2017
    June 2017
    April 2017
    March 2017
    January 2017
    December 2016
    November 2016
    October 2016
    September 2016
    August 2016
    July 2016
    June 2016
    May 2016
    April 2016
    March 2016
    February 2016
    January 2016
    December 2015
    November 2015
    October 2015
    September 2015
    August 2015
    July 2015

    Categories

    All
    ACW
    ADLG
    Ancients
    Battlegroup
    Battle Report
    Blucher
    Bolt Action
    Chain Of Command
    Eastern Renaissance
    Epic 40K
    For King And Parliament
    Games Workshop
    General
    Honour Games
    Lasalle
    Longstreet
    Modelling
    Napoleonics
    Pickett’s Charge
    Polish Armies
    Rules Review
    Scenarios
    Shenandoah
    Space Hulk
    Sword And Spear
    Tercios
    To The Strongest
    Wargame Campaign
    Warhammer
    Warhammer 40K
    What A Tanker
    World War Two

    RSS Feed

General rules

The Map

The map has the following features:
  1. Named towns (large dot)
  2. Named villages (small dot)
  3. Numbered farms (spotted dot)
  4. Forest hexes. Each patch of forest is lettered for identification purposes.
  5. Main roads (dark brown)
  6. Minor roads (tan)
  7. Rivers (blue)
  8. Railway line (black)
  9. Open hexes. Although ‘open’, these still represent farmland with fields and hedges, streams and ditches.

Hex rows are labelled with letters. Individual hexes are identified by counting away from the left of the row containing the letter (including part hexes). Thus, La Redoute is in hex E7; Saint Michel de Livet is in hex J3.

Assets


Each player has various assets, including fighting men and women, vehicles, technical resources and bases. As the campaign is under way at present I am not listing all of these on the website yet. But examples include
  • German infantry section with Opel lorry
  • Osttruppe section
  • Active Maquis cell
  • Sleeping Maquis cell
  • Arms cache
  • Safe house
  • Etc.

Issuing orders

Every turn, each player receives a briefing on events in the previous turn, along with one or more tasks for the turn ahead.

A turn is not a fixed period of time but an episode in which something happens. Each turn, the players will receive a briefing on the situation and should then issue orders to their assets to allow them to deal with the current challenge. Play is similar to a Dungeons and Dragons approach: they will not be constrained by mechanical rules although these exist in the umpire’s set. The umpire will try to carry out the players’ instructions and will report the outcome at the end of the turn.

That said, the players are given some guidelines:
  • Lorries can reach anywhere on the map using the road net. Their passengers can then disembark and move on foot. I will presume that lorry-borne units will return to base at the end of the turn unless a player orders them to stay in another village or town. The gas powered lorries risk breaking down but otherwise are the same as the Opel lorries.
  • The Steyr heavy car and kübelwagen can reach anywhere on the map, not just on the road net.
  • Troops on foot may walk up to 4 open hexes, either from their base or from the point where a vehicle has transported them. I will presume they will return to base at the end of the turn unless a player orders them to stay in another hex (troops on foot can bivouac in non-urban hexes).
  • The tank can travel up to 12 hexes in a turn and will end the turn where it has been sent (ie it won’t return to base at turn’s end). It derives no benefit from roads.
  • Players may issue contingency orders, for example to lie in ambush or to look out for a signal and then take another action..
  • Home
  • About me
  • Blog
  • Periods played
    • Napoleonics
    • 17th Century Eastern Europe
    • ACW
    • Ancients
  • Scenarios
    • American Civil War scenarios
    • 17th Century scenarios
    • Napoleonic scenarios
    • WW2 Maquis campaign