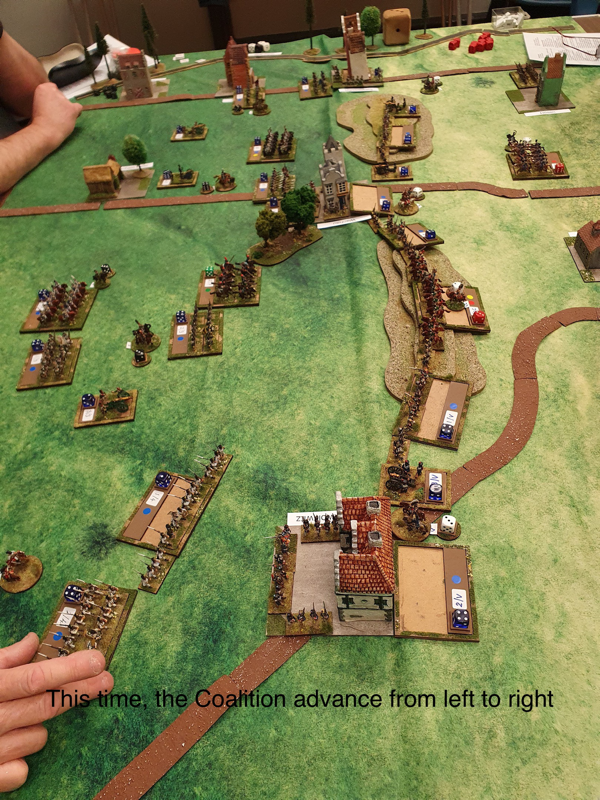
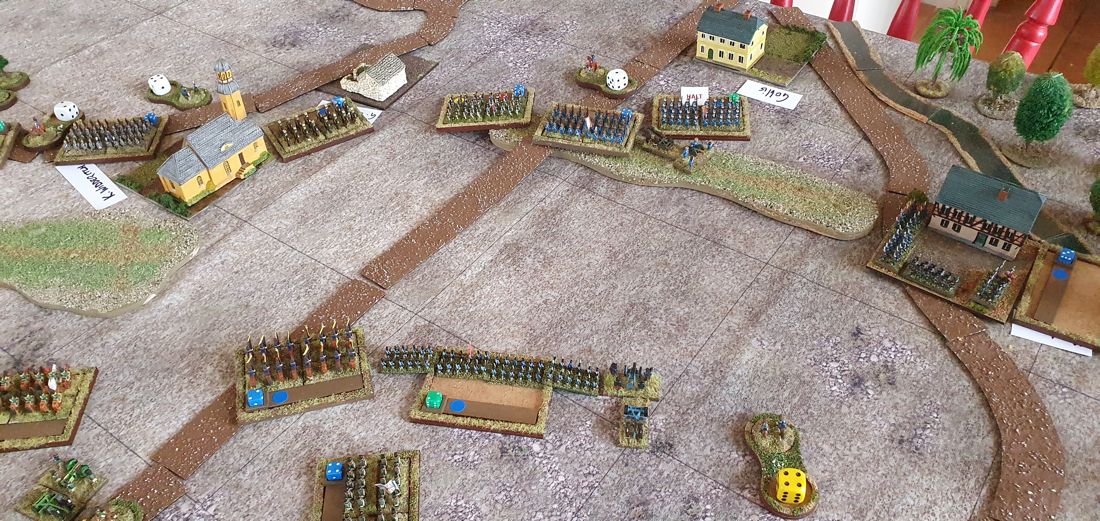
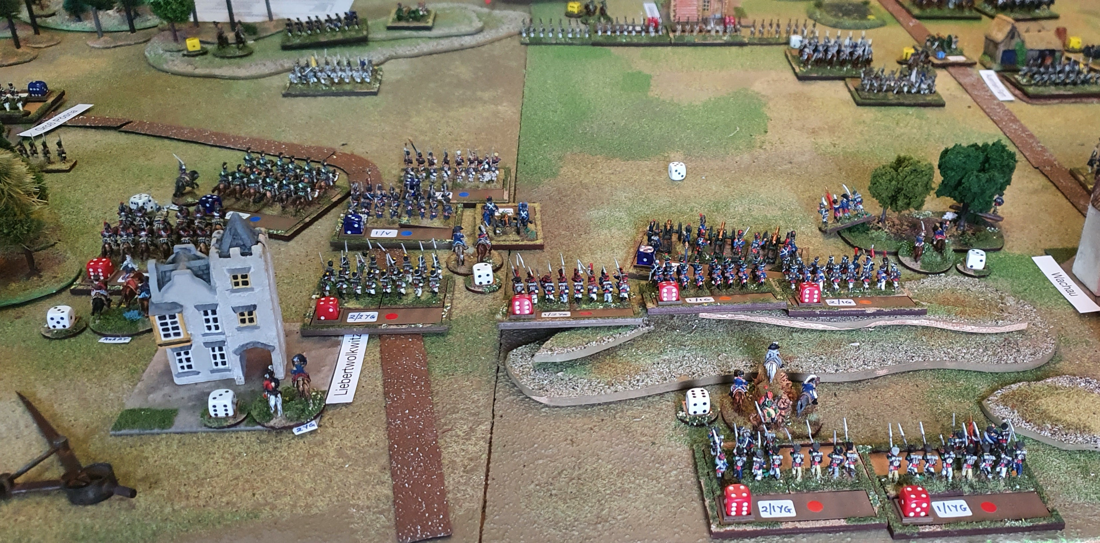
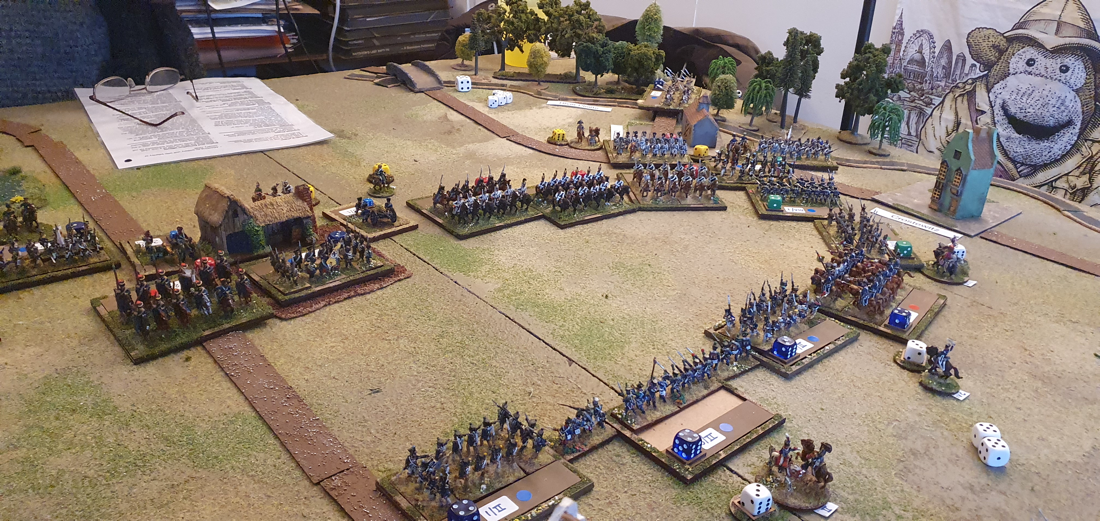
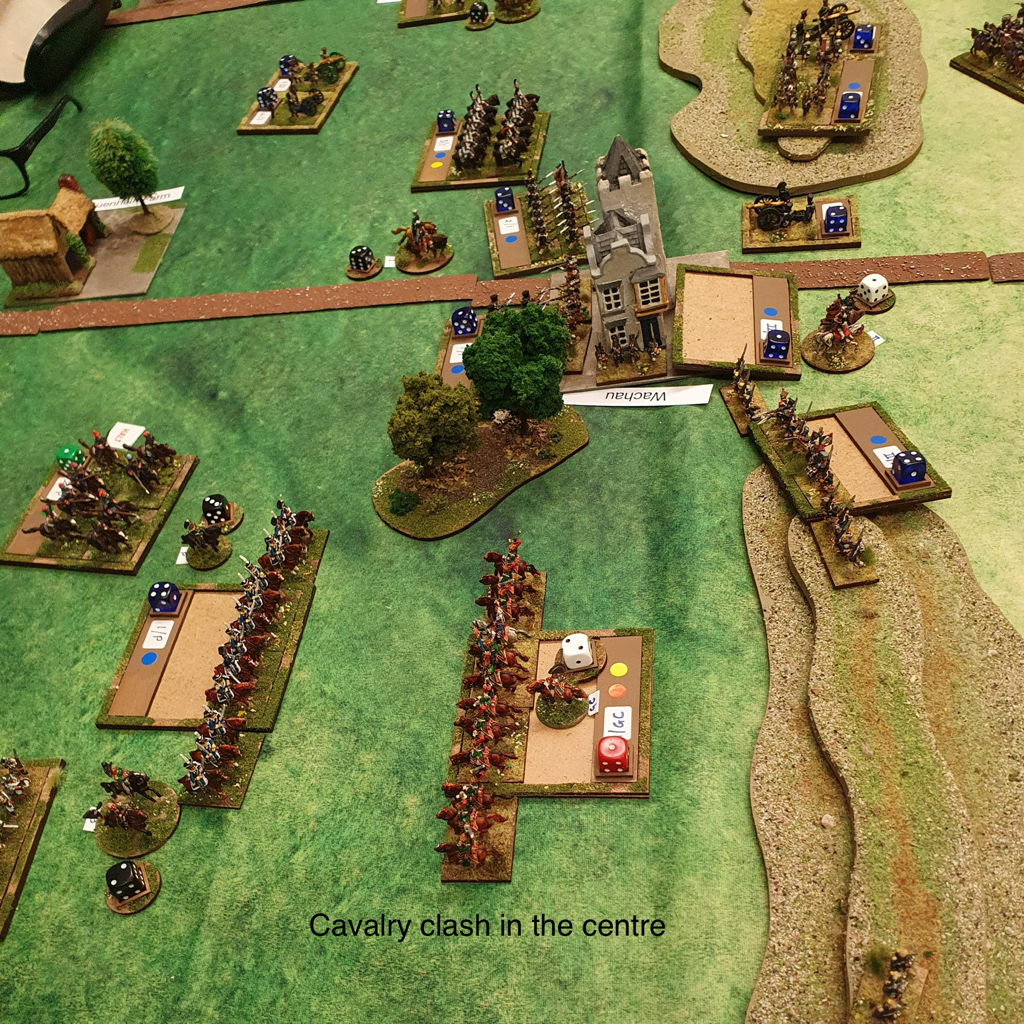
 The 2nd Silesians in the Coalition Centre SummarySoldiers of Napoleon provides a fast-moving and entertaining game. The cards pose tricky choices and have bags of period flavour. Our historical scenario gave moments of high excitement and a plausible outcome. Highly Recommended. DetailI recently bought Soldiers of Napoleon, the new card-moderated tactical rules by Warwick Kinrade, author of Battlegroup (and more besides). Five of us played our first game last week, using a scenario based on the fight for Markkleeberg during the Battle of Leipzig. This clash between Poles, French, Prussians and Russians seemed a good testing ground for the rules. The mechanics for movement, fire and melee are intuitive, straightforward and easy to learn. They hang together well, give good period flavour and on their own could have been the basis for a respectable IGO-YOUGO game. The card deck, however, takes things to another level. Every turn, each side receives a hand of cards linked to the number of Brigade or higher commanders on the table and players alternate card play until both run out. A card has three possible uses: to issue orders to a given number of units within a brigade; to rally units; or to play the special event that is described on the card. I’ve seen a couple of reviews that describe the rules at length so rather than repeat it all again, I’ll try to show how they affected our battle. I have put the Markkleeberg scenario here. I created it by following the game preparation procedure in the rules. The main Tactical Orders for both sides were chosen for them (Coalition attacking, Franco-Poles defending). The Order of Battle was fun to write because SoN doesn’t have standard unit sizes. A battalion or cavalry regiment can have between 2 and 6 stands, or roughly between 250 and 800 men. This suits the OoB for Markkleeberg well, as Helfreich’s 14th Corps was seriously understrength (so 3 stands per battalion), the Polish Cuirassiers only consisted of 2 squadrons/bases and the Prussian Landwehr battalions were numerous (but inexperienced). How the game playedWe played the scenario with two players per side. The Poles deployed their three brigades first, then the Allies set up in left echelon. Both sides had reserves off the table. The Russian 14th Corps advanced on the right; Coalition artillery in the centre bombarded the Polish hilltop position and the Prussian Foot screened Markkleeberg on the left. The Poles played a special event early on that allowed the Krakus lancers to advance far down the table and catch and destroy a Russian battalion in column (an incident that was only made possible by the special event: without it, the Russians would have had time to form square and fire at the threatening cavalry). This dislocated the Russian assault and bought time for the defenders, while the rest of Helfreich’s Corps formed square until the Krakusi retired. The Poles used another special event to bring in fire from the Grand Battery to their left rear. Phase 1 therefore gave the advantage to the defenders. In phase 2 the Russian assault got going again. A counter battery exchange in the centre went badly for the Poles and the Coalition artillery then whittled down the Vistula Regiment in the Polish centre as 14th Corps closed, supported by the Loubny Hussars. The French Reserve brigade arrived on the right and this, together with the Polish garrison of Markkleeberg, went forward to relieve pressure on the centre. Two Polish battalions chewed up a Prussian Landwehr battalion near the village and the Coalition left was now looking shaky. In response the Coalition played a special event to change the arrival location of their reserves to the Markkleeberg sector, which helped stabilise their left. In the final phase, the Coalition managed to shoot the Polish Division commander by playing a special event. The Russians then closed with the Polish centre and duffed it up enough to win the victory. The Love Child of Battlegroup and Longstreet?I love these rules! They do remind me of Longstreet, my (so far?) favourite rules for any period, which are also card-moderated and have a similar mixture of simple mechanisms and really challenging choices. Like Longstreet, SoN makes events possible that just don’t happen in many wargames, such as surprise attacks, missing ADCs, incoming damage from off-table batteries and stray bullets taking down senior officers. The sense of narrative and of history is really strong, which shouldn’t be a surprise from the author of Battlegroup. All involved in this game want to play again and we all took away some thoughts on how better to play the cards next time.
0 Comments
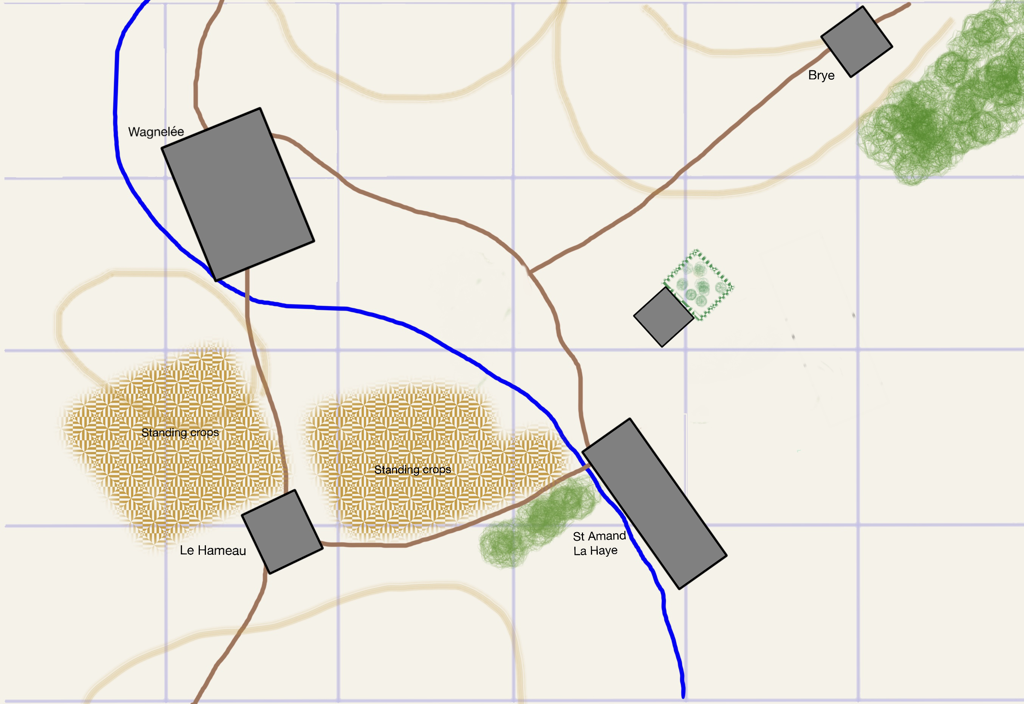
I have written a new scenario for Sam Mustafa’s Lasalle, based on the actions of Girard’s 7th Division at the battle of Ligny. Separated from II Corps, Girard was attached to Vandamme’s III Corps for the assault on the Prussian right flank, anchored on a string of villages along the Ligne brook. At the height of the fighting Girard was mortally wounded. The scenario covers the episode where Girard, having taken the village of Saint Amand La Haye, was counterattacked from the front and left flank. I chose this point in the action because the points values of the two sides at this point almost exactly match the standard weighted scenario in the rules, so 300 points of Prussians attacking 240 points of French. We havent played it yet so I can’t vouch for how it plays, but hope to do so in a month or so. The scenario can be found on the Napoleonic scenarios page here. 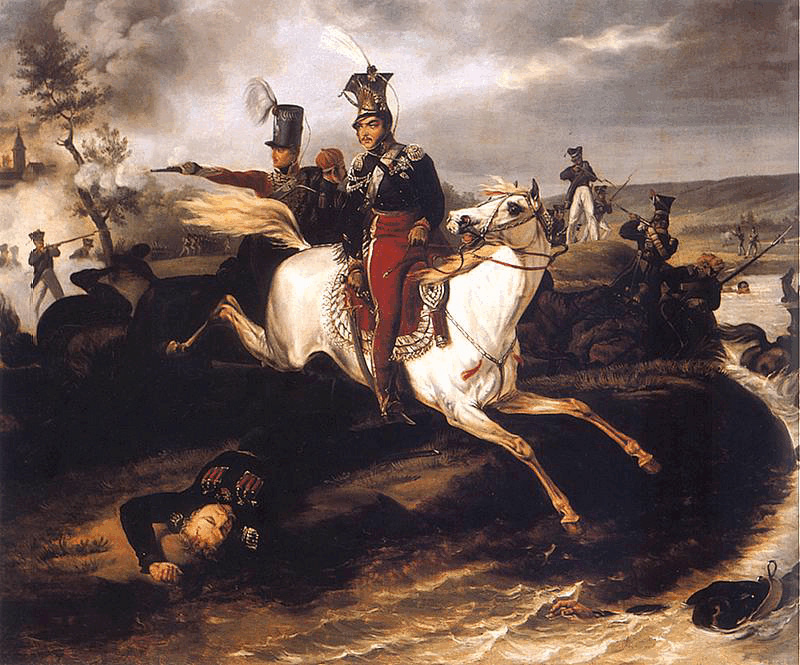 The other evening I laid on a game of Absolute Emperor at the Staines Wargames Club. I put together a scenario based on the Allied attack on the morning of the first day of the battle of Leipzig, 16 October 1813. It was deliberately a smallish game, as two players were new and the rest of us are still learning the rules. Ian and Paul led the Allies against Nick and Chris commanding the French. We used the house rules/clarifications that Chris and I had pulled together after our first two games. These don’t so much replace any published rules as clarify situations that the rules don’t directly address. I have uploaded the scenario here. The standard victory conditions were slightly modified by giving the Allies a bonus elan point for every town they take from the French during the game. How it played and some more thoughts about AETo cut a long story short, the Allies won, with the French line still intact at the end but withdrawn to near their baseline. These are my thoughts after our club night christening:
What next? Well, we could find another bit of Leipzig to refight but even I am feeling the need for a change from the Battle of Nations. I am thinking of an 1809 game, perhaps the Wagram scenario in the AE rulebook. I do have a soft spot for Austrians. I am also wondering about doubling the size of infantry and cavalry units, to reinforce the message that these are big formations.
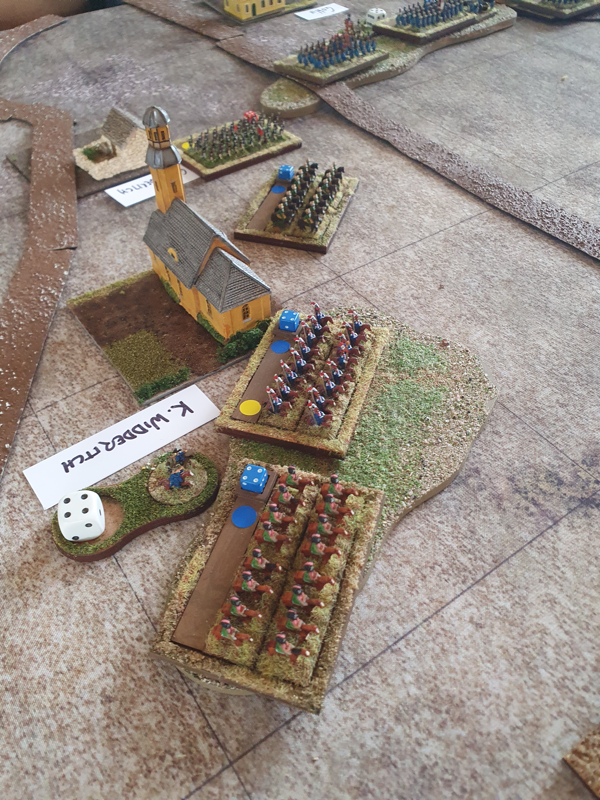
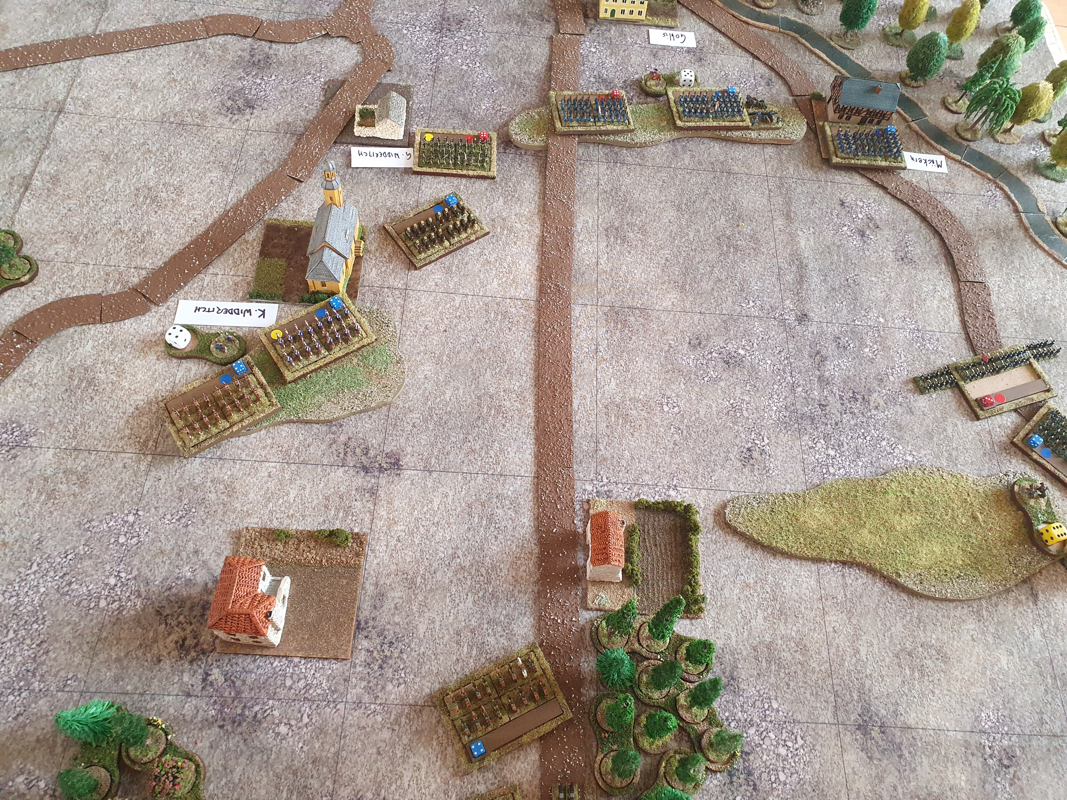
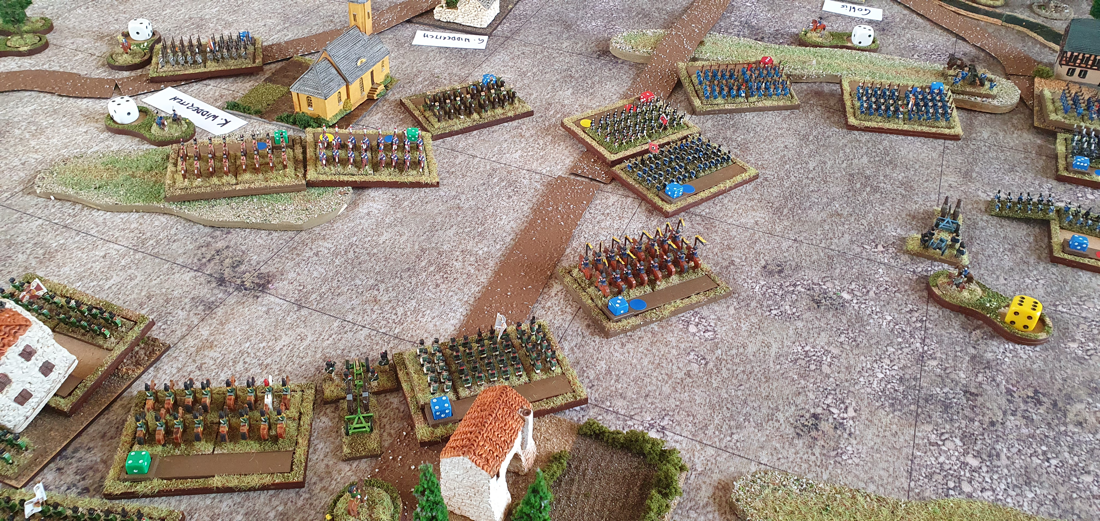
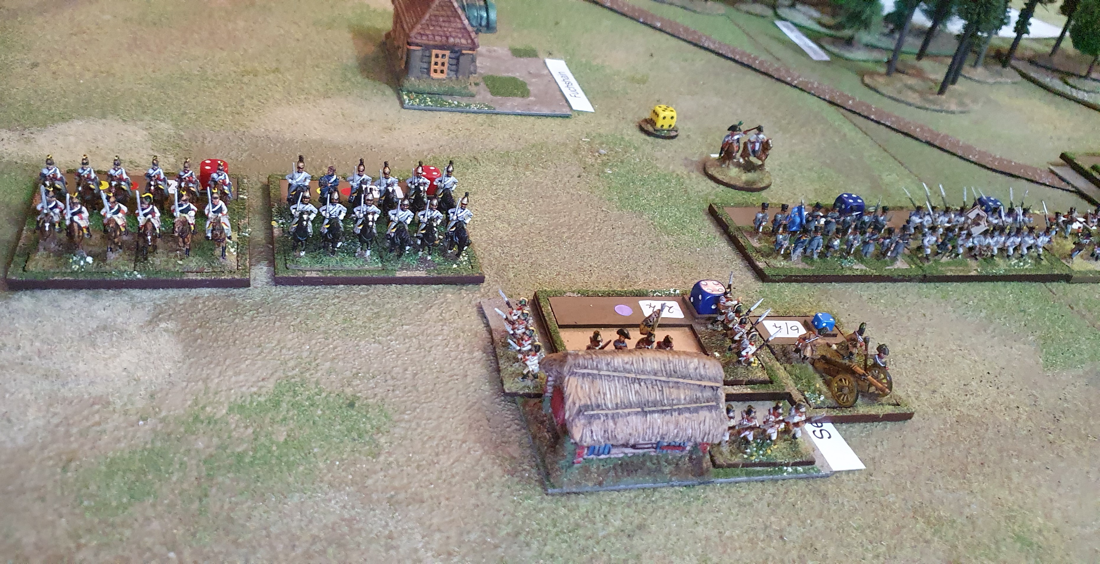
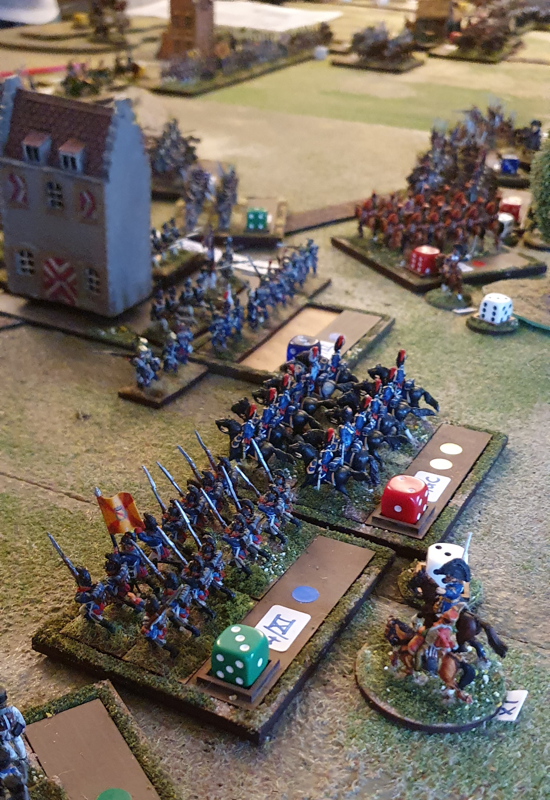
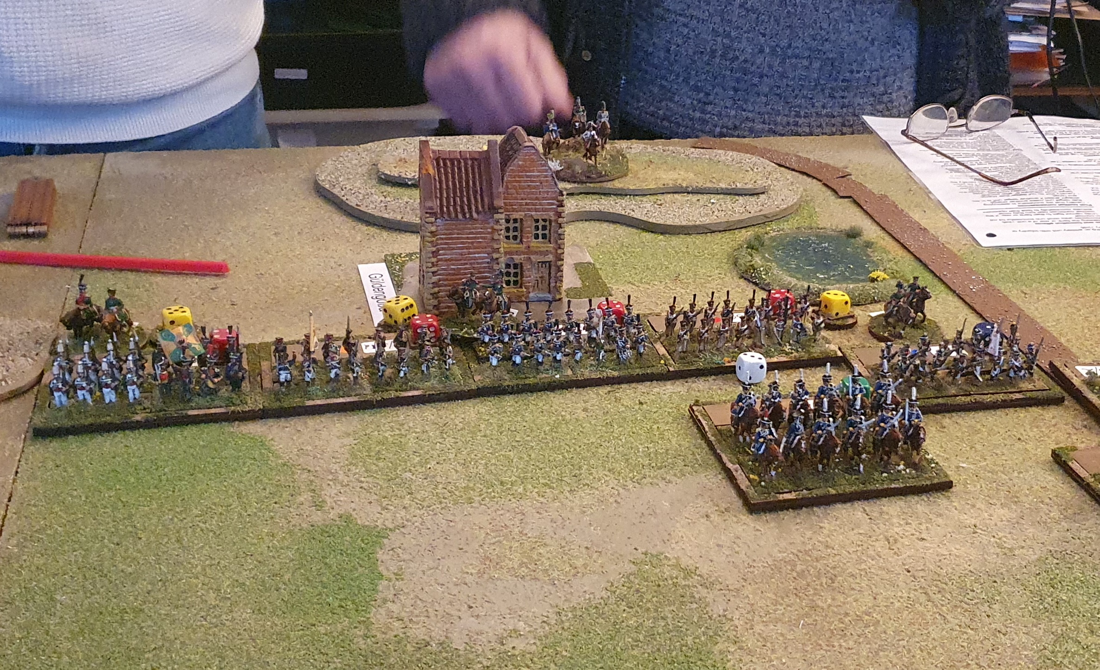
A quick game to sort out rules queriesThis week, Chris and I met to work through some of the questions that arose during our multiplayer Leipzig game on 23 January. As I mentioned in the report of that game in my previous blog post, the limited format of Osprey’s blue books means that cases will arise that the published rules don't cover. Easy to sort out in a one to one game but as we intend to play Absolute Emperor again with two or more players a side, we wanted to clarify how we will deal with them in future. So we sat down with our notes from the 23rd and played a game through as a workshop. Möckern: a tough little fight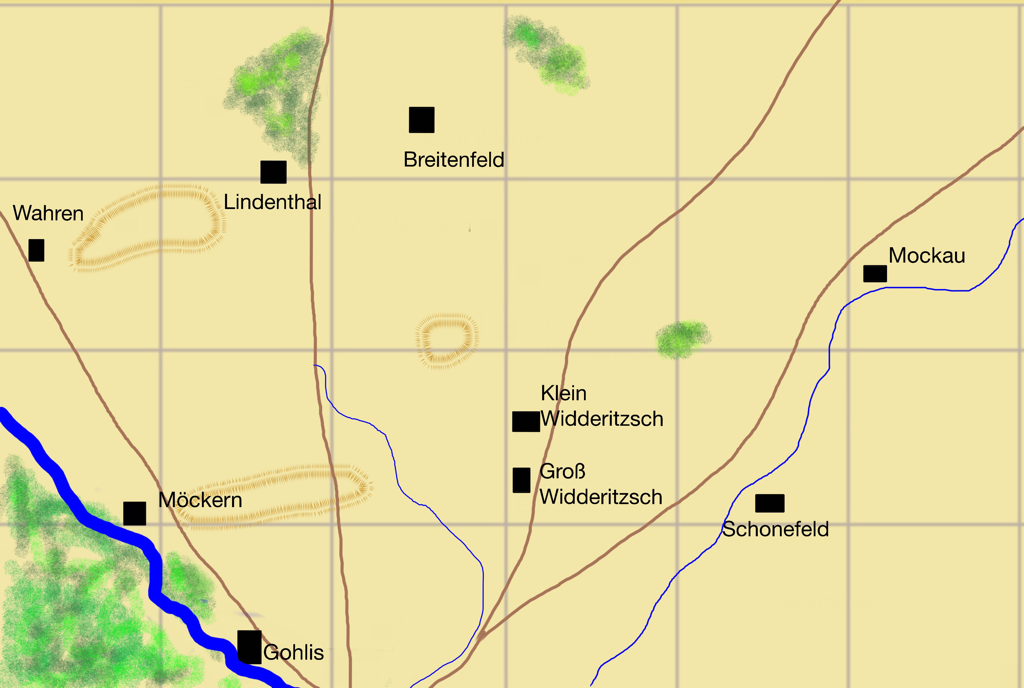 To give us an interesting situation I adapted a Blucher scenario for the combat at Möckern on 16 October 1813 for AE. This didn’t give that many more units per side than the introductory scenarios in the AE rulebook, though it did give an interesting asymmetry where the French had cavalry advantage while the Coalition had more infantry. Plus, I find a game based on a real engagement more, erm, ‘engaging’ than one that’s been made up. Chris took the role of Marshal Marmont, defending Möckern and the high ground beside it against my army of Yorck’s Prussians and Langeron’s Russians. See the scenario here. Although the aim was to create some situations where we could test or agree house rules, we actually had a tricky and challenging game. How the game playedChris set up his main line from Möckern in the west to beyond Klein Widderitzsch in the east. He had infantry on his left and mostly cavalry on the right. My Prussians advanced down the road from Wahren to Möckern and the advance guard, which was classified veteran as it included Grenadier battalions, assaulted the village. In the east, my Russians arrived between Breitenfeld and Lindenthal, to find that Chris had pushed his cavalry forward to threaten any advance beyond these villages. Meanwhile my further Prussian reinforcements started extending the Prussian line eastwards. The mid-game saw a steady grind in the fight for Möckern, in which I pulled back the advance guard as its strength nearly gave out, and fed in a fresh brigade to assault Chris’ unit in the village. Further east, my intended assault on his hilltop position was held up by effective artillery and infantry fire, which twice inflicted a Halt or worse result on the same Prussian unit. In retrospect I could have/should have spend some of Yorck’s elan to restore this unit’s forward momentum. At the point where two of my units were disordered by enemy fire, Chris launched a spoiling attack that swept one unit away and sent the other reeling backwards. In the same turn my assaut on Möckern village finally succeeded, but I had an embarrassing hole in my centre. Next turn, having more than done its job, Chris withdrew his army along the whole front, reasoning that his elan was now dangerously low and his cavalry in particular was close to breaking. We agreed that his aggressive forward defence had held up the Coalition advance sufficiently to give him the win. Some rules clarifications/amplificationsWe agreed various fiddly clarifications but these were our main house rules:
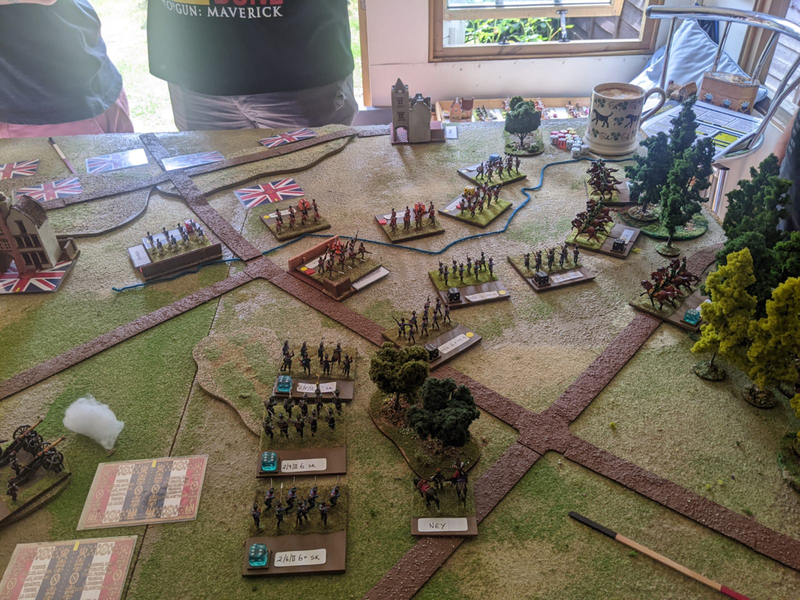
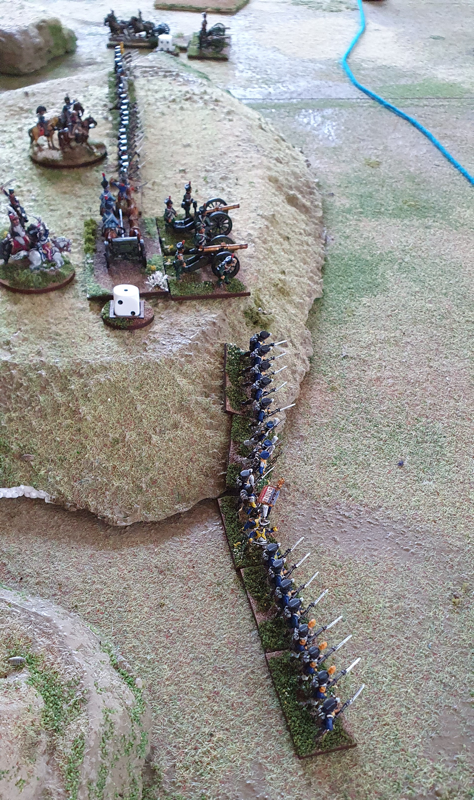
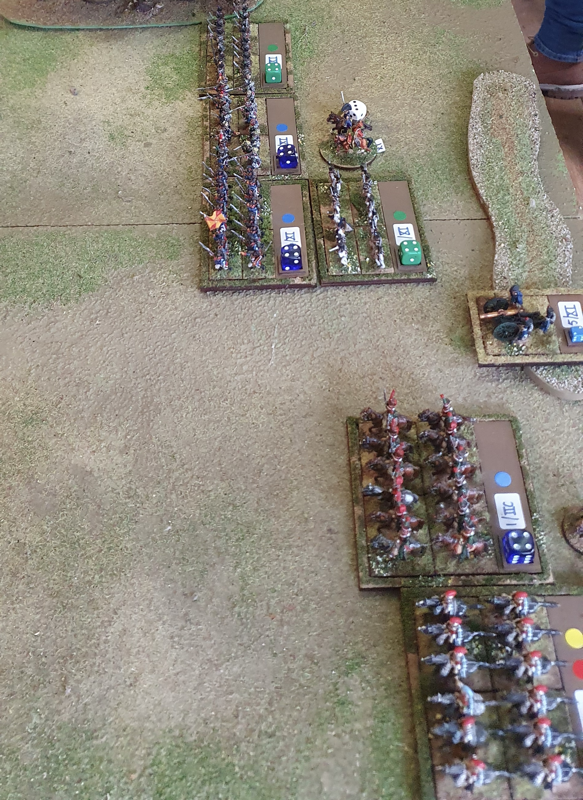
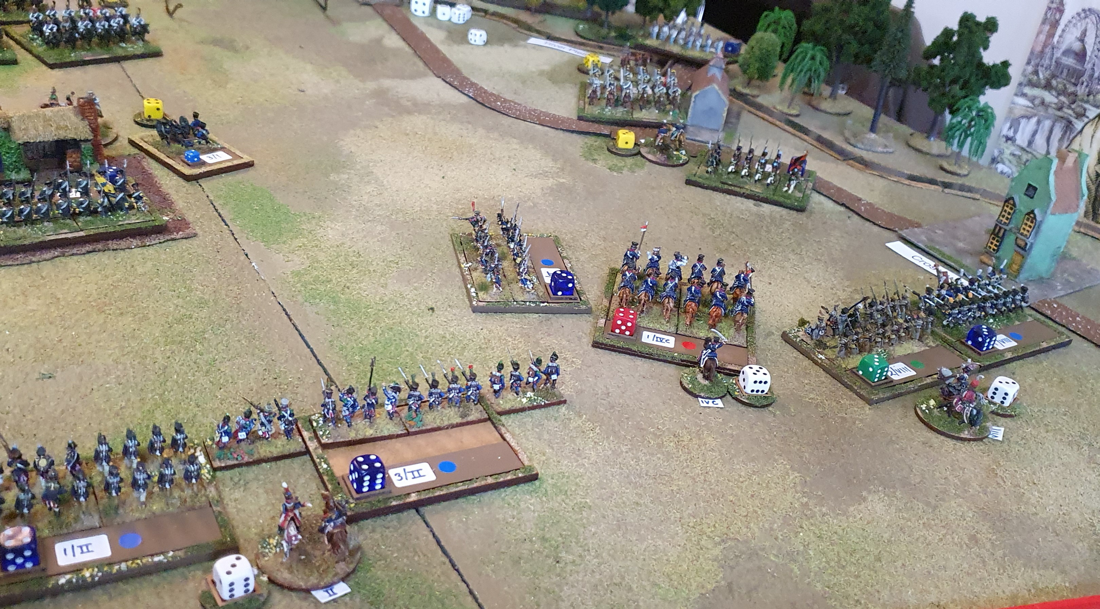
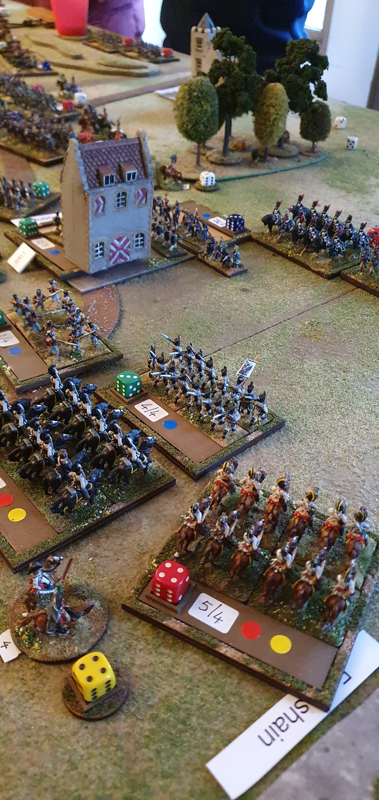
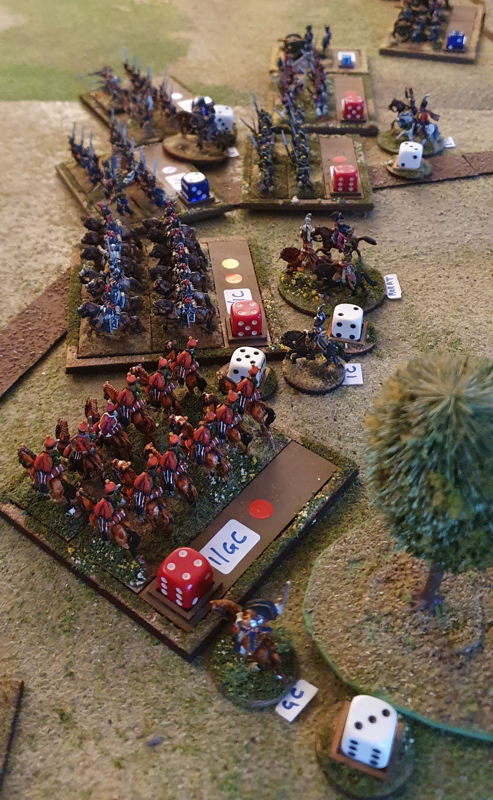
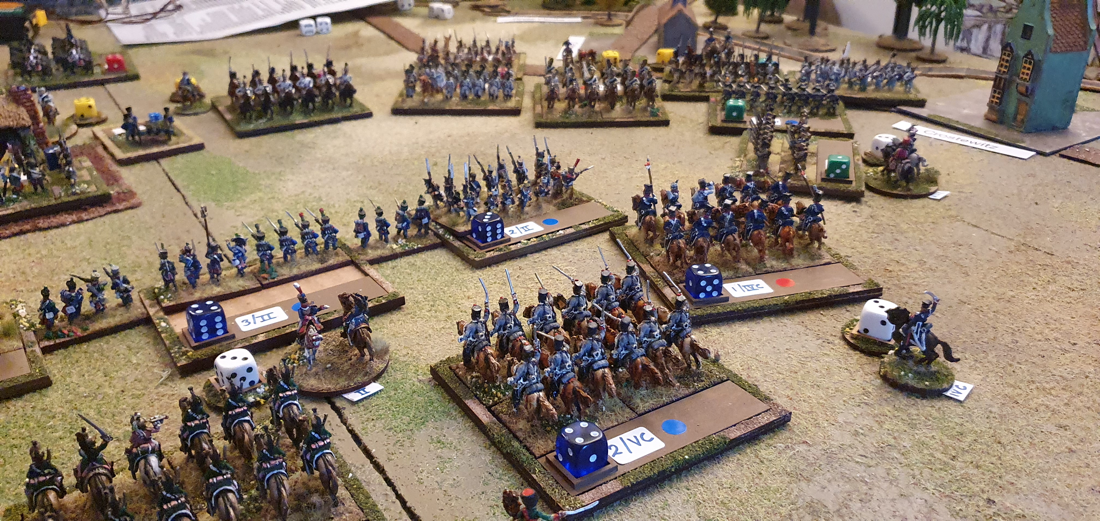
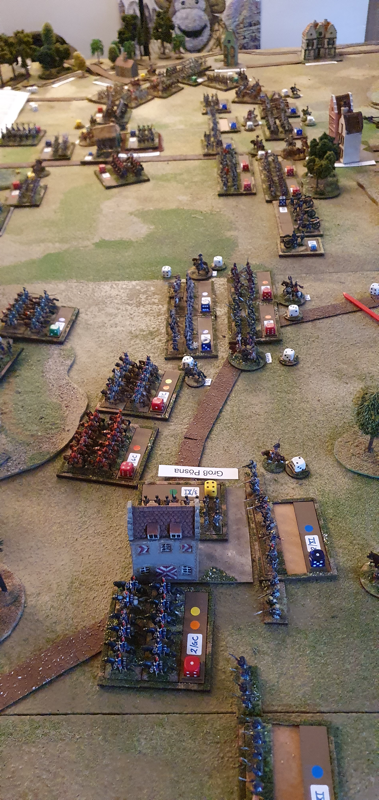
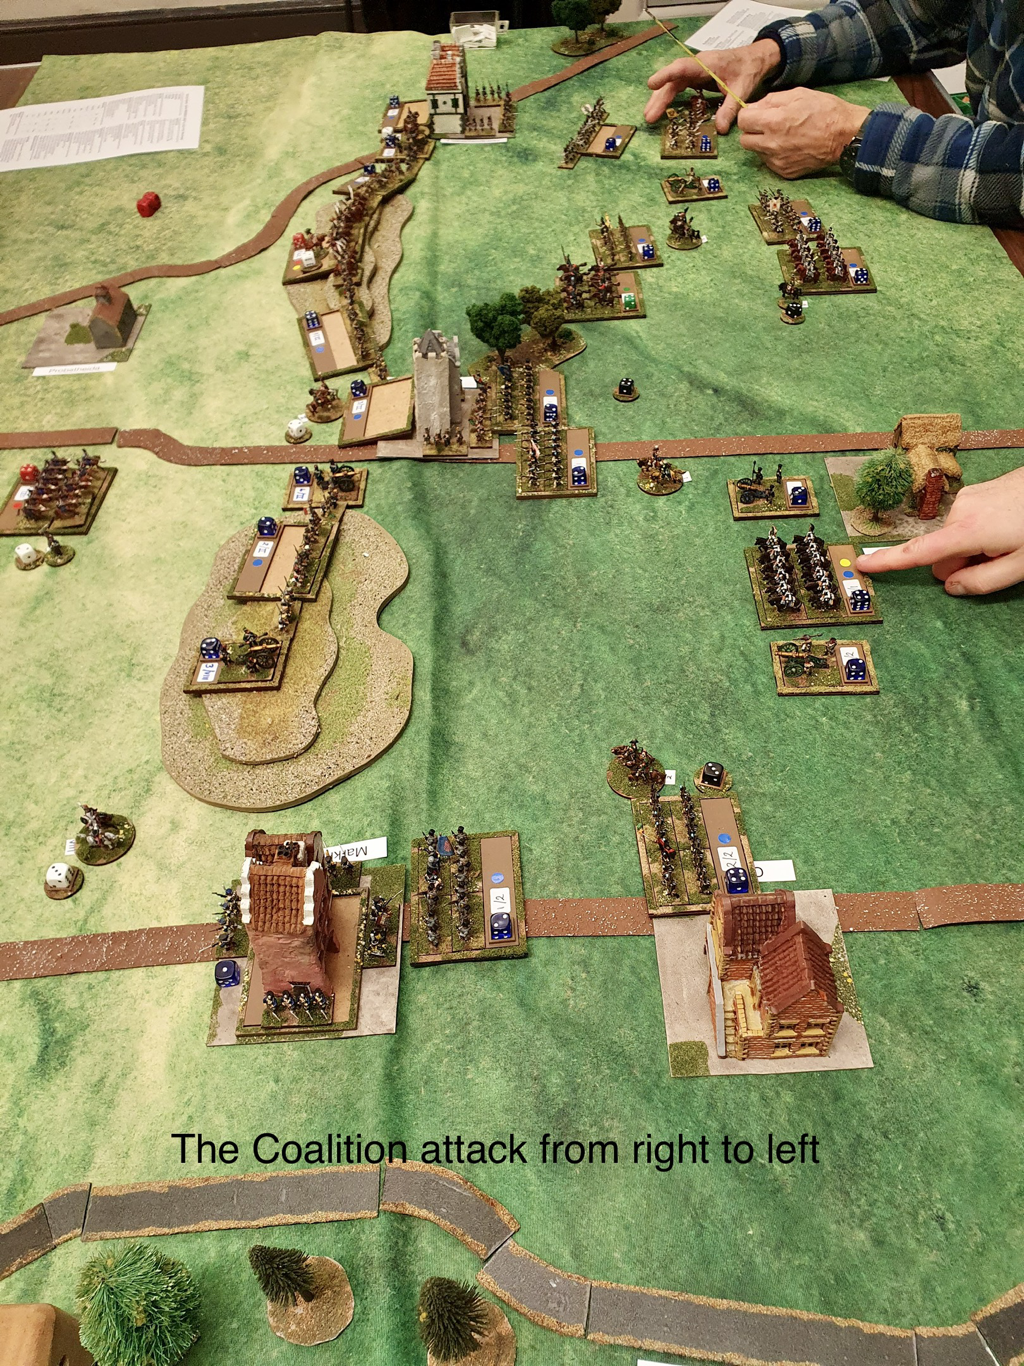
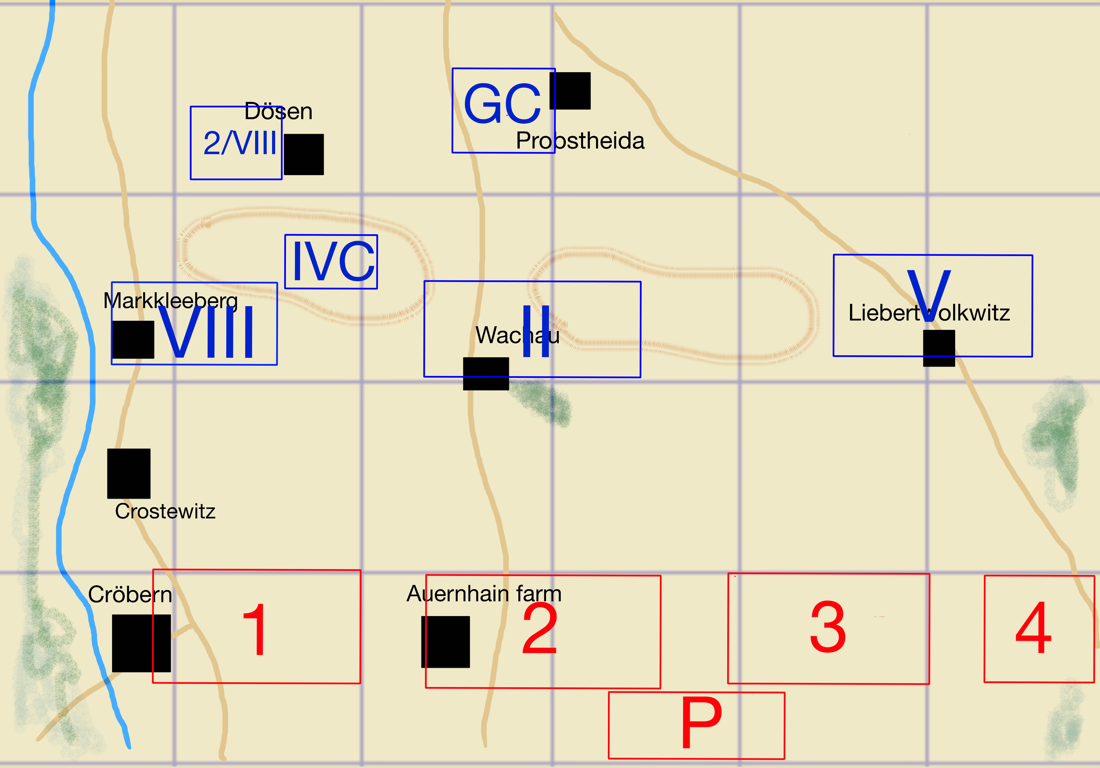
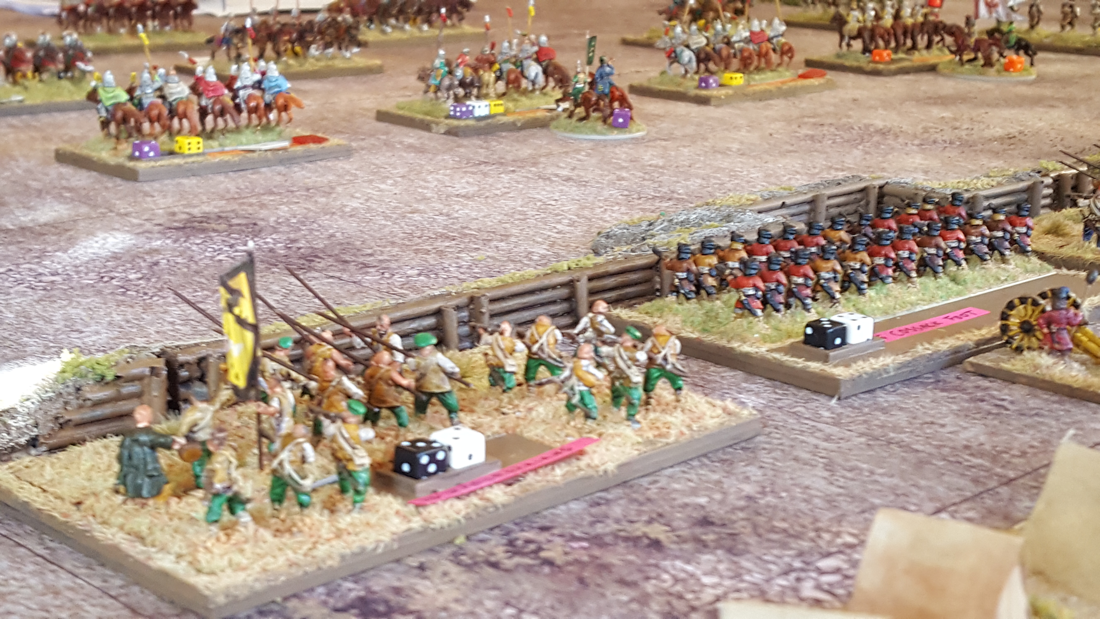
When we played AE with 15mm units, an infantry unit in line was 160mm wide so we used the standard AE movement and shooting distances. For this game, we used 6mm units which were 120mm wide in line. As this distance is 3/4 of the width of our 15s, we reduced all standard distances by a quarter. Thus, Infantry fire up to 3” instead of 4”, cavalry charge is 6” not 8” and so on. I am running a game at our club next Friday to try to attract more players. No doubt more questions will arise that we haven’t thought of yet! On 23 January eight of us gathered in the shed for a refight of Leipzig, 1813 - or rather, of the key confrontation on the first day of the battle. The catalyst was Ian, who was back on a short break from South Korea. We were also able to tempt Matt back from Shrewsbury, less epic than coming from Seoul but still an achievement. The rules we used were Absolute Emperor by Boyd Bruce, published in the Osprey blue wargames series. The basic unit in these rules is the division, which makes sense for recreating a battle as big as Leipzig. More on these rules later but the headline message is that the players picked them up quickly and enjoyed playing them, which gets them a big tick at the outset. Setting up the gameYou can find the scenario here. I’ve been playing games based on the battles around Leipzig since the mid-90s when I bought the first scenario book for Napoleon’s Battles, published at the time by Avalon Hill. I based the collection of my 15mm armies on the Leipzig order of battle and picked up as many histories of 1813 as I coud find. My German friend Clemens and I worked our way around the Leipzig compass, playing every scenario in the Avalon Hill book. Scott Bowden and George Nafziger both released books about the armies of 1813 and these led us to amend the Avalon Hill OOBs. After a break of a few years, in about 2010 I came back to Napoleonics and of course to Leipzig. In recent years we’ve played scenarios for Blücher and Lasalle and now, for Absolute Emperor. Writing the Orders of Battle for AE was quite straightforward. The main challenge was to decide how to represent the historical Russian formations, which had shrunk drastically over months of campaigning. I decided to focus on overall strength rather than formal organisation. For example, one of the Russian ‘‘Corps’ is represented by only one infantry unit. So apart from the 5th Guards and 3rd Grenadier Corps, the Russians in this scenario are quite thin on the ground. I also decided to start the game around the middle of 16 October, when several units on the table had already been fighting since the morning. I wanted to focus on the crucial struggle between Napoleon’s elite formations and the Coalition reserves, in which the French tried and failed to break the enemy centre. You’ll see that the scenario requires certain units to reduce their starting strength by 1 or 2 points, to reflect the losses they had suffered in the morning’s fighting. This wrinkle worked well and gave added punch to the fresh units on both sides that arrived from reserve. 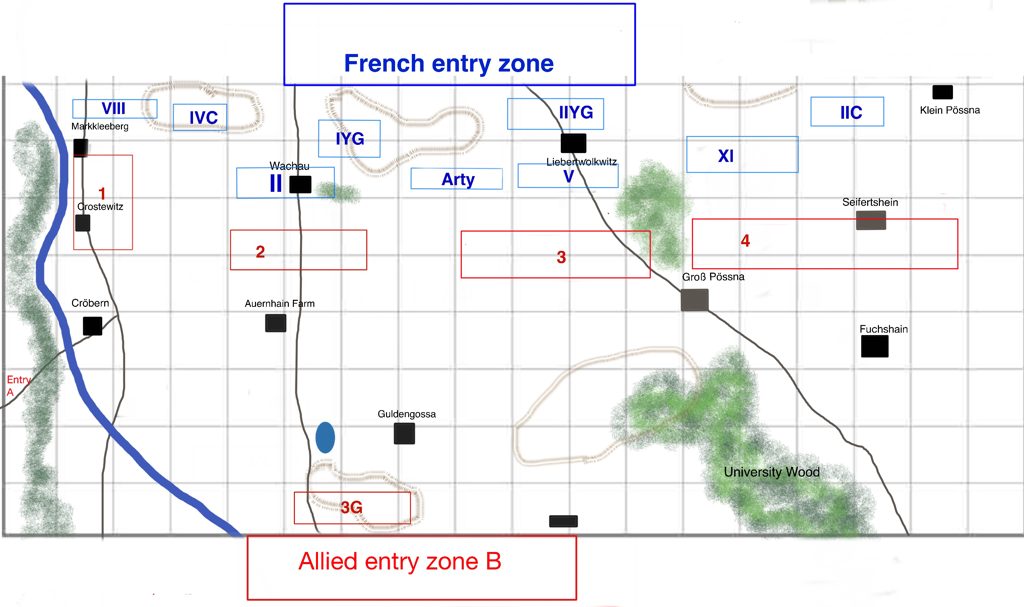 The map. The city of Leipzig is behind the French table edge. One square is 6 inches. Pre-game preparationsThe 15mm figures are all mine, mostly Old Glory, Battle Honours, Essex and Minifigs painted in the late 90s with an injection of new models in 2020-22. They are based for Lasalle but I use movement trays for Blucher and now Absolute Emperor. You might notice the infantry stands are one rank deep. Old habits die hard: having started out on Napoleonics with Bruce Quarrie’s rules, I still have an aversion to two deep stands as to my eye, they make a line formation look too deep when playing units as battalions. I know this is not the majority view nowadays (and my 6mm Napoleonics are based two deep..). The strip at the back of each unit has a sticker with its ID; a coloured sticker to show its starting quality; a dice cell to track losses and, where necessary, other stickers to show specific traits like heavy cavalry. The quality colours are orange (elite), red (veteran), blue (seasoned), green (conscript), yellow (exhausted conscript). A fresh unit with no losses begins with a die of the appropriate colour, showing 4 life points. When these run out, a die of the ‘exhausted’ colour is substituted. We found this a great help in play. I added a few house rules, partly to give the players more choices. Army and Wing commanders were given elan points that they could use, either directly to support fighting units, or to top up the elan of subordinate commanders. I also decided not to use the written order counters, instead telling players that they must obey the orders of the player in command. In our experience, a multi-player game brings enough of its own command friction. I’ll certainly use order counters for one-to-one games in future. What happened in the gameThe French side had 4 players and the Coalition 3. Matt was Napoleon; Paul took II, V and VIII Corps; Nick was Murat with the reserve cavalry and Harry led XI and II Cavalry Corps. For the Coalition, Chris as Schwarzenberg took columns 1 and 2 and the Austrian reserves; Ian led columns 3 and 4; and Dan was Constantine with the Russian and Prussian reserves. This led to Harry and Ian locking horns on the Eastern flank; Paul and Chris in the West; and Matt facing Dan in the centre. Nick, meanwhile, seemed to have horsemen in every sector of the field at one point or another. He had no difficulty channeling his inner Murat! The first stage of the game looked good for Napoleon and saw Harry push Ian back from his starting positions, while Paul headed down the river Pleisse. The Coalition lost several units in the east and the 3rd column was wiped out before the French had lost a single division. However, when the Coalition reinforcements arrived the confrontation became more equal. The Coalition were ready to give ground where necessary as all they needed to do was survive, whereas the French could only win by pressing their attack. The losses evened out somewhat when the Austrian reserves and 2nd Cavalry Corps took on Paul’s Poles and French in the west. In the centre the French Guard cavalry, V Corps and the Young Guard attacked the Prussian guard infantry who were, understandably, very tough to crack. In the west a minor disaster struck the French as Prussian heavy cavalry destroyed a French cavalry division and charged on into a march column of… Old Guard infantry! This division had been sent to bolster VIII Corps (as indeed happened in history) but was caught en route and in the worst possible formation. Soon after, we agreed that the French were not going to achieve the breakthrough they needed and that Napoleon would decide, as he did on the day, to call off the attack to avoid further losses. We totalled the remaining elan and found that the French had 3 more points than the Coalition. Technically this meant a marginal win for Napoleon but by such a small margin that we agreed it was at best a winning draw. Our day had run from 11.30 to about 4.30 with a break for lunch and we had got through 8 turns. Post match AnalysisAt the point we stopped playing, I asked the players to leave the units in place. I’m glad I did. I had spent the game at the eastern end of the table, so could only see the centre and eastern sectors from a distance. My general impression was that apart from some cavalry charges, the French centre and right had not gained much ground. But after the game, when I walked round the table, it was clear that the French centre had advanced further forward than I’d realised. There was admittedly a solid wall of Russian Grenadiers and Guards in front of it but the French, in turn, still had a force of Young Guard and heavy cavalry capable of engaging them. In short, the French came closer to breaking through the Coalition lines than I had thought. Could the French players have done better than their historical counterparts? It’s hard to see how, unless the Coalition reserves had been delayed in reaching the field (a possibility in the scenario, but an unlikely one). There wasn’t space for clever outflanking manoeuvres and the French attacks down the centre ran into too much tough opposition. There were some satisfying examples of game imitating history, for example when the Austrian reserves arrived to forestall the French right, while the Russian Guard Light Cavalry gave the French cavalry a bloody nose under the eyes of the Coalition monarchs. The biggest divergence from history was the retreat of Ian/Klenau’s troops in the east, effectively falling back on the big University Wood to form a refused flank. Ian did well in the face of a determined advance by Harry, supported by a couple of Nick’s cavalry divisions. The players picked up the important elements of the rules quickly and soon got stuck into the game. As always, they played with good humour and tolerance. From the noise levels and general chatter, I think they enjoyed themselves. I certainly did! Absolute Emperor: post-game rules reviewA multi-player wargame can really test a rules set. As mentioned above, the players picked up the basics of AE quickly and were soon struggling with each other rather than with the rules. The mechanics made sense and there were no outcomes that seemed illogical or ahistorical. A couple of situations arose for which we couldn’t find a rule, but we agreed a way forward and made a note to clarify the picture afterwards. We also agreed that we would happily play with these rules again. So on the general level, I am very impressed. If you are used to complete, watertight rules with extensive explanations and provisions for every possible situation, you may be surprised by Absolute Emperor. The full mechanics of some advanced rules are not explained. I have in mind particularly the rules for the Grand Battery and for elite formations. This shouldn’t put you off however. The Osprey rule book format is too restrictive to allow full explanations of every rules wrinkle, - but as these rules cost around a third of most available rule sets, I don’t mind joining some of the dots myself. The author runs a Facebook page for Absolute Emperor where he answers queries promptly. Also (and I love this!) he encourages players to adapt the rules to suit their interpretation of history. I admire a writer who is sufficiently confident in the core mechanics of his rules to be relaxed about individuals tinkering at the edges for their own satisfaction. There are subtleties behind Absolute Emperor that might not be apparent from just reading the rulebook. An example is the Built Up Area, where I had wondered before our game if a garrison might be ejected too easily. In practice, we discovered that the BUA rules make it difficult to evict a garrison that has not been softened up or is not outnumbered, but neither is a garrison impossible to crack (as is the case with some rules). I reckon Boyd Bruce has got the balance here right. In short, I would encourage anybody who has a copy of the rules to play them before forming a judgement on them, since so much more makes sense when you work things through on the tabletop. So AE will be back on the table again for more big battles. The only question now is which battle to choose. 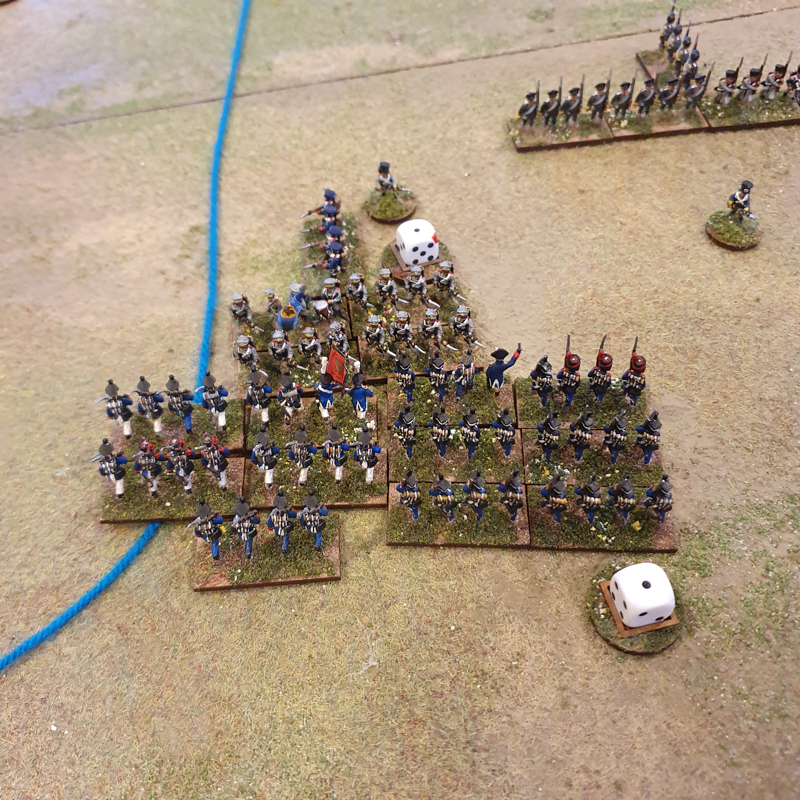 We recently played our first face to face game of Bolt Action since the Covid outbreak began. It was a tense game, only decided in the final turn. We used the Operation Jupiter scenario from the D-Day British and Canadian campaign book. Dan took the German defenders while Harry led the British, with a 10% points advantage. The British had a guaranteed preliminary bombardment with extra pinning power, to reflect the contribution of nearby naval guns. The scenario required Harry to get troops into the German defence zone, while Dan’s victory points could only come from killing enemy units. The British were a regular infantry platoon with a medium mortar, MMG in Bren carrier and Sherman in support, while the Germans also had a regular platoon, supported by a Command halftrack with light AT gun and a medium mortar. There were buildings in the centre of the table and scattered woods. Dan set up two squads, the Lieutenant, MMG, sniper and Mortar spotter in the buildings in the centre. He placed a third squad in woods on the right, with the mortar behind. His half track was in reserve. Harry’s preliminary bombardment was made even more effective by the additional pin on each unit required by the scenario (those naval guns!). The only casualty, however, was Dan’s medic, to Harry’s profuse apologies. The British arrived in two waves. Nobody came on in the centre; a couple of small teams arrived on the left wing; but the majority of units, including Sherman and Bren carrier with MMG team, arrived on the British right, in a bid to reach the German rear zone before Dan could redeploy his firepower. The plan very nearly worked. Dan’s reactions were slowed by having to roll off pins from the preliminary bombardment, but he was able to shift one squad left and brought his half track on facing the main British attack. The half track was able to knock out the Bren carrier, taking an MMG crewman with it, but was promptly destroyed by the Sherman. A shame for Dan but great narrative! Harry’s FAO called in an artillery barrage against the main German position but this fell long and plastered an empty field. In mid-game, the British right moved steadily forward, sparring with one German squad and the MG42 in the centre. Meanwhile Dan’s right went hunting for victory points. As he gained more VPs for destroying enemy units than Harry, it was cost effective for him to try to mop up the small teams on the British left. The end game saw a bid by Harry to get enough units into the German rear to beat Dan’s VP tally. This involved crossing open ground covered by German fields of fire. Crucially, in the final turn one unit stopped just short of the zone while another failed to move, being unable to shake off its pins from the enemy crossfire. Had these units made it over the line, Harry would have won. Instead, the day went to Dan. The game reminded me why Bolt Action is such great fun to play. There were several nail-biting moments, hanging on the sequence of the order dice draw or critical initiative tests. There were no interruptions to check the rules and no arguments over interpretation. It was a fast paced, entertaining game that reached a clear conclusion in an evening. And when the players bring Brew Dog and crisps, that makes for a perfect evening.  Two refights and a post-mortemI have recently hosted two games set in Eastern Europe, using For King and Parliament (FKaP) by Simon Miller and Anthony Brentnall. In both games we fought the historical scenario for the Battle of Lubar, which is on the 17th Century scenarios page here.  Background to the battle of LubarThe battle of Lubar (or Lyubar) was fought between a Muscovite-Cossack army and a Polish-Tatar force. It was the first engagement in the 1660 Ukrainian campaign, which took place during the Thirteen Years War between Muscovy and the Polish-Lithuanian Commonwealth. Lubar was actually an engagement over many days, most of which consisted of minor actions during an extended blockade. The action on 16 September 1660 was the only occasion when the full complement of both armies went toe to toe. We have played games based on Lubar several times in the past few years, first using Warlord Games’ Pike and Shotte, once with Maurice, then with Tercios by el Kraken and now using FKaP. All of them were interesting games but for my taste, FKaP gave the most satisfying game. Each of the rules we have used so far required a little tweaking to cover the troop types present at Lubar. The one set that we could have played without any amendment is ‘With Fire and Sword/Ogniem i Mieczem’ by Polish company, Wargamer. These rules and the fantastic figures and terrain released for them have opened up this period to non-Polish gamers and I have hundreds of their figures in my collection. The only thing is, I cannot get on with the rules themselves. As the saying goes, I am sure it’s not Them, it’s Me. A couple of weeks ago, Wargamer announced that they are to replace With Fire and Sword with a quite different version. I will pick these up and perhaps WFaS Reloaded will hit the spot. Adapting FKaP to Eastern Europe17th century warfare in Eastern Europe had more in common with the West European experience than some might presume, especially as the century progressed. So the bones of FKaP work very well as they stand. There were however some troop types, weapons and tactics that were unknown in the West and I wrote a small set of rule adaptations to cover them. Most of these were rules brought forward from Simon Miller’s Ancients rules, To the Strongest, so fitted in comfortably. I’ve adjusted them a few times after playtesting and the current version is on the scenarios page here. Lubar refight: Take 1Earlier this month I hosted the first refight, with Chris playing Muscovy and Paul leading the Poles and Tatars. Chris deployed his Cossacks in his main camp with a regiment in the forward trench on his right. He put Muscovite infantry with light guns in the redoubt on the left, with some cavalry behind them. The rest of the cavalry joined the infantry in his main camp. Paul placed his foot and artillery in his centre, with his cavalry divided between Potocki on the right and Lubomirski on the left. Paul left space on the left for his Tatar Allies to arrive (-and leave: the scenario makes their presence unreliable at best). The battle began with a spirited assault by the Tatars on the Cossack trenches, while the Polish infantry advanced on the hilltop redoubt. Chris responded to the hilltop assault by sending cavalry around the eastern side of the hill to threaten the Polish flank. Paul challenged this assault with pancerni and a unit of hussars, which blotted its copybook early on by failing to activate to charge, drawing the dreaded two 1s in succession. Paul was admirably calm about this and the hussars redeemed themselves on their next activation, smacking up some Muscovite Reiters and blocking Chris’ outflanking attempt. On the left the Tatar command steadily drained away, as units left the field in search of easier plunder, but not before they had caused impressive damage to the Cossacks in the trenches. Paul even managed to break into the main enemy camp, if only temporarily. The game ended with Chris handing over his last victory medal but he was still well established in his main camp and as Paul’s medals were also running low, we agreed this was more a winning draw than a walkover. In our after-action discussion, we agreed the game’s outcome was remarkably similar to the history: the Poles and Tatars had the advantage in the open with their superior cavalry, while the Muscovite and Cossack infantry were a tough challenge for the outnumbered Polish foot to beat. Both players attacked the scenario with gusto and picked up the rules easily. Refight Take 2After the first game I adjusted two aspects of the scenario. First, I moved the Muscovite camp one square westwards to make the land around the Muscovite hill more open to a flanking manoeuvre. I also changed the scenario special rules for the Tatar forces to make them last a little longer on the table. Game 2 saw Rupert’s Muscovites and Cossacks facing Kevin’s Poles and Tatars. Both sides deployed rather differently from the players in game 1. Rupert put his infantry in the hilltop redoubt, the trenches in the forest and his main camp, then deployed his cavalry in a line in front of the camp. He placed his field artillery in the trenches, initially facing forward but later rotating to enfilade the advancing Poles. Kevin drew up with his cavalry commands on the left and centre and his infantry on the right, facing the hilltop redoubt. On his first turn Kevin started an outflanking attempt with two infantry units and some dragoons, aiming to get around the eastern end of the Muscovite redoubt. Unfortunately, this manoeuvre was plagued by poor activation attempts throughout the day and by game’s end was still slogging up the table, without ever coming to grips. At the same time the Polish foot in front of the hilltop redoubt spent the day waiting for the outflanking force to get into position and so the entire Polish infantry complement was basically uncommitted throughout the game. The Polish cavalry and the Tatars, by contrast, were heavily engaged from the start. The Muscovite cavalry launched a spoiling attack as the enemy advanced, which considerably disrupted the Polish front line. However this attack then exposed the Muscovite horse, now variously out of pistols or spears and low on dash, to the still-fresh Polish second and third lines. The result was to be expected and in one turn, several Muscovite victory medals were handed over to the enemy. But with the Muscovite and Cossack infantry in the main camp now able to fire on the enemy cavalry, the balance of damage was nearly restored. It was clear that the Polish cavalry would not make headway against the entrenched Muscovite and Cossack foot and, with real time running low, we agreed that the Poles would not press home their attack and the battle ended. This was an interesting game, in which the deployment of both sides was unexpected. The Poles, already outnumbered in infantry, effectively left their Foot out of the battle by stacking them on their right and attempting the outflanking manoeuvre. Even if they had had more success with activation draws, the Polish ‘right hook’ would still have spent a lot of time getting into position before engaging. Kevin commented that if he had assigned the task to cavalry, the result could have been very different. On the other side, the screen of Muscovite cavalry across the centre delayed the Polish advance, but it was both outnumbered and outclassed by the cavalry facing it and it blocked the fire of its own infantry behind it. Once that infantry was given a free field of fire the prospects for the Polish horse became less rosy. Perhaps the Muscovite Horse could have withdrawn sooner once it inflicted the first reverse? All of this is easy for me to say, but I wasn’t playing the game. Both players showed considerable aggression and the cavalry confrontation in the centre was particularly hard-fought. Kevin certainly made the most of his flakey Tatar units, which did stay on table for longer than in the first game but were still sloping off the field at inconvenient moments. The game versus history: how credible were the results?I was frankly delighted by the way FKaP played out in both games. On a general level, the results were reassuringly similar to what happened in history, especially in the first game. The way cavalry performs is particularly satisfying. The clash between the Muscovite and Polish horse in the second game felt just right: the Muscovites were slightly, but not hopelessly outclassed in the initial combats but the Poles had the advantage of fresh units ready to challenge the increasingly tired Russians. As the saying goes, numbers have a quality all of their own.. The Tatars also behaved as I would expect. They are primarily a nuisance and with only one hit are brittle, but they can be devastating against an enemy that is already disordered and tired. Also, their sheer numbers can help them to overwhelm a superior opponent. The evade rule, adapted from To the Strongest, works fine. As for the infantry, pike and shot are suitably ponderous while the smaller Haiduk and Streltsi units are a little easier to move. Finally, artillery can occasionally do damage but isn’t a battle winner, which is appropriate for this period. In short, I think after these games that the Eastern Europe adaptations for FKaP are about right. Earthworks were an important feature of the battle of Lubar and I was impressed by the way they work in FKaP. Based on accounts of battles in this period, they should give an advantage to troops defending them but ought not to be impregnable: during the battle of Lubar, attackers did break in, both to the hilltop position and the main Cossack/Muscovite camp. I am increasingly impressed by FKaP: these rules are easy to learn and deceptively straightforward. New players pick up the mechanics very quickly but they face multiple choices and challenges each turn. The next battle I’d like to try is Polonka (great name!), the battle between Muscovites and Lithuanians fought earlier in the same year of 1660. This was an encounter battle without prepared positions and I’ll be interested to see how it plays with these rules. Figures and game aidsThe figures in our games were 15mm by Wargamer, Essex Miniatures, Lancashire Games (both from today and the 1980s) and a superb Spanish producer who had a stand at Salute some years ago, but whose figures I haven’t seen again. The game mat is by Deep Cut Studios, bought from Simon Miller’s Big Red Bat Shop. We used Simon’s ‘chits of war’ for activations, also available from his shop, and used ten-sided dice to resolve combats.
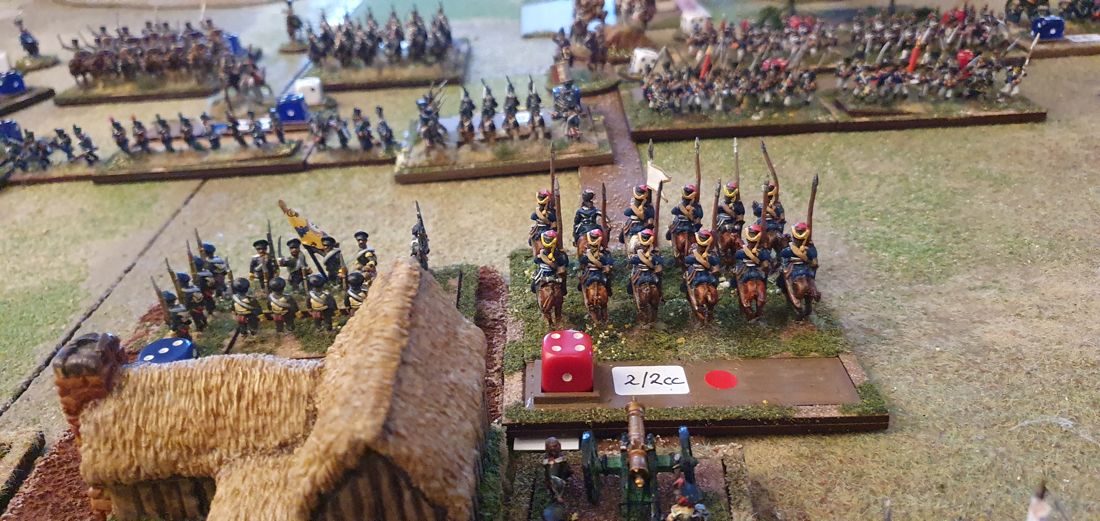
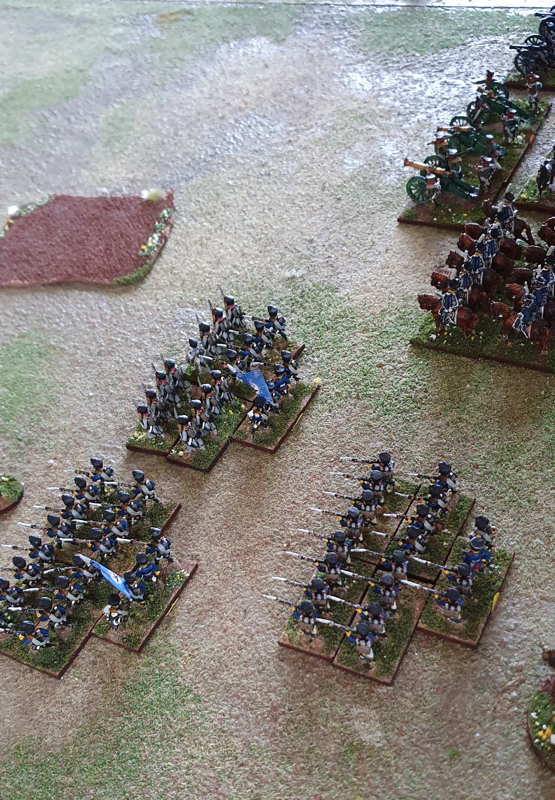
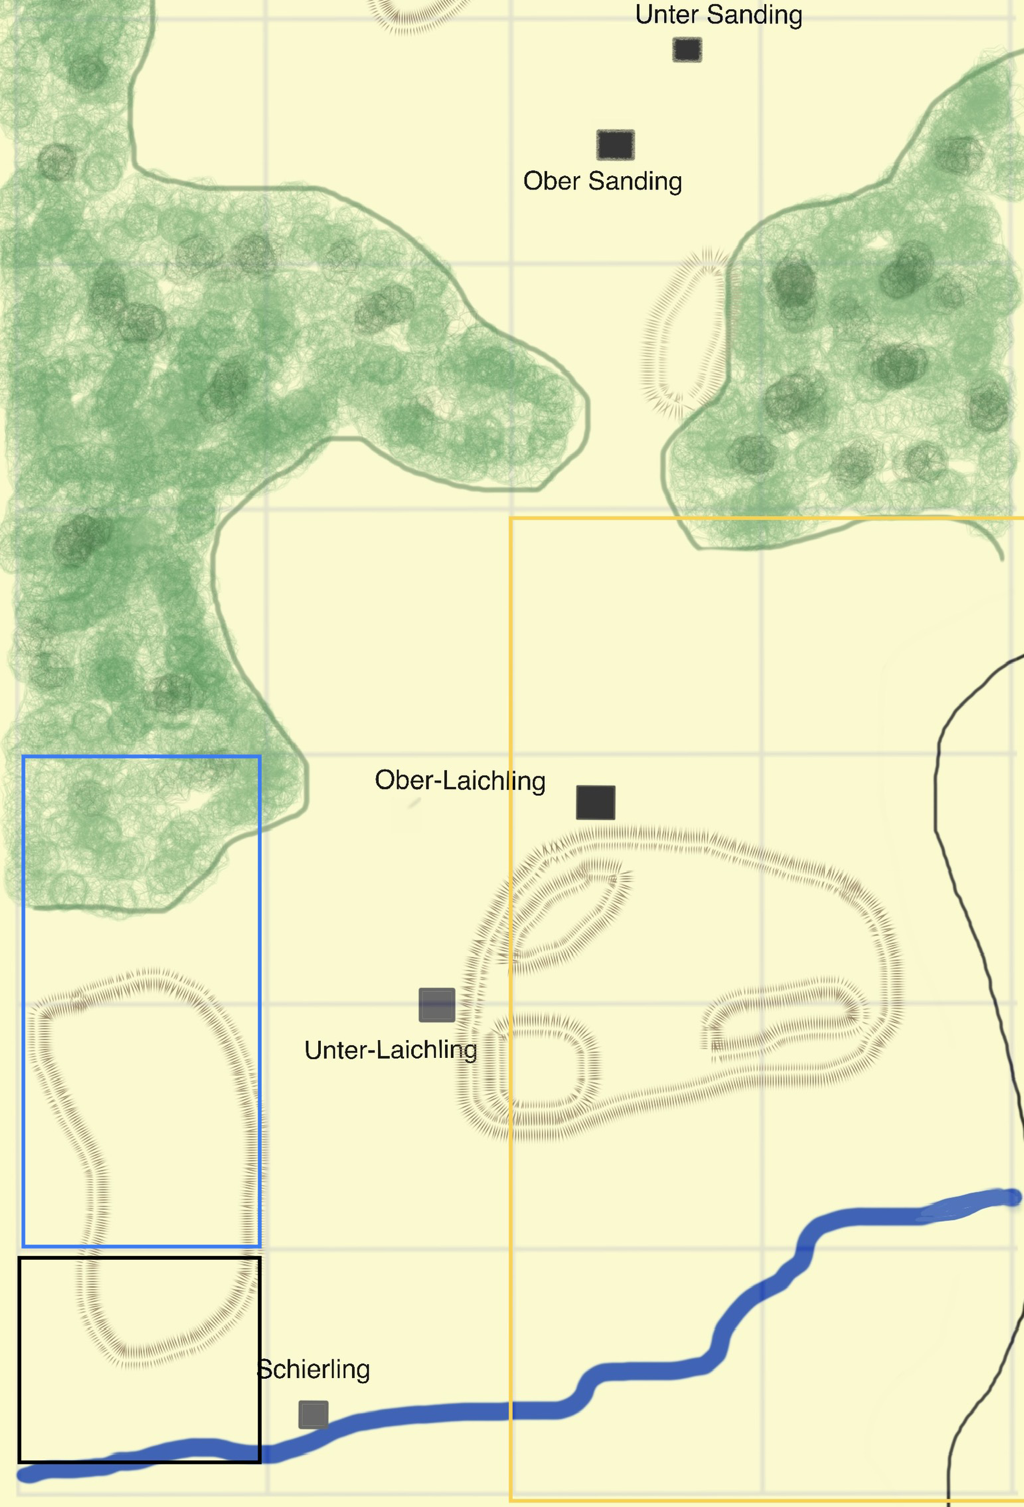
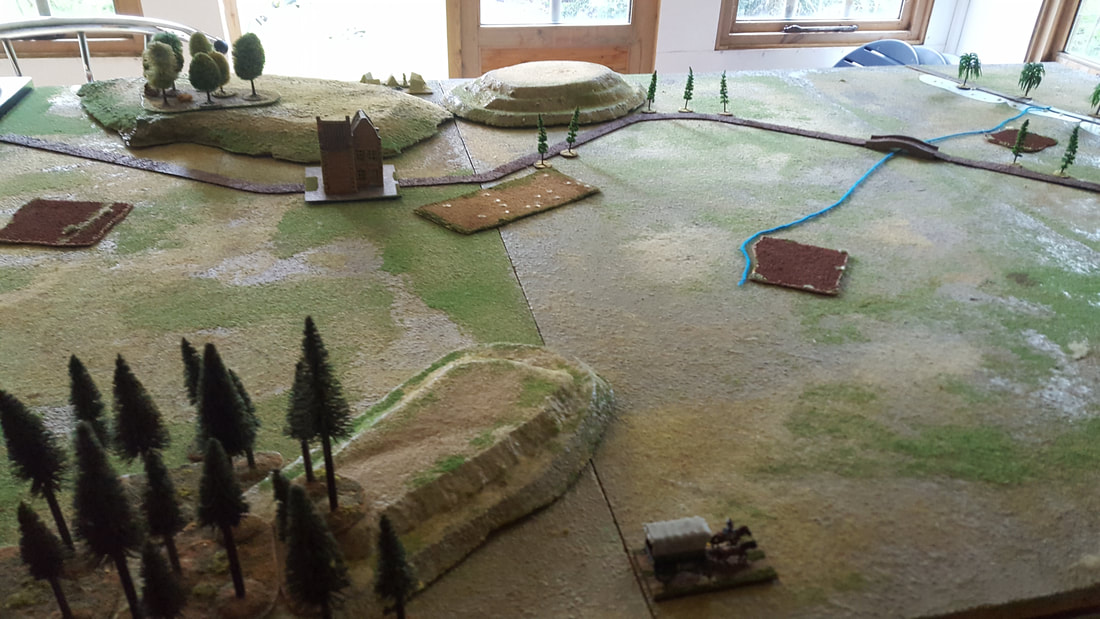
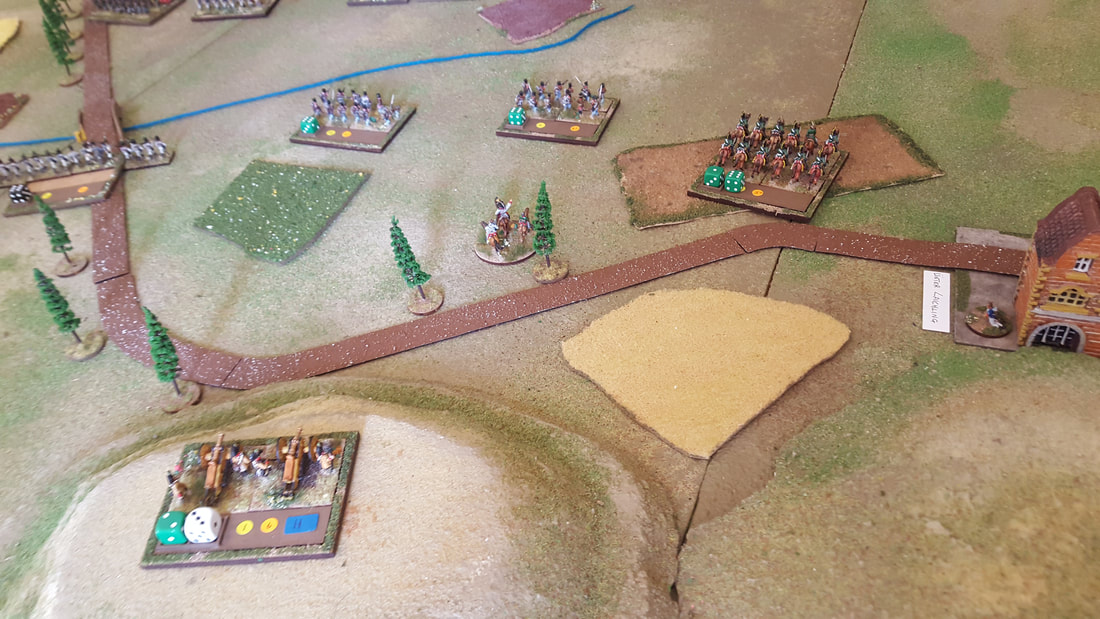
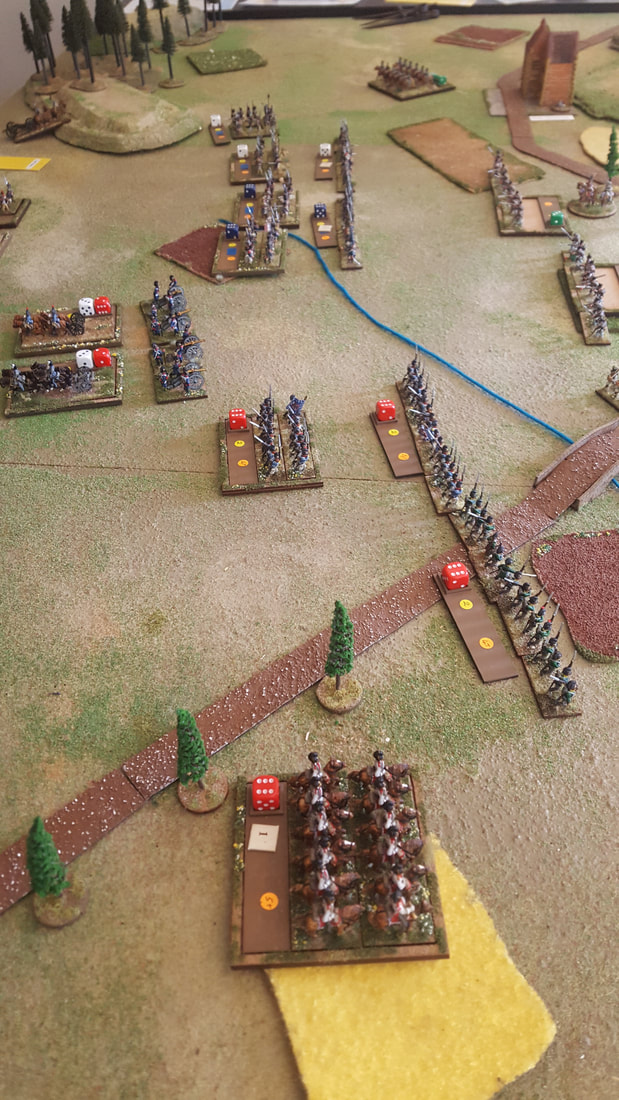
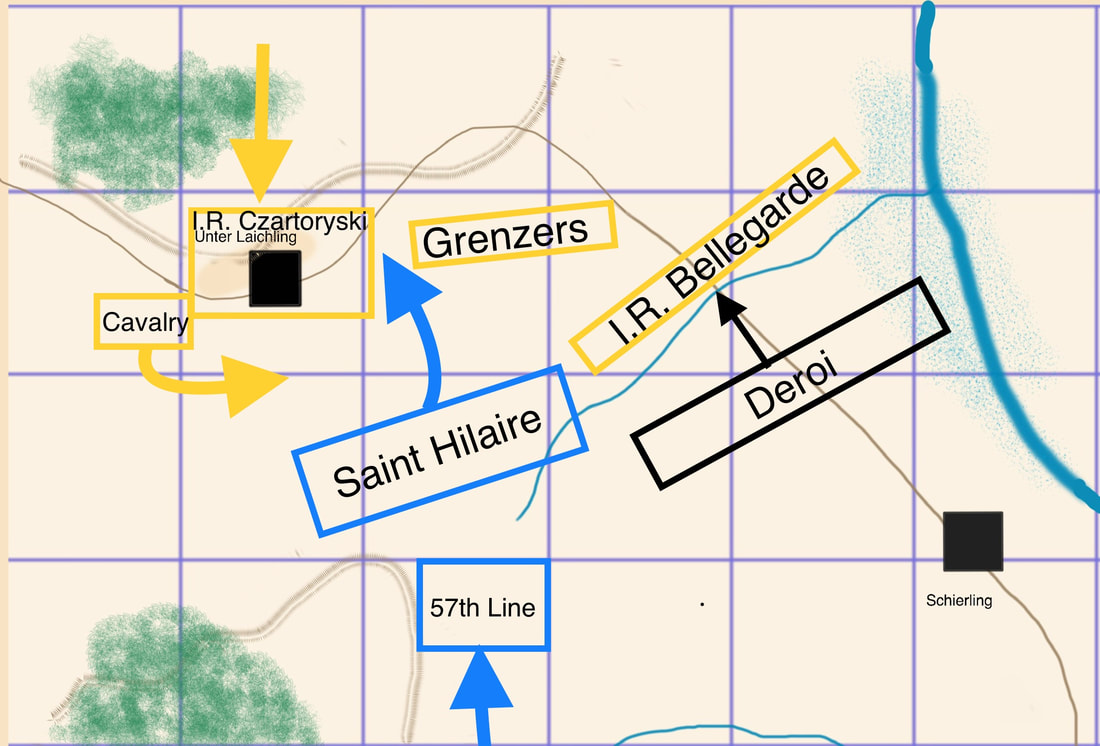
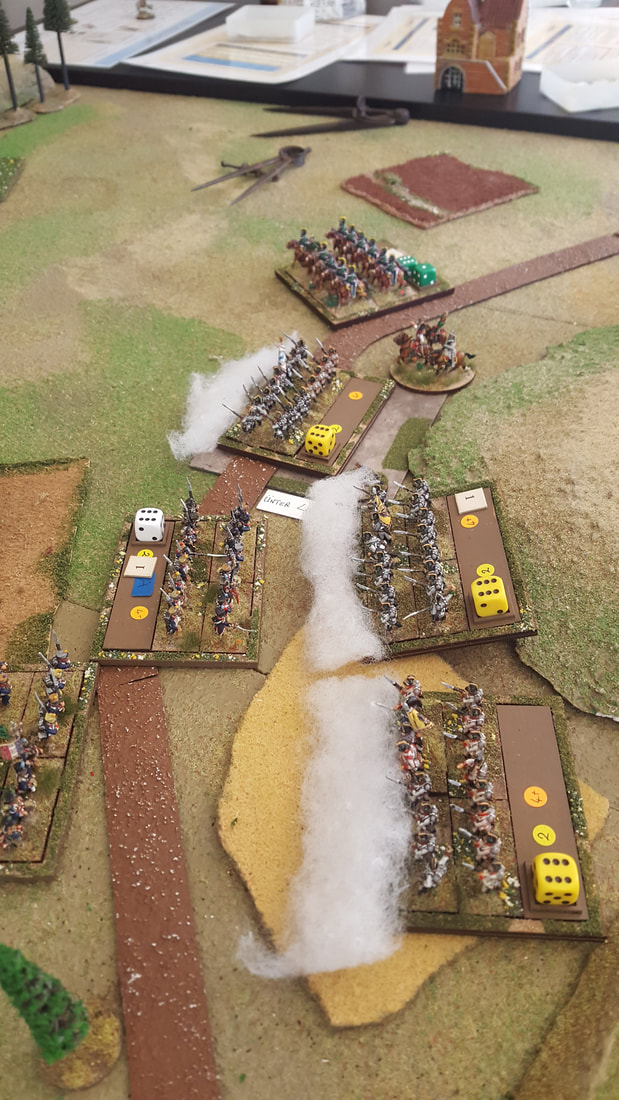
 A bit of August LardI’ve always liked the look of rules by the Two Fat Lardies but until recently I’d only played Chain of Command, What a Tanker and Pickett’s Charge (which while excellent isn’t exactly a full Lard experience). Lately I have started visiting Staines Wargames Club on a Friday evening, where Lard games are popular. So in the space of a fortnight I had my first taste of Infamy! Infamy! and of Sharp Practice. Both games were great fun. Arresting the Chief’s sonIn my first game of Infamy! I was required to take my Roman patrol to a Gaulish village to arrest the chief’s son for unspecified anti-Roman activities. The men of the village were out hunting at the time my force arrived. Chris had set up an atmospheric village with huts, vegetable patches, sundry rubbish and a palisade wall, surrounded on three sides by forest. I had to check each hut for the presence of the chief’s son, as quickly as possible because Ian’s hunting party was due back at any moment. The patrol found the suspect in the hut furthest from the village entrance, protected by a group of elite Gallic warriors. Luckily the search party were veteran legionaries and after a tough fight, the chief’s son was in custody. Meanwhile the hunting party had started to arrive. Fortunately for the Romans, no Gauls arrived between the patrol and its line of retreat. The patrol started to retire from the village, pressed by a growing band of angry Gauls. Had the chits been drawn differently, the captive would have been freed but I was fortunate to get enough distance between the patrol and its pursuers that we concluded the arrest had been carried out successfully. This was a tense and engaging game which really benefited from the storyline. Alas, I was too busy searching huts to take photos but the pretty table and lovely figures were a big contributory factor. Crossing the NiagaraThe following week Chris hosted a game of Sharp Practice, set in the War of 1812. Paul commanded his own British force while I had Chris’ Americans. The scenario was Crossing the Niagara from the War of 1812 Sharp Practice supplement, which involved a US force landing on the Canadian bank against British/Canadian opposition. Again the table was very fine, with some particularly lovely buildings (and this time I have the photos to prove it). 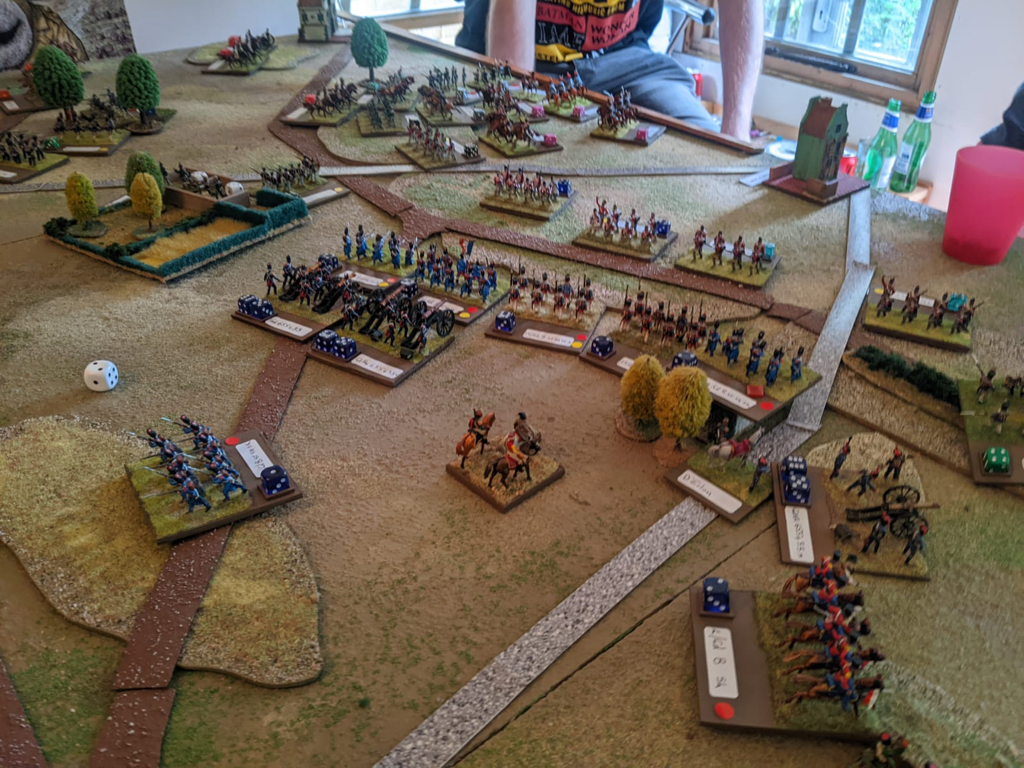 The US forces landed by boat in two waves, One group of British regulars were on the scene at the start while Canadian militia and an artillery piece arrived during the game to reinforce them. The challenge for both sides was to get their troops organised and firing before the opposition managed it. In our game, my US troops were able to form a firing line first and forced the forward-most British unit to retire. The US force maintained this edge for the rest of the game but did not dislodge the British entirely from its positions at the end of the table. Nevertheless the umpire concluded that the US beachhead was secure and so awarded the US a winning draw. I come late to Sharp Practice and there is nothing original I can add to the reviews already out there. I will say that I enjoyed it very much. The movement and firing mechanisms couldn’t be more straightforward. I love the random sequence of play, which gives suspense to every chit draw. I particularly like the rule that made it difficult to stop my militia from blazing away once they started firing. These rules are great for narrative play and Chris managed the story very well. On the strength of these games I have bought a pdf of Sharp Practice and some movement trays to use with my 15mm Napoleonics. I have a lot of individually based skirmishers on 20mm round bases and just need to add more command figures. I did briefly consider a 28mm contingent but my investment in 15mm is too big, both in figures and scenery. I have a lot of surplus skirmishers since changing rules from Lasalle to Lasalle 2. Plus, I should be ready to game with them months earlier than if I started on 28s. Being an impatient Wargamer, that is a big advantage!   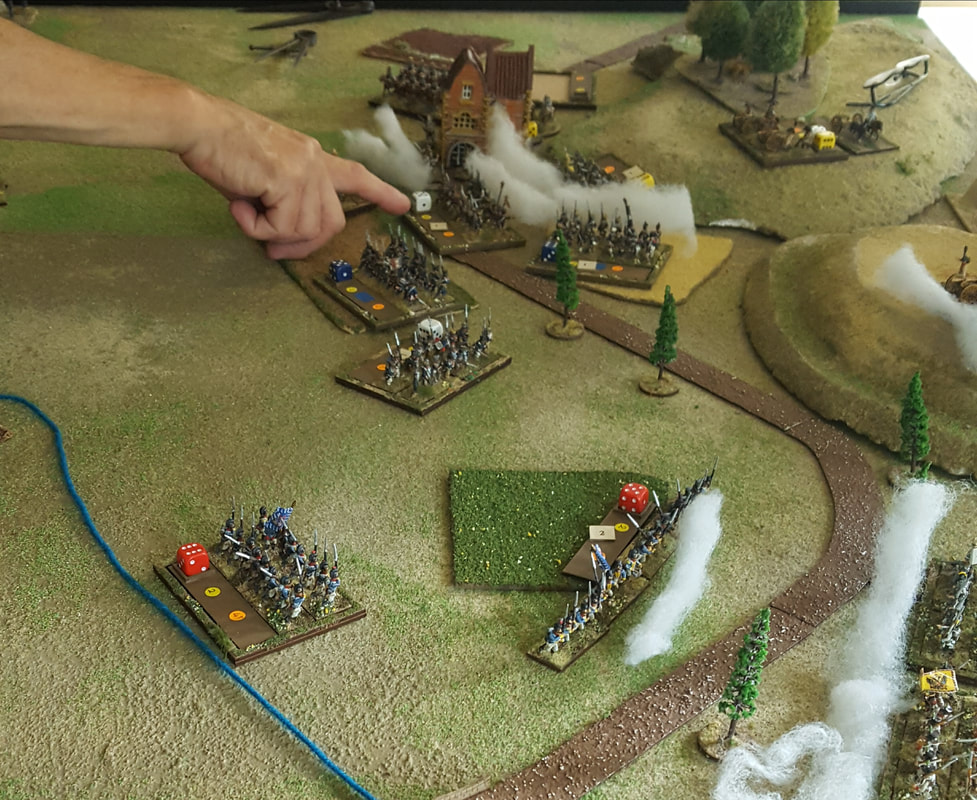 Building our experience with Lasalle 2The other day Chris, Paul and I played a game of Lasalle, using the scenario for Unter Laichling in April 1809, "Bristling with Guns", on the scenarios page here. Chris took the Austrians of Rosenberg’s IV Corps while Paul led the French (St Hilaire) and Bavarians (Deroi). Most of Paul’s troops began on table while fully half of Chris’s command were in Reserve. There were two objectives, one each in the villages of Schierling and Unter Laichling. The Austrians deployed with the Bellegarde Regiment on the left, two battalions of Grenzers in the centre and the Vincent Chevaulegers on the right. They did not garrison the village of Unter Laichling at this stage. St Hilaire deployed in the French centre and Deroi’s Bavarians began on the right. Paul left the wooded area on the French left unoccupied. The French and Bavarian artillery deployed in the hinge between the two commands. The Franco-Bavarians advanced briskly on the Austrian positions, although the left of the French advance was slowed somewhat by the threat from the Austrian cavalry. An artillery duel began, in which the Franco-Bavarians gained an edge, twice disrupting an Austrian battery. Where the hell are my reinforcements?Both sides were awaiting reinforcements and the French 57th Line and Austrian Czartoryski regiments appeared relatively early. The Czartoryski arrived just in time to occupy Unter Laichling before Paul’s battalions attacked. Had the Austrian cavalry not been slowing the French advance down, the village might have been taken without a fight. The cavalry also had the effect of channeling the French advance into the centre, which prevented Paul from attacking the village from three sides. Although the Austrian right was holding its own, in their centre and left Franco-Bavarian weight of numbers was starting to tell. Chris’s final reinforcements kept refusing to appear and in their absence, his Grenz regiments in particular started to crumble in the unequal struggle. In the final turn, Austria was reduced to her morale break point. The French had still not taken Unter Laichling, although Paul had lots of fresh units and with more time he could have taken the village, However the last turn represented nightfall and moreover the foot-dragging Austrian reinforcements had finally arrived on the table. We agreed therefore that the French would have to withdraw to their side of the valley and renew their attacks in the morning. Nevertheless, for bringing the Austrians to their break point and holding one of the two objective villages, the French secured a minor victory. Honours about evenWith hindsight, I reckon both players performed better on their right. Paul had the advantage with his Bavarians from the outset, maintaining pressure on the Bellegarde regiment facing them (Neutral I may be but I was secretly pleased for the Bavarian figures: this was their first ever game!). Chris, meanwhile, used his solitary cavalry unit well to slow down and constrict the French advance. He slipped a battalion into the village just in time and his right was still secure by the end of the game. This was Paul’s first and Chris’s second game of Lasalle 2. They were soon on top of the rules and the game flowed well. They both seemed to have fun and are ready to play again so next time I’ll add some advanced rules. I’m keen to try the advanced skirmisher rules in particular. Unter Laichling as history and gameSo how did the scenario play against the history? Pretty well I think, although of course there are conflicting accounts of exactly what happened on the day. One memoir claims the French took the village of Unter Laichling but doesn’t explain why they didn’t end the day in possession. It seems likely they either never got in or did so, only to withdraw under Austrian pressure. Whatever, as in the real encounter, the Austrians in our game ended the day still in possession of the village and the hilltop position, where they would be when the battle of Eckmühl began the next day.
And how did the scenario play as a game? Again, I think pretty well. The points values equate neatly to an attack-defence scenario in the rulebook and while both sides seemed to feel under pressure, neither complained of being unfairly disadvantaged. I do regret that Chris just couldn’t roll the dice to get his final reinforcements onto the table, despite the odds of succeeding improving every turn. This did limit his options and I was grateful for his philosophical acceptance of his bad luck. That said, Austrian accounts of the battle report that the Archduke Charles’ sole contribution to the day’s fighting was to redeploy certain units without informing their Corps commander, and so handicapping the performance of his own army. Perhaps Chris’s misfortune with his reinforcement dice was a fitting echo of Charles’ meddling on the day! What next? While the fight for Unter Laichling was going on in the South, the rest of Davout’s Command was advancing through the hilly woodland to the north, trying to find and envelop the Austrian right flank. I am working on a scenario for this fight and will be interested to see how Lasalle plays in dense terrain. I have been working on some new scenarios for Honour Games' big battle rules, Blucher, based on the battles around Leipzig in October 1813. I began by revisiting one I had already uploaded for Mockern, the fight to the north of the city between the Army of Silesia and Marshal Marmont. I wrote this a few years ago and reading it again, I realise it wasn't the most helpful document for somebody looking for a scenario without the need to research the historical battle. For example, I failed to explain which units were infantry and which cavalry. I also left out some key information like the number of MO dice and a clear reinforcement schedule. So I have now uploaded an amended scenario which will, I hope, be more useful than the previous version. While I was at it, I also tweaked the scenario for Montmirail, 1814, to make it more accessible. I decided it was also time to remove the one and only scenario for Lasalle 1, since anybody who still wants to play Lasalle 1 can adapt a scenario from Lasalle 2 without bursting a blood vessel. Both scenarios can be found here. |
Archives
November 2023
Categories
All
|


 RSS Feed