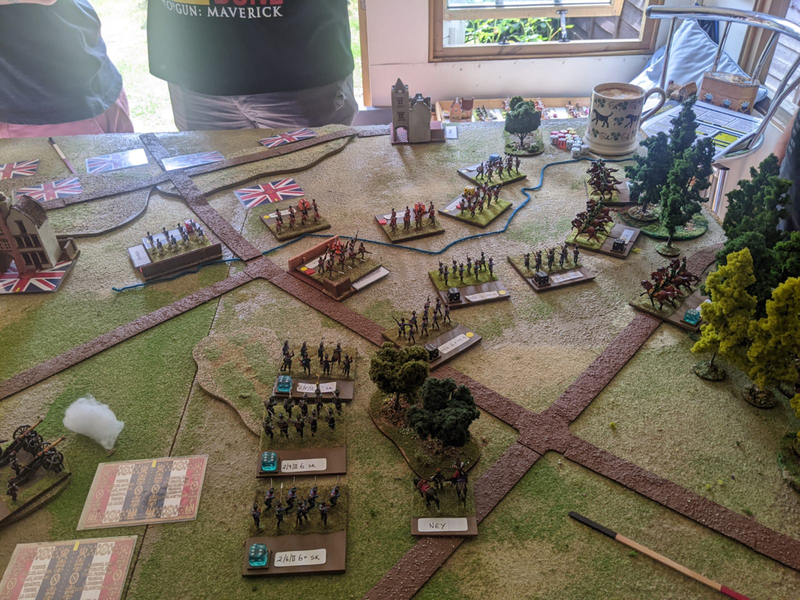
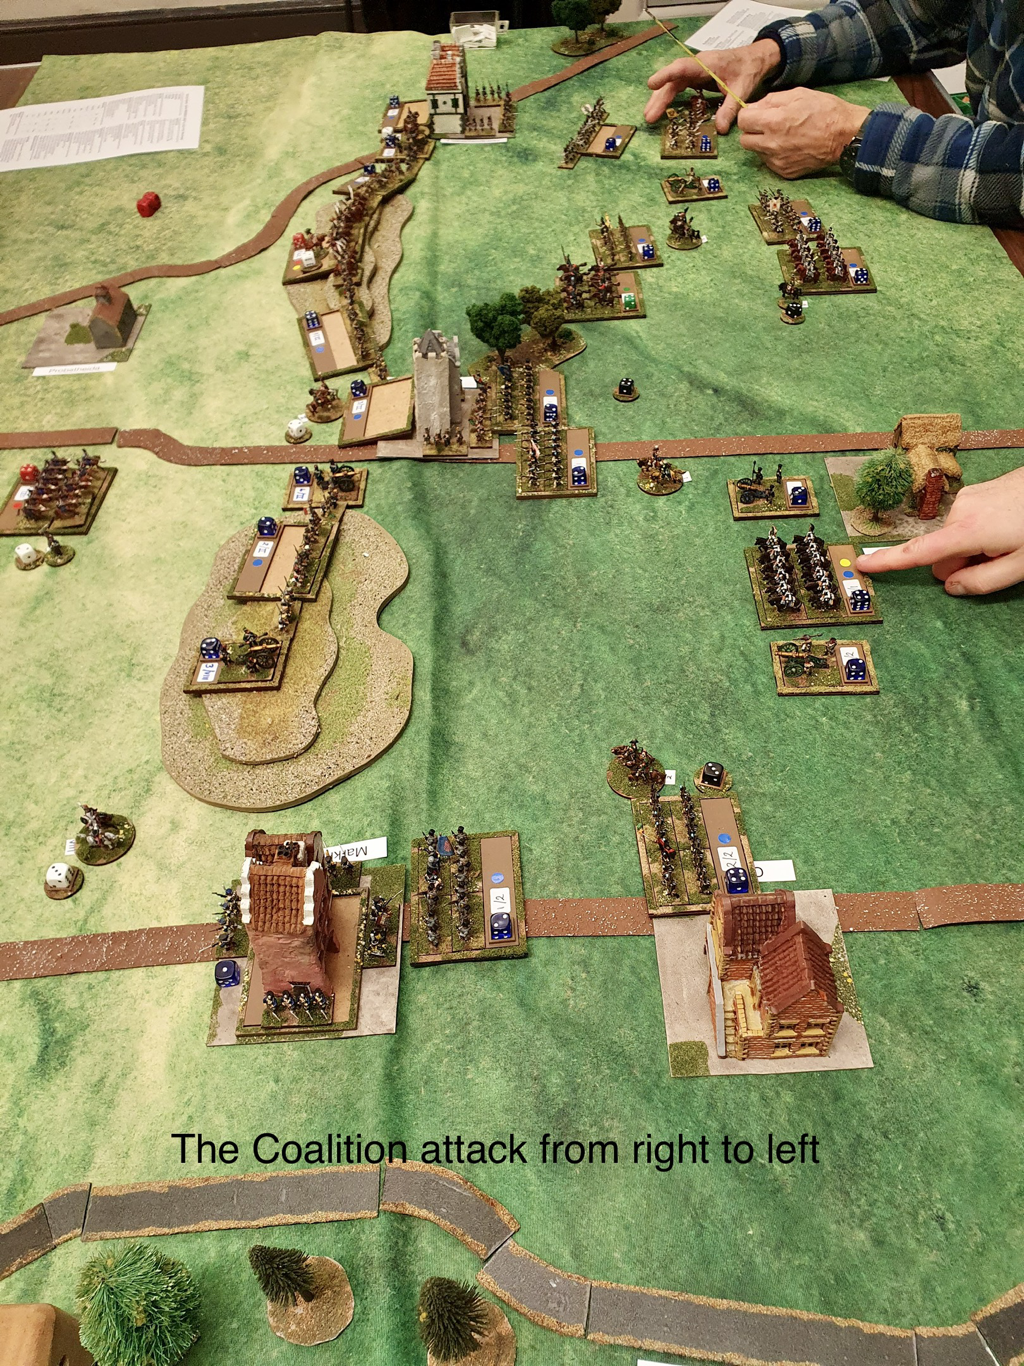
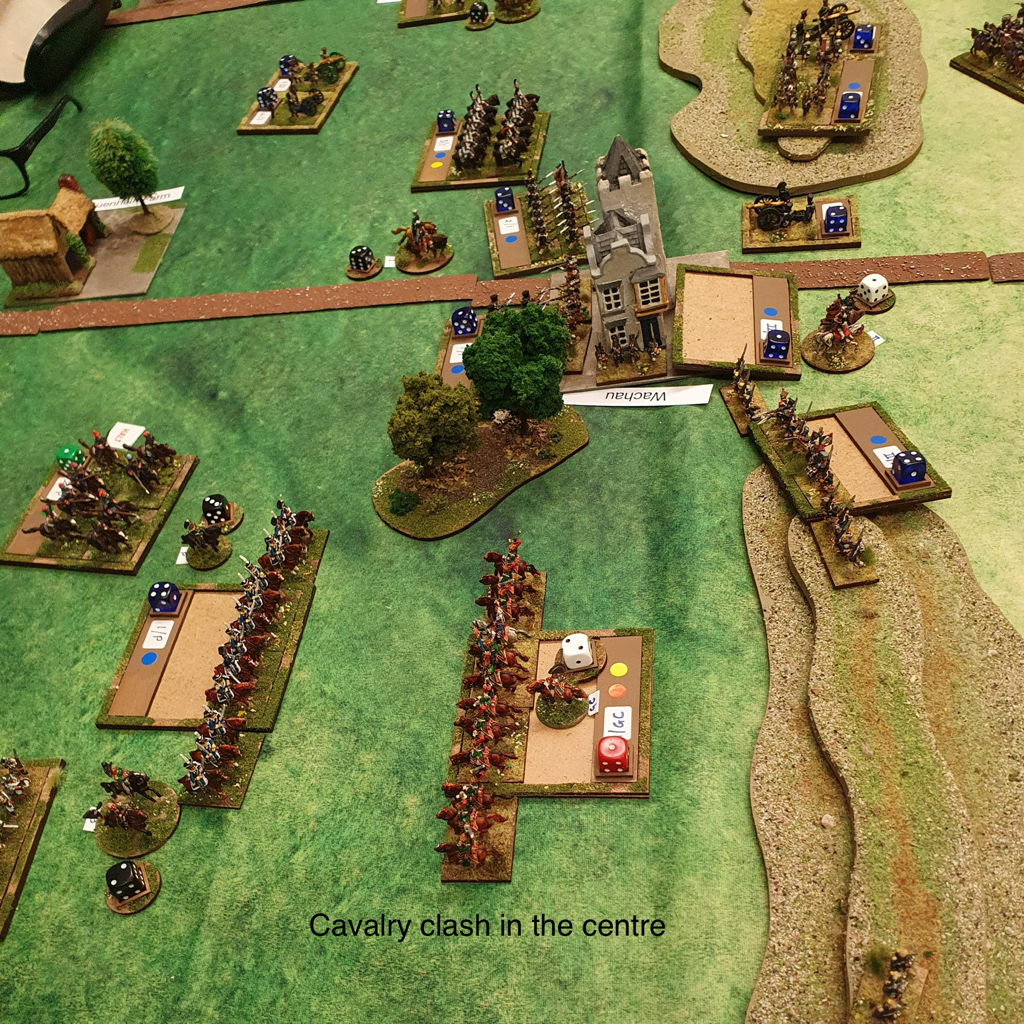
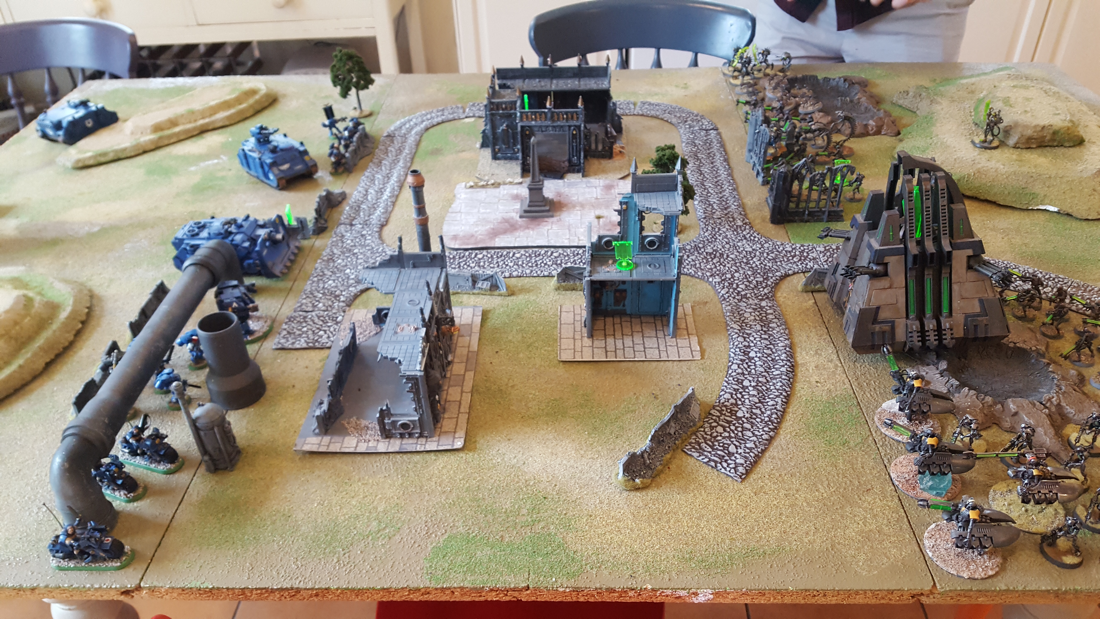
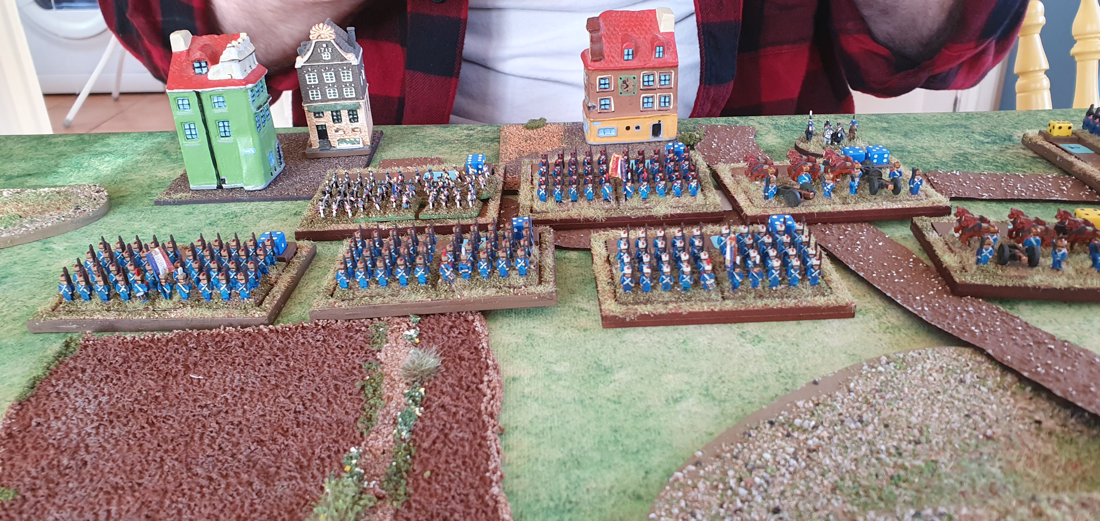
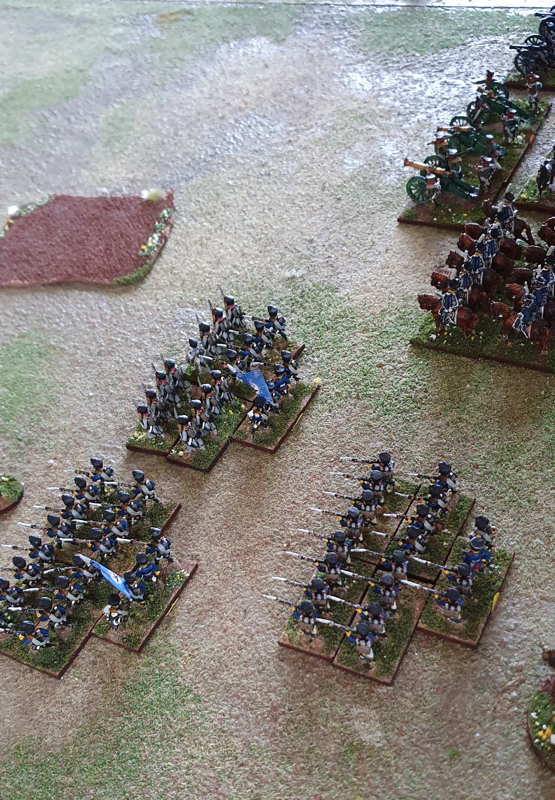
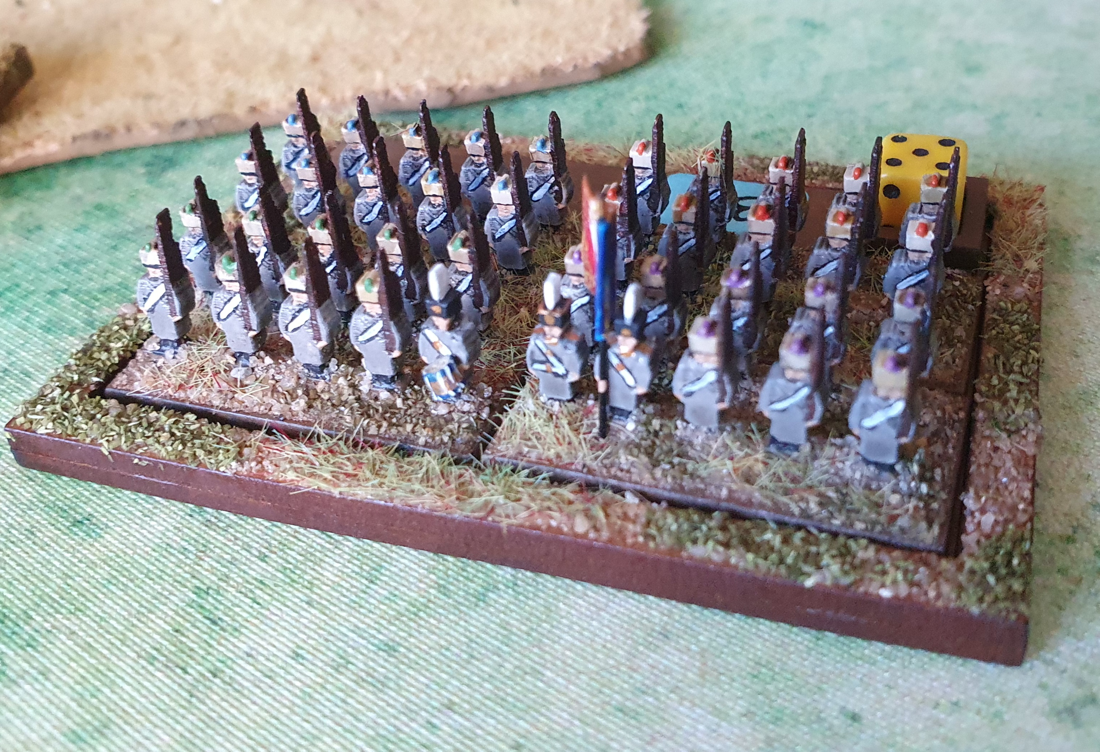
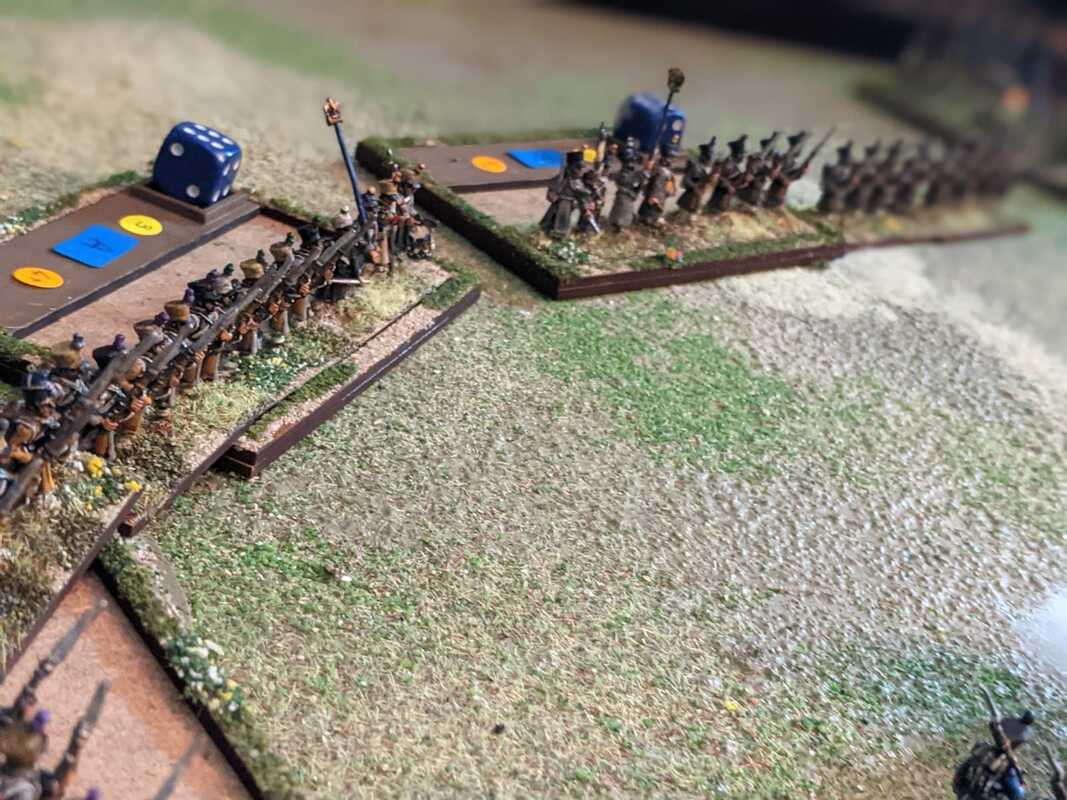
Two refights and a post-mortemI have recently hosted two games set in Eastern Europe, using For King and Parliament (FKaP) by Simon Miller and Anthony Brentnall. In both games we fought the historical scenario for the Battle of Lubar, which is on the 17th Century scenarios page here.  Background to the battle of LubarThe battle of Lubar (or Lyubar) was fought between a Muscovite-Cossack army and a Polish-Tatar force. It was the first engagement in the 1660 Ukrainian campaign, which took place during the Thirteen Years War between Muscovy and the Polish-Lithuanian Commonwealth. Lubar was actually an engagement over many days, most of which consisted of minor actions during an extended blockade. The action on 16 September 1660 was the only occasion when the full complement of both armies went toe to toe. We have played games based on Lubar several times in the past few years, first using Warlord Games’ Pike and Shotte, once with Maurice, then with Tercios by el Kraken and now using FKaP. All of them were interesting games but for my taste, FKaP gave the most satisfying game. Each of the rules we have used so far required a little tweaking to cover the troop types present at Lubar. The one set that we could have played without any amendment is ‘With Fire and Sword/Ogniem i Mieczem’ by Polish company, Wargamer. These rules and the fantastic figures and terrain released for them have opened up this period to non-Polish gamers and I have hundreds of their figures in my collection. The only thing is, I cannot get on with the rules themselves. As the saying goes, I am sure it’s not Them, it’s Me. A couple of weeks ago, Wargamer announced that they are to replace With Fire and Sword with a quite different version. I will pick these up and perhaps WFaS Reloaded will hit the spot. Adapting FKaP to Eastern Europe17th century warfare in Eastern Europe had more in common with the West European experience than some might presume, especially as the century progressed. So the bones of FKaP work very well as they stand. There were however some troop types, weapons and tactics that were unknown in the West and I wrote a small set of rule adaptations to cover them. Most of these were rules brought forward from Simon Miller’s Ancients rules, To the Strongest, so fitted in comfortably. I’ve adjusted them a few times after playtesting and the current version is on the scenarios page here. Lubar refight: Take 1Earlier this month I hosted the first refight, with Chris playing Muscovy and Paul leading the Poles and Tatars. Chris deployed his Cossacks in his main camp with a regiment in the forward trench on his right. He put Muscovite infantry with light guns in the redoubt on the left, with some cavalry behind them. The rest of the cavalry joined the infantry in his main camp. Paul placed his foot and artillery in his centre, with his cavalry divided between Potocki on the right and Lubomirski on the left. Paul left space on the left for his Tatar Allies to arrive (-and leave: the scenario makes their presence unreliable at best). The battle began with a spirited assault by the Tatars on the Cossack trenches, while the Polish infantry advanced on the hilltop redoubt. Chris responded to the hilltop assault by sending cavalry around the eastern side of the hill to threaten the Polish flank. Paul challenged this assault with pancerni and a unit of hussars, which blotted its copybook early on by failing to activate to charge, drawing the dreaded two 1s in succession. Paul was admirably calm about this and the hussars redeemed themselves on their next activation, smacking up some Muscovite Reiters and blocking Chris’ outflanking attempt. On the left the Tatar command steadily drained away, as units left the field in search of easier plunder, but not before they had caused impressive damage to the Cossacks in the trenches. Paul even managed to break into the main enemy camp, if only temporarily. The game ended with Chris handing over his last victory medal but he was still well established in his main camp and as Paul’s medals were also running low, we agreed this was more a winning draw than a walkover. In our after-action discussion, we agreed the game’s outcome was remarkably similar to the history: the Poles and Tatars had the advantage in the open with their superior cavalry, while the Muscovite and Cossack infantry were a tough challenge for the outnumbered Polish foot to beat. Both players attacked the scenario with gusto and picked up the rules easily. Refight Take 2After the first game I adjusted two aspects of the scenario. First, I moved the Muscovite camp one square westwards to make the land around the Muscovite hill more open to a flanking manoeuvre. I also changed the scenario special rules for the Tatar forces to make them last a little longer on the table. Game 2 saw Rupert’s Muscovites and Cossacks facing Kevin’s Poles and Tatars. Both sides deployed rather differently from the players in game 1. Rupert put his infantry in the hilltop redoubt, the trenches in the forest and his main camp, then deployed his cavalry in a line in front of the camp. He placed his field artillery in the trenches, initially facing forward but later rotating to enfilade the advancing Poles. Kevin drew up with his cavalry commands on the left and centre and his infantry on the right, facing the hilltop redoubt. On his first turn Kevin started an outflanking attempt with two infantry units and some dragoons, aiming to get around the eastern end of the Muscovite redoubt. Unfortunately, this manoeuvre was plagued by poor activation attempts throughout the day and by game’s end was still slogging up the table, without ever coming to grips. At the same time the Polish foot in front of the hilltop redoubt spent the day waiting for the outflanking force to get into position and so the entire Polish infantry complement was basically uncommitted throughout the game. The Polish cavalry and the Tatars, by contrast, were heavily engaged from the start. The Muscovite cavalry launched a spoiling attack as the enemy advanced, which considerably disrupted the Polish front line. However this attack then exposed the Muscovite horse, now variously out of pistols or spears and low on dash, to the still-fresh Polish second and third lines. The result was to be expected and in one turn, several Muscovite victory medals were handed over to the enemy. But with the Muscovite and Cossack infantry in the main camp now able to fire on the enemy cavalry, the balance of damage was nearly restored. It was clear that the Polish cavalry would not make headway against the entrenched Muscovite and Cossack foot and, with real time running low, we agreed that the Poles would not press home their attack and the battle ended. This was an interesting game, in which the deployment of both sides was unexpected. The Poles, already outnumbered in infantry, effectively left their Foot out of the battle by stacking them on their right and attempting the outflanking manoeuvre. Even if they had had more success with activation draws, the Polish ‘right hook’ would still have spent a lot of time getting into position before engaging. Kevin commented that if he had assigned the task to cavalry, the result could have been very different. On the other side, the screen of Muscovite cavalry across the centre delayed the Polish advance, but it was both outnumbered and outclassed by the cavalry facing it and it blocked the fire of its own infantry behind it. Once that infantry was given a free field of fire the prospects for the Polish horse became less rosy. Perhaps the Muscovite Horse could have withdrawn sooner once it inflicted the first reverse? All of this is easy for me to say, but I wasn’t playing the game. Both players showed considerable aggression and the cavalry confrontation in the centre was particularly hard-fought. Kevin certainly made the most of his flakey Tatar units, which did stay on table for longer than in the first game but were still sloping off the field at inconvenient moments. The game versus history: how credible were the results?I was frankly delighted by the way FKaP played out in both games. On a general level, the results were reassuringly similar to what happened in history, especially in the first game. The way cavalry performs is particularly satisfying. The clash between the Muscovite and Polish horse in the second game felt just right: the Muscovites were slightly, but not hopelessly outclassed in the initial combats but the Poles had the advantage of fresh units ready to challenge the increasingly tired Russians. As the saying goes, numbers have a quality all of their own.. The Tatars also behaved as I would expect. They are primarily a nuisance and with only one hit are brittle, but they can be devastating against an enemy that is already disordered and tired. Also, their sheer numbers can help them to overwhelm a superior opponent. The evade rule, adapted from To the Strongest, works fine. As for the infantry, pike and shot are suitably ponderous while the smaller Haiduk and Streltsi units are a little easier to move. Finally, artillery can occasionally do damage but isn’t a battle winner, which is appropriate for this period. In short, I think after these games that the Eastern Europe adaptations for FKaP are about right. Earthworks were an important feature of the battle of Lubar and I was impressed by the way they work in FKaP. Based on accounts of battles in this period, they should give an advantage to troops defending them but ought not to be impregnable: during the battle of Lubar, attackers did break in, both to the hilltop position and the main Cossack/Muscovite camp. I am increasingly impressed by FKaP: these rules are easy to learn and deceptively straightforward. New players pick up the mechanics very quickly but they face multiple choices and challenges each turn. The next battle I’d like to try is Polonka (great name!), the battle between Muscovites and Lithuanians fought earlier in the same year of 1660. This was an encounter battle without prepared positions and I’ll be interested to see how it plays with these rules. Figures and game aidsThe figures in our games were 15mm by Wargamer, Essex Miniatures, Lancashire Games (both from today and the 1980s) and a superb Spanish producer who had a stand at Salute some years ago, but whose figures I haven’t seen again. The game mat is by Deep Cut Studios, bought from Simon Miller’s Big Red Bat Shop. We used Simon’s ‘chits of war’ for activations, also available from his shop, and used ten-sided dice to resolve combats.
6 Comments
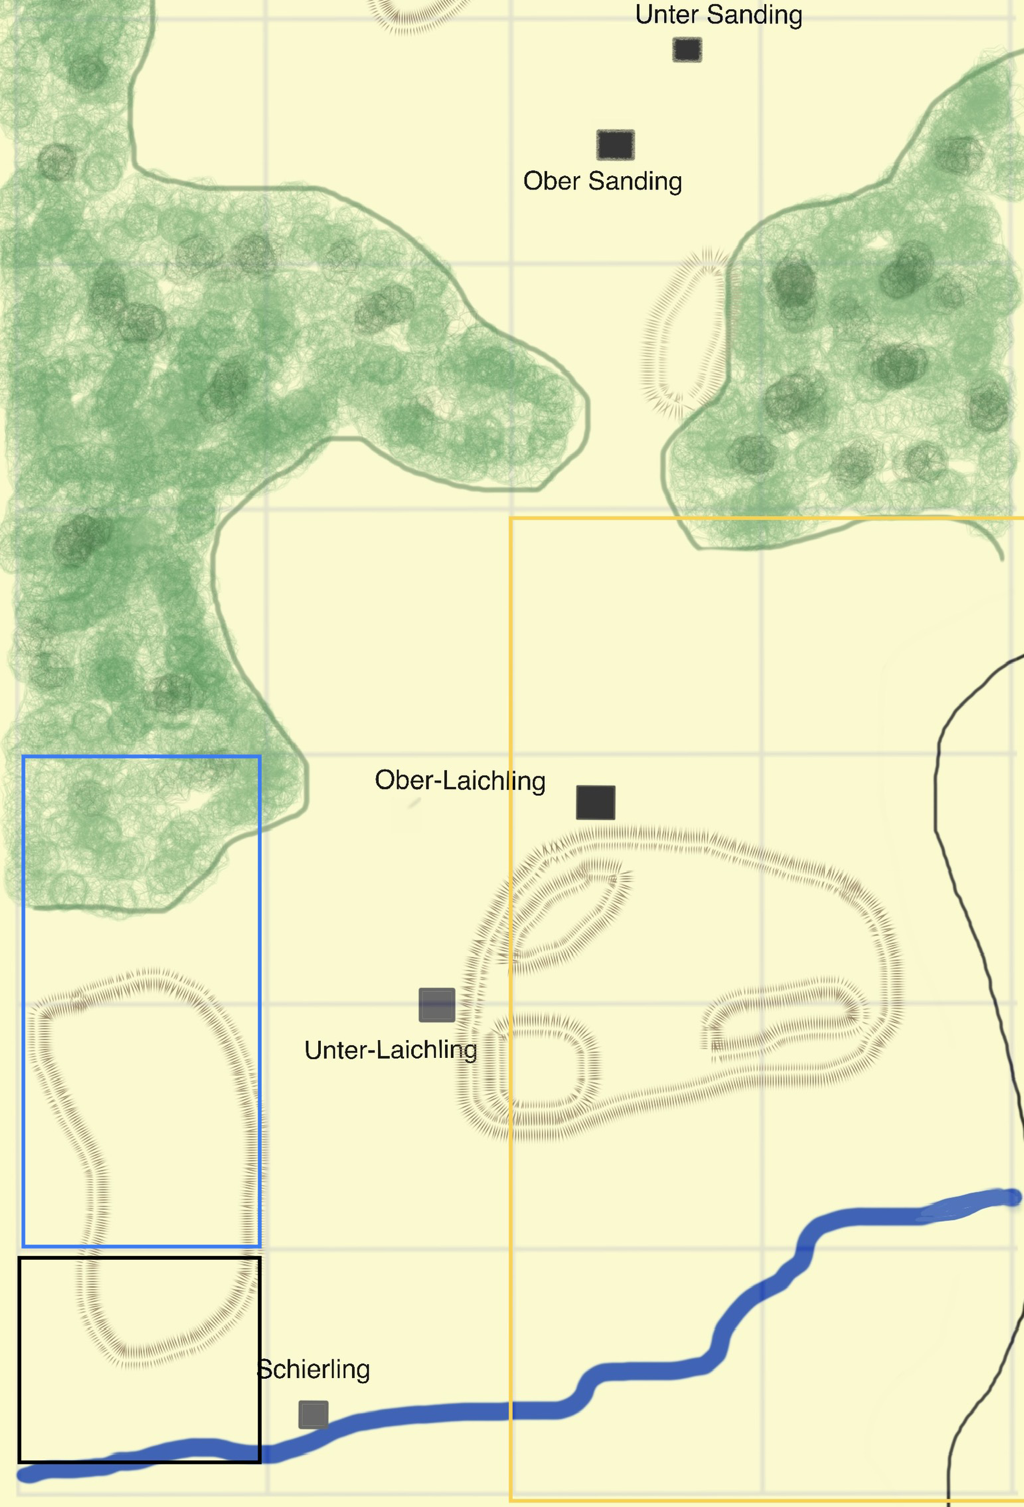
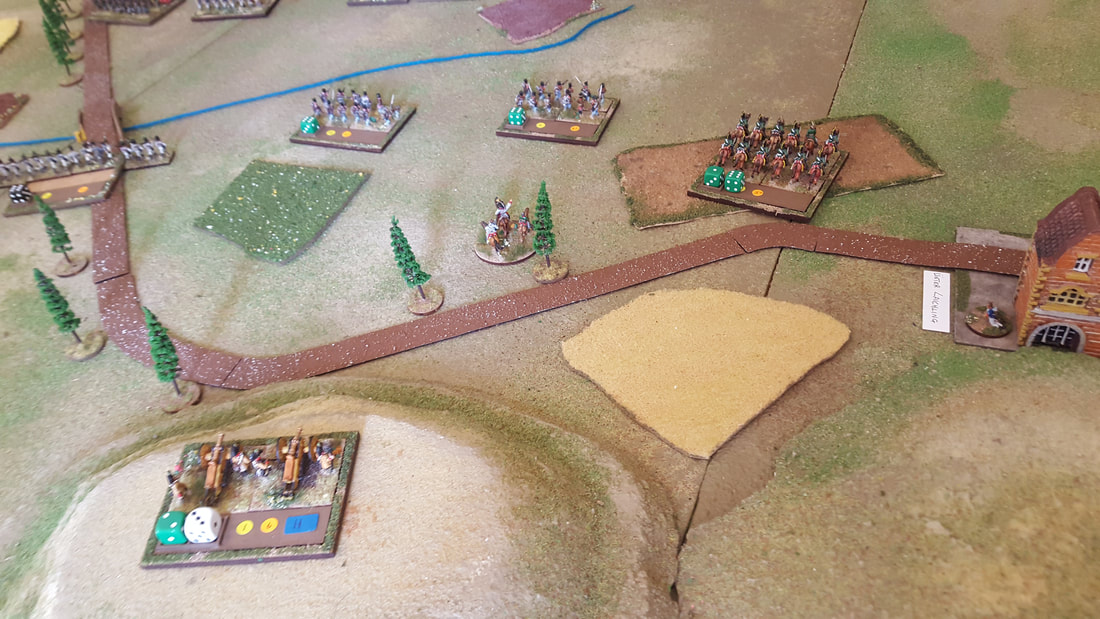
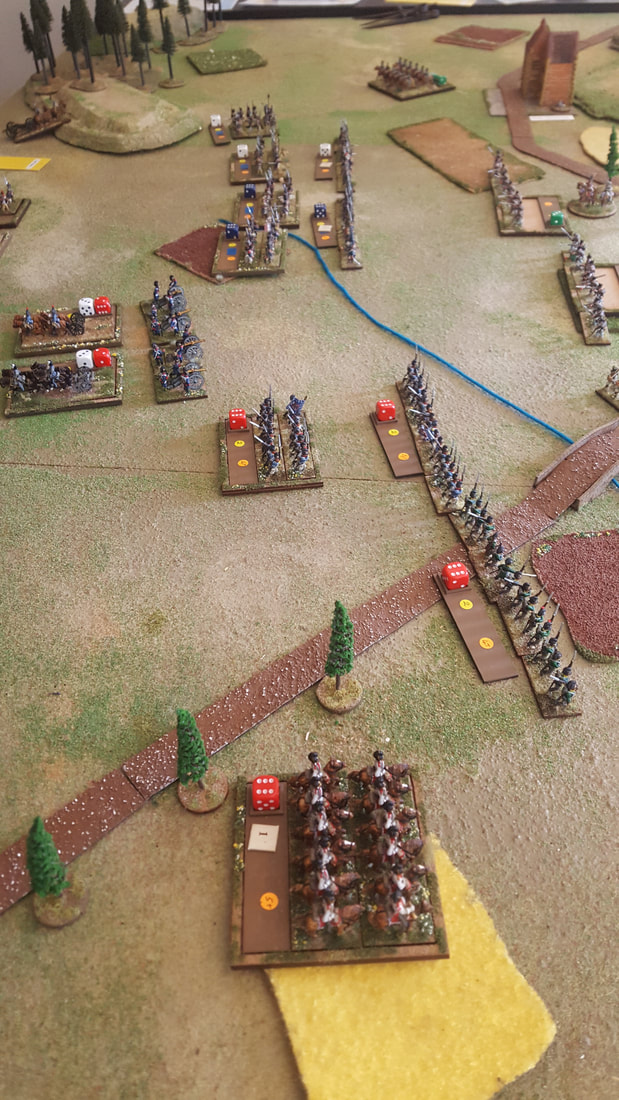
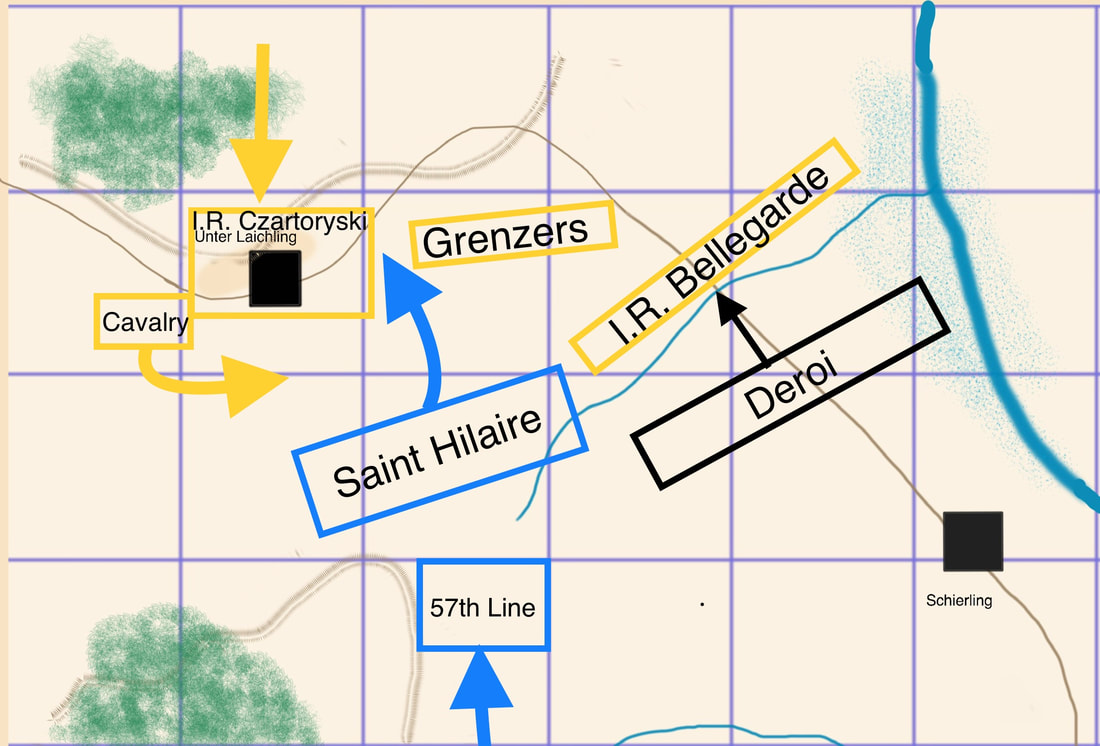
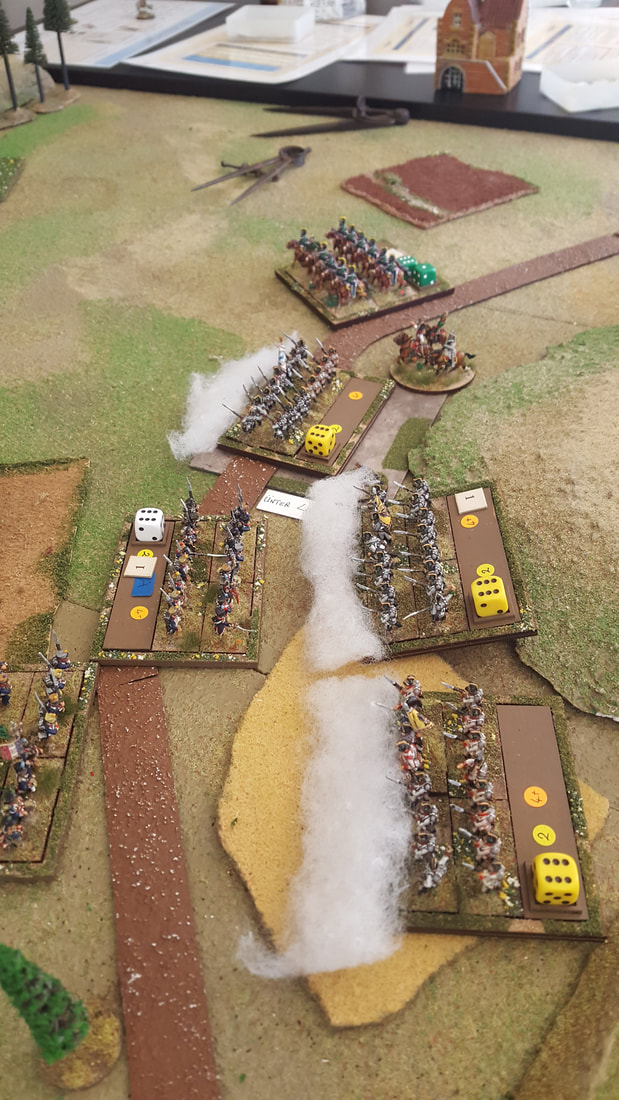
 A bit of August LardI’ve always liked the look of rules by the Two Fat Lardies but until recently I’d only played Chain of Command, What a Tanker and Pickett’s Charge (which while excellent isn’t exactly a full Lard experience). Lately I have started visiting Staines Wargames Club on a Friday evening, where Lard games are popular. So in the space of a fortnight I had my first taste of Infamy! Infamy! and of Sharp Practice. Both games were great fun. Arresting the Chief’s sonIn my first game of Infamy! I was required to take my Roman patrol to a Gaulish village to arrest the chief’s son for unspecified anti-Roman activities. The men of the village were out hunting at the time my force arrived. Chris had set up an atmospheric village with huts, vegetable patches, sundry rubbish and a palisade wall, surrounded on three sides by forest. I had to check each hut for the presence of the chief’s son, as quickly as possible because Ian’s hunting party was due back at any moment. The patrol found the suspect in the hut furthest from the village entrance, protected by a group of elite Gallic warriors. Luckily the search party were veteran legionaries and after a tough fight, the chief’s son was in custody. Meanwhile the hunting party had started to arrive. Fortunately for the Romans, no Gauls arrived between the patrol and its line of retreat. The patrol started to retire from the village, pressed by a growing band of angry Gauls. Had the chits been drawn differently, the captive would have been freed but I was fortunate to get enough distance between the patrol and its pursuers that we concluded the arrest had been carried out successfully. This was a tense and engaging game which really benefited from the storyline. Alas, I was too busy searching huts to take photos but the pretty table and lovely figures were a big contributory factor. Crossing the NiagaraThe following week Chris hosted a game of Sharp Practice, set in the War of 1812. Paul commanded his own British force while I had Chris’ Americans. The scenario was Crossing the Niagara from the War of 1812 Sharp Practice supplement, which involved a US force landing on the Canadian bank against British/Canadian opposition. Again the table was very fine, with some particularly lovely buildings (and this time I have the photos to prove it). 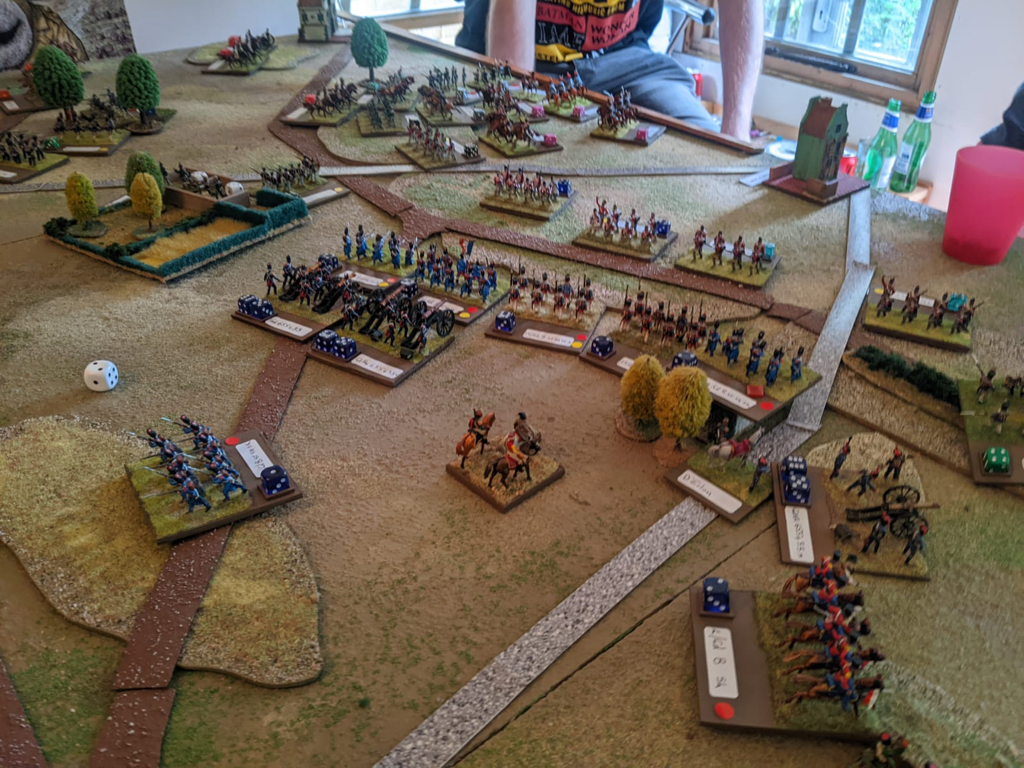 The US forces landed by boat in two waves, One group of British regulars were on the scene at the start while Canadian militia and an artillery piece arrived during the game to reinforce them. The challenge for both sides was to get their troops organised and firing before the opposition managed it. In our game, my US troops were able to form a firing line first and forced the forward-most British unit to retire. The US force maintained this edge for the rest of the game but did not dislodge the British entirely from its positions at the end of the table. Nevertheless the umpire concluded that the US beachhead was secure and so awarded the US a winning draw. I come late to Sharp Practice and there is nothing original I can add to the reviews already out there. I will say that I enjoyed it very much. The movement and firing mechanisms couldn’t be more straightforward. I love the random sequence of play, which gives suspense to every chit draw. I particularly like the rule that made it difficult to stop my militia from blazing away once they started firing. These rules are great for narrative play and Chris managed the story very well. On the strength of these games I have bought a pdf of Sharp Practice and some movement trays to use with my 15mm Napoleonics. I have a lot of individually based skirmishers on 20mm round bases and just need to add more command figures. I did briefly consider a 28mm contingent but my investment in 15mm is too big, both in figures and scenery. I have a lot of surplus skirmishers since changing rules from Lasalle to Lasalle 2. Plus, I should be ready to game with them months earlier than if I started on 28s. Being an impatient Wargamer, that is a big advantage!   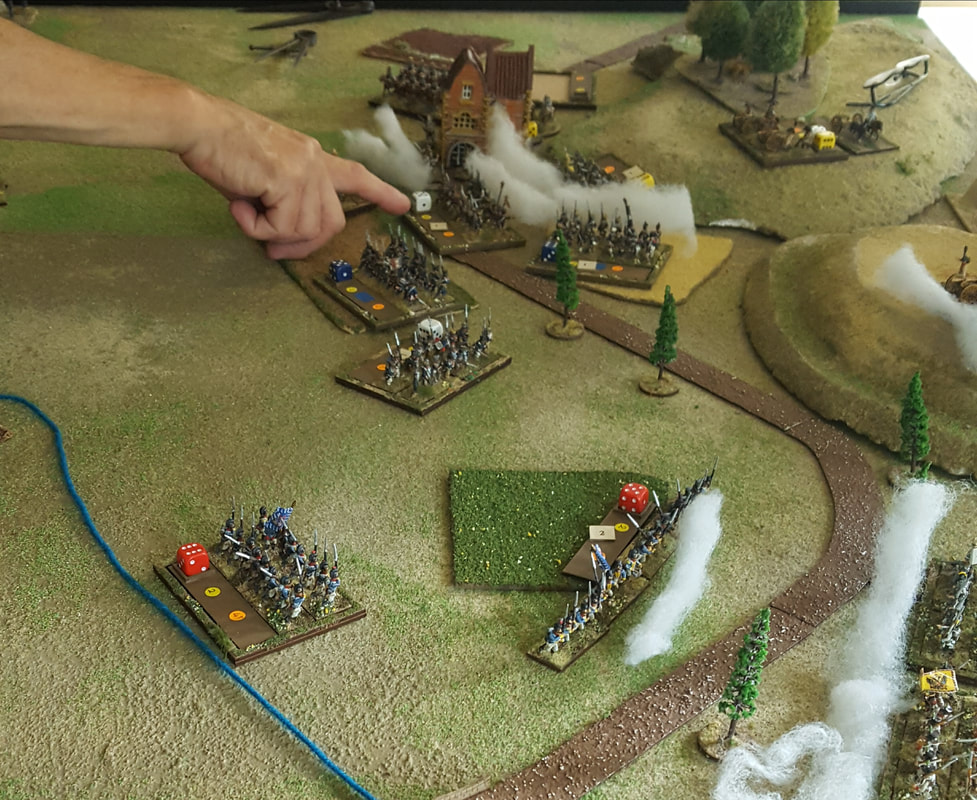 Building our experience with Lasalle 2The other day Chris, Paul and I played a game of Lasalle, using the scenario for Unter Laichling in April 1809, "Bristling with Guns", on the scenarios page here. Chris took the Austrians of Rosenberg’s IV Corps while Paul led the French (St Hilaire) and Bavarians (Deroi). Most of Paul’s troops began on table while fully half of Chris’s command were in Reserve. There were two objectives, one each in the villages of Schierling and Unter Laichling. The Austrians deployed with the Bellegarde Regiment on the left, two battalions of Grenzers in the centre and the Vincent Chevaulegers on the right. They did not garrison the village of Unter Laichling at this stage. St Hilaire deployed in the French centre and Deroi’s Bavarians began on the right. Paul left the wooded area on the French left unoccupied. The French and Bavarian artillery deployed in the hinge between the two commands. The Franco-Bavarians advanced briskly on the Austrian positions, although the left of the French advance was slowed somewhat by the threat from the Austrian cavalry. An artillery duel began, in which the Franco-Bavarians gained an edge, twice disrupting an Austrian battery. Where the hell are my reinforcements?Both sides were awaiting reinforcements and the French 57th Line and Austrian Czartoryski regiments appeared relatively early. The Czartoryski arrived just in time to occupy Unter Laichling before Paul’s battalions attacked. Had the Austrian cavalry not been slowing the French advance down, the village might have been taken without a fight. The cavalry also had the effect of channeling the French advance into the centre, which prevented Paul from attacking the village from three sides. Although the Austrian right was holding its own, in their centre and left Franco-Bavarian weight of numbers was starting to tell. Chris’s final reinforcements kept refusing to appear and in their absence, his Grenz regiments in particular started to crumble in the unequal struggle. In the final turn, Austria was reduced to her morale break point. The French had still not taken Unter Laichling, although Paul had lots of fresh units and with more time he could have taken the village, However the last turn represented nightfall and moreover the foot-dragging Austrian reinforcements had finally arrived on the table. We agreed therefore that the French would have to withdraw to their side of the valley and renew their attacks in the morning. Nevertheless, for bringing the Austrians to their break point and holding one of the two objective villages, the French secured a minor victory. Honours about evenWith hindsight, I reckon both players performed better on their right. Paul had the advantage with his Bavarians from the outset, maintaining pressure on the Bellegarde regiment facing them (Neutral I may be but I was secretly pleased for the Bavarian figures: this was their first ever game!). Chris, meanwhile, used his solitary cavalry unit well to slow down and constrict the French advance. He slipped a battalion into the village just in time and his right was still secure by the end of the game. This was Paul’s first and Chris’s second game of Lasalle 2. They were soon on top of the rules and the game flowed well. They both seemed to have fun and are ready to play again so next time I’ll add some advanced rules. I’m keen to try the advanced skirmisher rules in particular. Unter Laichling as history and gameSo how did the scenario play against the history? Pretty well I think, although of course there are conflicting accounts of exactly what happened on the day. One memoir claims the French took the village of Unter Laichling but doesn’t explain why they didn’t end the day in possession. It seems likely they either never got in or did so, only to withdraw under Austrian pressure. Whatever, as in the real encounter, the Austrians in our game ended the day still in possession of the village and the hilltop position, where they would be when the battle of Eckmühl began the next day.
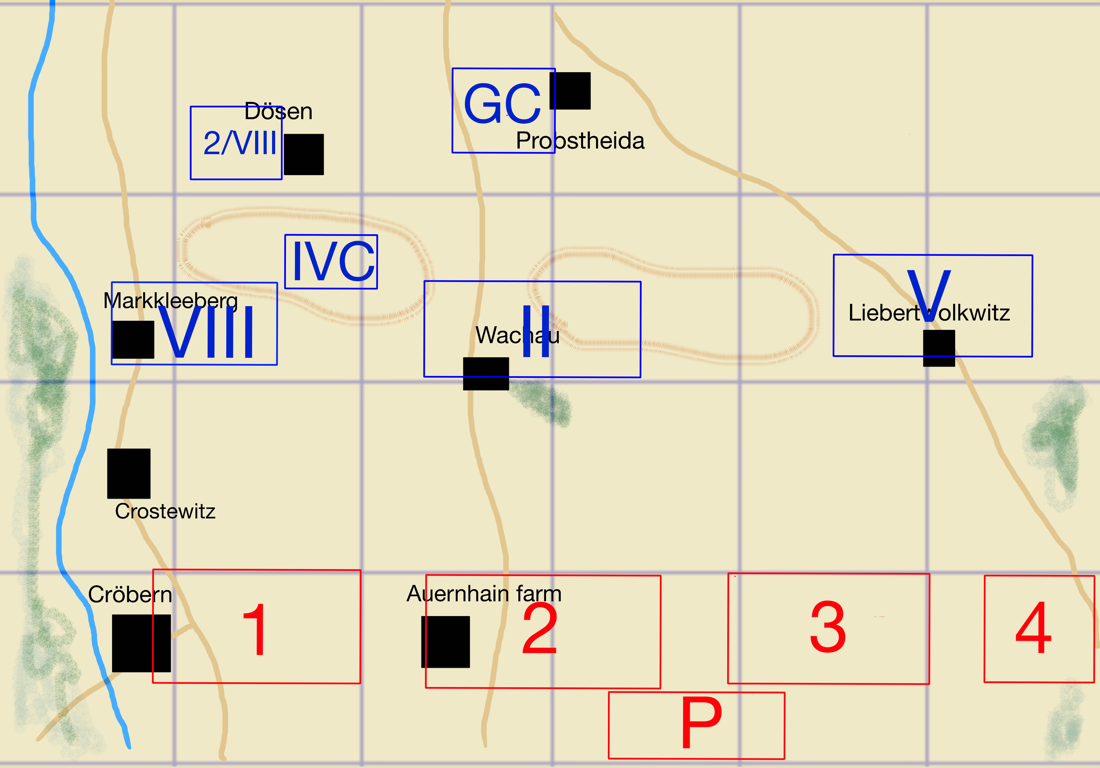
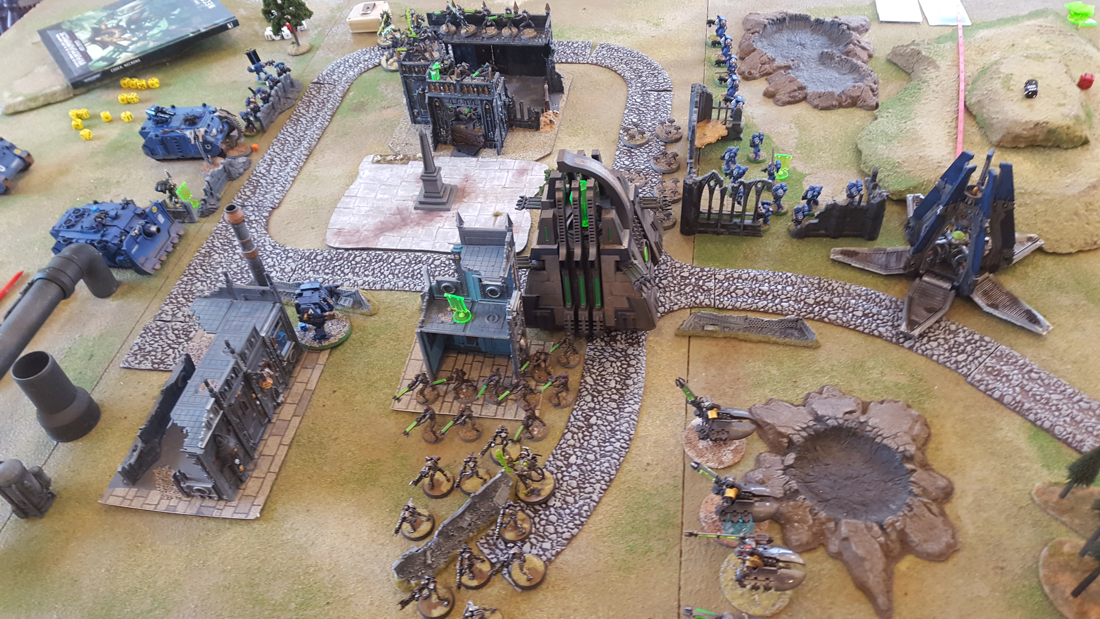
And how did the scenario play as a game? Again, I think pretty well. The points values equate neatly to an attack-defence scenario in the rulebook and while both sides seemed to feel under pressure, neither complained of being unfairly disadvantaged. I do regret that Chris just couldn’t roll the dice to get his final reinforcements onto the table, despite the odds of succeeding improving every turn. This did limit his options and I was grateful for his philosophical acceptance of his bad luck. That said, Austrian accounts of the battle report that the Archduke Charles’ sole contribution to the day’s fighting was to redeploy certain units without informing their Corps commander, and so handicapping the performance of his own army. Perhaps Chris’s misfortune with his reinforcement dice was a fitting echo of Charles’ meddling on the day! What next? While the fight for Unter Laichling was going on in the South, the rest of Davout’s Command was advancing through the hilly woodland to the north, trying to find and envelop the Austrian right flank. I am working on a scenario for this fight and will be interested to see how Lasalle plays in dense terrain.  Copper is disappointed by my Ultramarines’ performance We and Games Workshop got historyBetween 1997 and about 2015, Games Workshop was a central part of our family life. We played every system they released between Gorkamorka and 40K 7th edition, with the exception of Inquisitor. Nick, our older son, was (and still is) a gamer above all while his younger brother, Will, enjoyed the modelling and painting, even selling his skills to raise cash while at university. I both played, but not as well as Nick, and painted, though not a patch on Will. The boys have grown up and moved out and our gaming opportunities have become rarer. Wargames still have a pull: I started playing historical games again and Nick has been happy to join in, while Will still enjoys picking up obscure modelling materials at wargame shows. At most, we now play a couple of GW games a year. I stopped buying White Dwarf soon after Age of Sigmar was released, not in protest exactly, but the new universe just didn’t interest me. 40K 8th edition also passed us by, though I did enjoy the one brief game that Ian Barber ran to introduce the new system. In short, for no particular reason, my 40K knowledge ended with 7th. My Firstborn: beaten by my first bornUntil autumn 2020 that is, when Nick bought me the Indomitus boxed set as a surprise lockdown gift. We had both been curious about 9th edition and he couldn’t resist the bargain of large new forces for two of our favourite 40K armies. A small test game between Orks and Cadians went well (for the Orks), Christmas brought the Space Marine and Necron codices and we were back in the thick of it. Nick came over on Father’s Day and we played our first biggish game with the new rules. Nick took Necrons and I led the Ultramarines. Nick had some of the new Necron models but my army was a continuation of my 7th edition force. Who knew when I originally collected them that I would be fielding ‘Firstborn’ Space Marines? Honestly, I turn my back for a moment and the lore changes everything! We fought over a ruined Imperial settlement, which allowed a lot of cover to both sides. This favoured the close combat specialists who could close the range without exposing themselves to too much firepower. I was happy with my deployment, including landing a drop pod and some terminators behind Nick’s line, so for a short time Ultramar seemed ascendant. Then Nick’s warriors shot up my Assault Marines, his scarabs ate up my dropped squad and his destroyers destroyed my razorback squad. That basically put the lid on my efforts and by game’s end he held all but one objective. It was an exciting game that moved fast despite us both having to refer often to our faction rules. My mistakes included focussing overmuch on Nick’s Monolith, which I did nearly destroy but only after pounding it with my Vindicator for most of the game. Those shots could have been more successful thinning out Nick’s Necron warrior horde. I also failed to appreciate that under 9th edition Ultramarines can fall back from close combat and still fire. Had I done that instead of staying engaged, I might not have suffered the humiliation of a whole squad succumbing to a tide of tin cockroaches. My ‘gun line’ on the other side of the table might also have lasted longer by keeping more distance between itself and the Skorpeth destroyers. Just wait until next time! As ever, it was a pleasure to be across the table from Nick, adding another chapter to the story of our games since the late 90s. That’s a lot of happy memories, for which I will always be grateful to Games Workshop. Good to be back?So how does it feel to jump straight from 7th edition into 9th? I can’t deny it’s confusing. I suppose vehicles have changed the most and they strike me as more resilient than before. Right up to 7th edition, a couple of lucky dice rolls could wipe out a very expensive piece of kit. Things can still go wrong for vehicles but they generally hang around for longer, no doubt making them a less risky investment. The stripped back rules themselves are appealing and I especially like the way morale is now treated. I love the extra involvement provided by command points, which give a nod to Chain of Command, one of the best World War 2 rules on the market. Anything I don’t like? Nope. I even like the Primaris Marines, who seem more like the superhuman giants encountered in 40K literature. The ‘Firstborn’ plot twist is a clever bit of reverse lore engineering. I would, however, observe that 9th edition seems no less complex than older editions. The basic rules are now wonderfully simple but the complexity has transferred over to army and faction rules, the range and detail of which is bewildering. I had expected today’s 40K to be more accessible for new, casual or ageing players like me, but I don’t think it is. If I am to play my next game half-way effectively, I’m going to have to revise, remember and apply all the subtleties required to get the most out of an Ultramarine force. I really look forward to our next game but will timetable in some serious pre-fight preparation first. 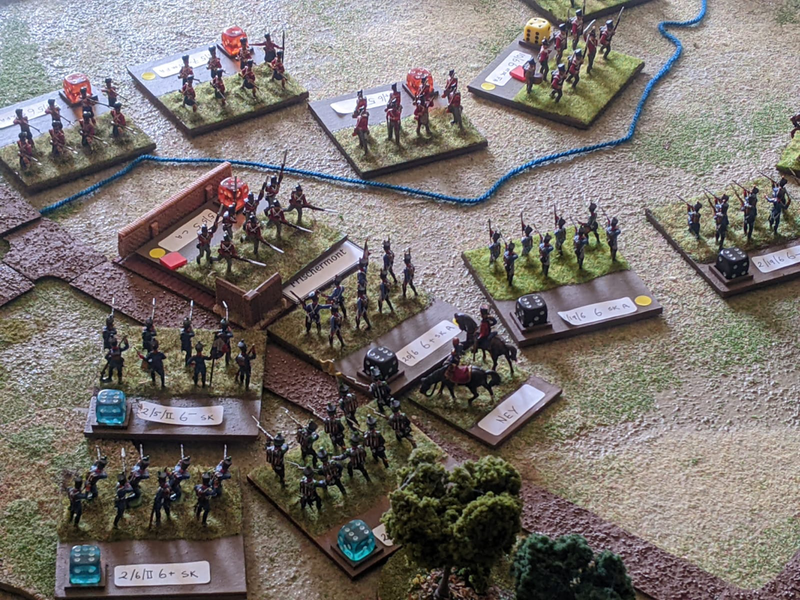 Hell, yeah! When Firstborn were metal... I have been working on some new scenarios for Honour Games' big battle rules, Blucher, based on the battles around Leipzig in October 1813. I began by revisiting one I had already uploaded for Mockern, the fight to the north of the city between the Army of Silesia and Marshal Marmont. I wrote this a few years ago and reading it again, I realise it wasn't the most helpful document for somebody looking for a scenario without the need to research the historical battle. For example, I failed to explain which units were infantry and which cavalry. I also left out some key information like the number of MO dice and a clear reinforcement schedule. So I have now uploaded an amended scenario which will, I hope, be more useful than the previous version. While I was at it, I also tweaked the scenario for Montmirail, 1814, to make it more accessible. I decided it was also time to remove the one and only scenario for Lasalle 1, since anybody who still wants to play Lasalle 1 can adapt a scenario from Lasalle 2 without bursting a blood vessel. Both scenarios can be found here.  Last month Chris and I played a game of Lasalle 2, the tactical Napoleonic game by Sam Mustafa of Honour Games. Chris was new to the rules and picked them up very quickly. We replayed the Markkleeberg 1813 scenario that I had first tried on Spencer and Dan, described here. After the first game of Markkleeberg I had changed the victory conditions by removing the sudden death victory provision, which allows a player to win by ignoring geographical objectives and simply killing enough enemy units. In our first game Spencer had bunched all his forces into his right wing and tried to overwhelm Dan’s left, while leaving Markkleeberg with its objective marker alone. A valid approach in a stand-alone game (and it nearly succeeded) but it meant the battle played out very differently from the actual events of 1813. With sudden death removed, victory now depends on who holds real estate in two locations: the village on the Polish right and the hill in their centre. I also modified the arrival of some Prussian reinforcements, after rereading the sources and producing a ‘best guess’ sequence of events drawn from the five different accounts that I have of the action. The current version of the scenario is here. I am happy with these tweaks as the game with Chris played out more closely to the actual battle. My Prussians tried and failed to kick Chris’s Polish garrison out of Markkleeberg while the Russians attacked the central hill. To cut a long story short, after a bitter struggle the Russians briefly reached the objective on the hill but couldn’t consolidate their hold and the Poles retook it in the final turn. Victory therefore went to Chris, with my troops back near their starting positions in the valley. The game moved quickly and we both enjoyed the rules. The fluid turn sequence keeps both sides fully involved and presents the players with tricky choices about how to use their scarce momentum points. There was only one incident when our experience of ‘conventional’ rules made us question whether what happened was right. Namely, a regiment of cavalry charged and overthrew an enemy battery, without that battery being able to fire canister as the cavalry closed. This did feel tough on the guns but chewing it over afterwards, I concluded the issue was of our perception rather than a failing in the rules. In most circumstances, Lasalle would allow a battery facing cavalry to its front the chance to fire before that cavalry charged. It just happened in our game that the battery had already fired at a different target earlier in the same turn, so it is plausible that the cavalry could have closed while the battery was reloading. Also, even without firing, there was a slim chance that the battery could have won the combat against the charging cavalry, which, had this happened, might have been rationalised as the gunners successfully loading and firing canister in the nick of time. Try these rules! It’s interesting to see how fashions in wargame rules evolve. When I started playing Napoleonics in 1974 or thereabouts, the fashion was for simultaneous turns, highly differentiated national characteristics, detailed casualty calculations, quirky game aids (anybody remember the bounce stick??) and almost no command friction. In recent years there has been a shift to IGO-UGO turn sequences, more abstraction of the mechanics of combat, and greater focus on the options and limitations placed on command control. All welcome developments as far as I can see. The combination of MO points and totally fluid turn sequence in Lasalle 2 takes us into yet new territory. This approach may sound odd to some, but I would urge every Napoleonic gamer to give it a try. I suspect that with Lasalle 2, Sam Mustafa has set a new standard for tactical Napoleonic games that other rules writers will be emulating for some time to come.
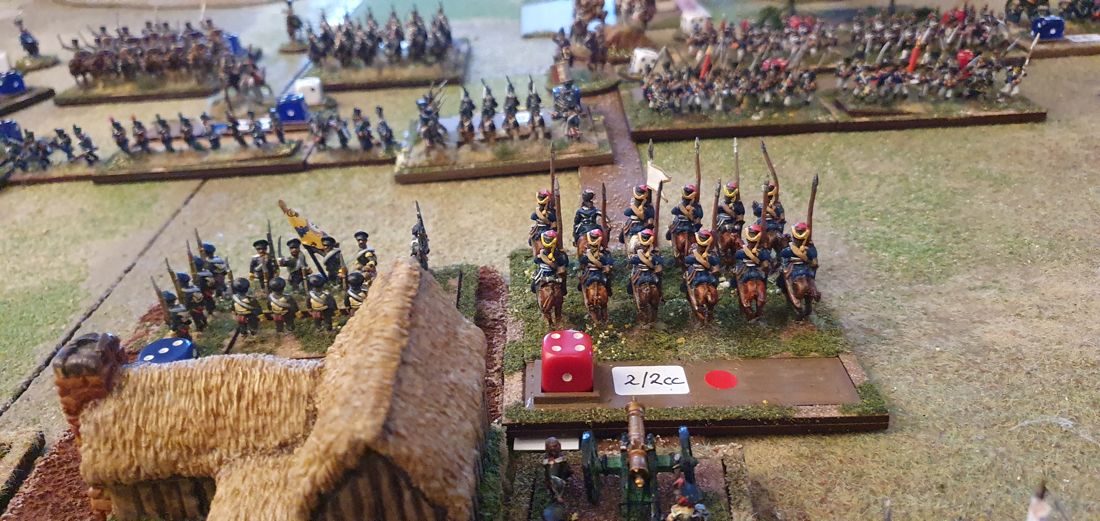
The Allies advance The revised version of Sam Mustafa’s tactical Napoleonic rules, Lasalle, has been some time coming. If I recall rightly, it was first trailed in mid-2019 with the aim of landing in 2020. The release timeline then went vague, presumably in part due to Covid, and it finally appeared in February this year. As he usually does with new rules, Sam put various teasers and extracts on the Honour website in advance, including two quick reference sheets: one over several pages and a single-sider for hardcore players. I bought the new rules in pdf and print. As is now the Honour standard, they are well laid out, clearly written and nicely illustrated. There are also several opportunities to find out why a rule was written as it was and generally to understand the author’s design philosophy. If you haven’t read the rules yet, I’d say their most important feature is the lack of a fixed player turn or sequence of play. Both players begin each turn with a variable number of momentum points, with which they can pay for various actions. The initiative can pass between the two sides several times until both run out of momentum, when the turn ends. The order in which a force might move, fire, change formation, charge or rally is entirely up to the player. It makes for some tough choices, careful timing and steady nerves. After a read-through of the rules and some solo moves I thought Lasalle 2 looked promising, but I was finally able to test it with live opponents last Friday, in our first face to face game since March last year. Now, I suppose I should aim off a bit for the excitement of live gaming after such a long break, but I had a fantastic time and was absolutely delighted with these rules. 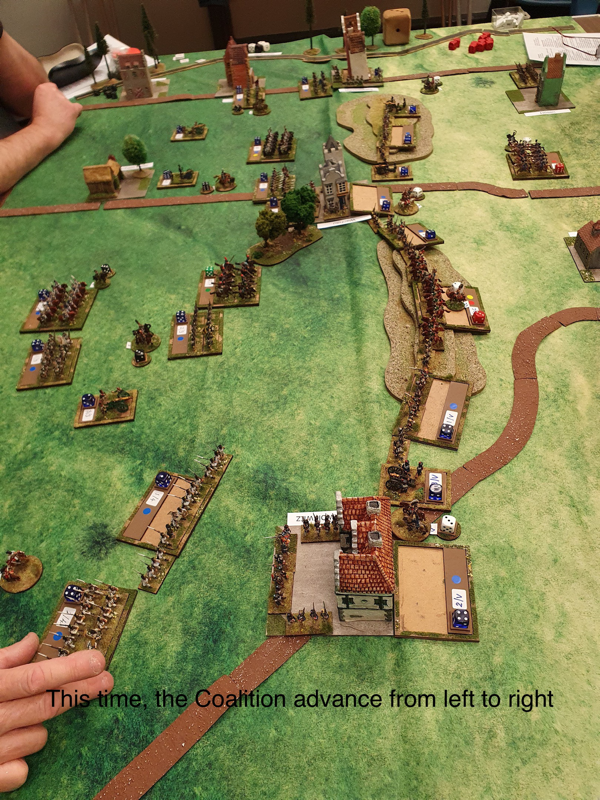 Dignity, always Dignity! A brief battle reportWe used the Markkleeberg scenario from the first day of the battle of Leipzig, on the scenarios page here. Dan took Poniatowski and his Poles, reinforced later by French from Augereau’s Corps. Spencer took the role of Kleist, assaulting the village and the high ground to its north east with the Prussian 12th Brigade and 14th Russian Division. Dan deployed the Vistula regiment in Markkleeberg and the rest of his infantry behind the stream, with artillery on the hill behind. He divided Uminski’s Cavalry Division, putting the cuirassiers on the eastern flank and the Krakus and horse artillery behind Markkleeberg in the West. Spencer masked off the village with three artillery batteries and massed the rest of his force on the eastern half of the table, with the Prussians in front of the Russians. Spencer advanced on the Polish line behind the stream, halting to exchange fire while his landwehr lancers sent Dan’s cuirassiers packing in an upset victory (I bear some responsibility for this: I encouraged Dan to come forward, assuring him he wasn’t running a big risk. I was wrong. All things considered, he was remarkably good about it!). Dan’s artillery did some impressive damage early on, destroying a Russian battery and disrupting several battalions. Spencer’s troops were initially packed in a small area so suffered a fair bit from bounce through, although they rallied most of this off. The Polish Infantry in line had the better of the firefight with the Prussian columns, as one would expect. Dan then decided to exploit the disruption of the left hand Prussian column by crossing the stream and attacking it. This was a great success and the Prussian unit was destroyed. Dan used the ‘huzzah’ counter to then bowl into the flank of the next unit along, in which the odds were stacked in his favour. However, Spencer achieved his second upset victory of the game, which stopped Dan’s attack and saved Spencer’s bacon. The attack had been so well conceived that Spencer actually apologised for defeating it. On the western flank, the artillery duel didn’t do much damage, except when Dan took it into his head to send the Krakus skittling South past Markkleeberg, where they took a pasting from Spencer’s cannon and scuttled back to their starting position with several empty saddles. It appears that Dan had heard of the Charge of the Light Brigade but didn’t know how it turned out.... It was his only misstep in an otherwise masterful game. Back East, reinforcements arrived for both sides, in the nick of time for Dan as Spencer was just swinging around his flank and racking up kills. The landwehr lancers wiped out a French battery soon after it entered the table and two Prussian columns destroyed Dan’s eastern-most Polish battalion. The French reinforcements managed to plug the gap in the line but Spencer was one unit away from inflicting sudden death on the Polish side. In the final stage, Dan sent his three surviving Polish battalions over the stream and into the Prussians with whom they had been engaged for most of the game. The Poles had inflicted more losses in the preceding firefight and so were in better shape, but even so we were not expecting quite the success they enjoyed. First one, then a second Prussian battalion was destroyed, pushing Spencer past his sudden death limit. “What do you think of the rules so far?” “Brilliant!”We thoroughly enjoyed the game and were greatly impressed by the rules. The momentum rules at their heart work smoothly and keep both sides involved throughout the turn. The concepts are easier to play than they are to explain and the fluid sequence of play makes for a tense and exciting game. The simple movement rules spared us the fiddling and bickering that accompanies some tactical rules I know. The rules don’t impose a straitjacket on the players but they reward ‘historical’ deployment and formations and punish rash actions, as Dan’s cavalry found out! As ever, Spencer and Dan threw themselves into the game with good humour and sportsmanship. Although his victory was snatched from him, Spencer was so impressed by Dan’s game-winning attack that he was genuinely pleased it succeeded. It is always a pleasure to play with such people. I’d like to play Markkleeberg again but our next outing with Lasalle will see French and Bavarians facing off against Austrians. Lots of Austrians. 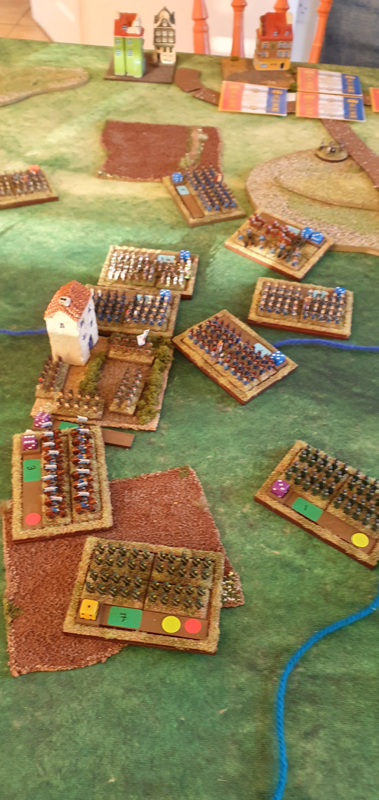 The Krakusi, my latest Polish unit, bought from Fighting 15s during lockdown. I have uploaded a Blucher scenario for the fighting at Laichling on 21 April 1809, between Marshals Davout and Lefebvre and the Austrian IV Corps under Rosenberg. In a foretaste of Aspern-Essling later in the campaign, this encounter really showed the quality of the Austrian soldier in a stand-up fight. I first wrote a scenario for Laichling in the mid 1990s, for use with the Napoleon's Battles rules by Avalon Hill. I believe it translates well to Sam Mustafa's Blucher. However, thanks to the Covid lockdown I have not yet played the scenario against a live opponent, I don't normally upload scenarios that we haven't played but I do plan to play it once we can meet up for gaming later this month. I will report on how the game goes and make any tweaks to the scenario after that. The scenario is posted here  Over the Easter weekend I was able to play two socially distanced wargames with my son Nick, using the To the Strongest rules (TtS) by Simon Miller. We play TtS with 25mm figures on a 6” grid. The figures are a mix of ages and manufacturers, some of them dating back to 1981 when, aged 21, I started collecting Classical Greeks by Minifigs and by the long-defunct Rospaks. I have added to the collection over the years, with both modern sculpts by First Corps and Newline Designs and older models picked up through eBay or gifted by a friend who has downsized to 15s. I now have Greeks, Macedonians, Gauls, Iberians, Carthaginians and Republican Romans. The Romans are an entire army of very early Minifigs from the collection of a gamer who had passed away. I felt honoured to re-home them. Their spears are like telegraph poles and sculpting definition can be fuzzy but they have great character. And unlike so many ‘heroic’ scale figures, their proportions are realistic. To my eye, too many 28s today look like Space Marines in togas. But I digress! 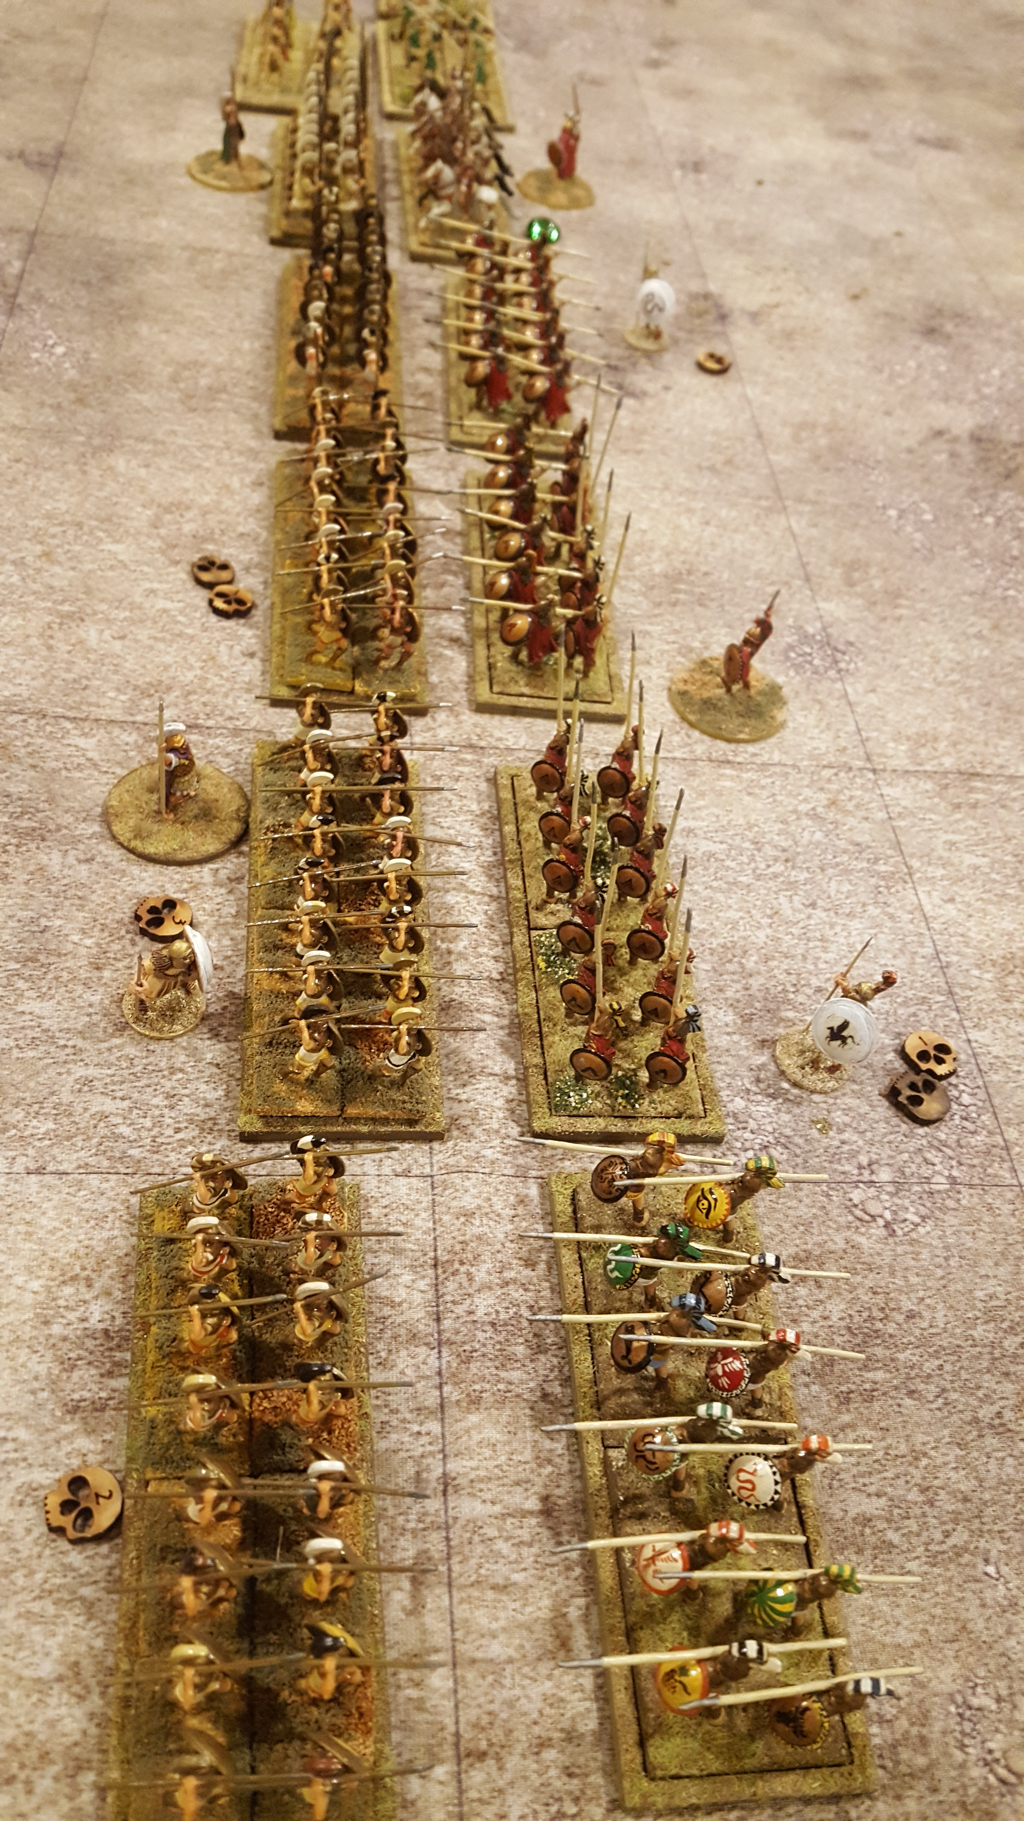 The death of LeonidasOur first game was a battle between my Athenians and Nick’s Spartans. His hoplites had the qualitative edge while I had more lights. While the two flanks bickered, our centres got stuck in, with Nick’s lads doing marginally better. We both had success with our left flank forces, so as the fight developed, each of our right flanks had to deal with the danger of being rolled up. I was losing victory medals faster than Nick but then had the good fortune to kill his heroic general, which brought our losses into balance. The cards went my way next turn, destroying one more Spartan hoplite unit and the battle was mine. The whole thing was very close however and at game’s end I had only one victory medal surviving. Still, a win is a win! The game felt very satisfying as a clash between two hoplite armies, with no fancy manoeuvres and no detached generals. Our lights kept busy fighting each other but the game’s outcome was decided by the hoplites. 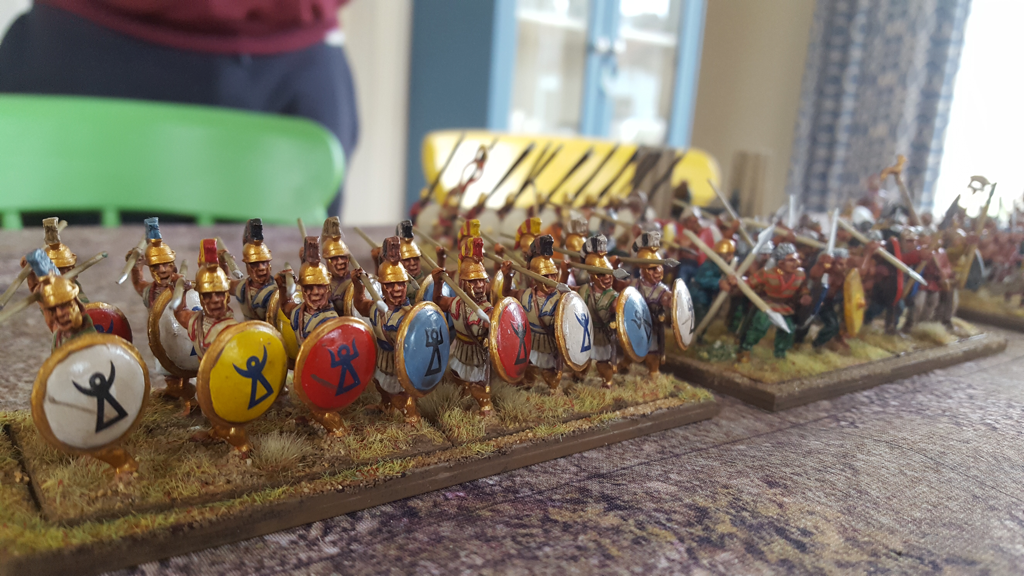 Hannibal ad portasGame two was between Nick’s Carthaginians and my Romans. I was seriously outnumbered and Nick set out to envelop my army. On the other hand my infantry were rock hard and their pila gave them an edge on the first turn of combat. I set out to demolish Nick’s centre while I refused both of my flanks and kept my triarii back to act as a fire brigade. Nick placed all his cavalry on his right flank and two units of elephants on his left, along with some high quality Iberian Scutarii. My centre started well, doing serious damage to some Gauls and wiping out a unit of citizen spearmen. However, the general in command of my centre then missed a turn at a key moment when he drew two aces in succession on his first activation. This allowed Nick time to patch up his centre while his left wing trundled down as far as my baseline and turned to face inwards. I squandered my next turn in a bout of tunnel vision, trying multiple activations on one unit so it could destroy a double-disordered unit of Gauls. Of course I failed the third activation on my unit and so ended the turn without activating a single other unit in the Command. I know, I know! Basic mistake and I should never be so dumb, except I was so fixated on the opportunity to destroy the single enemy unit I was attacking that I completely forgot my own advice. Meanwhile Nick’s left wing started grinding down the troops defending my right rear, as well as threatening my front line from the side. At this point our lines were in an ‘L’ shape, with particular pressure on my units in the angle. Then in one turn, a flurry of high card hits by Nick, met with low card failed saves by me, took him comfortably over the victory line. To his only slight disappointment, he had won without his elephants actually fighting anybody. But we agreed that they had done great work forcing me to conform to their advance.  Nick’s Carthaginians How (not) to play Republican RomansThat didn’t go well for me, but as we played we agreed some resolutions for the next time the Romans fight. Ideally, we would seek to use terrain to negate the enemy’s numerical advantage. In this game, it was Nick who exploited rough ground to shelter his advance down his left flank. Next, the Roman shouldn’t wait around to be outflanked by a bigger force: the heavy infantry should get stuck in quickly and try to eat up the enemy centre before the flanks and rear are threatened. Once engaged, the first priority each turn must be to use the Romans’ special line exchange rule for every unit that is disordered (representing the fresh principes replacing the tired hastati in the front line). This is a really powerful advantage but I lacked the discipline to sort out the line before other activations. At least twice, my command’s turn ended before I had attempted a line exchange. Finally, we decided that if possible, every command should have just one main function. My centre command Included both front line units and my reserve. Besides making it a very big command, I was trying to deploy the triarii to face Nick’s flank attack and to fight his centre to the front. Too often, the command’s turn ended before one group or the other had completed its tasks. It is of course one thing to draw conclusions after a game but entirely another to remember them next time I play. And in case I haven’t made it clear: I didn’t ‘throw’ the game. Nick conclusively won it, making great use of his army’s strengths and obliging me to respond to his movements. A classy win for Carthage. 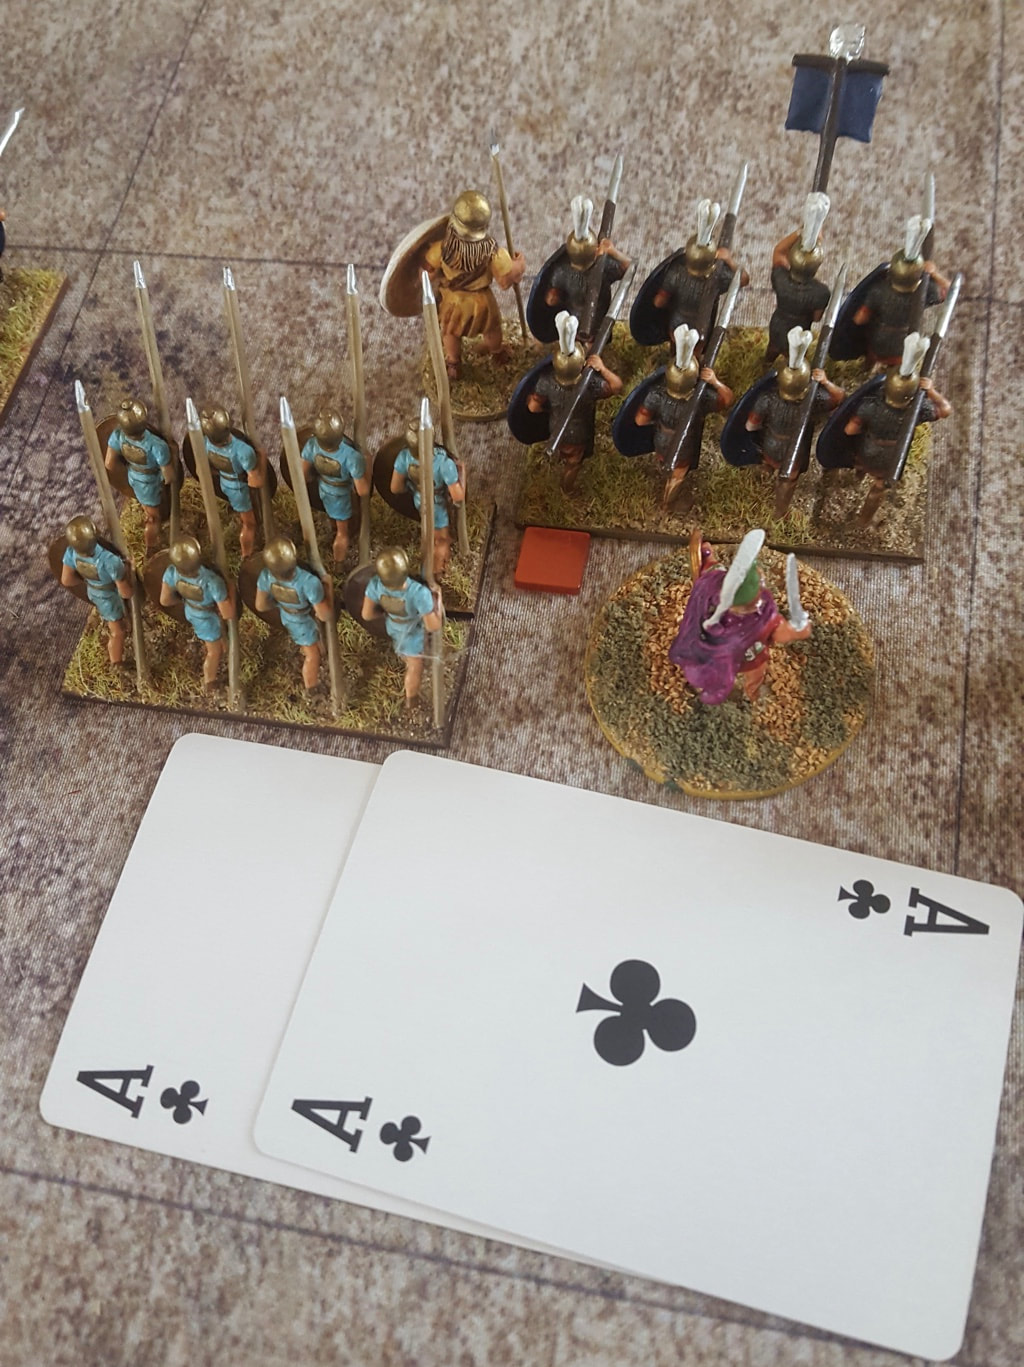 Aww, nuts! Turn over before it begins Out of lockdown with To the StrongestThe second game was much more fluid than the hoplite encounter had been and it felt a bigger challenge for both of us. The card activation system in To the Strongest is inspired. A sensible player can minimise the risk of their turn ending prematurely but very occasionally, as when I drew two aces in succession at the start of one turn, bad luck just happens. Fair enough. On the other hand, it is all too easy for an idiot like me to get drawn into the drama of a single combat and completely forget that I should be taking care of other activations before trying again with the critical combat. I reckon a game that draws me in so completely is doing something right.
I remember that when I first read the TtS rules, I wondered if units had enough hits/lives to sustain a good game. I also worried that a squared grid might be too restrictive on movement. Neither concern survived contact with actual play. I very soon concluded that these rules are perfectly gauged to give an exciting and rewarding game, with the strong sense of what I would expect from an ancient battle. They are also so easy to learn and (crucial at my age!) to remember during play. After months and months without a face to face game, it was wonderful to be playing again. Fingers crossed, if the road map out of lockdown stays on track, we can soon play a great many more. It is some time since I last played a 17th Century game but earlier this year I was tempted back after reading Michał Paradowski’s new book published by Helion, “Despite destruction, misery and privations” about the Polish army fighting the Swedes in Prussia in the 1620s. This fascinating book is full of detailed information about the recruitment, equipment and organisation of the Polish forces. I rather wish it had also described the course of the war, if only in general terms, for the benefit of non-Poles like me who don’t already know the history. But I still strongly recommend it to anybody with an interest in the period. Over the years our gaming group has tried a few rules sets for 17th Century Battles in Eastern Europe. My favourite for some time have been Tercios by el Kraken, but the need to issue a separate order card to every unit can make bigger battles a bit slow to play. When Simon Miller and Andrew Brentnall released ‘For King and Parliament’ three or so years ago, I picked them up because I really like Simon’s Ancients rules, ‘To the Strongest’. FK&P doesn’t have rules for several east European troop types but they are easily adaptable. With a bit of borrowing from To the Strongest, I drew up some house rules to adapt FK&P to battles further east. We played a test game based on Berestechko, 1651, which went well. I then started on troop stats for 1660, which added Muscovite troop types to the mix. At that point I was distracted by a rebasing project for my 15mm Napoleonics and 1660 went onto the back burner. Thanks to Paradowski, I have now hauled it out again and done some more work on the house rules and troop stats, and have written a couple of scenarios to test them. The latest house rules are here  Two scenarios for the price of oneThe scenarios are set during the 1660 Chudnov/Cudnów campaign, between the Commonwealth and Tatars on one side and a Muscovite-Cossack alliance on the other. I love taking ideas from this campaign! It offers several candidates for an interesting game, including a clash of advance guards, a running fight, a rearguard action at a ford, a field battle and an assault on the enemy camp. Both of the new scenarios are based on the third day of the battle of Lubar on 16 September 1660. The historical version represents an attack by the Poles and Tatars on the enemy camp. The second is a What If scenario, involving a battle in the open ground between the two camps. This scenario presumes the Poles adopted a battle plan supposedly put forward by Field Hetman Lubomirski. Both scenarios can be found here. We played the What If version as a multiplayer scenario in 2014 using Warlord Games’ Pike and Shotte and It gave a balanced game. I later converted the orders of battle for the Tercios rules and we played the historical battle in 2016. Last week I played the historical FKaP scenario with Chris and Paul and will play it again this Friday with two more opponents, Kevin and Rupert. I will post battle reports and photos after the second game. Meanwhile, as English language accounts are hard to come by, I have written an account of the battle below. It is based on a few sources, mainly Łukasz Ossolinski and Mirosław Nagielski. 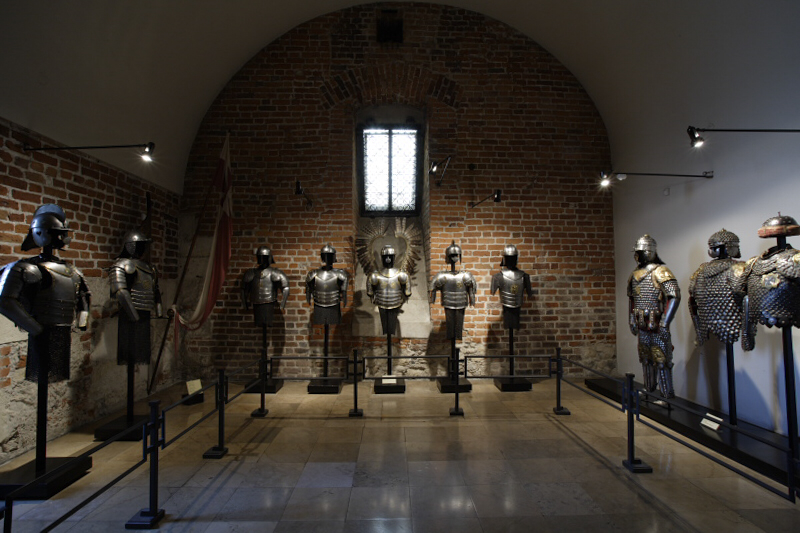 Hussar panoplies at the Wawel Castle in Kraków The battle of Lubar 16 September 1660
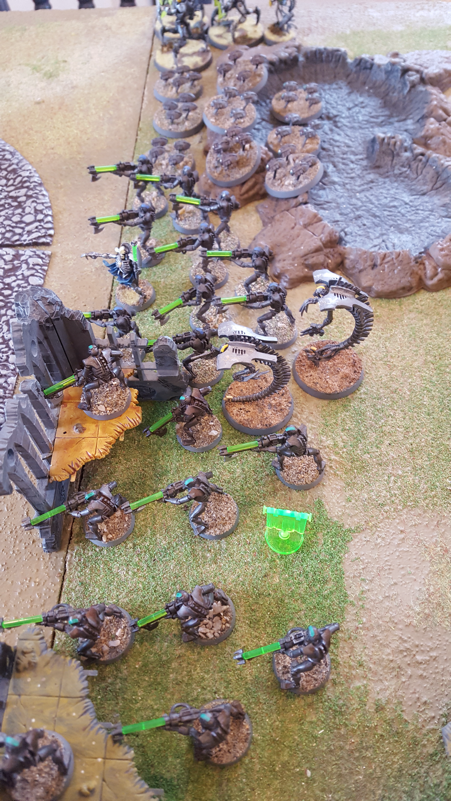
The battle of Lubar was the first act of the Chudnov campaign of 1660, when a Muscovite-Cossack alliance took the field against the armies of the Polish-Lithuanian Commonwealth and their Tatar allies in Ukraine. Lubar was in fact a confrontation over several days. It began on 14 September with a chance encounter between the vanguards of the Commonwealth-Tatar army and the main Muscovite-Cossack army led by Sheremetyev and Tsetsura. Having made contact, the two sides made camp within a few kilometres of each other. At this time it was standard practice to fortify in the presence of the enemy, first by placing wagons around the perimeter and if a long stay seemed likely, by digging earthworks. After the initial clashes of the 14th, both sides spent the 15th strengthening their camps and preparing for battle. The Commonwealth and Tatar camps were placed near the town of Lubar, with easy access to fresh water and forage. Sheremetyev and Tsetsura’s camp was well situated for defence with forest to its rear and an emplacement on high ground covering its southern side, facing the enemy. However, it was poorly suited to a long stay, as forage was scarce and its water supply was a marshy stream that was barely able to meet the needs of 30,000 men and their livestock. On 16 September, the opposing forces drew up in battle array, facing each other between their camps. The Commonwealth army had an interest in fighting in the open, where it could take full advantage of its superiority in cavalry. The enemy was believed to be unaware that Field Hetman Lubomirski and his division had arrived in theatre to join Grand Hetman Potocki. According to some accounts, Lubomirski proposed setting a trap, by hiding his troops behind high ground and drawing the enemy further into the open before launching an ambush. For whatever reason, no trap was laid and the whole Commonwealth army advanced on the enemy. In response, Sheremetyev withdrew the bulk of his army back behind his camp earthworks, leaving two forward garrisons: the fortified hill in front of his left, occupied by infantry and artillery with cavalry hidden behind the hill; and trenches in front of his right, occupied by Tsetsura’s Cossacks with light artillery. The action began with an assault by Potocki’s Command on the Muscovite-held hill. The first attack, by Polish dragoons, overran the position and forced the enemy infantry out. The Muscovites counterattacked and retook the hilltop, to be ejected in turn by some of Potocki’s ‘foreign’ foot. Meanwhile a cavalry fight developed around the base of the hill, with both sides feeding in reinforcements. The hilltop may have exchanged hands again in the course of the fight but by late afternoon it was in Polish hands and the Muscovite forces had withdrawn to their main camp. With the hill in his possession, Potocki ordered his troops to prepare to assault the main enemy camp. However, as his infantry formed up in front of the Muscovite earthworks it was disrupted by heavy artillery bombardment and this evidence of Muscovite determination, combined with the advanced hour, prompted Potocki to call off the assault. On the Commonwealth left flank, Lubomirski’s infantry attacked the Cossack forward trenches and eventually cleared them. Again, given the late hour, Lubomirski did not wish his troops to go on to attack the main camp, from which the Cossacks kept up a determined fire. At this point, according to Polish eyewitnesses, an incident occurred that led to the fight restarting. Throughout the day, the Tatar contingent had been coming and going from the field, harassing the enemy with bow fire and looking for weaknesses around the enemy position. Shortly after the Cossack trenches had been cleared, a senior Tatar warrior fell wounded from his horse in front of the enemy camp and a group of Cossacks jumped out from behind their earthworks to take him prisoner. Seeing this, those Tatars in the vicinity rounded on the Cossack group, saved their wounded comrade and amidst the confusion, pursued the enemy back inside the camp. More Tatars followed and were joined by Polish horse and a regiment of foreign foot, all of whom broke into the Cossack earthworks. The infantry commander believed the Cossacks were breaking and urged that the breach be exploited, but Lubomirski insisted that all troops return to Polish lines. The day therefore ended with the Commonwealth army abandoning its gains on both the left and right wings and retiring to its own camp. The fighting on 16 September illustrated the strengths and weaknesses of the opposing armies. Sheremetyev and Tsetsura were outclassed in the cavalry arm so unlikely to win a battle in the open. Potocki and Lubomirski meanwhile had too few infantry to carry the enemy camp by storm. Sheremetyev decided to stay behind his earthworks and wait to be reinforced by Chmielnicki’s 20000-strong Cossack army, which was only a few days’ march away. Potocki and Lubomirski laid siege to Sheremetyev’s camp. Over the days that followed, the Muscovite/Cossack camp, hemmed in by the Commonwealth/Tatar blockade, began to suffer from the poor water supply and limited access to fodder. Moreover, Chmielnicki showed no signs of advancing to reinforce Sheremetyev, despite exhortations to hurry up. On 26 September Sheremetyev retreated to his forward supply depot at Chudnov, pursued a little belatedly by the Commonwealth army. The next day, the two armies settled down again in much the same situation as before, with Sheremetyev blockaded in his camp by the Poles and Tatars. There would follow several minor engagements, a battle at Słobodiście and the desertion of his Cossack allies before Sheremetyev was forced to surrender and marched his army into captivity. As events turned out, the confrontation at Lubar on 16 September had been the high point of Muscovite fortunes. |
Archives
November 2023
Categories
All
|


 RSS Feed