|
We fly to Kraków on Friday for four nights, our first trip there in twelve years. Hoping to pick up some new publications about the Commonwealth of Two Nations, especially 17th century campaigns. Lots of old haunts to revisit and top of my list is the Wawel Castle museum, where there are some fine suits of armour to admire. Plus some warming winter food and drink. 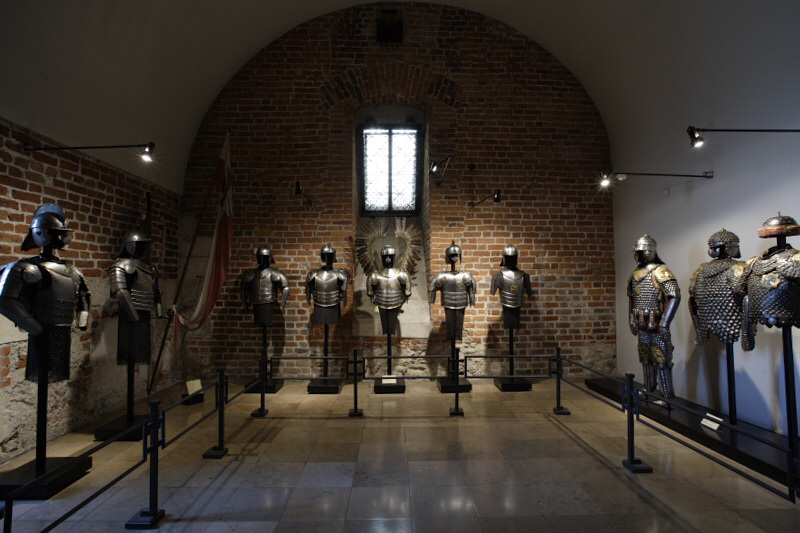
2 Comments
I have produced a Tercios army list for the battle of Słobodyszcze, based on Łukasz Ossolinski's study of the 1660 campaign. It results in two pretty large wargame armies so I created further lists at 66 and 50% of starting strength. These broadly follow the proportions in the real armies, but with some types a little over -represented, especially hussars and Polish foot. For games using Pike and Shotte or Maurice, the number of mounted units should be halved, since cavalry units in Tercios are squadrons not regiments. However, the size of units should be roughly doubled so the broad numbers of figures remains the same. The Commonwealth army is pretty straightforward to represent. The shortage of Foot is striking: Lubomirski deliberately selected a fast moving, mostly cavalry force to surprise Khmelnytsky. 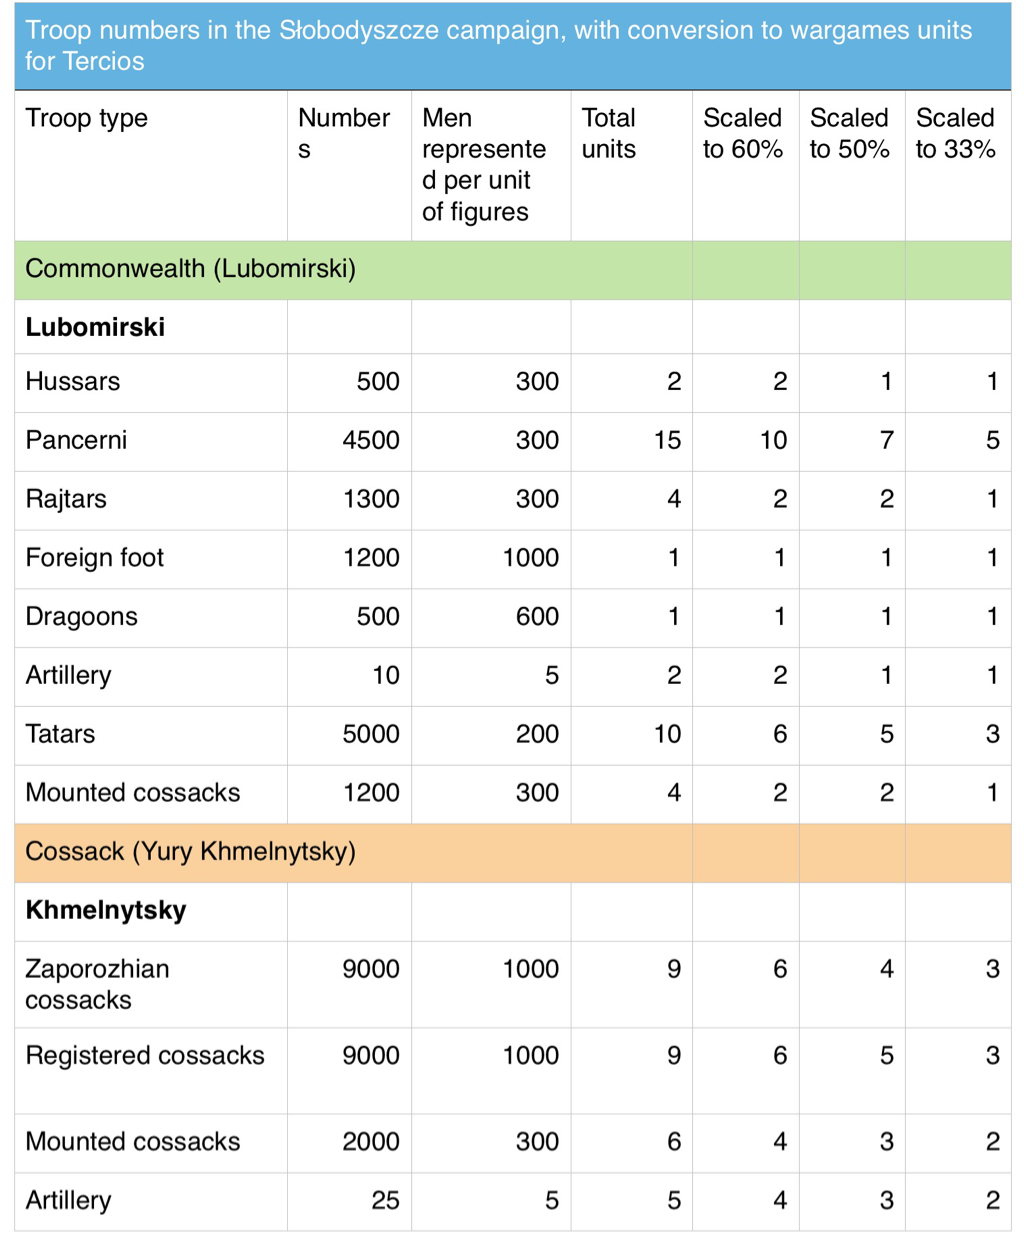 The Cossack army is tricky to represent. It included a great many troops who had mutinied against their Commonwealth paymasters and joined the rebellion. In Commonwealth pay these had been known as Registered Cossacks. They wore uniforms and were better trained and experienced than the Zaporozhian regiments recruited direct by Khmelnytsky. In the absence of reliable information about the make-up of the army, I arbitrarily divided the Cossack regiments 50-50 between Registered and Zaporozhian foot. In gaming terms the Registered troops have slightly better staying power although both fight well. Another task is to represent the defended wagons around the Southern perimeter of the Cossack camp, the so-called Tabor. In the battle, Khmelnytsky lined his wagons with part of his force but held back several formed regiments which counter attacked the Commonwealth and ejected them from the camp. I allowed the Cossack player to convert up to half of its regiments into defended wagons, on a one-for-one swap. The next task is to produce the map of the battlefield. I have started one on Sketchpad, using the map on Wikipedia. It's a pretty basic one but should do the job. I just wish I had more talent for producing a polished final product. I have just finished a new unit of Polish 17th century dragoons from the Wargamer's Fire and Sword line. I am quite pleased but the dismounted poses are almost like old flats. I guess they must be older sculpts as they are much less animated than other Wargamer figures I know. Still, it's good to have another régiment in the line. Finishing the dragoons has got me looking at the 1660 campaign again. I am working up a scenario for the battle of Słobodyszcze (Polish spelling), between a Cossack army and a smaller Polish attacker. I plan to play it with the Tercios rules by el Kraken, but as few people seem to have discovered these yet, I will try to make the scenario adaptable to any rules. This battle gives the chance to pit winged hussars and Pancerni against defended wagons and Zaporozhian foot. Despite the spin put on the outcome in the Polish commander's memoirs, it was a tactical repulse for the Poles, albeit leading to a strategic success in the end. As so little is available in English about the battle, I have written a longer background note than usual, relying on a study by Lukasz Ossolinski. I have included it below. I find it fascinating that the battle is the cause of controversy even today, with Russian, Ukrainian and Polish historians all looking at it through the prism of today's murky politics. The Battle of Słobodyszcze
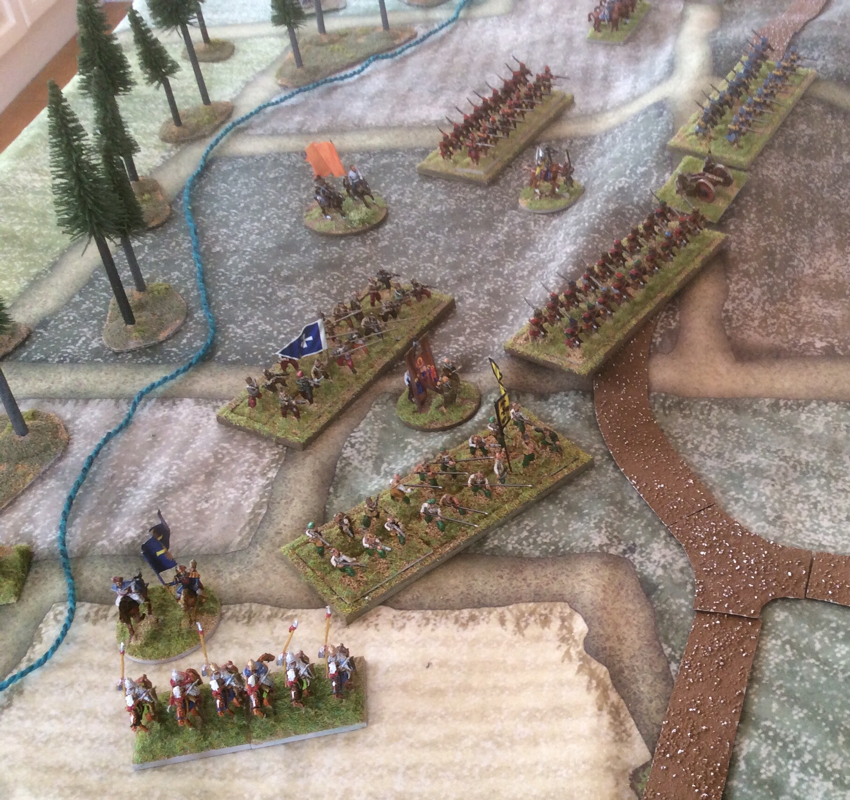
1660 saw one of the most eventful campaigning seasons in the 13 Years war between the Polish-Lithuanian Commonwealth and Muscovy. Muscovite armies were active in both Lithuania and Ukraine, taking maximum advantage of the Commonwealth's weakened condition after the years of Swedish devastation of Polish-Lithuanian lands known as the 'Deluge'. In Ukraine,Voivod Sheremetyev led a combined Muscovite-Cossack army against the army of Grand Hetman Stanisław 'Rewera' Potocki. His objective, in cooperation with the Cossack army of Yuriy Khmelnytsky, was to defeat Potocki, take Lvov and perhaps threaten Kraków. Khmelnytsky's army was slow to muster and risked delaying the start of the campaign. Anxious not to lose time, Sheremetyev set his army in motion, having secured Khmelnytsky's promise to join him in the field. First contact with Potocki took place at Lubar on 14 September. Sheremetyev quickly discovered that his enemy outnumbered him by around 40,000 to 31,000. Potocki had been reinforced by the army of Field Hetman Lubomirski, fresh from campaigning on the Baltic. After a sharp engagement in which Potocki had the upper hand, Sheremetyev decided he could not win an open battle without reinforcement. He withdrew into fortified camp, first at Lubar and subsequently at Chudnov, intending to wait for Khmelnytsky to arrive and catch the enemy between their two armies. Potocki meanwhile laid siege to the Muscovite camp, placing his own fortified camp to the South of the Muscovite position. On 5 October, news reached Potocki that Khmelnytsky's 20,000 strong army was approaching from the South East and had reached Słobodyszcze, 27km from Chudnov. Potocki now faced the prospect of being caught between two enemy armies that would outnumber him by 50,000 to 40,000. Potocki and Lubomirski reacted to this threat by splitting their forces. On 6 October Lubomirski set off for Słobodyszcze with a cavalry-heavy force of around 14,000. Meanwhile, Potocki shifted the main camp to a stronger position to the West of its original location and prepared to confront a Muscovite breakout attempt. Lubomirski reached Słobodyszcze around midday on 7 October, to find the Cossacks encamped on a hill on the far side of the river Hnilopat. The Cossacks had not fortified their camp and scrambled to form a defensive position, forming a hasty barrier of wagons facing the Commonwealth advance. Cossack infantry in a fortified position was famously tough to dislodge, especially by a force lacking a strong infantry contingent of its own. Lubomirski therefore decided to attack almost directly from the line of march. After forcing the river Hnilopat, Lubomirski divided his army into three groups. The centre and left attacked the Cossack position from the south, while the right worked its way round to the east of the enemy camp. The centre and left broke into the camp, reaching as far as Khmelnytsky's own tent but losing cohesion in the process. At this point a Cossack counterattack bundled them out again and back down the hill towards the river. Only now did the attack by the right wing go in and was soundly repulsed. Lubomirski mounted another attack from the South but could not match the initial success. He withdrew across the Hnilopat at nightfall. On 8 October Lubomirski was recalled to Chudnov by Potocki, who was facing a breakout attempt by Sheremetyev. Lubomirski left his Tatar contingent to patrol the river and rejoined the main army. Khmelnytsky did not pursue. Within days, Khmelnytsky and Potocki agreed a truce; the Cossack contingent within Sheremetyev's main army began to drift away and the campaign would end with the most decisive Muscovite defeat of the war. Politics and rumours There are various theories to explain Khmelnytsky's actions in the 1660 campaign. He was a young, militarily inexperienced leader who had difficulty controlling his senior colonels. One view is that although his initial intention was to join Sheremetyev, he lost his nerve after Słobodyszcze and asked for peace. Another is that he, or more likely some of his colonels, were disenchanted with the Muscovite alliance and planned to see how the confrontation between Sheremetyev and Potocki played out before committing to one side or the other. A still harsher theory is that negotiations with Potocki were already far advanced and that Lubomirski's attack was intended to convince the last of the pro-Muscovite faction in the Cossack army to give up. Finally, some historians even claim the battle did not take place at all: they suggest it was a fig leaf invented to hide Khmelnytsky's betrayal of his Muscovite allies. This last version is hard to credit, given that correspondence survived from different participants, including foreign officers who took part in the battle. Also, if Khmelnytsky had been looking for a convincing reason why he changed sides, he and Lubomirski would presumably have spread the story that he had been defeated. On the Commonwealth side, Lubomirski's actions too have been much discussed. After his return to Chudnov, the Tatar contingent successfully kept Khmelnytsky on the far side of the Hnilopat. If he knew that Khmelnytsky was already in negotiations with Potocki, did Lubomirski need to mount his attack at all? One explanation offered to explain his aggression is that he was chafing under Potocki's command and wanted a slice of glory for himself. Whatever the whys and wherefores, Słobodyszcze provides an interesting basis for a wargame, and the chance to practice some appallingly different pronunciation! I have had some interesting exchanges recently with Michel, a prolific wargamer and driving force behind Opération Zéro, the site for Francophone wargamers in Belgium. http://operationzero.rforum.biz/forum. He is a great supporter of the Renaissance rules Tercios, which he and colleagues play in 10mm. Michel recently started collecting Poles and Cossacks and we have been discussing how to track down useful background in English or French about the period and theatre. Of course the rules By Fire and Sword provide a lot of really useful background, but there is not much else published about the period in the sort of detail a wargamer wants. Having been obsessed with the Chudnov (Cudnów) campaign of 1660 for a few years now, I have put together a conversion chart to turn the Orbats for this campaign into units for Tercios. Of course the original data is open to challenge as sources disagree on the numbers involved, but I used the set on which the majority seem to concur. I hope the tables are self explanatory. There is more about the campaign on this website as well as a scenario each for Tercios and for Maurice. I plan to offer scenarios for every engagement of the campaign eventually. These include a meeting engagement, a set piece battle, a fighting retreat and an assault on an entrenched camp. 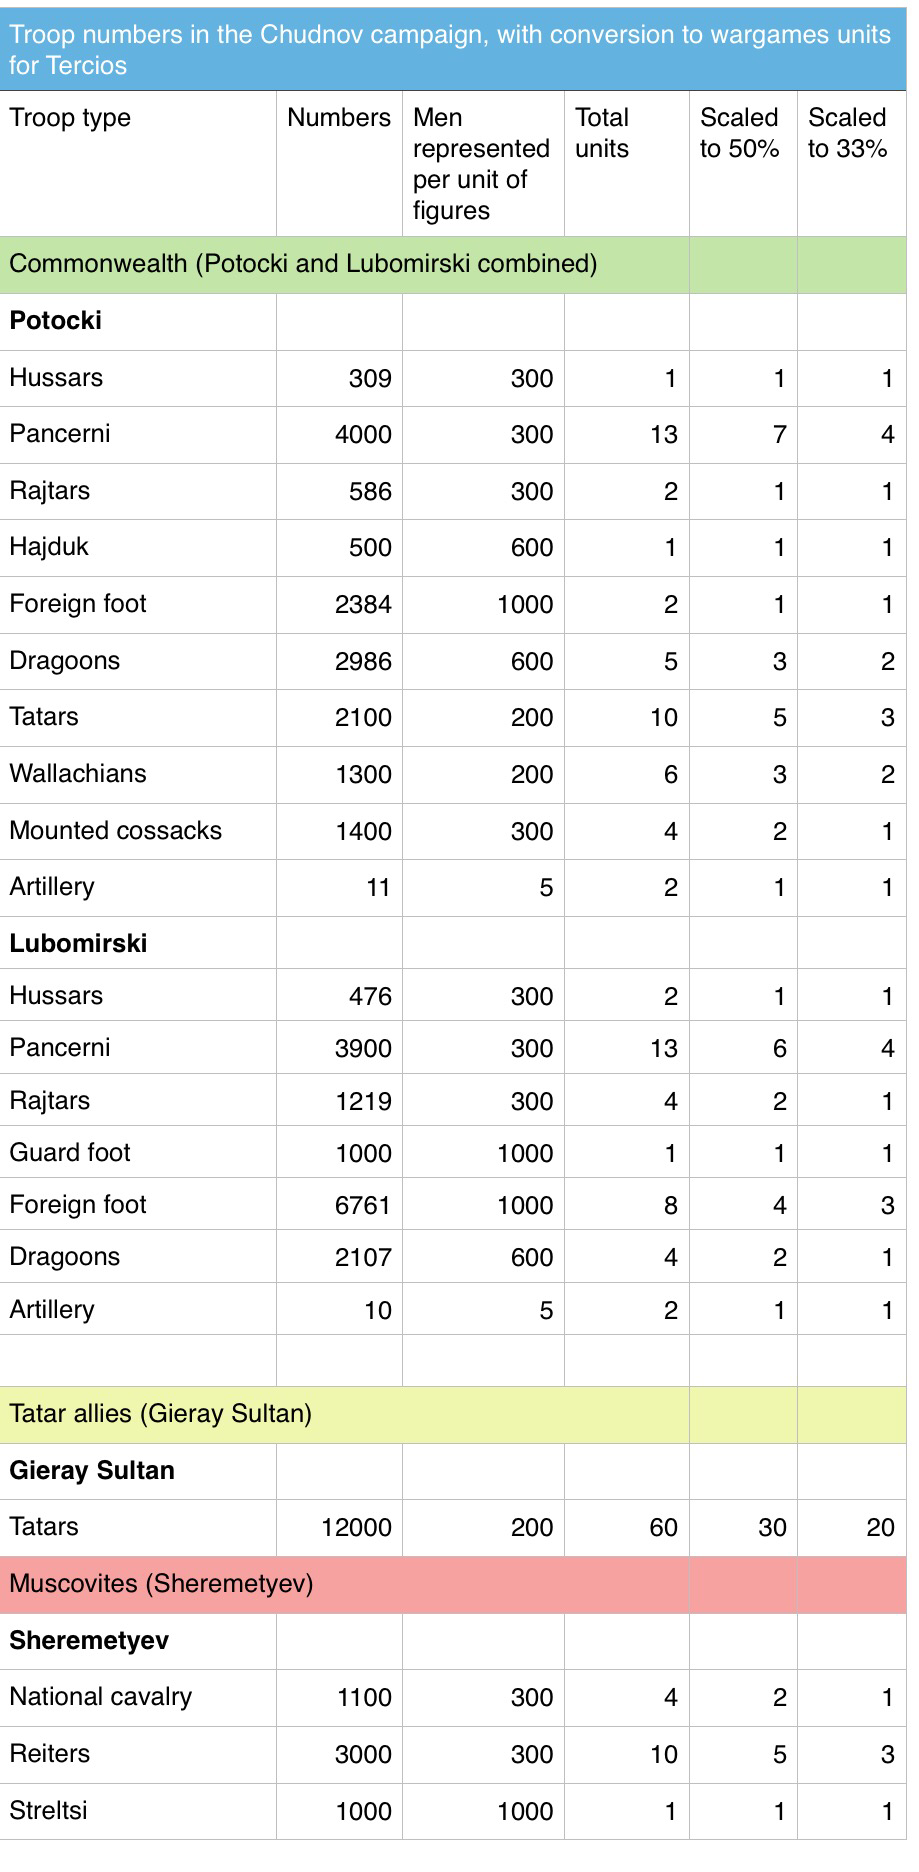  Last night Ian and I played a game of Tercios, based on the Polish assault on the Muscovite redoubt at Lubar, 16 September 1660. The scenario is here. It was our first full game so I kept it to a manageable ten units or so a side. The rules came back easily and we referred only rarely to the reference sheet. it was a cracker! As the Pole, Ian pinned the redoubt from the front and sent his cavalry deep around the left flank. Polish Hussars met Muscovite Dyeti Boyarskies almost behind the Muscovite lines, smashing them and following up into supporting Muscovite horse. For a time the outcome seemed uncertain but the Muscovite horse were unable to catch their breath and a persistent Polish pursuit tipped them over into rout. To crown the moment, a Polish foot regiment broke into the redoubt and with that, they won a Clear victory (one level down from decisive). The victory conditions are straightforward: the game stops when the disparity in victory points reaches a given level. I love these rules. The core system is so elegant and effective and feels like a Pike and Shot system ought to. Frontal assaults tend to be slow going and indecisive, but once flanks are exposed or a unit becomes disordered, things can go wrong very fast. Ian did a great job of unhinging my position and rolling up my line. A great game. 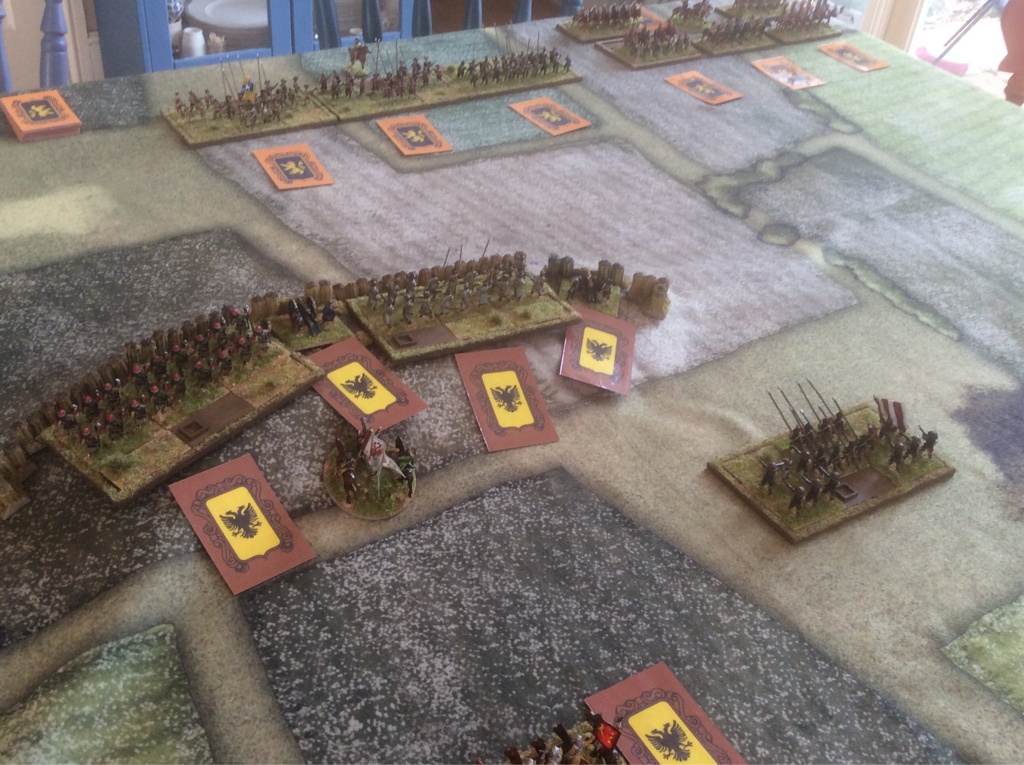 The view from behind the redoubt at games start. 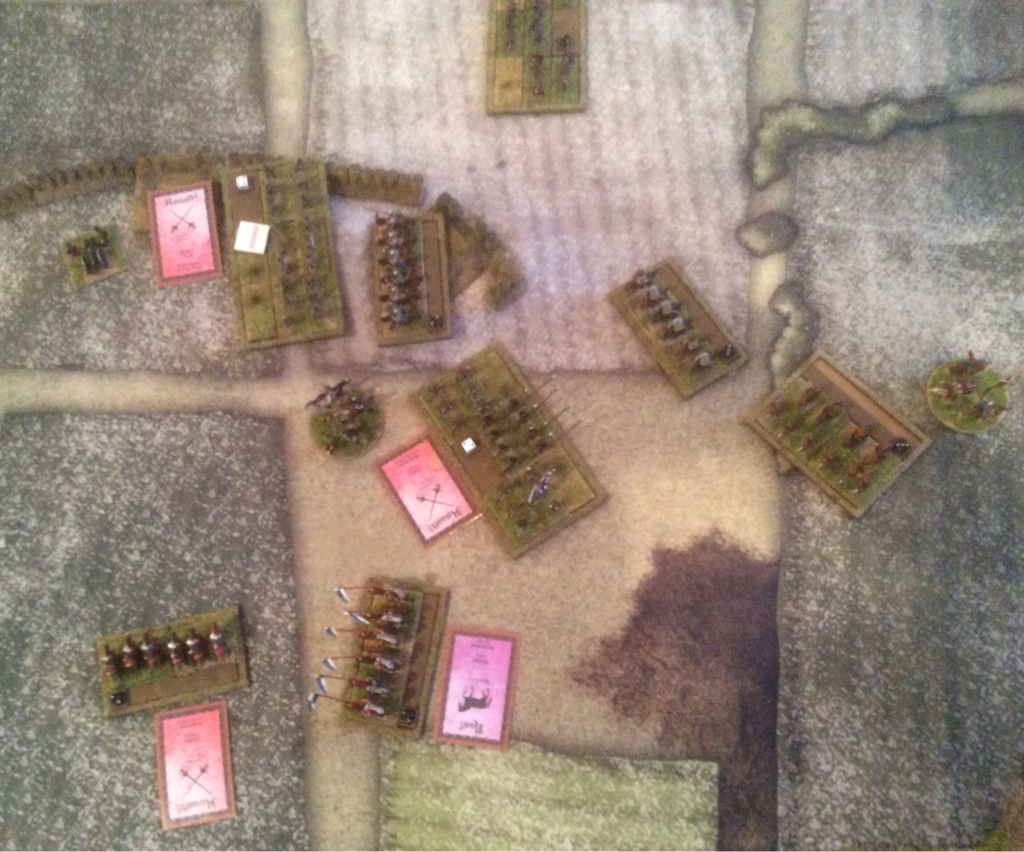 The Poles start turning the Muscovite flank. 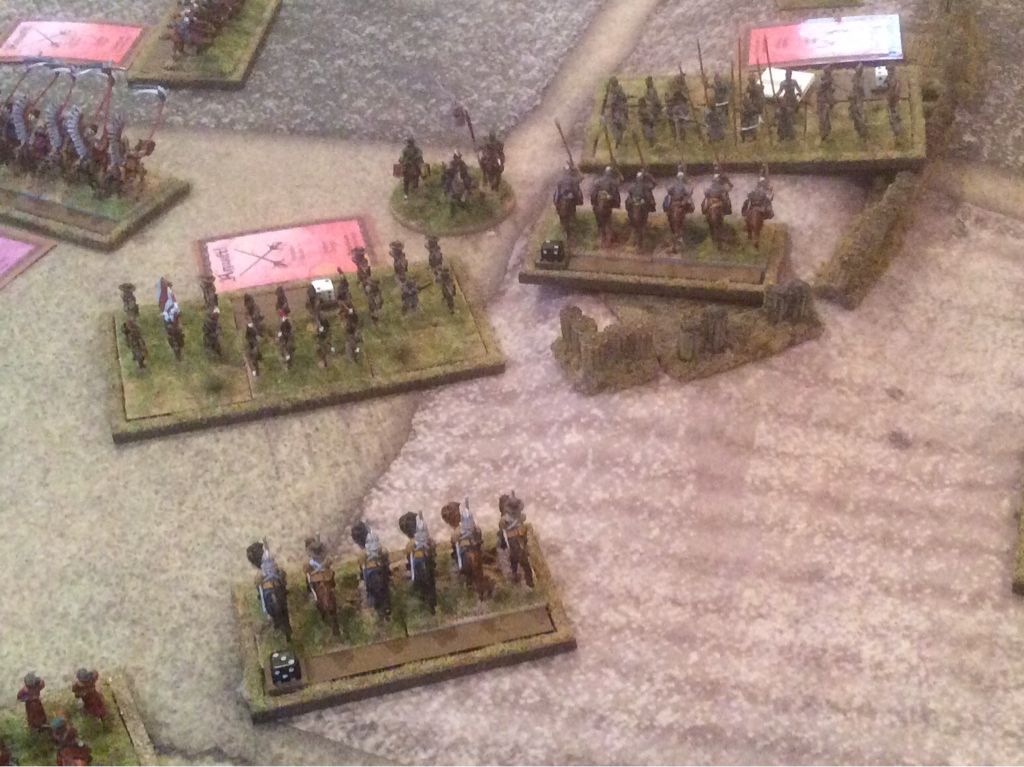 It's all over: the Poles flood theMuscovite position.  I played a second run through with Tercios at the weekend, using a scenario based on the First Encounter at Lubar, 11 September 1660, previously written for Maurice. To test the variety of troop types, I added some Pike and Shot units to the Polish OOB. The Battle was fought between Cossacks with Muscovite cavalry support and Poles with a Tatar contingent. In the actual encounter, the Poles surprised the Cossacks on the march. The Cossacks withdrew to high ground and held the Poles off until relieved by Muscovite Horse. I started the game at the point when the Cossacks had already formed on the high ground and the Muscovite Horse had arrived to reinforce them. I chose to start here because Tercios doesn't allow for units to be in March formation. This shouldn't be too difficult to invent with a bit more experience but I steered clear for now. The game began with an attack on the mounted troops on the Cossack right by the Tatars. This took place in forest and made little progress either way: the two sides were well matched and fired a lot of arrows, but without decisive effect. This felt absolutely right. Then the Polish heavy cavalry, also on the left, clashed with Muscovite Horse and annihilated it. However the Poles were disorganised at the end of the combat and struck in turn by supporting Muscovite Horse. They survived but were forced to retreat. These rules certainly reward the use of supporting units. In the centre, the Polish Pike and Shot closed on the Cossack Foot on the hill. The encounter was slower going than the mounted combats. To their right, two Polish Dragoon regiments exchanged fire with more Cossack foot regiments and came off significantly worse. Again, this felt right: dragoons ought not to stand toe to toe with enemy infantry for long, as they will inevitably come off worse. On the Polish right, two regiments of Reiters, one Muscovite and one Polish, clashed. (By 1660 Reiters in both armies no longer fought with Caracole fire: they mostly reserved the pistol for melee, although they might fire at infantry in preference to charging home. In Tercios terms, they were more like Modern cavalry squadrons.) In this combat, the Muscovites gained the advantage and their Polish opponents retreated. With their cavalry recoiling on both flanks and the centre accumulating wear points, I decided the Poles had had enough for the day. For this second run through, the rules worked smoothly and gave plausible results. Great fun. The long-suffering Ian and Matt have agreed that our next game will be Tercios. I plan to write a scenario for Lubar on 12 September 1660, when both armies had arrived on the field and prepared for a set-piece battle. 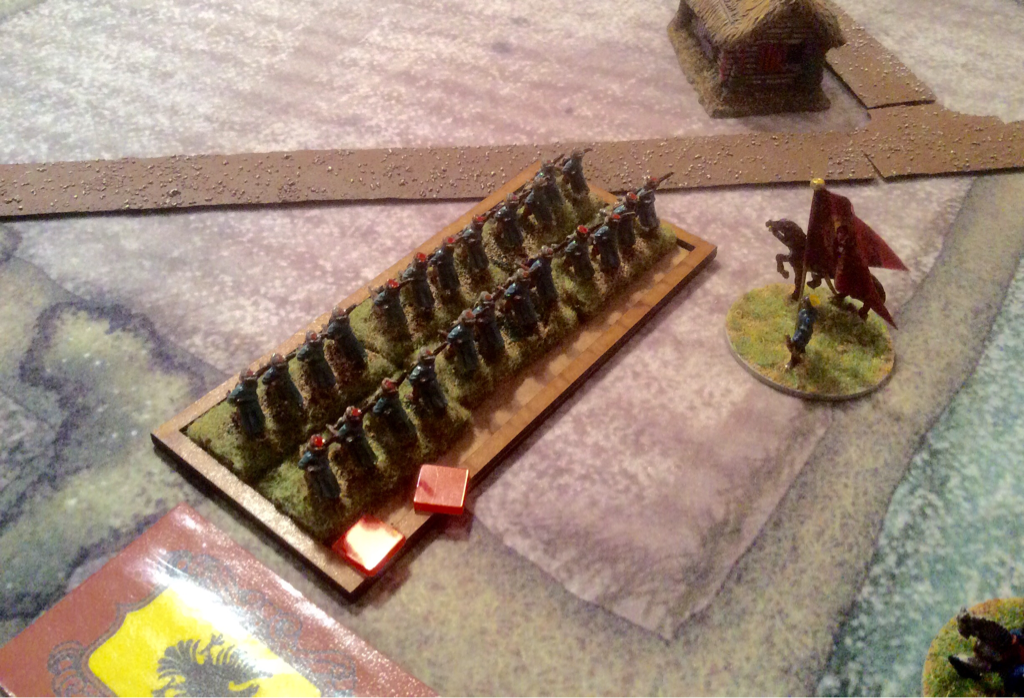 Our first run through of the Tercios rules had a varied selection of troop types to see how they coped under the rules. We played turn one collaboratively, placing order counters face up and discussing their expected effects. From turn two we placed orders face down but still agreed to set up some particular situations to see how they played out.
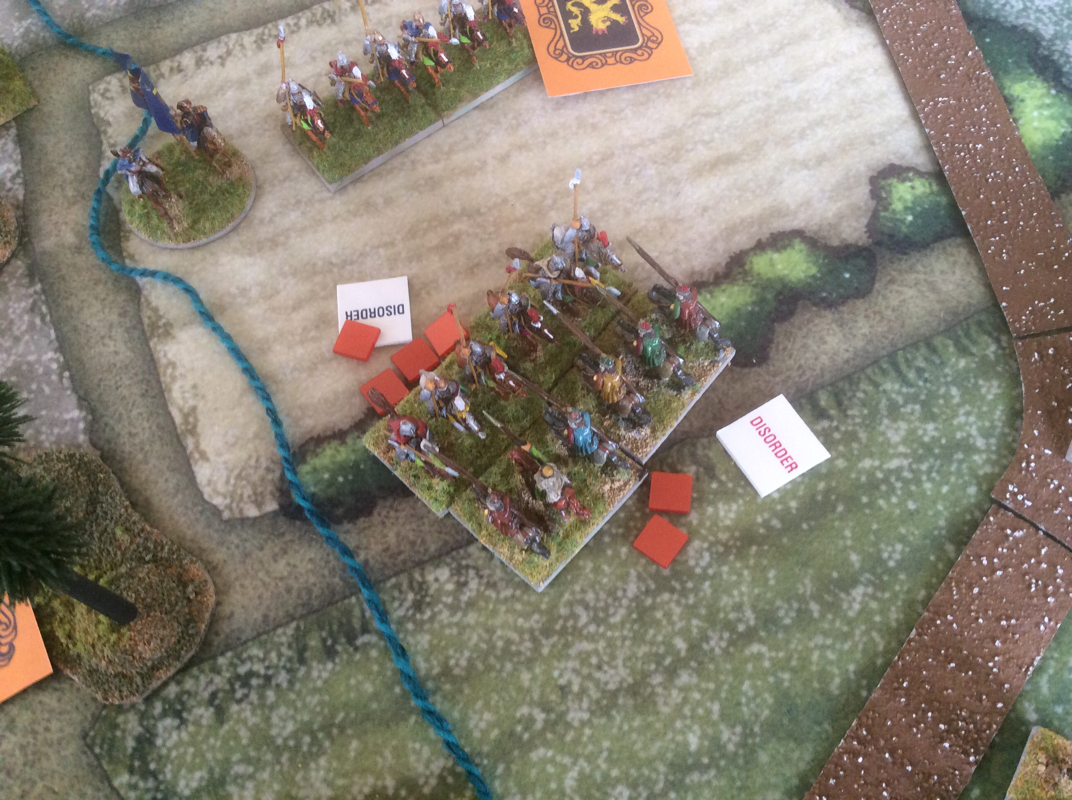
Our conclusions were: It is great fun and quick to learn. Placing orders really makes you think about your force. The reaction function of each order enlivens the game no end and allows opposing units to interact naturally and convincingly. For example, some Polish Hajduks assaulted a unit of Registered Cossacks, who fired at them as they closed, inflicting some damage but not enough to stop the attack. However, the Attack in turn wasn't as decisive as it could have been so the Hajduks disengaged. Cavalry combat can be brutally quick, especially if lances are involved. The rules for commanders seem a bit complicated and there are a great many traits available to choose from. I expect they will feel less complicated with experience and it is welcome that commander models have a real part to play in the game. But I'm pretty sure already that we will outlaw some of the more 'magical' traits, which behave almost like Warhammer spells. Kingdoms The Kingdoms supplement has some interesting rules to suit Eastern armies, such as the ability of Tatar bowmen to fire and evade. The Tabor and Gulay Gorod are well represented and Polish Hussars are suitably powerful but not superhuman. I had reservations about some of the interpretations of Eastern troop types. For example, Polish Pancerni are billed as heavy, presumably because their name means 'armoured' in Polish. But these troops were no more heavily armoured than Hussars and indeed were originally known as Cossacks: they only acquired their new name after the start of the Khmelnytsky rebellion to distinguish them from Cossack insurgents. Another thing that puzzled me was the absence of Cossack infantry besides the Plastun skirmishing companies. These companies can be converted to Tabor but this isn't enough: I expected to see stats for Registered and Zaporozhian Cossack Infantry as well. The Cossacks were mainly infantry armies at this period, having the reputation of producing the finest infantry in the region. Registered Cossacks constituted some of the Polish army's best Foot regiments, when they weren't in rebellion! And they did not always fight from wagons. I was therefore a bit disappointed but not for long. With these rules it is easy to adapt the stats to suit your own prejudices. So I made up my own stats for formed Cossack infantry, drawing on Musketeer and Hajduk stats, and simply dropped the Pancernis' heavy status. The verdict after first play? Very positive. PS I have gone into a bit of detail because superficial rules reviews are a pet hate. But if I have banged on for too long please excuse me - and let me know, so I don't repeat the mistake in future. Summary for the skim reader: Tercios is elegant, fast moving, full of period flavour and great fun to play. Kingdoms provides essential extra rules and army lists for Eastern Europe and the ECW. A free PDF of the basic rules is available at http://elkraken.es/released/en/. Give it a try. Mechanics On 24 February we ran through a quick action using Tercios and its supplement for Eastern Europe and the ECW, Kingdoms. It was an interesting and decisive encounter. I found the rules much easier to demonstrate than describe. Each unit has a whopping 10 factors on its Stats line, each used for a different situation. 6 of these are 'active' factors and 4 are used by the enemy in different fire and melee situations. Before you walk off in disgust, this is the most complicated element of the rules and the engine of the system is elegant, simple and intuitive. Speed is a basic allowance in inches. Every other active factor represents the number of six sided dice to be thrown against that quality. An increase or decrease in a factor reduces the number of dice to roll: the target number doesn't change, just the number of dice you are rolling. We learned pretty quickly what we needed to roll for each test. It helps to have played Dreadball, which has a similar system. Each turn begins with the selection of orders for each unit on both sides. The options are Ready, the vanilla order allowing any two actions from a short list including fire at reduced effectiveness; Assault, with increases to speed and melee factors; Run, putting everything into speed; Fire, allowing a salvo at full effect; and Resist, which allows a unit to recover damage. Each card also has a Reaction function that can be taken as an interrupt when enemy either declares an assault on the unit or moves within 3". The reaction on a card can be subtly different from its Order, so for example Musket-armed foot who fire as a reaction to an enemy charge receive a bonus that they wouldn't have got had they fired as an action. However, a unit must pass an order check to react that it might fail, so deciding when to activate a unit can be a tricky challenge. Players then roll for initiative and one of them selects the first unit to activate. If a unit has suffered no damage this is automatic, but any unit with at least one 'wear' point must pass an Order check. I mentioned above that wear markers can be removed with the Resist order, but one hit always sticks so once damaged, a unit will have to test to obey orders for the rest of the game. The effect of this simple mechanic is pleasing: control and army cohesion become harder to maintain as the action develops. Movement is very simple but satisfyingly clunky for the formations represented. Measurements for this and for firing are all made from the centre points of the unit. You need to plan your moves carefully as exposed flanks are very vulnerable. I like it that without imposing strict limits on dispositions, the rules work best for the player whose army deploys along historical lines. Shooting and melee have similar mechanics. The active player rolls a number of dice equal to its relevant modified factor and compares the results to the target's defence factor. Every die that equals or exceeds this factor scores a hit. The target then takes a Courage test and every roll of 5 or 6 saves one hit. Unsaved hits convert to wear markers. A target whose total of wear markers equals its stamina becomes weary and loses effectiveness. If it receives more wear markers than its stamina it must take a break test, needing to roll a 6 to overcome each point over its stamina. In melee, the target unit fights back with the same procedure and the winner is determined by a comparison of the total wear markers inflicted. A melee can result in one side disengaging by retiring 3"; retreating with backs to the enemy; or breaking completely. In both firing and melee, certain circumstances can disorder a unit, with a drop in effectiveness. Oops. Getting carried away. Review to be continued in next blog. 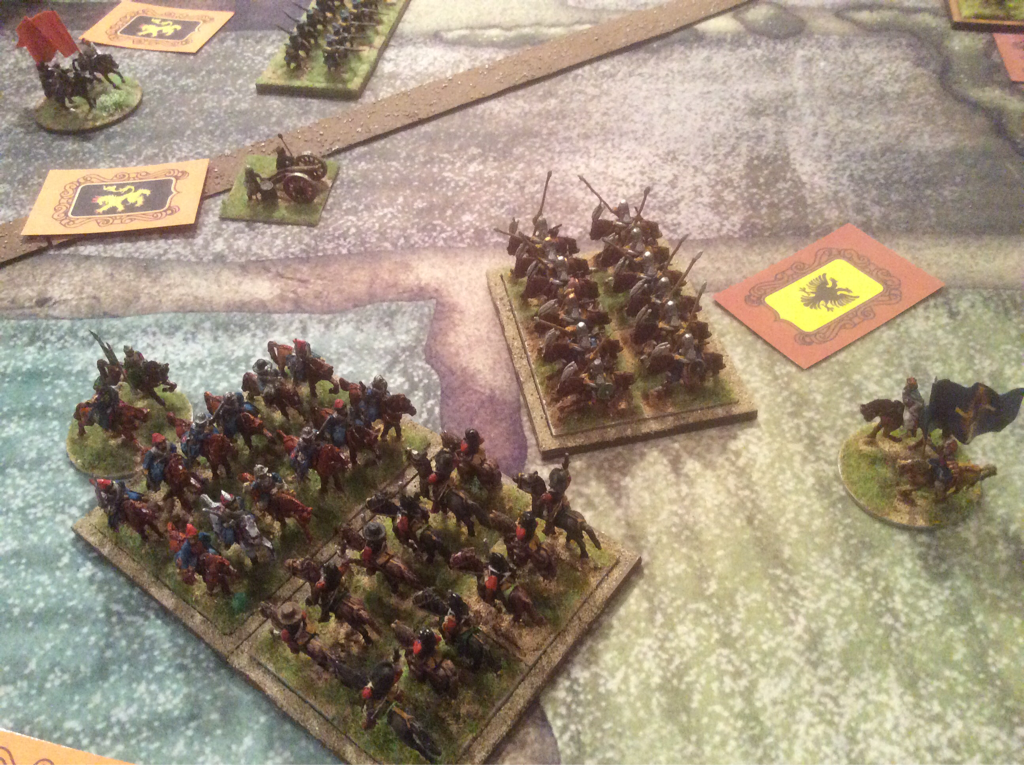 The other day I bought Tercios, the translation of a Spanish rule set that caught my eye at Warfare in Reading. It is a cracking rules system. The smallest unit is a Foot company or Horse squadron, with frontages being 12cm for large and 8cm for smaller units. Losses are accumulated as 'wear' points and there is no figure removal, so any basing system will work.
Units have various factors that mostly convert to the number of dice rolled to conduct a certain function. Dreadball players will recognise the approach: if, for example, a unit with discipline 4 wants to obey an order, 4 dice are rolled and as long as at least one rolls a 5+, the unit can proceed. Each turn, both players allocate order cards to their units and activate them alternately. Each order card has two possible functions, depending whether it is used for an activation or for a reaction. Certain cards give bonuses to different factors, so charging troops, for example, receive an increase in combat dice. These rules are carefully considered, elegant and intuitive once you get the hang of the basic concepts. The only aspect that I am not so sure about is the very wide range of qualities that are available to choose from for commander figures. There are so many that I end up confused by all of the nuances and possible combinations. They feel a bit like unnecessary chrome and my solution so far has been to ignore all but the simplest ones. The game plays fine without them and indeed, the free download of the rules from the el kraken website doesn't include them. This week I have received my copy of the supplement Kingdoms direct from Captain General in Spain. It adds many new options for the ECW and for armies in my beloved East European theatre The book is in Spanish and I have needed to use the dictionary here and there, but having a copy of Tercios in English helps a lot. I love the way the authors tackle the particularities of Eastern European warfare: Gulay-gorod, Tabor, Tatar horsemen, etc. are all represented neatly and without over complicating the rules. I also like the open-ended nature of unit construction: I can make this unit veteran, give that unit muskets, arm these horse with lances and so on. These rules deserve to be widely known outside Spain. I do hope somebody is writing an English translation of Kingdoms as I am sure they will be a success. Later this month we will be using Tercios/Kingdoms to replay the first encounter of the 1660 campaign in Ukraine, at Lubar. I am looking forward to seeing how they play in a multi-player game. I have uploaded a scenario written for Sam Mustafa's Maurice rules, concerning the meeting encounter on 14 September 1660 between Potocki's Poles and their Tatar allies and Tsetsura's Cossack contingent of the Muscovite army. This battle was almost an ambush, since the Cossacks were advancing in march column, unaware that any enemy were within striking distance.
On the day, the Polish and Tatar attackers had initial success but Tsetsura rallied his command on a low hill, where they stood until relieved by cavalry sent forward by Sheremetyev. We are replaying the scenario this weekend and I will upload a report. The scenario can be downloaded here.. |
Archives
November 2023
Categories
All
|


 RSS Feed