|
I have spent the last couple of weeks painting ACW casualties. I picked up a copy of Pickett's Charge from Too Fat Lardies and they have really caught my imagination. Longstreet is my favourite game for brigade actions (actually it's my favourite game full stop) but it was over its limit when we used it to play day one of Gettysburg. On to Richmond by Paul Koch is excellent for army level actions, with its brigade sized units and streamlined mechanics. But Pickett's Charge strikes me as a good set for divisional and Corps level battles. Unlike Longstreet, these rules require casualty markers, so I needed to get equipped. I bought 30 casualty dials from Warbases, which show numbers from 1 to 12, and painted up some Kallistra 12mm casualties I have had for a year or so. I stuck them on the dials and added sand, tufts and flock. I am pleased with the results. The casualties don't stand out too much but my aim is for the dials to blend in to the rest of the table, which I think they will do. 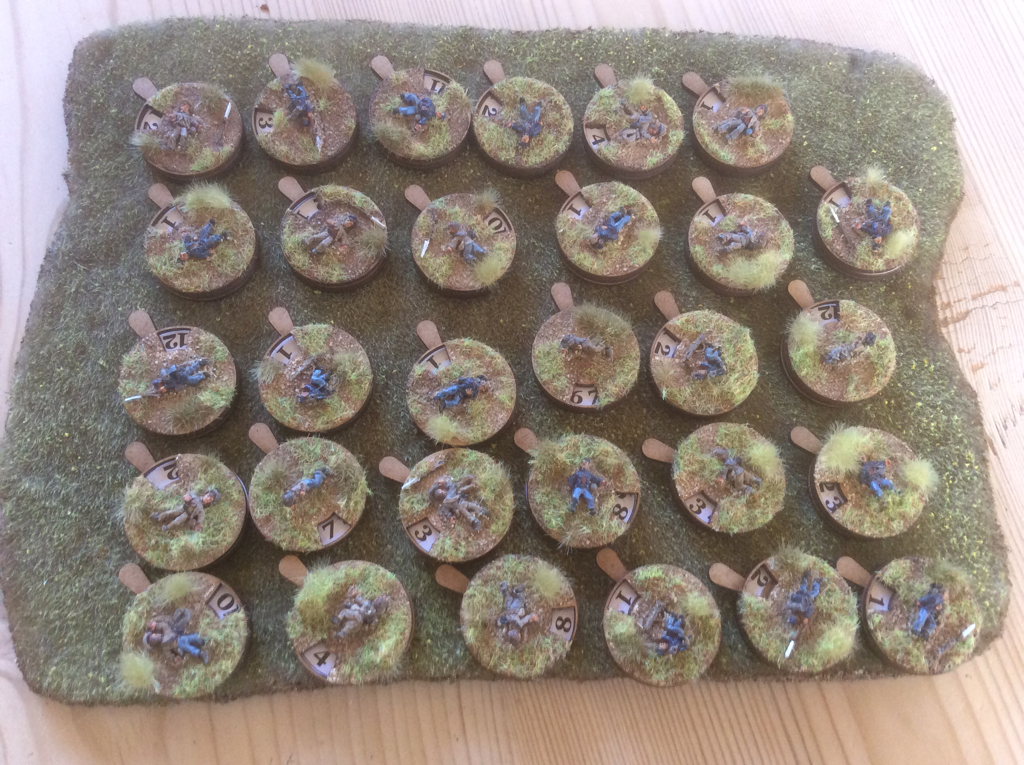 I decided against splatting ketchup everywhere. The most I'll paint on a wargame figure is a red stain on a bandage. I think this is a generational thing. Zulu is my favourite war film and I wanted my sons to share my enthusiasm. They quite enjoyed it but both thought it odd that with all the shooting and stabbing, virtually no blood was visible throughout the film. This had never occurred to me! Anyway, I prefer my casualties to be nearer the spirit of Zulu than of Saving Private Ryan. Perhaps I should have waited to see if I enjoyed playing Pickett's Charge before making the markers. But I'm pretty confident it will go down well. For our first game, I am looking at Bristoe Station in late 1863, the one after which Lee told Hill to bury the dead and say no more about it. I am attracted to the fog of war in this battle, when a force pursuing a retreating enemy was suddenly assailed from a new direction entirely. It is a situation that most wargame rules make very hard to pull of: usually the players can see too much and the rules allow them to do too much. I'm hoping that Pickett's Charge will provide the balance between restricting player omnipotence and still giving a satisfying game. Meanwhile I have just finished reading Rebel Yell, the biography of Thomas 'Stonewall' Jackson by S.C .Gwynne . It is a great book, showing the contrasts in Jackson's character and bringing his campaigns vividly to life. The accounts of fighting are authoritative and clear. This isn't a biased account: Jackson's frailties are scrutinised as closely as his strengths. There is plenty of inspiration here for the wargamer. The author doesn't speculate on what would have happened had Jackson not died after Chancellorsville, but is certain that the loss to the Confederate military cause was immense. 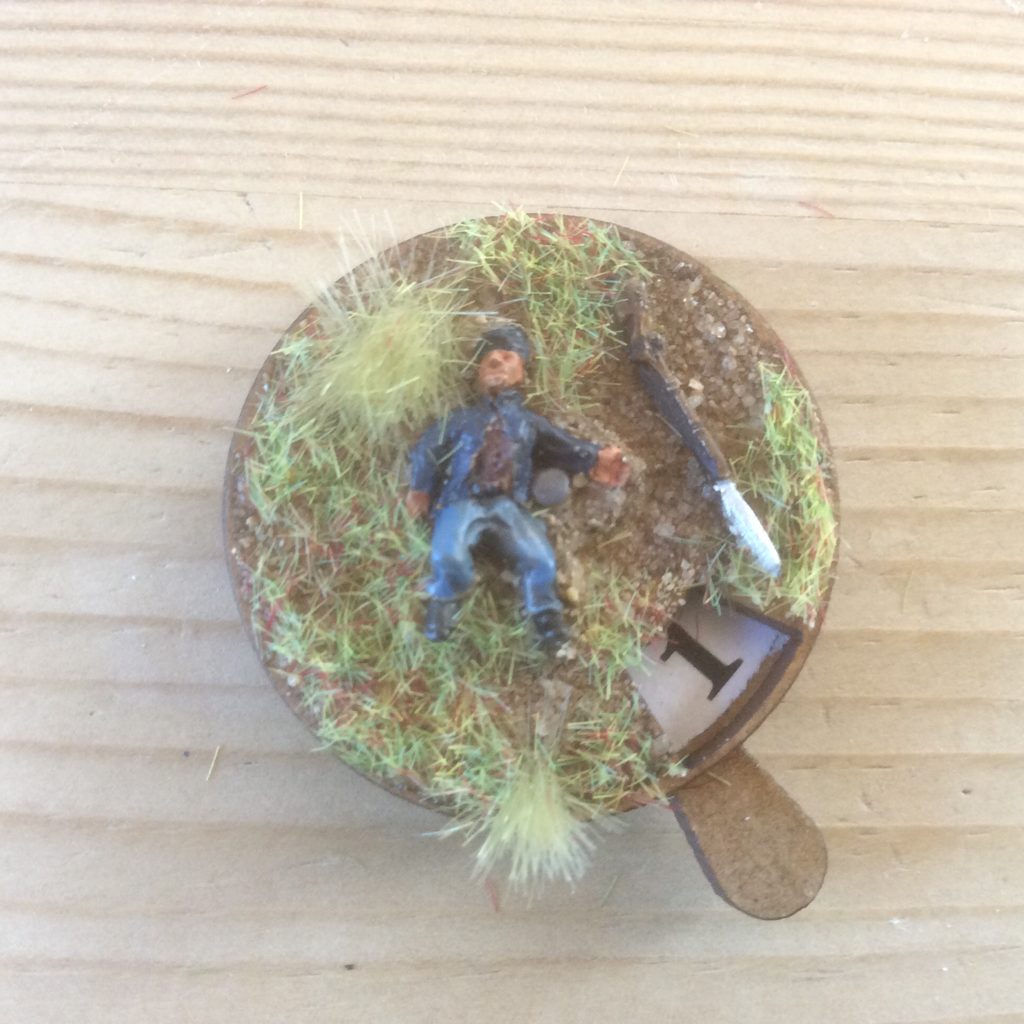
1 Comment
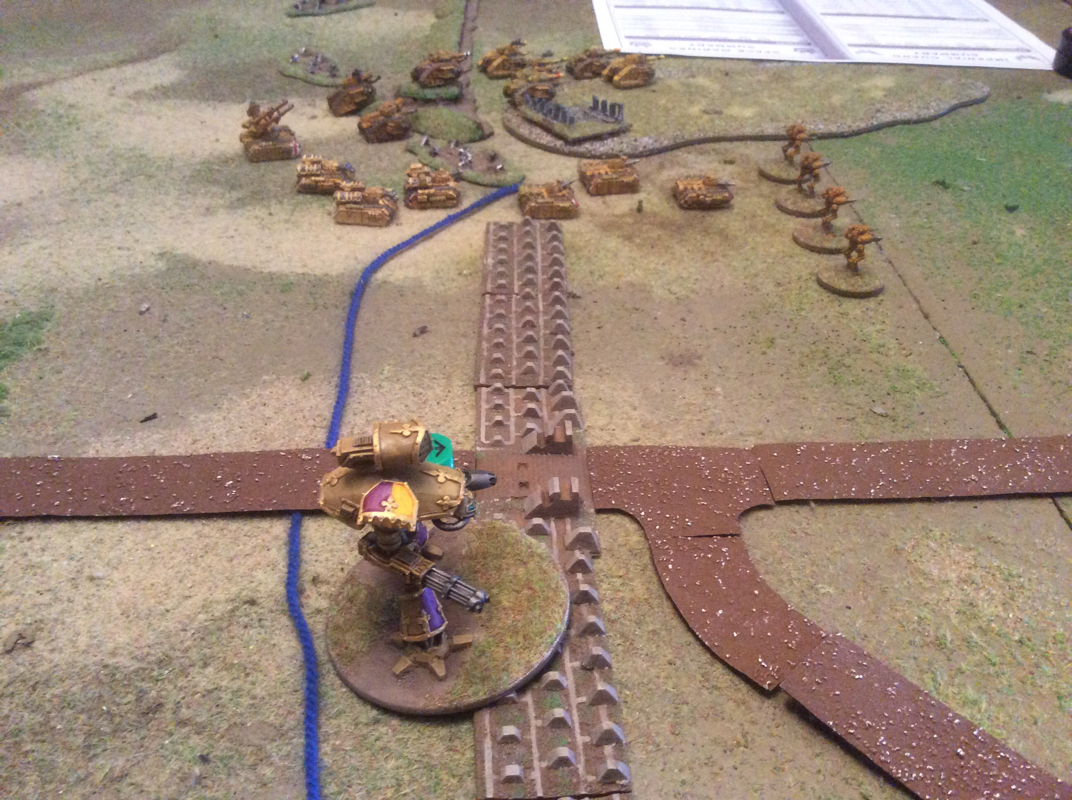
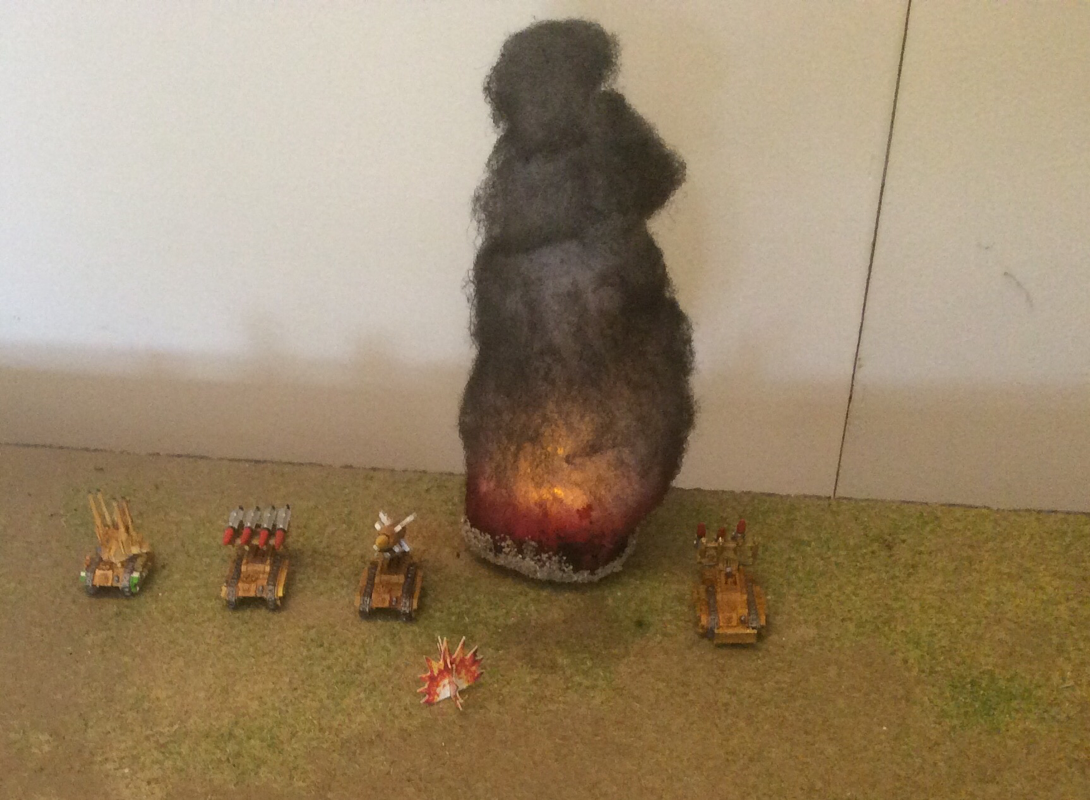
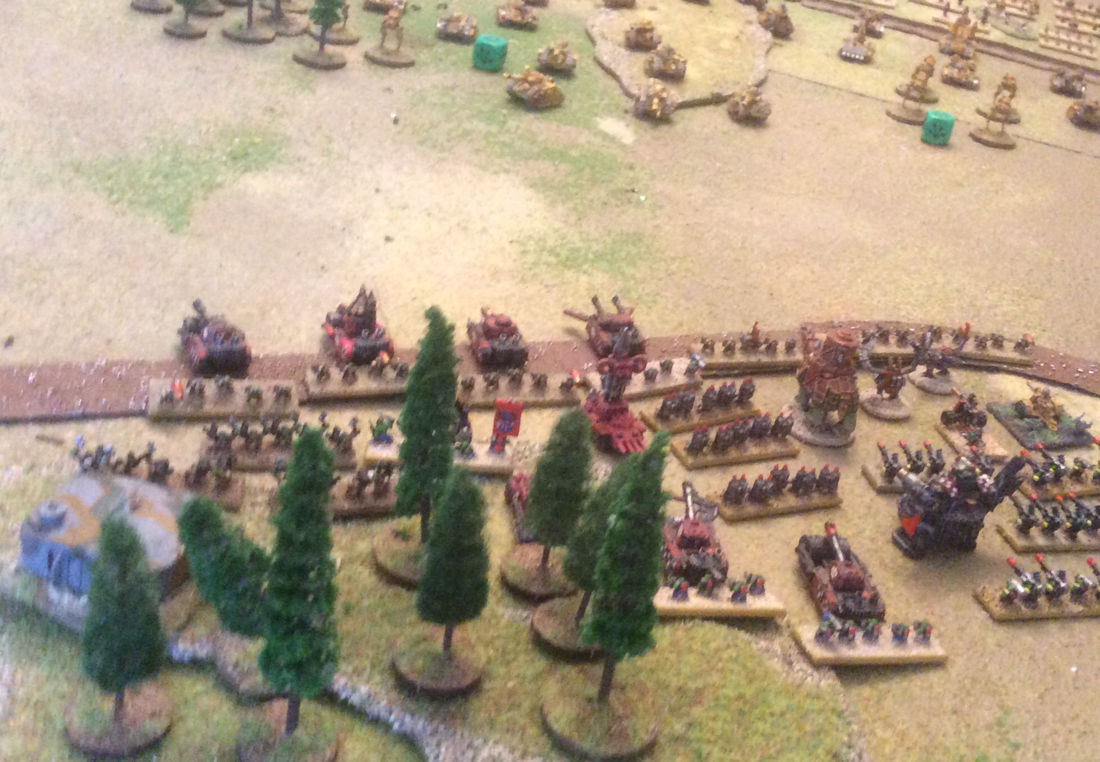
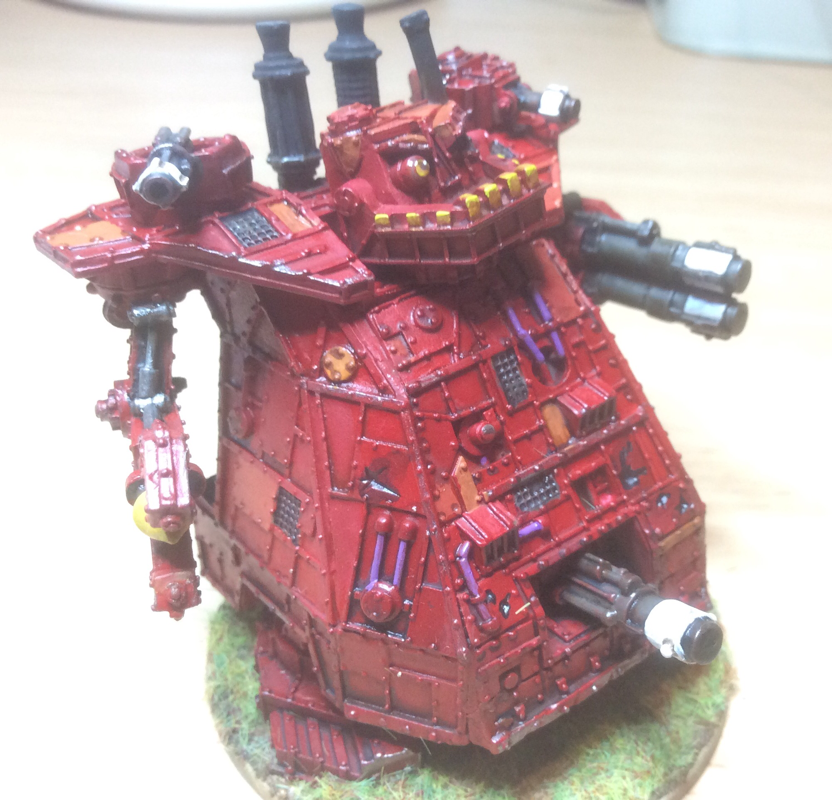
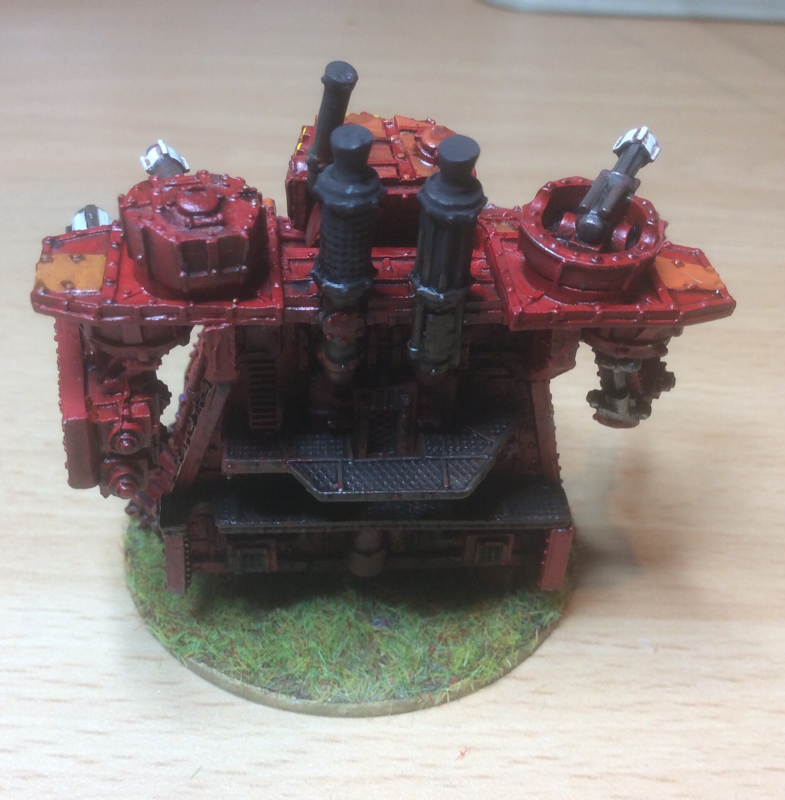
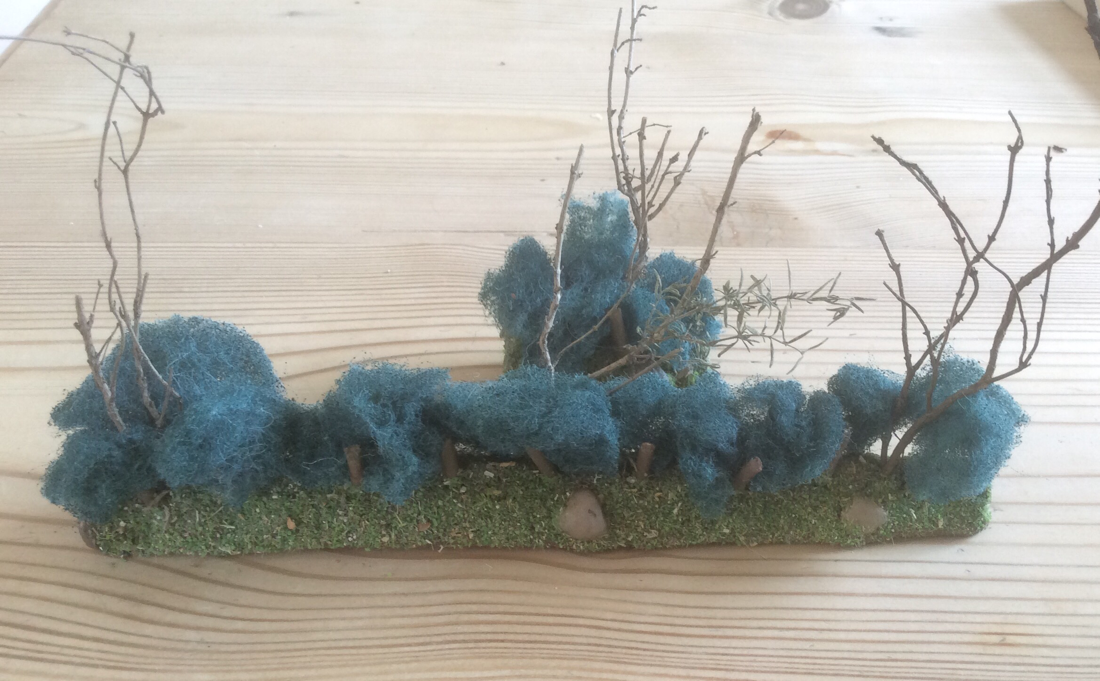
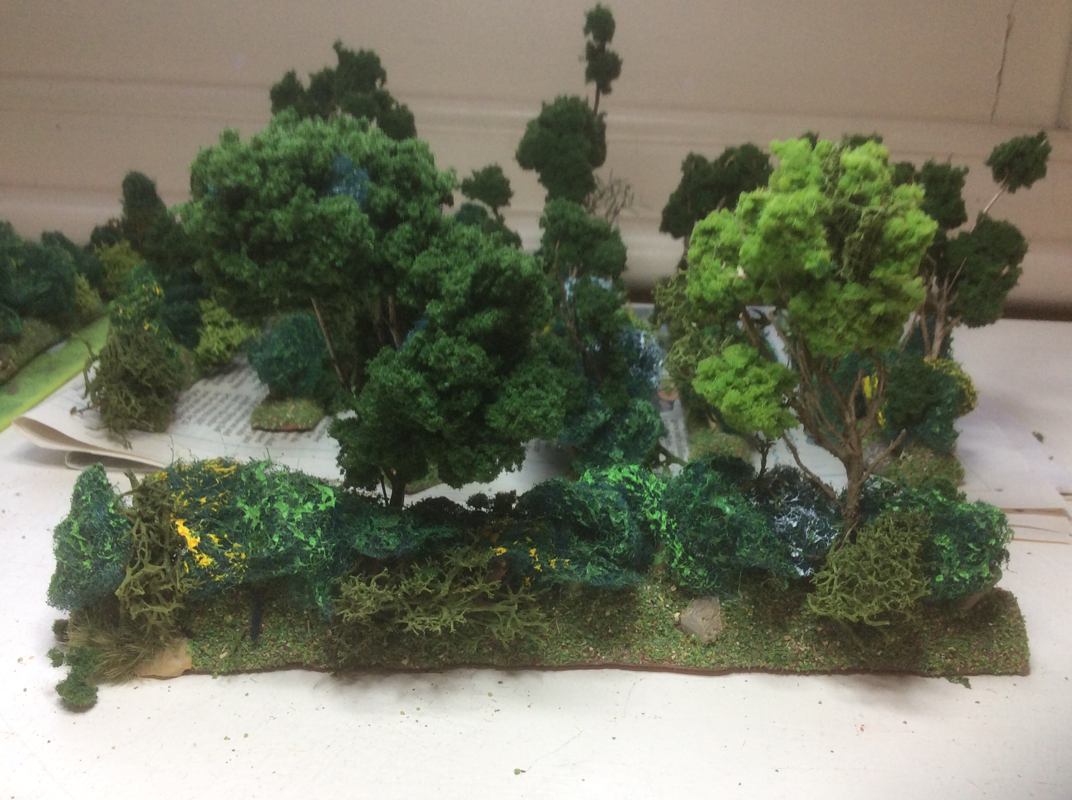
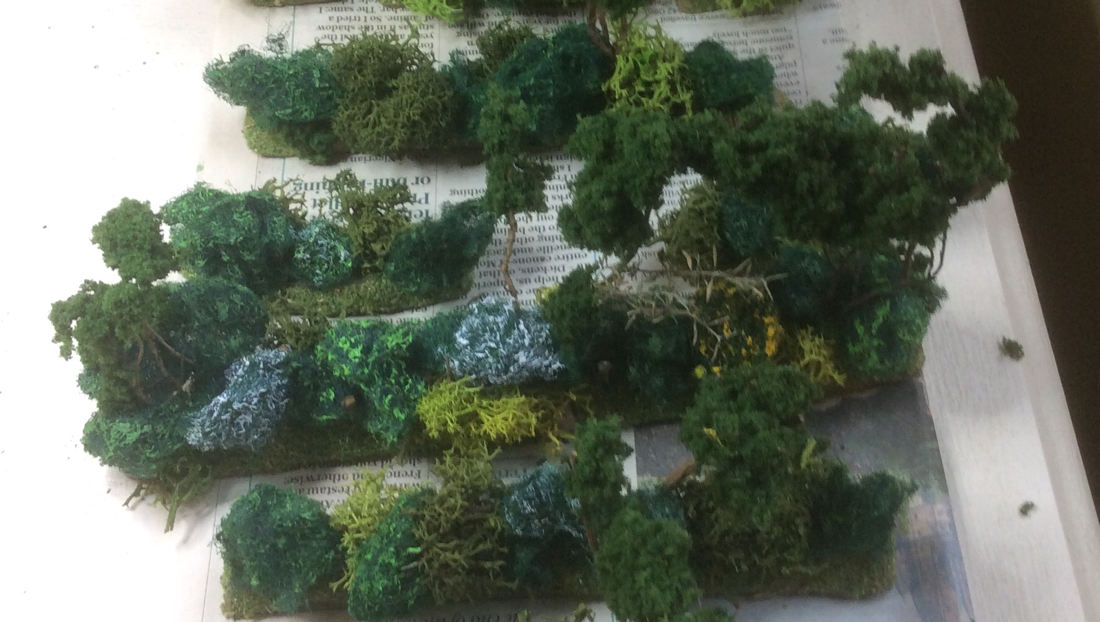
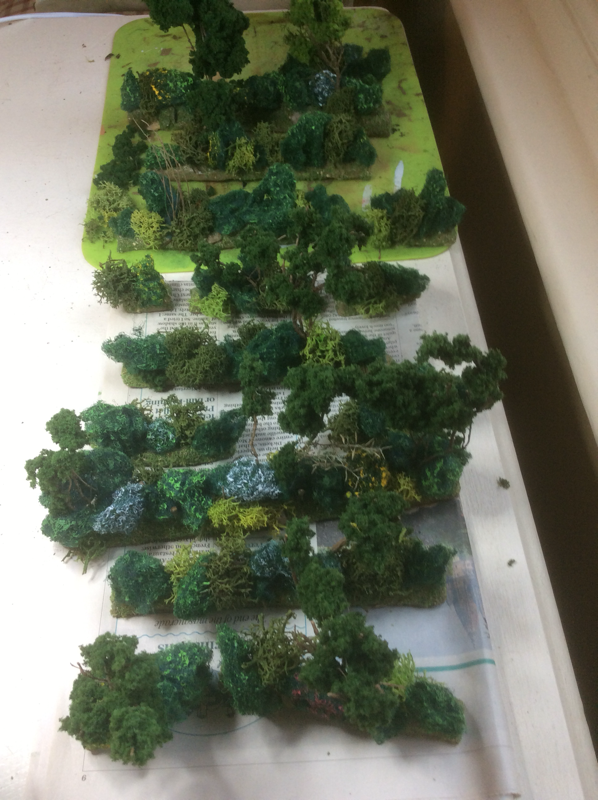
our Epic game on Saturday gave us the opportunity to use my newly made night light smoke stack. I'd rather it was used on a Gargant but it still looked impressive from a distance. 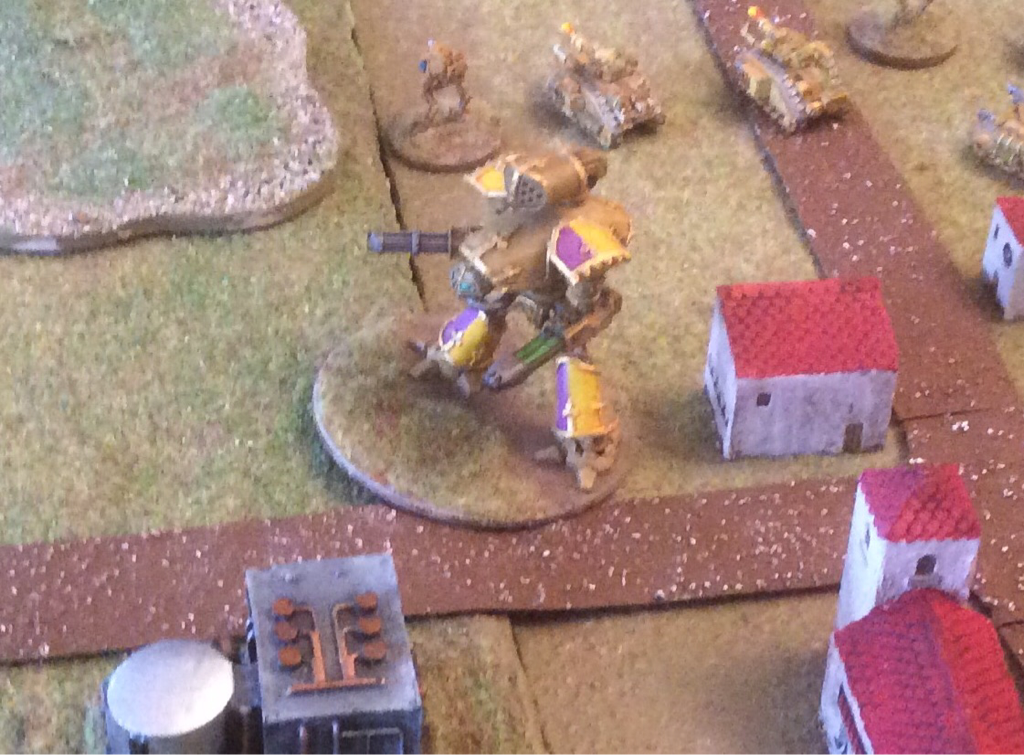 One Reaver Titan. Going... 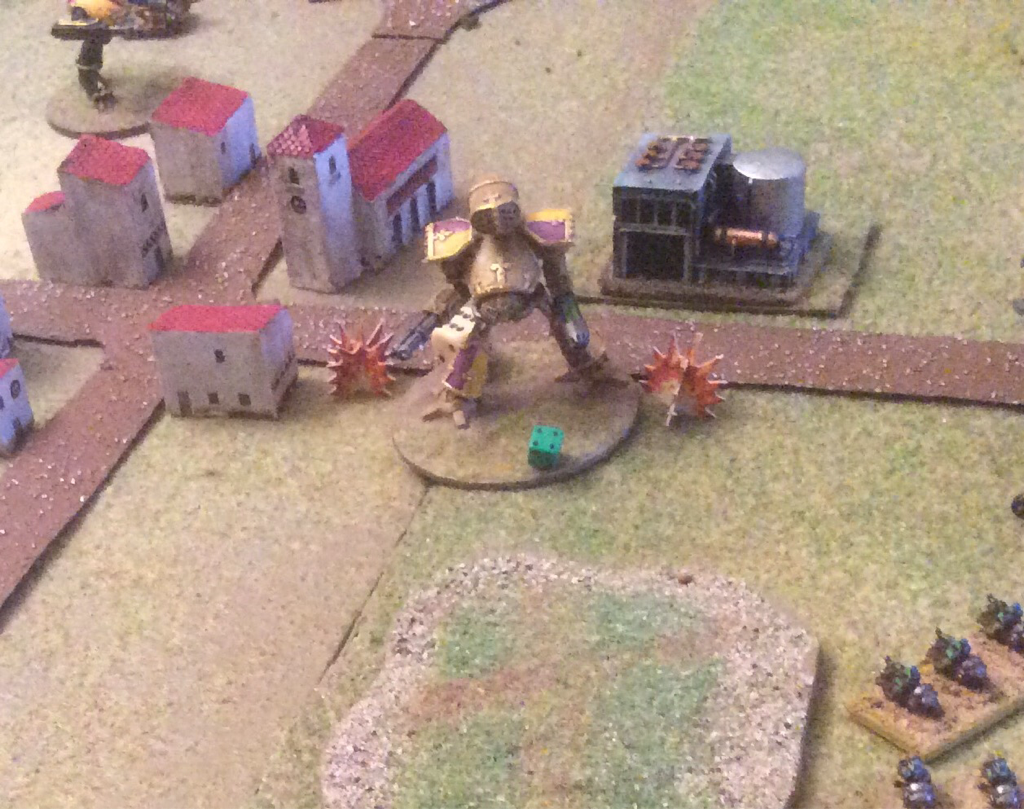 Going... 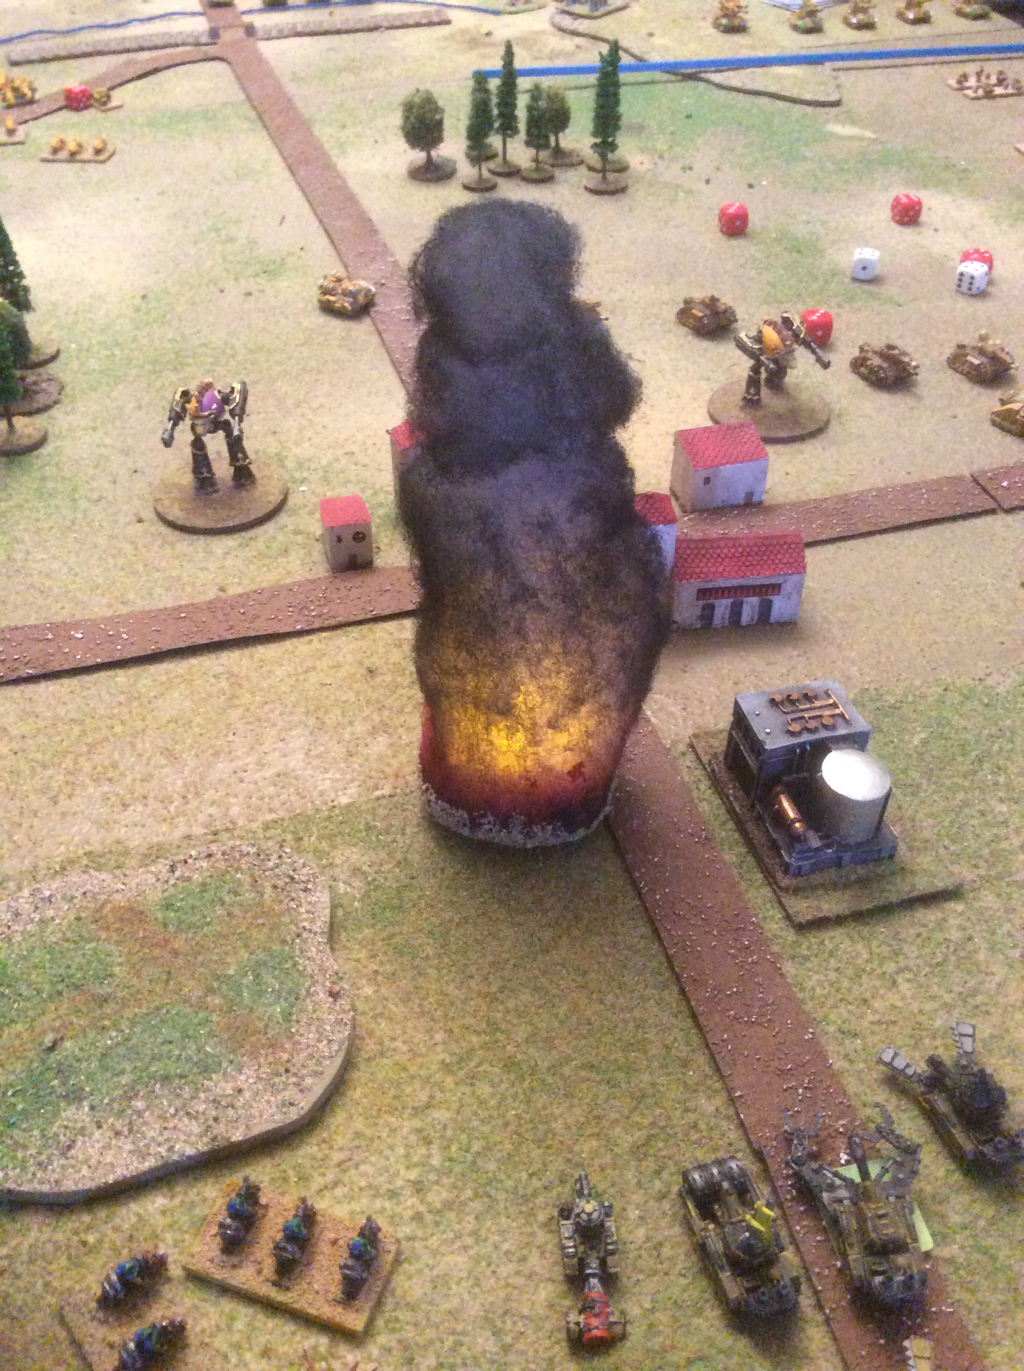 Gone! Yesterday we played an Epic 40k game, very loosely based on Operation Market Garden. Nick and Matt led the Orks; Ian commanded the Imperial Guard ground forces and I combined scenario management with leading the Space Wolves force, air-landed to take and hold the Bridge over the river Grime. We had around 4000 points a side. The player briefing was in my last blog. Turn one The Space Wolf detachment landed on open ground north of the river. An Ork Gargant began in the Imperial ruins north of the river, while a Kult of Speed set up just south of it. On turn one, nearly half the Imperial army arrived on the South table edge. The Orks decided to concentrate on wiping out the Space Wolves, so left the Imperial advance unopposed. Morale levels at end of turn I: 88 O: 103 Turn two The Imperials marched up the field while three Ork detachments arrived from the flanks. Imperial siege artillery and armour took out a great many Orks from Zeke'z Army. Using a Fate card, the Orks brought in an orbital barrage against the Imperial siege guns. The Space Wolves were obliterated north of the river. I: 76 O: 90 Turn three More Ork reinforcements arrived on the field and started to form a defensive line north of the river. An imperial deathstrike missile hit the Gargant, causing massive damage: the Gargant just survived the turn with three damage points left, three onboard fires and only one weapon unbroken. Two Ork detachments were taken below half strength, but with all objectives still in their possession, their morale stayed pretty resilient. I: 76 O: 76 Turn four The Ork line solidified north of the river. The Reaver Titan finished off the damaged Gargant. Ork assaults went in on both flanks: Alarik's Ardboyz, led by Alarik on a Boar, obliterated the Catachan armoured detachment in the East, while Zeke'z Army assaulted but bounced off the Fighting 207th. I: 63 O: 69 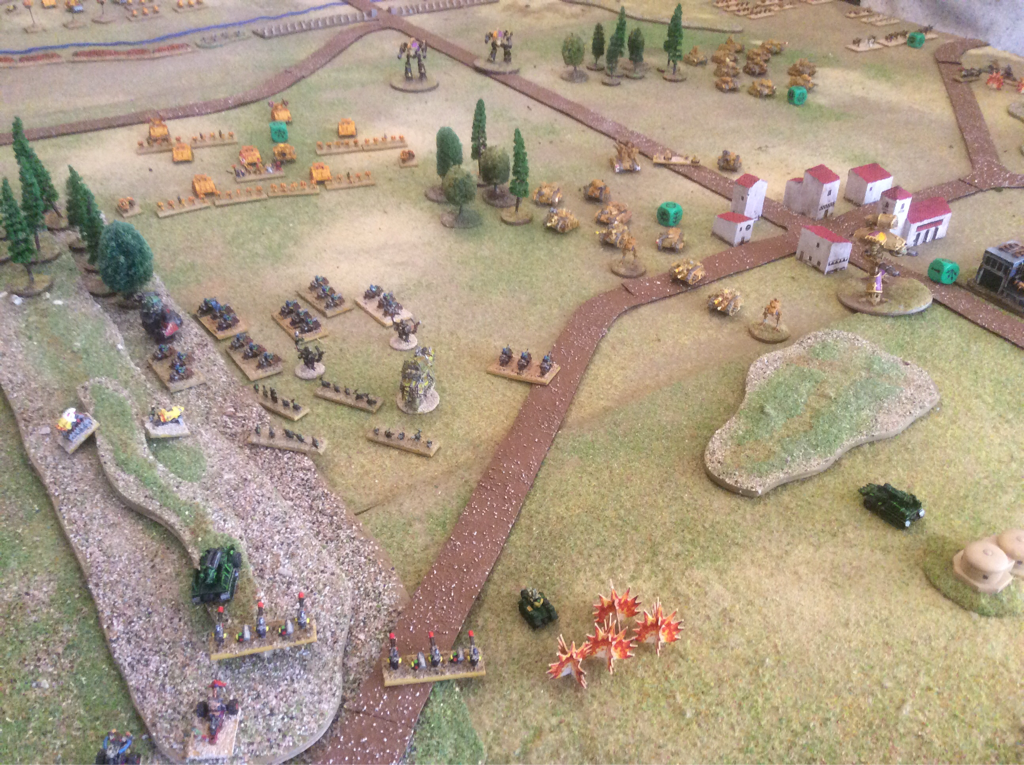 Turn five The Great Gargant and Mega Gargant arrived at the North table edge (to their frustration as it meant a long walk). Meanwhile three flights of fighta Bommaz appeared on the horizon and nearly wiped out a marching Detachment of Imperial armour. Zeke'z Army managed to stay alive for another turn. Alarik's Ardboyz with their boarboyz spearhead assaulted and broke another Imperial armour detachment. I: 41 O: 63 Turn six Alarik and his boars suffered heavy damage from advancing Space Marines but heroically charged a Warhound Titan, who promptly squished them. Thus passed the mighty Alarik. The Orks on the north bank of the Grime started to crossed the bridge to engage the Reaver, surrounding it on three sides. Four detachments broke down its shields then a detachment of battle fortresses destroyed it. One reactor meltdown later and the Reaver was no more. On the Western flank, Zeke and the not-so-fighting 207th both failed to remove a single blast marker, so stalemate fell over that part of the field. The mega Gargant fired a krooz missul into the Imperial siege artillery and took out a manticore and a hydra. Imperial morale took a serious tumble this turn. I: 25 O: 55 Turn seven The Imperial Fists closed up to the river, while the Great Gargant waded into the water intent on making its mark. Three squadrons of fighta bommaz smacked the Imperials in the West; both great and mega Gargant let rip their armaments and both Warhounds ceased to exist. A second Krooz missul took the Imperial siege artillery below half strength and by turn's end, imperial morale went into the negative. The I: -3 O: 48 Post mortem Until turn five, the game seemed well balanced. However, the outcome was already becoming inevitable. The Imperials did have some poor reinforcement rolls that delayed the arrival of two big artillery detachments, the Imperial Fists and the Warhounds. Their advance fell into successive waves, which the Orks were able to contain one after the other. Perhaps the most significant decision of the game was in turn one when the Orks ignored the southern front to concentrate on crushing the Space Wolves north of the bridge. The removal of this threat cleaned up the Ork front and made passage over the bridge easy. Obliged to cover ground fast, the Imperials used a lot of March orders and when Ork air power turned up, this proved lethal to the marching Imperial armour. I hope it was some compensation for the Imperials that the outcome in our game mirrored the outcome of Market Garden. Even with more strength coming up the road, the Imperials would be obliged to halt south of the river. The day flew by and the game was great fun. As the forces on the table multiplied, it looked pretty impressive too. Hats off to Matt and Nick, and commiserations to Ian, who may have felt a little puzzled that despite being on his side, I seemed to take as much pleasure in the outcome as the Ork players. Of course I'd rather we had won, but I was delighted that the scenario had given a tense game and arresting spectacle. What will inspire us next? The Bulge maybe? 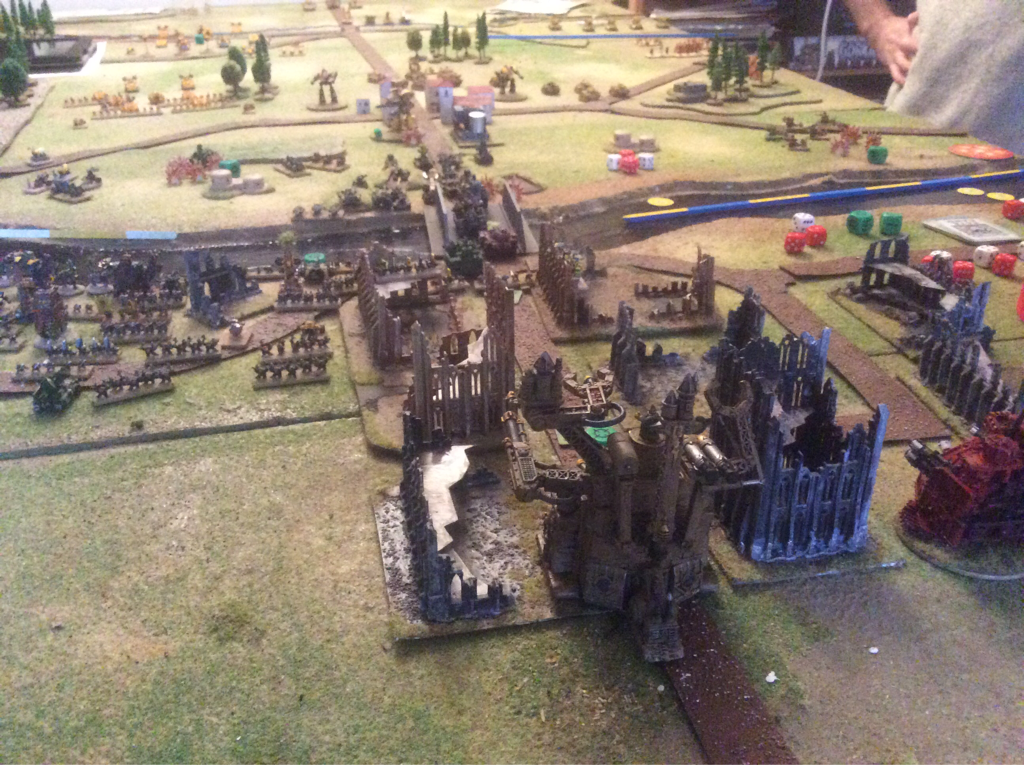 I've just finished painting my Orks to fill out a 4,000 points Epic 40k army. Saving the best fun until last, I ended with a Great Gargant for my Warlord to ride. I have a basic Gargant in shades of metal but thought Warlord Tamrine would demand a red paint job. Writing the detachment lists ready for a practice game next week, prior to the big game on the 8th. 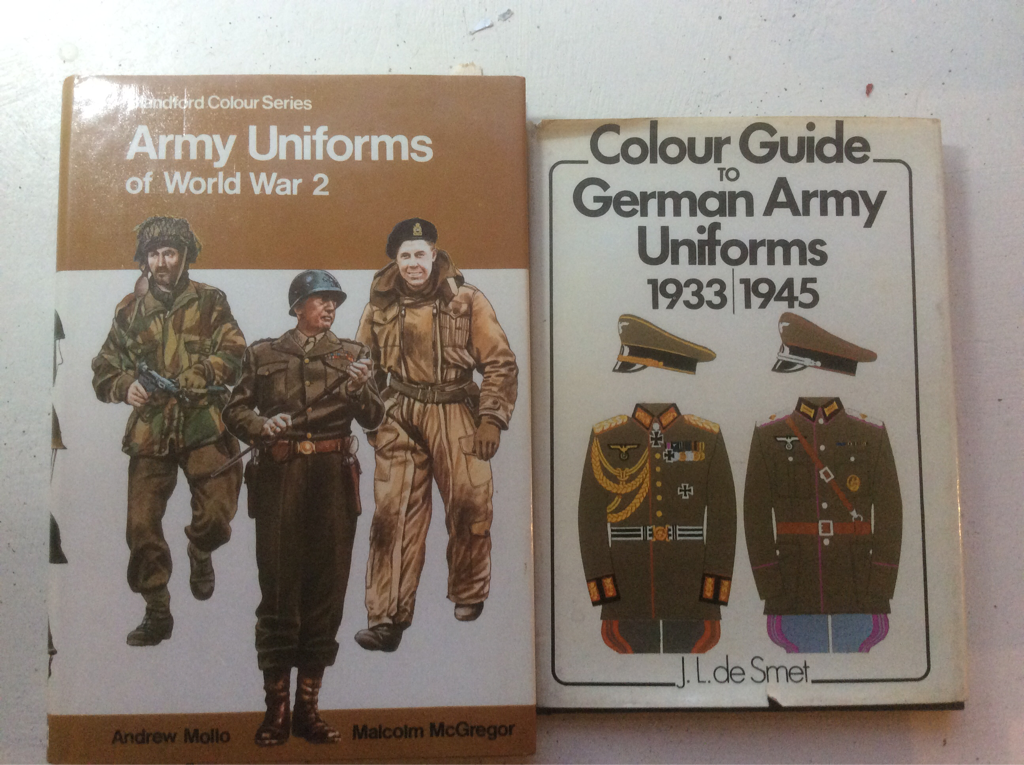 Today I picked up these two titles in our excellent local second hand book store. The German uniform guide, which dates from 1973, is packed full of interesting details. In truth a lot of it will be wasted on my painting skills but I predict that some cuff bands will appear on my Germans pretty soon. I'm also tempted to pick up the Warlord general staff set for the bling. 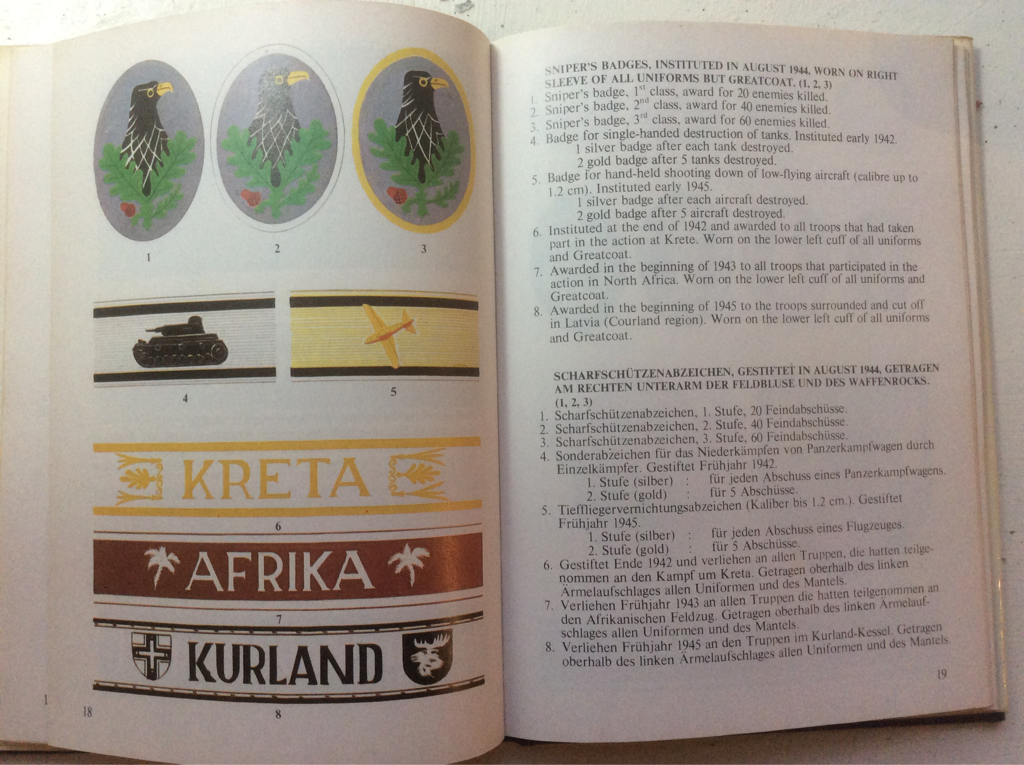 The Blandford title goes back to 1974. The illustrations, all based on contemporary photos, are very pleasing to study. They include some uniforms I have never seen before, such as an Italian Liberation Corps officer, in British uniform with Bersaglieri feathers on his helmet. There is a French mounted officer of Moroccan rifles in Italy, wearing a fabulous striped djellabah (sleeved over-garment). The fact that every figure is based on a real person brings home how much dress differed from the regulations. I doubt I'll ever collect a French colonial force (although never say never, I didn't expect to own a Cossack 17th century army but there they now are in the cupboard!). But the figures for late war Western Europe provide loads of inspiration. In fact, I think figure 166 alone is enough to inspire me to start a German Grenadier platoon. I spend hours trawling through the Internet for uniform information and scenario ideas and it is a wonderful resource. But turning the pages of a book, especially when it's a charity shop find, is strangely satisfying. 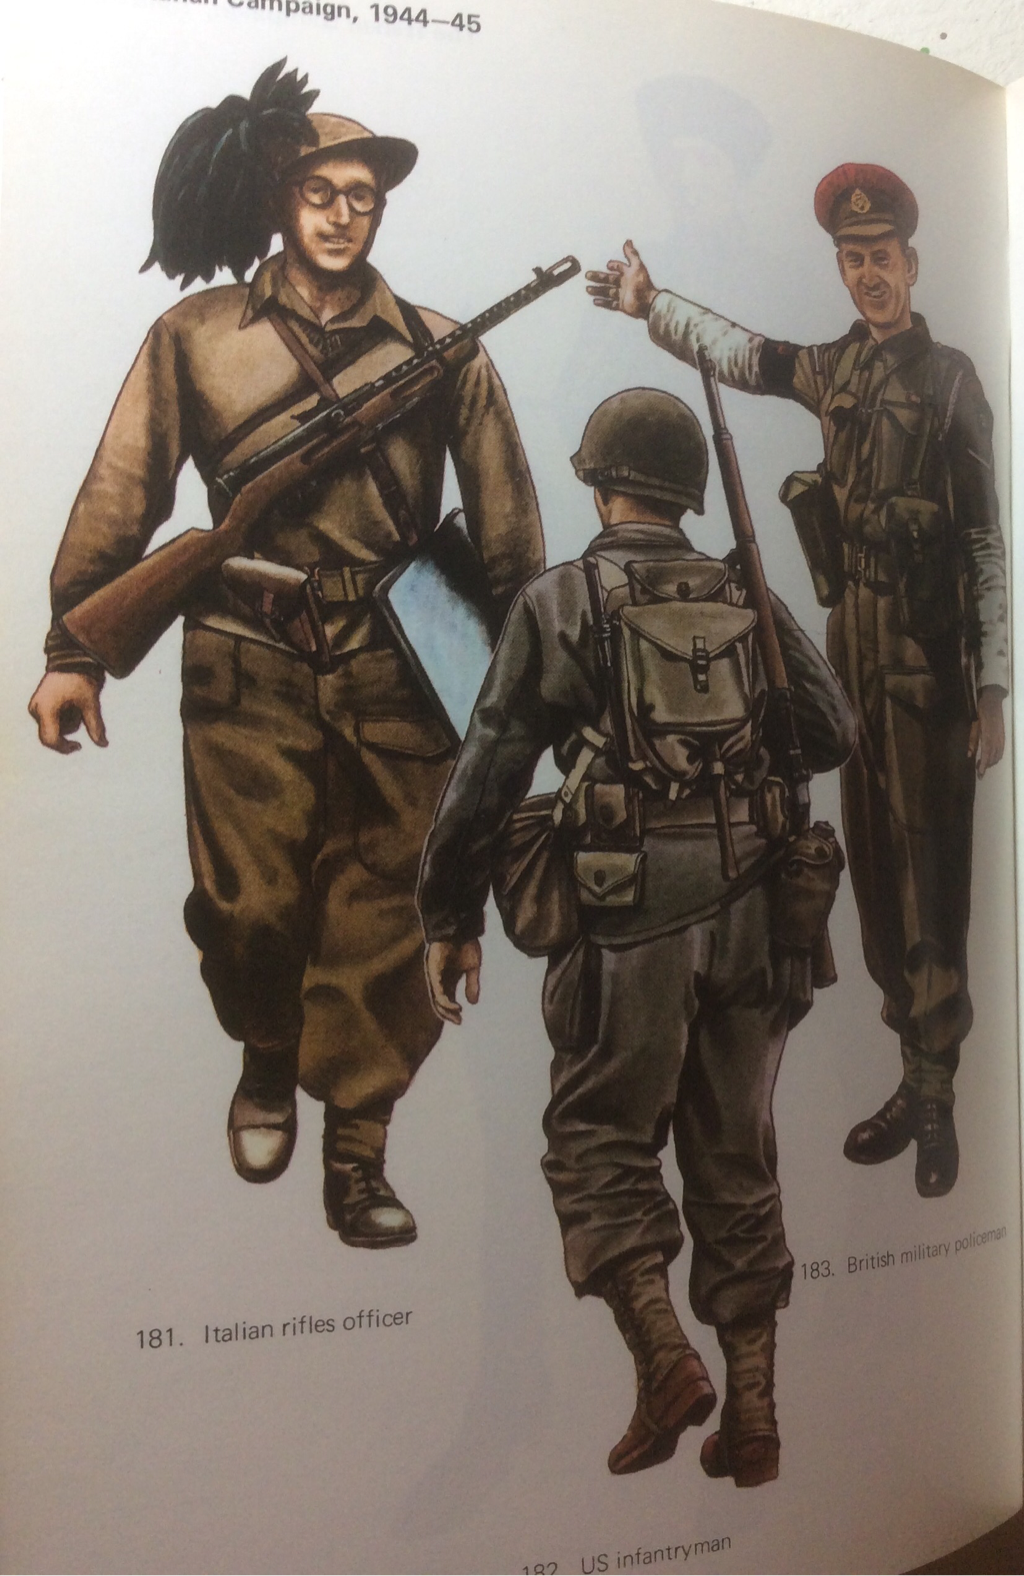 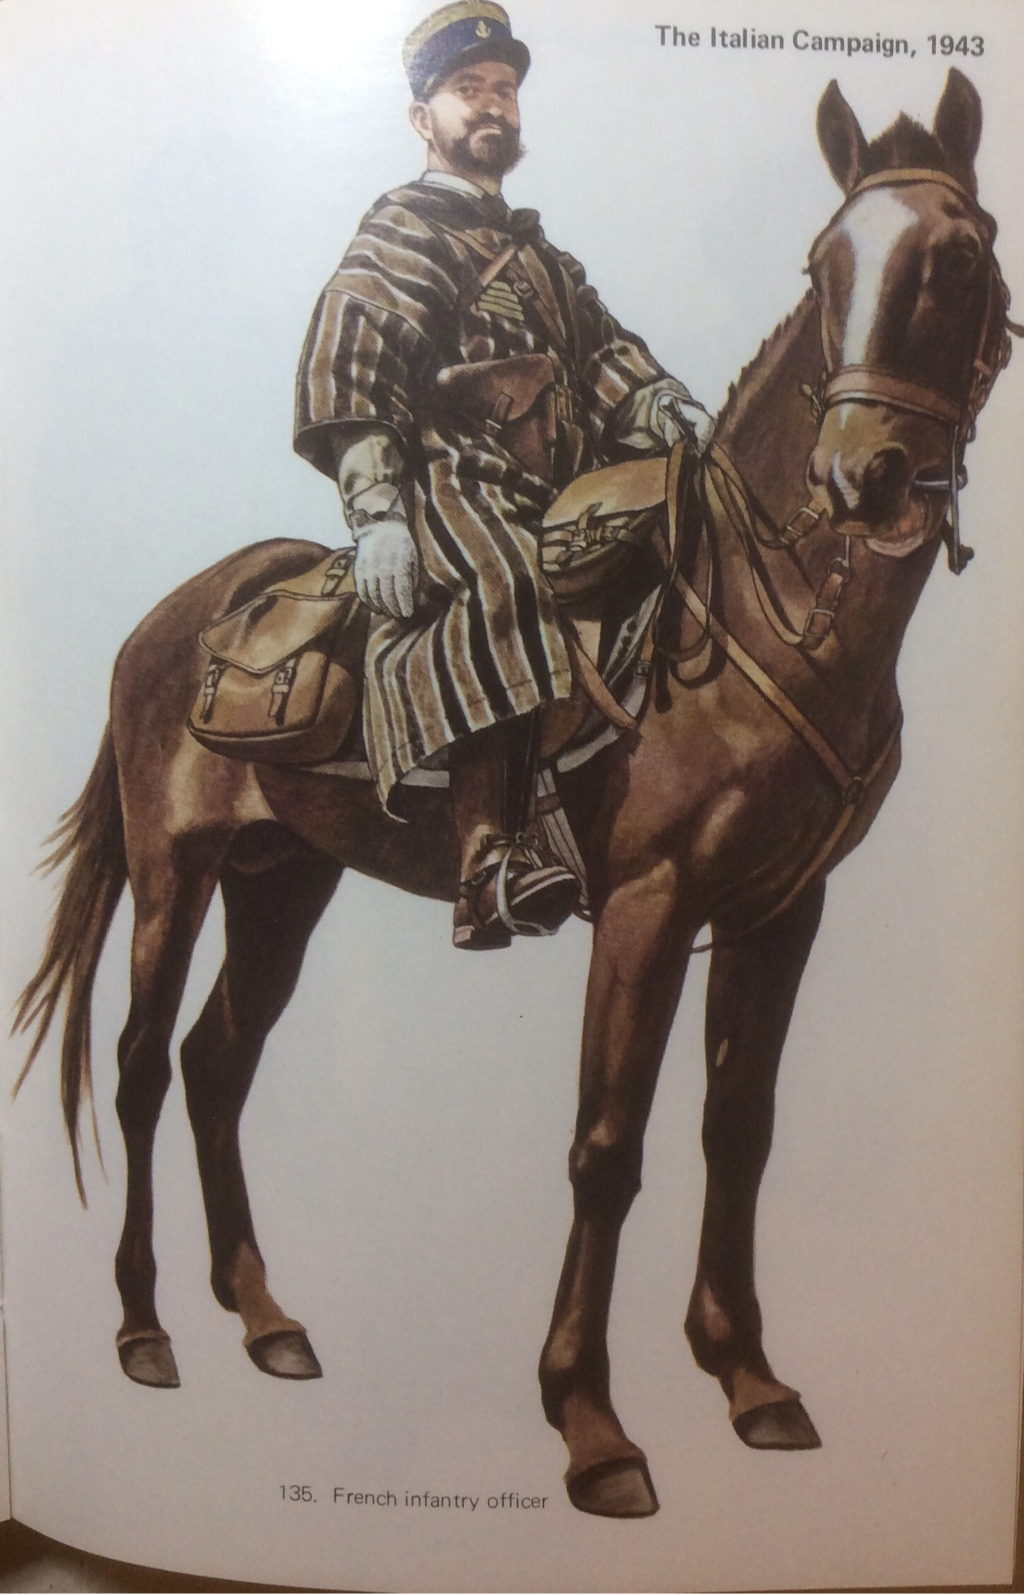 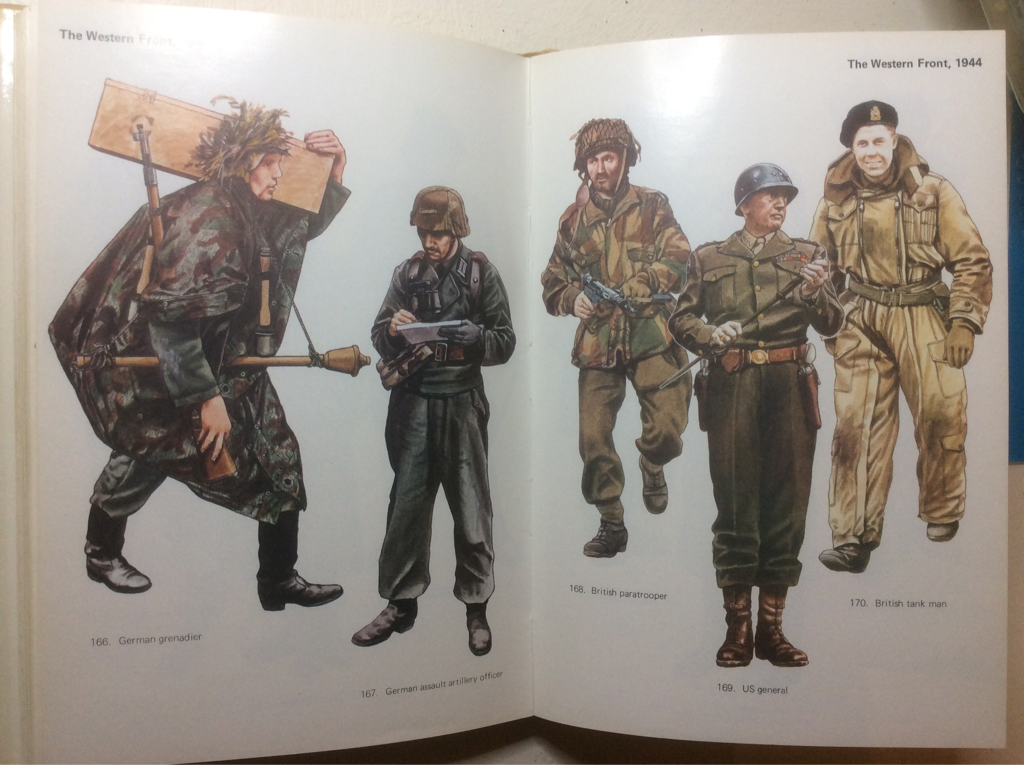 I have spent the past several evenings making lengths of model bocage for our scenarios in Normandy. It was a bit of trial and error but I am quite happy with the end result. I started with DAS air-drying modelling clay, some wooden skewers, green pan scourers, Icelandic moss in various shades and some clump foliage by Woodland Scenics. The steps I followed were: 1. Make sausages of DAS, mould them into a Toblerone shape and stick lengths of skewer into them to provide a purchase for the foliage. Collect twigs from the garden and stick a few of these in to add height. From the options in our garden, I found that Thyme twigs look the most like miniature trees. Texture the sides with the point of another skewer. Leave to dry for at least three days. 2. Paint the dry DAS with earth coloured emulsion (I use Dulux Chalky Downs 1, a close match to GW steel legion drab). 3. Coat the sides of the DAS with PVA and apply green flock. 4. Tear up the pan scourers into ragged shapes. I discovered that the secret is to use the cheapest scourers you can find: my first purchase from a supermarket wouldn't tear up sufficiently. Pound shop scourers are much cheaper and better for this purpose. 5. Dab PVA glue onto the top of the DAS sausages and press down pieces of torn scourer, alternating with clumps of Icelandic moss. Dry overnight. 6. Dry brush the pieces of scourer with different shades of green acrylic paint, from darker to lighter. 7. Dry brush selected pieces of scourer with white, yellow or pink paint to represent blossom. This works for Normandy in June but if you're being picky, it wouldn't suit high summer! 8. When all the bushes have been coloured, apply clump foliage to the Thyme twigs with super glue. 9. Finally, titivate the bases with random bits of foliage. Lessons for future projects: DAS warps! Pieces longer than 6" tend to twist as they dry so don't make them too long. Don't bother to texture the DAS as it doesn't show through. Sticking clump foliage to twigs is a messy nightmare: PVA won't hold it and superglue gets everywhere. I'm sure Woodland Scenics must make a specialist glue for this. I wondered whether to use just Icelandic moss as it looks more realistic than scourer, but scourer is much more rigid so I think a combination will be more hard wearing. And at gaming distance, it looks pretty convincing I hope.
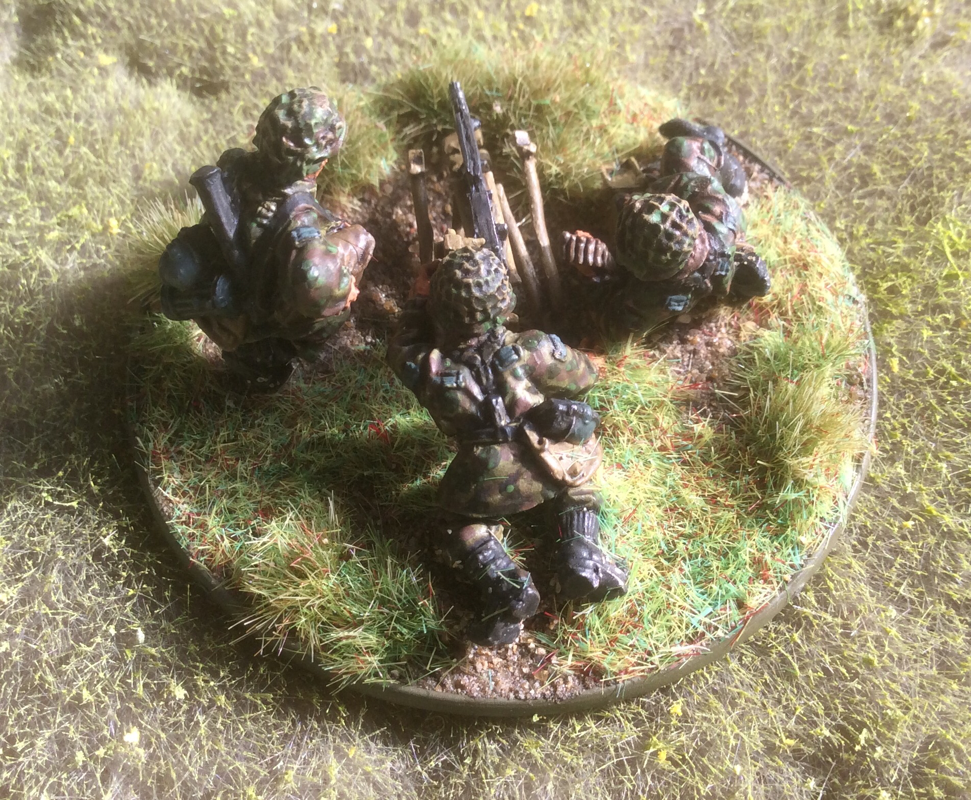
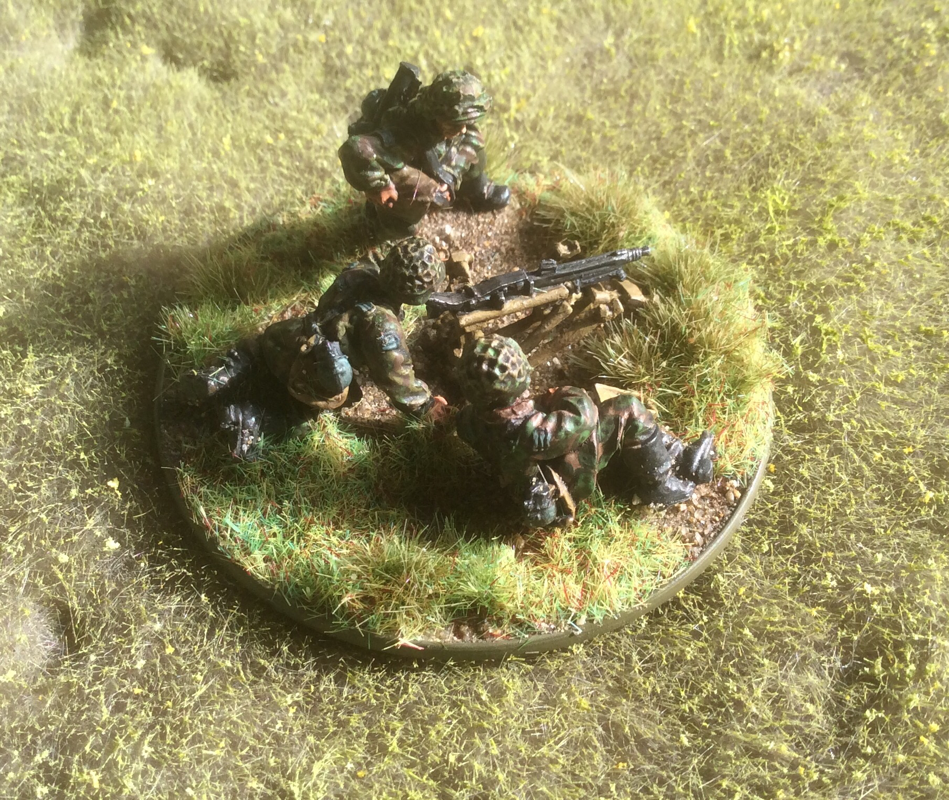
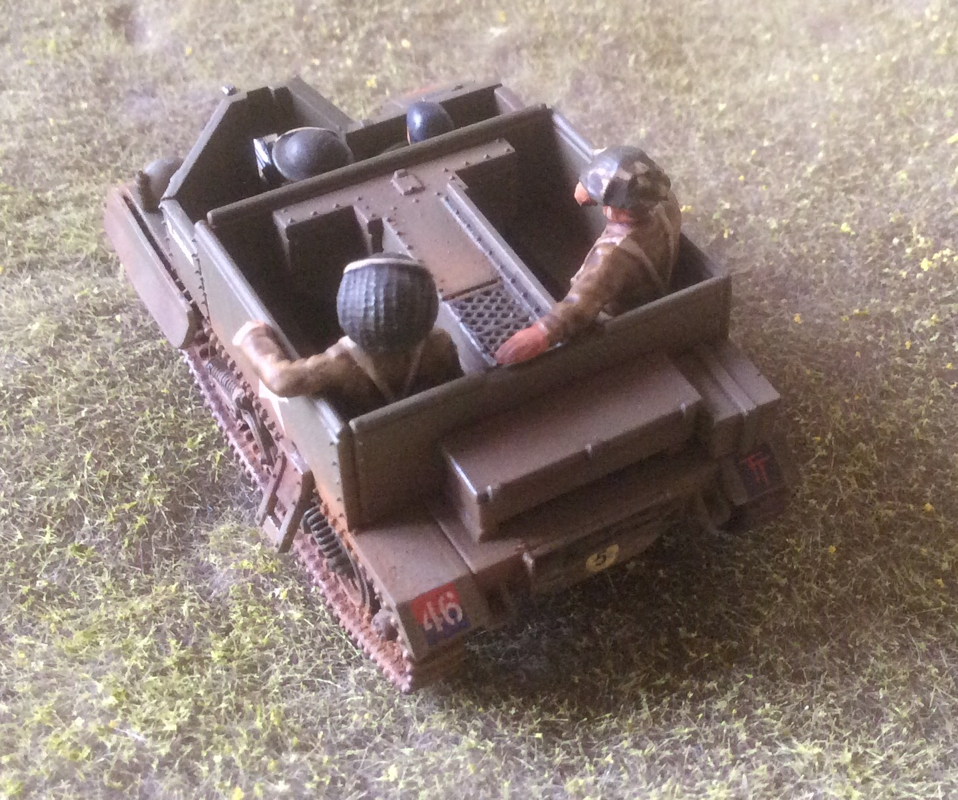
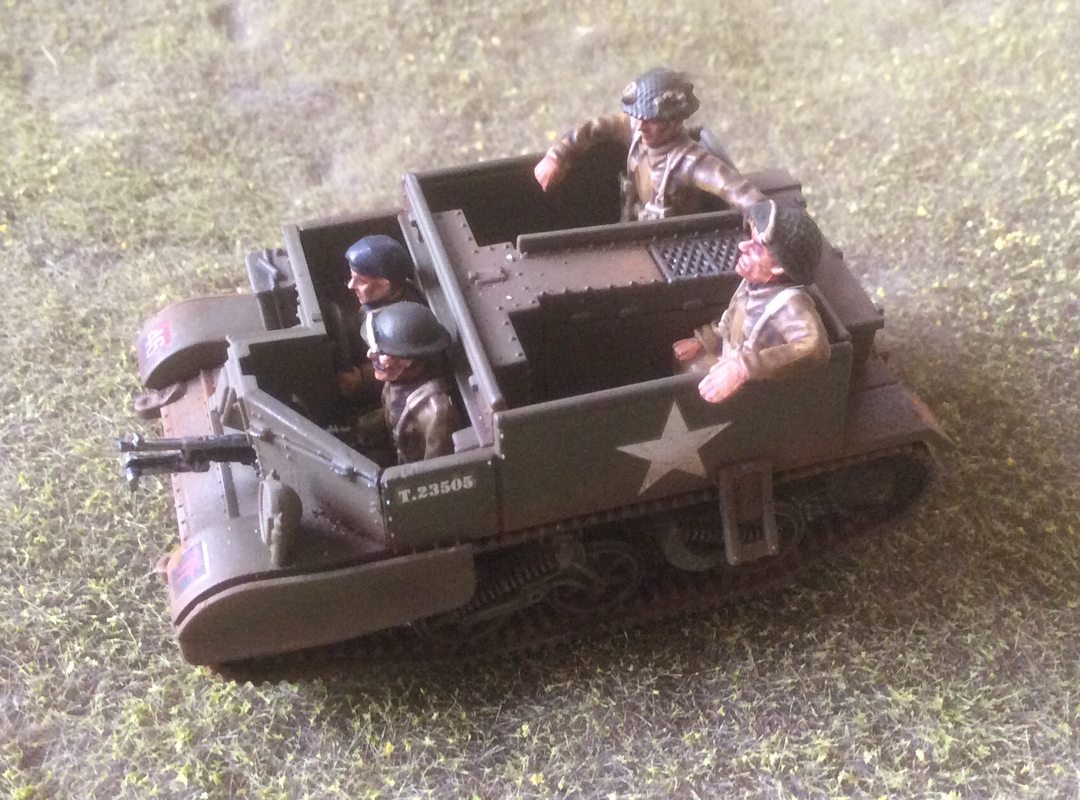
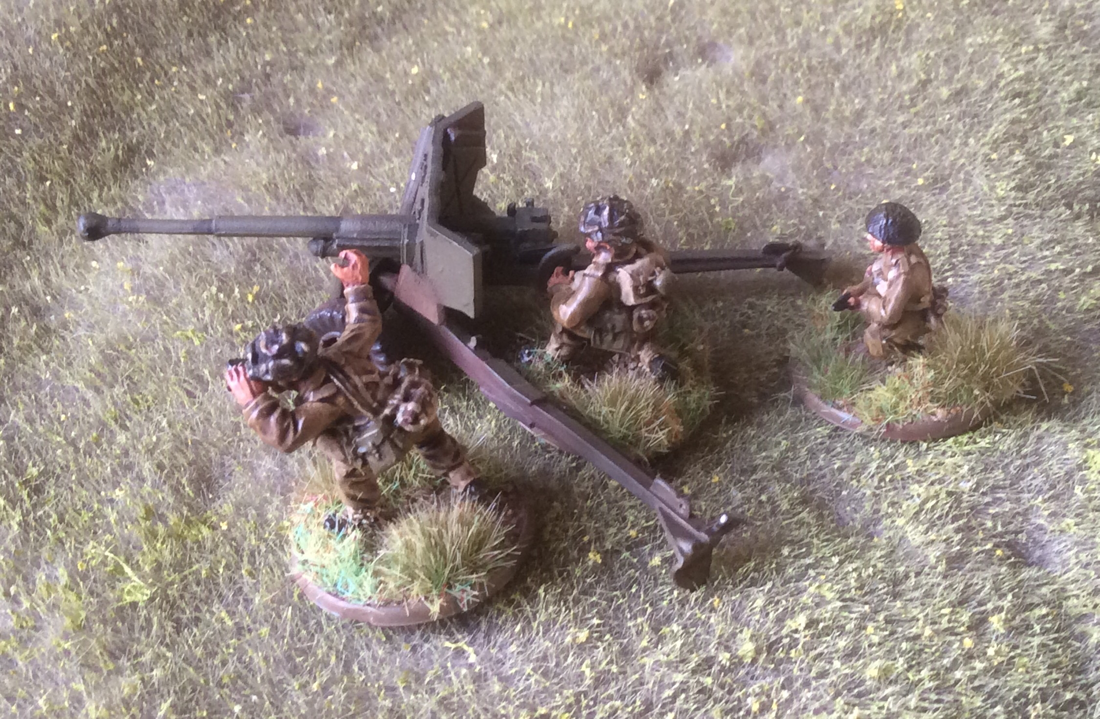
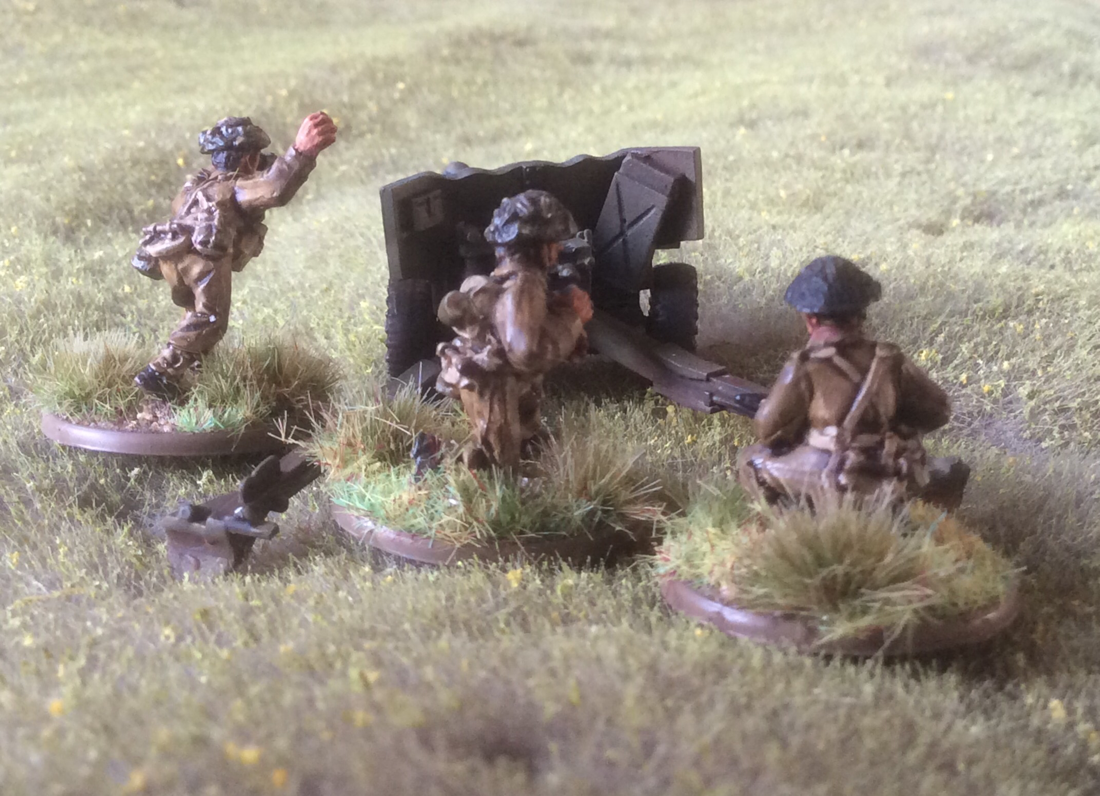
Overall, this has been a fun project but very messy. I'm looking forward to seeing my bocage in action. 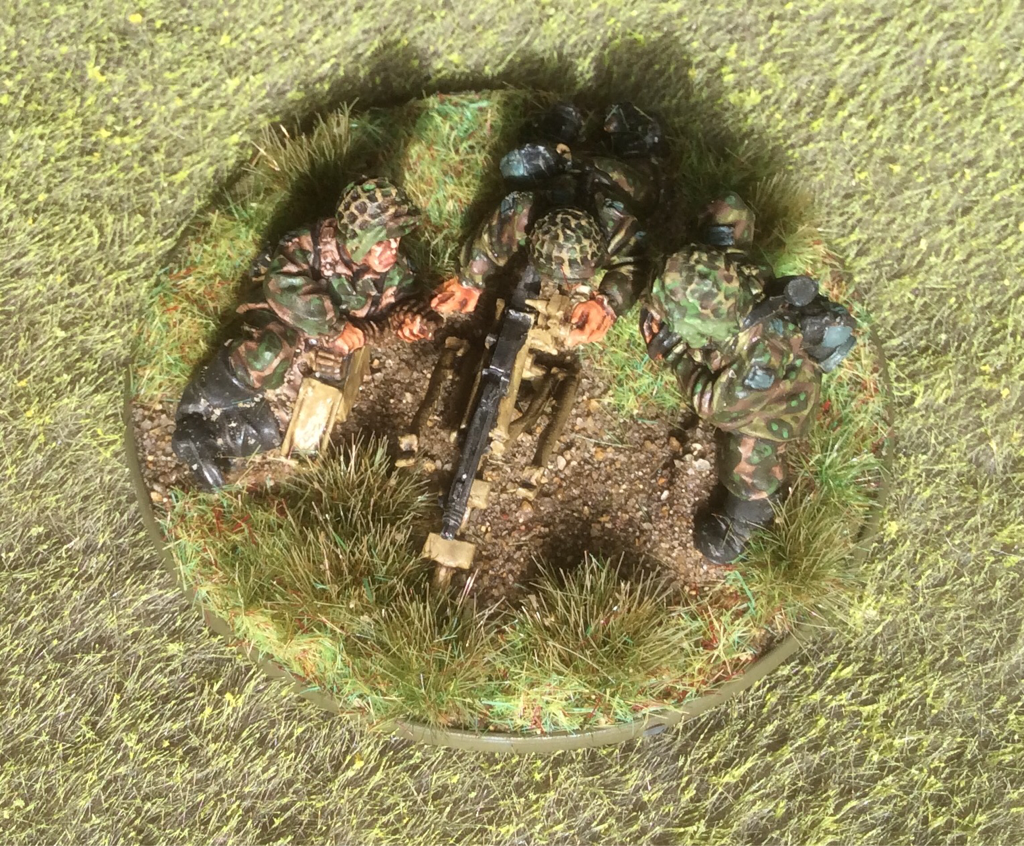 I have finished a German machine gun team in camouflage, fleshing out the Waffen SS boxed set. I followed the steps on the Flames of War website. http://www.flamesofwar.com. Although the guide is for 15mm figures, it scaled up pretty well I think. When I was painting the figures, I wondered if the colours were a bit bright. But looking at the finished models from 'wargaming' distance, I think they could have been brighter still. I varnished the team with Windsor and Newton, using a brush. No hot weather frosting thus time, I'm glad to say. Rats! I chose the hottest day of the year to spray Matt varnish on my British vehicles. Immediately it gave them a white bloom, obscuring much of the weathering that I'd applied so carefully with Forge World powders. What an idiot. Of course, my son Will explained, the biggest risk of this happening is on a hot day. Didn't I know? Well, obviously not. The solution, he suggested, was to apply more varnish by brush. This actually worked. I'll know what to do next time the white bloom appears but it'll save time and my patience if I remember in future not to spray varnish in the heat. Meanwhile, I am trying different recipes for Oak leaf camouflage on my German MMG team. I'm probably most pleased with the advice on the Flames of War website. Next up is the newly delivered Cromwell. 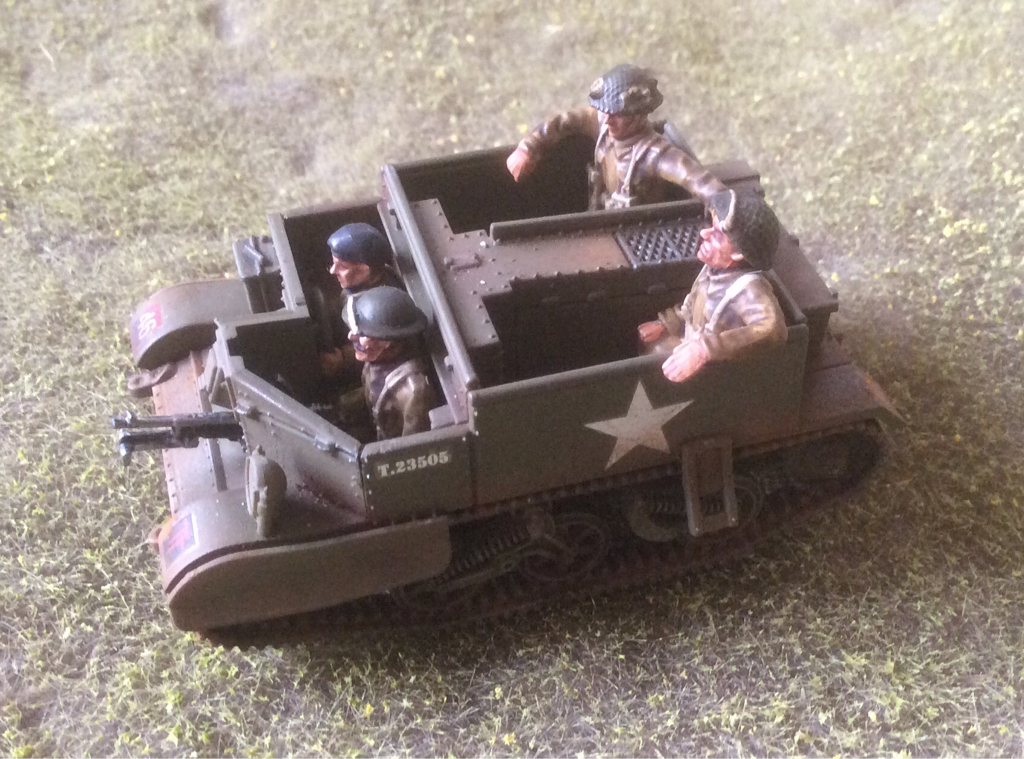 Post powders, pre spray varnish Inspired by our first game of Bolt Action last week, I have completed a British 6pdr Anti Tank gun with Universal carrier tow. The carrier is a lovely little model that fits together easily, - for the most part. I did have problems with the tracks however. I planned to make a Mark II, but I couldn't make the track guards fit on the chassis. The Mark I track guards fitted much better so I went with the earlier model. I suspect I didn't glue the tracks close enough to the body of the carrier. Next time (because of course I will be making more carriers!) I will take more care with dry assembly. The driver and riders are nicely posed. The three helmeted heads are identical which is a bit dull, so I swapped two of them for spare heads from the British infantry set. When I first got the British infantry I wondered if these faces were a bit too close to caricature but they paint up very nicely. The 6pdr was straightforward to build and paint. I had fun using Forge World weathering powders on the gun and tow. On 6 July we will have our first game of Bolt Action. In preparation,I have been painting my British to 499 points and finishing off some terrain pieces. My only 28mm scenery to date has been either fantasy or Gothic Sci Fi, so I need the table to look more Normandy than Bretonnia. At least the hills and woods already fit the part, as long as nobody looks too closely at some of the debris stuck to bases (damn those old White Dwarf articles about theming terrain!). The Charlie Foxtrot house is now table-ready. I had some problems fitting the windows because I stuck chinchilla dust on the inside of the openings, making them too small for the window frames to fit. Instead I had to glue them behind the openings. This was fiddly and I'll be careful where I put the dust in future but they do make the walls look more substantial. If anybody questions the look of the model I'll send them outside to look at the windows of our real house, which are recessed by the depth of a brick. And with one bound he was free. 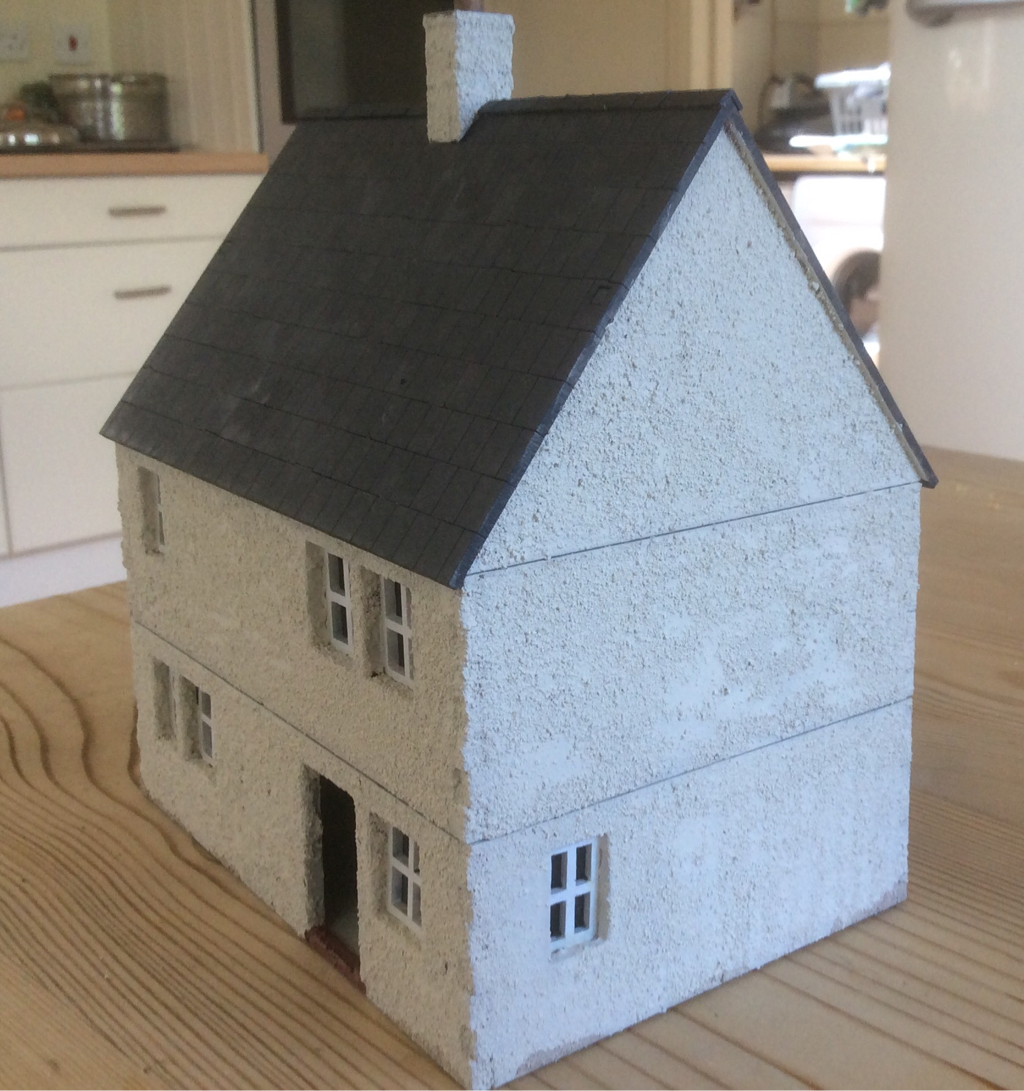 The army list for Wednesday is as follows:
First Lieutenant. 75 points 1 Regular runner. 10 points Medic. 30 points 1 supporting infantryman. 13 points. 1st Regular infantry section, 10 men, 1 Bren gun, 1 sten. 123 points 2nd Regular infantry section, 10 men, 1 Bren gun, 1 sten. 123 points Regular PIAT team. 40 points Regular Light mortar team. 35 points Regular Machine gun team. 50 points Total 499 points If I put on a turn of speed I might complete the universal carrier and 6pdr anti tank gun by mid-week, although as I don't think anybody has painted armour yet, there's little point in including it in Wednesday's game. But the two pieces combined come to 145 points, taking me some way to the next target of 750 points. Next I'm thinking of a third section so I have a full strength platoon. Then I'll have to turn my attention back to the Germans so the two forces grow at the same rate. |
Archives
November 2023
Categories
All
|


 RSS Feed